
This guide explains how to set up a Commonwealth Home Support Program (CHSP) recipient's profile, funding scheme, service and outlet access, care plan and matching requirements. With these in place, services can be scheduled, delivered and reported to the Data Exchange (DEX) in line with CHSP requirements.
Overview
Once your setup and configuration are complete, you can create Members and manage their CHSP information. This article walks a Staffer through seven steps:
- Setting up the Member's profile and Membership
- Agreeing on a Service Agreement
- Recording the CHSP funding scheme and DEX client details
- Setting which CHSP services and outlets the Member can receive
- Capturing Goals and Care Planning
- Adding matching requirements
- Offboarding a CHSP Member
Important: CHSP doesn't use Budgets in Lookout. Services are reported to DEX, not claimed against a plan. That's why the Member's DEX client details, CHSP services and outlets need to be accurate from the start.
Before you start
To complete this process, make sure:
- Access and setup: You have Staffer access, are logged in to the web app, and your CHSP configuration is complete, including outlets, services, rates, Membership plans, and funder profiles (see CHSP: Set up and configuration).
- Member information: You have the Member's My Aged Care referral or support plan, My Aged Care number, date of birth, and the required DEX demographic and consent information.
- Member management: A CHSP Membership plan is available to assign to the Member, and you're familiar with Creating a profile and managing Member records.
Top tip: Keep the Member's My Aged Care referral open next to Lookout. Most of the CHSP details you need are in it and can be copied straight across.
Step-by-step instructions
Step 1: Create the Member and their Membership
- Click on Members from the main navigation bar
- Select + New membership.
- Enter the Member's personal and contact details to create a new Member, or select to use an existing profile if previously created.
- Fill in other mandatory fields indicated with red coloured asterick (*) such as Communities (You can create Communities such as VHC Members) and public holiday preferences.
- Select the CHSP Membership Plan configured by your Admin.
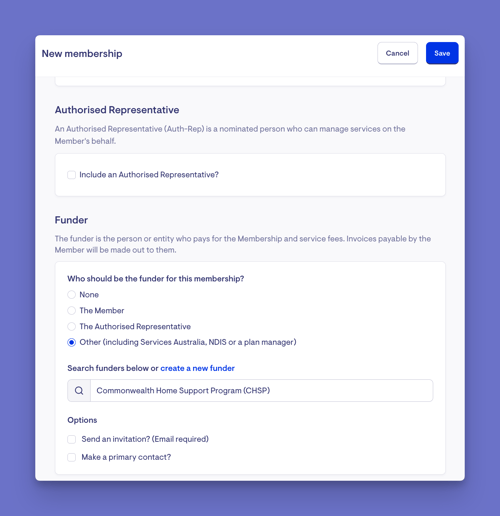
Unsure about Membership plans? Visit our articles Creating a profile and Creating and managing a Membership plans for an in-depth walk-through to learn more.
A Member record holds the client's details, funding and everything needed to schedule and report their services. For CHSP clients, the funding scheme must be set to CHSP, and their DEX client details must be recorded accurately. Lookout uses them to build each client's record and sessions in your DEX report.
Important: Make sure the Member's date of birth is recorded on their profile. Lookout uses it, along with the Member's name and gender, to automatically create their DEX SLK.
Step 2: Add the CHSP funding scheme
- From the Member's dashboard, open ⚙ Settings and click Funding scheme.
- Select Link funder, search for your organisation's CHSP funder profile and select it.
- Select Add funding scheme and choose CHSP from Funding scheme.
- Complete the Further details section (see the table below).
- Click Save.
| Field | What to enter |
|---|---|
| Client ID | Filled in automatically with the Member's Lookout ID. Only change it if the Member already has a DEX client ID with your organisation. It must match the client ID used in DEX. |
| Consent to provide details | Whether the Member has agreed to share their identifying details with DEX. |
| Consented for future contacts | Whether the Member has agreed to be contacted in future, for example, for surveys. |
| Given name and Family name | Required if the Member consented to provide details. Maximum 30 characters each. |
| Using pseudonym | Whether the name recorded isn't the Member's legal name. |
| Is birth date an estimate | Whether the recorded date of birth is an estimate. |
| Gender, Country of birth, Language spoken at home and Aboriginal or Torres Strait Islander | Select from the lists provided. |
| Does the client have disabilities | If Yes, select all that apply under Disabilities. |
| Accommodation type, DVA card status and Household composition | Select from the lists provided. |
| Has carer | Whether the Member has a carer. |
| Aged Care reference number (My Aged Care number) | The Member's My Aged Care number, in the format AC12345678. |
Important: Don't change or remove CHSP funding yourself. CHSP reports use a Member's current funding scheme, even for past periods. That means:
- Removing CHSP takes the Member's past CHSP services out of your reports.
- Changing to CHSP can report their past non-CHSP services as CHSP.
Once saved, the Funder card on the Member's dashboard shows their CHSP details, including the generated DEX SLK and their CHSP services.
Step 3: Record consent on a Service Agreement
- View the Member's dashboard and scroll to the Agreement requests card.
- Select Create request to generate a new agreement ticket.
- Review the generated Agreement with the Member.
- Select Approve once all parties have given consent.
Important: Ensure the funding scheme and funder have been configured into the Member's record. If it is not, the Agreements card will not appear in the Member's dashboard.
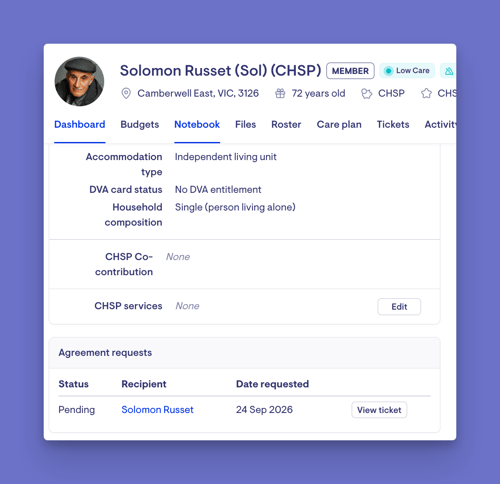
A Service Agreement records the Member's consent to receive services. Create and review the agreement with the Member and, where applicable, with their registered supporter or representative. Approve it once everyone has agreed. A Membership plan must be attached before Agreement requests appear on the Member's dashboard. For CHSP clients, make sure the agreement reflects the services they've been referred for and your client contribution arrangements. Create a new agreement whenever these change.
New to service agreements? This article covers the digital signing add-on. For the underlying service agreement (and the manual, non-digital process), see our Service agreements article. To set up the wording, please see our Agreement templates article.
Step 4: Set the Member's CHSP services and outlets
After the CHSP funding scheme is saved, two extra options appear in the Member's settings, Services and Outlets. Both are optional. Use them to limit what can be rostered for the Member.
Restrict CHSP services
- From the Member's dashboard, open ⚙ Settings and click CHSP Services.
- Under Restrict the CHSP services this Member can receive (optional), select Yes.
- Under CHSP Services, select the services the Member has been referred for.
- Click Save.
Services you don't select can't be rostered for this Member.
Restrict outlets
- From the Member's dashboard, open ⚙ Settings and click Outlets.
- Under Restrict outlets that are available to this Member (optional), select Yes.
- Under Outlets, pick the outlets that serve this Member.
- Click Save.
When you roster a Visit for the Member, Lookout only offers these outlets. From that list, it also offers only outlets registered to deliver the Visit's CHSP service.
Top tip: Match the Member's CHSP services to their My Aged Care referral. This prevents staff from accidentally rostering services the Member isn't referred for, which would otherwise appear in your DEX report.
Please note: If you don't set any restrictions, all active outlets and CHSP services remain available to the Member.
Step 5: Record Goals and Care Planning
- Open the Member's Care Plan tab from the Member's dashboard.
- Add entries to the relevant care plan categories.
Unfamiliar with Care plans? Visit the Care plans: an overview for detailed guidance on the Care plan and its functionality.
The Care Plan uses custom categories to capture important information about each Member. For CHSP clients, the care plan can record the goals and supports agreed in the Member's My Aged Care support plan, along with the operational and care information Helpers need to deliver services safely and consistently.
Care plan considerations
- Align care plan information with the Member's My Aged Care support plan, wellness and reablement goals, and individual support needs.
- Record risks, medications, health conditions and other relevant clinical information to support safe service delivery and your duty of care.
- Review and update the care plan whenever the Member's circumstances, needs or referral change, so Helpers are always working from current information.
- Consider whether details about the Member's carer and support network belong in Key Contacts rather than in care plan categories that all Helpers can see.
Important: Every Helper contracted to provide services to the Member can see the care plan. Only record what a Helper needs to know to carry out their duty of care.
Step 6: Configure Member Requisites
Create the matching requirement in ⚙ Settings
- From your home dashboard, open ⚙ Settings. Under Verifications, click Requisites.
- Select + New requisite.
- Enter a Title, such as CHSP Verified Support Worker.
- Under Verification, select the verifications required, such as a National Police Check and First Aid/CPR.
- Click Save.
You can now assign the matching requirement to Members.
Add the CHSP matching requirement to the Member
- View the Member's dashboard and scroll to the Matching card.
- Next to Requisites, click Edit and select your CHSP requisite, along with any other requirements the Member needs.
- Click Save.
Only Helpers who meet the assigned requirements will appear as eligible matches. Existing arrangements that no longer meet the requirements will be flagged.
Please note: If no Helpers hold the required verifications, no eligible matches will be returned.
Wanting support on managing Helper compliance? For Helpers to meet your CHSP requirements, their worker verifications must be recorded and kept up to date on their profiles. Visit our article on CHSP: Worker compliance.
Step 7. Offboarding a CHSP Member (Optional)
When a Member stops receiving services, archive their Membership. Archiving hides them from searches and reports, but doesn't cancel their Visits, schedules or surveys, so clear those first.
- Archive the Membership
From the Member dashboard, go to Danger zone → Archive Membership. Enter the exit date and time, select an archive reason, and review any red warnings. - Resolve any warnings
- Recurring Visits: End schedules before the exit date.
- Future Visits: Cancel any visits after the exit date.
- Group Activities: Remove the Member from future sessions.
- Surveys: Mark active or incomplete surveys as Inactive.
- Complete the archive
Return to Archive Membership, confirm the details, and select Save. - Finalise the account
On the Finances tab, resolve any outstanding client contributions, then select Close Account. CHSP visits are reported to DEX, so you don't need to wait for claims.
Please note: Do not remove or change the Member's CHSP funding scheme after they leave. It stores DEX client details required for historical reporting.
Important: Unarchiving a Member does not restore cancelled visits, ended schedules, or inactive surveys. These must be recreated manually.
Top tip: Add custom archive reasons via ⚙ Settings → Archive reasons.
Ongoing management considerations
- Keep DEX client details current. Update the Member's funding scheme when their accommodation, household composition, carer status or DVA card status changes. These details are sent with their DEX client record.
- The SLK updates automatically. The DEX SLK is built from the Member's name, date of birth and gender. If any of these are corrected, the SLK updates as well, so make sure the changes are accurate.
- Handle personal information carefully. The Member's My Aged Care number and DEX demographic details are sensitive personal information. Enter them accurately and handle them confidentially.
- Changes are tracked. Edits to the Member's funding details are logged under Changes in the Member's ⚙ Settings, including what changed. Make corrections deliberately, because they leave a lasting audit trail.
- Be careful when archiving. You can't archive a Member who still has active recurring schedules or incomplete surveys, and you can't archive them with a date before their last Visit. Tidy up any loose ends first.
- Reporting reflects the setup. The DEX report automatically pulls in the Member's Client ID, DEX details, and the outlets from which their Visits were delivered. Errors in the funding scheme, CHSP services or outlets will show up later as DEX errors.
What happens next?
-
Visits for the Member are recorded against a CHSP service type and outlet, ready for DEX reporting. See CHSP: Service delivery and DEX reporting for more information.
-
Each Member's sessions are grouped by outlet in your CHSP DEX report, using their Client ID and the outlet's activity ID.
-
Client contributions are invoiced to the Member's funder in line with your Membership plan and Rates.
-
Staffers with access to the Member can view their goals, supports and plan information as needed.
-
Reports can be run through the data export function to analyse CHSP-specific information.
What Staffers, Members and Helpers will see
For Staffers
- Can use the Member dashboard to view and update Funding, Agreements, CHSP Services, Outlets, Goals and Care Plan information.
For Members on the Lookout app
- Can view their own Care Plan and Goals, along with recorded risks, conditions and other categories, where sharing is turned on.
- Members and their authorised representatives can also view statements, manage payment details, respond to surveys and request Visits.
For Helpers on the Lookout app
- Can open each Member they support and view their Care Plan, including Goals, risks, clinical summary, conditions, medications, allergies and any custom categories you've set up.
- Can view their scheduled Visits, the services to deliver, and shared check-out notes or care forms where turned on.
- Cannot see the Member's funding scheme, DEX client details or billing. These are only available to Staffers.
- Every Helper contracted to the Member can see all care plan information, so only record what a Helper needs to deliver support safely.
Troubleshooting
I can't see this option
- Check your Access role.
- Confirm the Member has an active Membership with a CHSP funding scheme. CHSP Services and Outlets only appear in the Member's ⚙ Settings after CHSP is saved.
- Confirm your CHSP outlets, Rates and Membership plans are set up.
- Try logging out and back in.
The funding scheme won't save
- Check that every required field has an answer, including the Yes/No questions.
- If Consent to provide details is Yes, enter a Given name and Family name.
- If Does the client have disabilities is Yes, select at least one option under Disabilities.
- Check that the My Aged Care number is in the format AC12345678.
The DEX SLK is missing or looks wrong
- Check the Member's date of birth on their profile.
- Check the Given name, Family name and Gender in their CHSP funding scheme.
I can't select a service or outlet when rostering
- Check the Member's CHSP Services and Outlets in their ⚙ Settings. The service or outlet may not be selected.
- Check that the outlet is registered to deliver the Visit's CHSP service. Your Admin can check this in CHSP outlets and services.
I completed the steps, but nothing changed
- Make sure you clicked Save on each page.
- Check for any error messages on the page.
- Contact support if the issue continues.
Top tip: Make sure the Helpers delivering these services are compliant. See CHSP: Worker compliance. Next in the series: CHSP: Service delivery and DEX reporting
Still need help?
If you're still having issues, contact our support team and include:
- Screenshots, if possible
- The user's name and email
- The exact steps you took
- Any error messages you received