
This guide explains what a profile is, why it's the starting point for adding any person to Lookout, and how to create one step by step. Once a profile exists, you can give that person a role - such as a Member or Helper, using the relevant onboarding guide.
What is a profile?
A profile is a record of information about a person or entity. In Lookout, Members, Helpers, Authorised Representatives, Funders, suppliers, and clinicians all have their own profile.
Think of a profile as the foundation. It holds the person's basic details - their name, contact information, address, and so on. Whatever role that person will go on to play is layered on top afterwards. That's why, whenever you add a new individual to Lookout, a profile needs to be created first.
The good news: creating a profile works exactly the same way, no matter who the person is. Whether you're setting up a Member, a Helper, or a Staffer, this first step is identical - the differences only come later, when you give the profile a role.
Before you start
To create a profile, make sure:
- You have the details you'll need to hand: the person's full name, contact details, address, time zone, and date of birth.
Top tip: You don't need every detail to get started - you can add or update information later by editing the profile.
Step-by-step instructions
Step one: Navigate to Profile search
- From the main navigation menu, click Profile search. If all sections are expanded, you may need to scroll to find it.
- You'll see all the profiles currently in Lookout.
Top tip: Before creating a new profile, it's worth searching to check the person doesn't already exist.
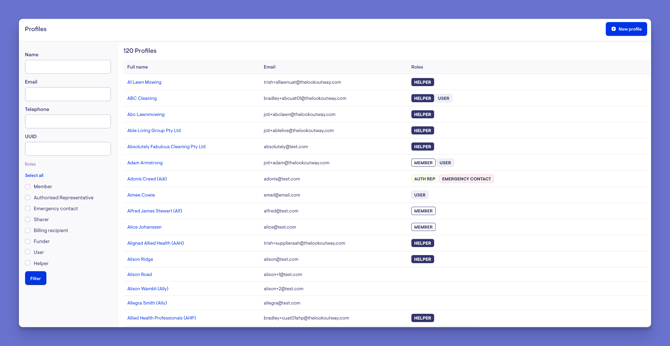
Step 2: Search to avoid duplicates
You can search existing profiles by:
- Name - first name, last name, or preferred name
- Email address
- Telephone number
- Unique ID (UUID)
You can also filter by role to narrow the list. Each result shows the person's full name, email address, and roles.
Step 3: Create the new profile
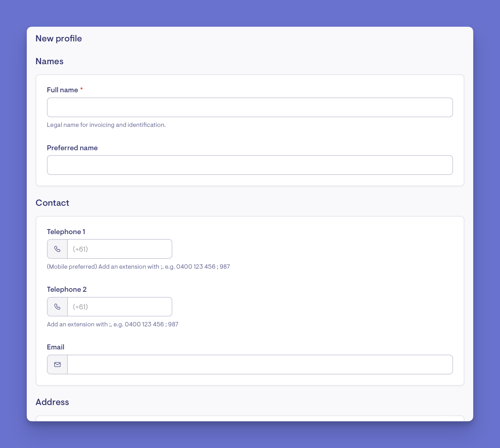
Please note: Only a full name and time zone are required to create a profile. You can enter just these and Save, then return to the profile to add more details later. But if you already have additional information to hand, we recommend adding it now.
- Click the blue + New Profile button.
- Enter the full name, and a preferred name if applicable.
- Enter the contact details - telephone number and email address.
- Enter the address. As you start typing, Lookout suggests street addresses; selecting one fills in the address fields for you.
- Select the applicable time zone.
- Enter the date of birth.
- When ready, click the blue Save button in the top right corner.
- The new profile will load, and a green banner will display confirming your new profile was created successfully.
You should now see:
- All the basic details you entered
- The option to invite the person to the Lookout app (an email address is required for this)
Top tip: To make changes, select Edit, update the details, and select Save again.
What happens next?
Once the profile is created:
- The person now exists in Lookout as a basic record, ready to be given a role.
- You can invite them to the Lookout app (if they have an email address).
- The next step depends on who they are - see the onboarding guides below.
Giving a profile a role
A profile on its own is just a record. To make the person a Member, Helper, or Staffer, follow the relevant guide:
- Onboarding a Member - turn the profile into a Member by creating their membership.
- Onboarding a Helper - set the profile up as a Helper.
- Adding a Staffer - give the profile admin access as a Staffer.
Troubleshooting
The person already seems to exist
Search Profile Search first by name, email, or telephone. If a profile already exists, use it rather than creating a duplicate.
I can't invite the person to the app
An email address is required to send an app invitation. Add one to the profile, then try again.
The address won't populate
Start typing the street address and wait for the suggestions to appear, then select the correct one from the list.
My profile won't save
Check for any highlighted errors on the form - a telephone number or address may need completing or correcting.
Still Need Help?
If you're still experiencing issues, please contact our Support Team and include:
- Screenshots (if possible)
- The user's name/email
- The type of notification affected
- The channel you expected it on (in-app, email, or push)
- The exact steps taken