
This guide explains how to add a Staffer (an admin user) in Lookout. It covers setting up their access to the system, the communities they work across, and the roles that determine what they can do.
Please note: Adding a Staffer is done in the Settings area of Lookout and requires the right permissions. Unlike Members and Helpers, adding a Staffer is a single, self-contained process - you don't need to create a separate profile first.
Adding a Staffer
A Staffer is a member of your admin team with access to the Lookout admin interface - covering areas such as rostering, care management, and finance. Adding a Staffer gives that person the access they need to do their job, scoped to the communities and responsibilities that apply to them.
There are two steps to adding a Staffer:
- Create a profile - the basic record for the person.
- Set them up as a Staffer - the step that gives the profile the Staffer role, along with their communities access reach.
This article covers step two. If you haven't created the person's profile yet, start with our Creating a Profile article, then come back here.
Before you start
Before reviewing this article, please ensure you meet these prerequisites:
- You are logged into Lookout as a staff member.
- To add, edit or remove Staffers, you need the "Manage staffers" permission. This sits within the access roles area - typically held by Administrators. If your access role doesn't include it, you won't see the Staffers option in Settings.
- To change a Staffer's access role or access reach, you need the additional permission to edit roles and access - this goes beyond simply viewing the Staffers list.
- You know what level of access the new Staffer should have and which communities they'll work across before you begin.
- Ideally, your access reach is set to Full - access to every community, with no assignment needed.
Step-by-step instructions
Step 1: Navigate to the Staffers settings
-
From your home dashboard, navigate to the overflow menu by clicking the ellipsis (...) next to your name in the bottom left-hand corner.
-
The overflow menu will open - click Settings.
-
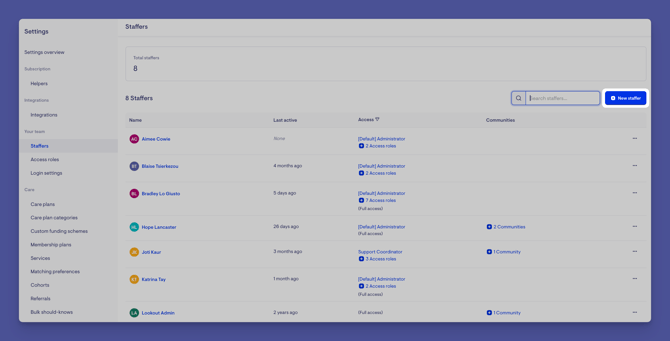
In the main settings, navigate to the Your team section, then click Staffers.
- A new screen will load, showing all existing Staffers.
Step 2: Add a new Staffer
-
Click the blue + New Staffer button on the right-hand side of the screen.
-
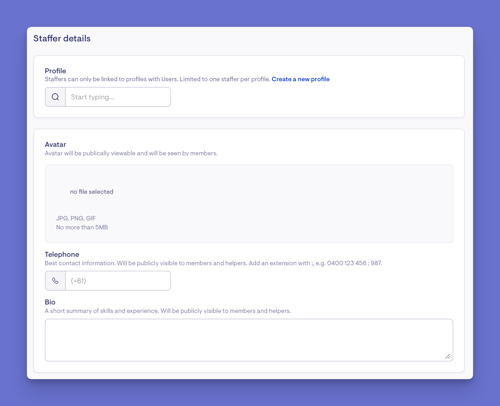
A new screen will load where you can start typing personal details to find your Helper.
-
Use the available search bar to find the profile you created for this Staffer and select it.
-
If, when typing the Staffer's name, you realise a profile hasn't been created, you will see an option to create a new profile and follow the same steps outlined in our Creating a profile article.
-
-
Click the Staffer's profile when it appears after searching.
- You will see an avatar made with the Staffer's initials. If you have a photo of the Staffer to replace this, you can add their profile photo here. The avatar will be publicly viewable and will be seen by Members.
- Although it's not a requirement, you can add the Staffer's best contact number. This will be visible to both Members and Helpers.
-
You can also add a bio - a short summary of the Staffer's skills and experience. This will also be publicly visible to Members and Helpers.
Step 3: Set their communities access reach
-
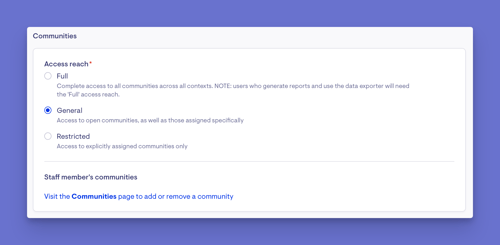
Set their access reach - whether they can access all communities, or only specific ones.
Top tip: Access reach controls how much the Staffer can see. Giving access to specific communities keeps their view focused on the people they're responsible for.
For more information on communities, please read our Communities: an overview article or our Managing communities as an Admin article.
-
You'll also see a clickable link to Communities, to add or remove a Staff member from communities. This is not a required step at this point when adding a Staffer, so it can be skipped. Please read our Managing Staffers in a community article to learn about this in detail.
- When you are ready, click the blue Save button in the top-right corner.
- Confirm your actions and ensure their email address is accurate, as they will be granted admin access immediately.
- A green banner will appear confirming your new staffer has been successfully added, and they will now appear in the Staffers list, ready to use.
Step 4: Set the Staffer's permissions
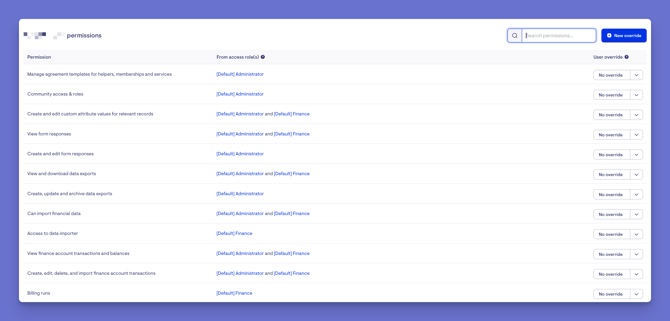
Permissions are managed separately, once the Staffer has been created and appears in the Staffers list.
Please note: Creating a Staffer sets up their account, communities, and access role - but their detailed permissions are set here, as a separate step. It's worth doing this straight after adding them, so they have the right access from day one.
- In the Staffers list, find your new Staffer.
- Select the ellipsis (…) button to the right of their name.
- A small options menu will appear. Click Permissions.
- The Staffer's permission page will load. Review and set the permissions this Staffer should have.
Want to understand permissions better? For a fuller understanding of how roles and permissions work together, see our Role-based access controls (RBAC) in Lookout article.
What happens next?
After adding a Staffer:
- The person can log in and access the parts of Lookout that their role allows.
- They'll appear as an option when assigning work, such as tickets, within their communities.
- You can update their access, communities, and roles at any time from the Staffers settings.
Troubleshooting
I can't add a Staffer
Adding Staffers is an admin task. If you can't see the option, you may not have permission - those who manage roles and permissions in your organisation can adjust it.
The Staffer can't see certain areas after logging in
Check their access role and access reach. Their role determines what they can do, and their reach determines which communities they can see.
Tickets aren't reaching the new Staffer
Confirm they've been added to the right communities and given the correct role within them. Ticket routing depends on both.
I need to change a Staffer's access later
You can update a Staffer's role, access reach, communities, and community roles at any time from the Staffers settings. To learn more, please read our Role-based access controls (RBAC) in Lookout article.
Still Need Help?
If you're still experiencing issues, please contact our Support Team and include:
- Screenshots (if possible)
- The user's name/email
- The exact steps taken
- Any error messages received