
This guide explains how to onboard a Helper in Lookout. Onboarding happens in two stages: first, creating the person's profile, then setting them up as a Helper. This article focuses on the second stage - turning a profile into a Helper.
Before you begin: Onboarding a Helper starts with creating their profile. If you haven't done this yet, head to our Creating a Profile article first, then return here to set them up as a Helper.
Onboarding a Helper
A Helper is a person providing care or support to Members - this includes support workers, care workers, clinicians, and third-party providers. Onboarding a Helper brings them into Lookout so they can be matched with Members, scheduled for visits, and access their own view of the people they support.
There are two steps to onboarding:
- Create a profile - the basic record for the person.
- Set them up as a Helper - the step that gives the profile the Helper role, along with their engagement type, communities, and services.
This article covers step two. If you haven't created the person's profile yet, start with our Creating a Profile article, then come back here.
Before you start
To onboard a Helper, also make sure:
- The person's profile already exists. If not, create it first.
- The profile has the full details a Helper needs: an email address, a telephone number, and a complete address. These are required to fully set someone up as a Helper.
- You know which engagement type applies (for example, employee, contractor, or volunteer) and which communities and services they'll be part of.
Top tip: A profile can only be linked to one Helper. If a profile is already associated with another Helper, you won't be able to reuse it.
Step-by-step instructions
Step 1: Start a new Helper
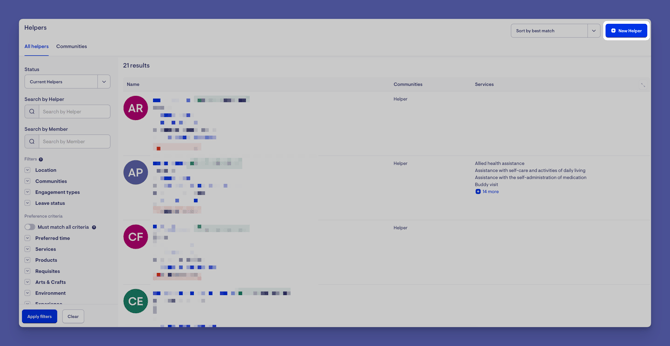
- From the main navigation menu, click Helpers under the Rostering section to open the full list of Helpers.
- Click the blue +New Helper button in the top-right corner.
- A new screen will load where you can start typing personal details to find your Helper or supplier.
Step 2: Select the person's profile
-
Use the available search bar to find the profile you created for this Helper and select it.
-
If, when typing the Helper's name, you realise a profile hasn't been created, you will see an option to add a new profile and follow the same steps outlined in our Creating a profile article.
-
-
Click the Helper's profile when it appears after searching.
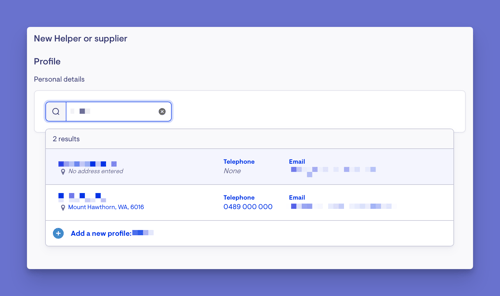
Top tip: If the profile is missing required details (such as email or address), you'll be prompted by Lookout - you can update the profile and continue.
Step 3: Set the Helper's role and engagement
-
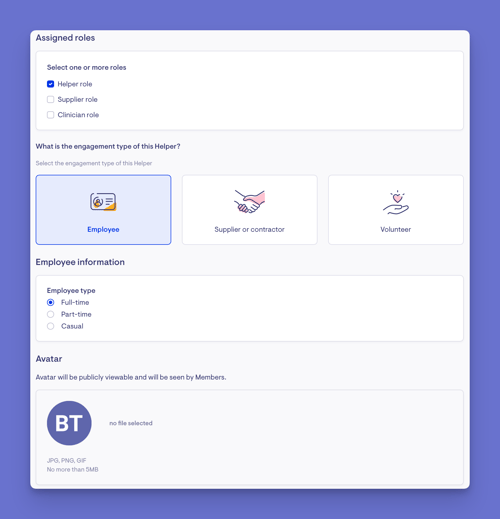
Under Assigned roles, choose the Helper's role(s) - for example, Helper (care worker), supplier, or clinician. They can be assigned more than one.
- Select the engagement type - such as employee, contractor, or volunteer.
- If selecting employee, an additional box will appear to set an employee type - full-time, part-time or casual.
- If selecting contractors, enter the required business details (such as company name and tax details).
-
You will see an avatar made with the Helper's initials. If you have a photo of the Helper to replace this, you can add their profile photo here. The avatar will be publicly viewable and will be seen by Members.
Please note: The engagement type affects how the Helper is rostered and paid, so choose carefully.
Step 4: Assign communities and services
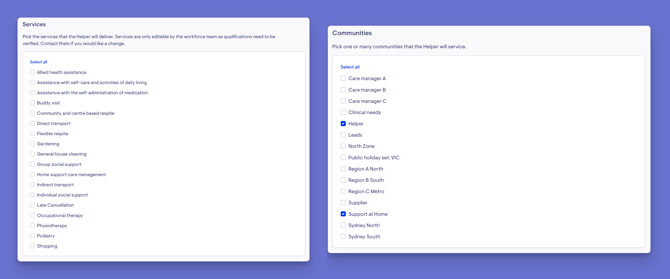
- Select the communities this Helper will belong to.
- Choose the services they can provide.
Step 5: Travel and transport options
Decide whether this Helper can charge for travel and transport, based on their arrangement with your organisation:
-
Provider travel: Set whether the Helper can charge for their own travel (time and distance) to and from a visit.
-
Client transport: Set whether the Helper can charge for transporting the Member during a visit.
Top tip: These are on/off switches for the Helper - they don't charge anything on their own. They simply allow travel or transport to be charged on the Helper's visits when the visit and the Member's plan permit it, with the actual amounts handled per visit. You can update these at any time.
Step 6: Complete the remaining details
-
Add any matching preferences to help pair them with suitable Members.
- Depending on your setup, you may also:
-
Set a weekly capacity (how many hours they're available).
-
Add an agreement template (required for contractors providing care).
-
Choose which products and prices apply.
-
Fill in any custom attributes your organisation uses.
-
Add notes relevant to this Helper.
-
- When you are happy with all of the details provided, click the blue Save button in the top-right corner.
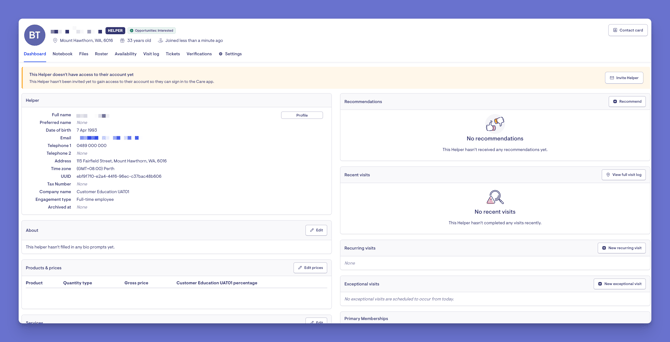
- A green banner will display confirming your Helper was added successfully, and their Helper dashboard will load. For more information on the Helper dashboard, please read our dedicated article.
- Your Helper is now ready for matching and scheduling.
What happens next?
After adding a Helper:
- You'll need to invite the Helper to access their account. This will need to be done so that they can sign in to the Care app.
- Once the Helper has access, they can log in and access the parts of Lookout their role allows.
- They'll appear as an option when assigning work, such as tickets, within their communities.
- You can update their access, communities, and roles at any time from their Helper dashboard or Settings tab.
For more information on the Helper dashboard and its tabs, please read our dedicated article.
What different Users/ Staff will see
For staff with access to the community
- Can view and manage the Helper, their communities, services, contracts, and schedule.
For rostering and care management staff
-
The Helper becomes available to match and schedule with Members in their assigned communities and for the services they provide. If a Helper isn't set up in a community or with a service, they won't appear as an option for that work.
For the Helper
-
Once set up and invited, the Helper can access their own app view - including their schedule, the Members they support, and those Members' care plans. They do not see Members' financial details.
For third-party providers (suppliers and clinicians)
-
If the person is set up as a supplier or clinician rather than a hands-on care worker, their setup and what they can access differs. They're brought in to provide their specific service rather than being rostered like a support worker.
For Members
-
Members will see the Helper once they've been matched or scheduled together.
For a Member's loved ones and Sharers
- Depending on your setup, a Member's connected loved ones or Sharers may see the Helper's name in the context of the Member's schedule, but not the Helper's private details.
Troubleshooting
I can't find the profile when adding a Helper
Make sure the profile has been created first. If not, see our Creating a profile article. Try searching by preferred name.
The profile is already associated with another worker
A profile can only be linked to one Helper. Check whether the person has already been set up as a Helper.
I'm told the profile is missing details
A Helper needs a complete profile - email, telephone, and full address. Update the profile with the missing information and try again.
I can't save - a community or service is required
A Helper must belong to at least one community. Make sure you've selected the applicable communities (and services) before saving.
Contractor details are being requested
For contractors, business details such as company name and tax number are required. Add these to continue.
Still Need Help?
If you're still experiencing issues, please contact our Support Team and include:
- Screenshots (if possible)
- The user's name/email
- The exact steps taken
- Any error messages received