
This guide explains how to deliver CHSP services and report them to the Data Exchange (DEX) in Lookout. It covers what you need before starting and what to do if something isn't working.
Overview
Delivering and reporting on CHSP services in Lookout follows a single path from start to finish. You roster a Visit for a Member, the Helper delivers it and checks out, and a billing run turns the completed Visit into an invoice for the Member's client contribution. The CHSP DEX report then turns those invoices into the clients, cases and sessions you upload to DEX.
CHSP services are reported to DEX, not claimed. CHSP Members don't use Budgets in Lookout, so the accuracy of each Visit is what keeps your DEX report correct. That means its Rate, CHSP outlet and session details.
Before you start
To complete this process, make sure:
- You have permission to roster Visits, run billing, and access Claims to open the CHSP DEX report.
- You're signed in to the web app.
- The Member has an active CHSP Membership, complete DEX client details, and a recorded My Aged Care number. See CHSP: Member management.
- The Member's profile includes their date of birth, suburb, postcode, and state.
- CHSP outlets are configured with valid DEX outlet activity IDs and registered CHSP services.
- Each CHSP rate has a valid CHSP service ID.
- Each Helper's engagement type (Employee, Contractor/Supplier, or Volunteer) is recorded on their profile.
Top tip: Set the Member's CHSP Services and Outlets in their Settings first. Lookout then only offers the services and outlets they've been referred to when you roster.
Step-by-step instructions
Step 1: Roster the Visit
- From the main navigation bar, Navigate to Care and select Members.
- Search for the Member and select them to open the Member's dashboard.
- Select New recurring visit for a regular service, or New exceptional visit for a one-off.
- Choose the Helper, the date and time, and the Rate being delivered. The rate must be set up for CHSP.
- Choose the CHSP outlet the service is delivered from.
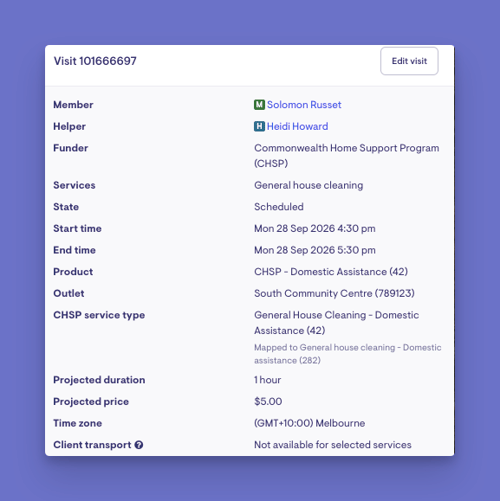
- Complete the Additional reportable information section (see the table below).
- Select Save to place the Visit on the roster.
Additional reportable information
For Visits from 1 July 2026, DEX needs extra detail about some services. Lookout only shows the fields that apply to the Visit's CHSP service, and fills each one in with a suggested answer.
→ Visit our article on CHSP DEX Stage 3 reporting changes in Lookout for the full rundown.
| Field | Applies to |
|---|---|
| Service location (home or community) | Services that report where they were delivered. |
| Meal provided, Meal cooked offsite, Items texture modified and meal counts (Main meal count, Light meal count, Dessert count, Beverage count, Snack count) | Meals and respite services. |
| Overnight support | Respite services. |
| Engagement time minutes | Services that report social engagement time. |
| Trip distance (km) and Trip time minutes | Transport services. Distance must be in whole kilometres. |
| Subcontractor delivered, and Volunteer delivered | Filled in from the Helper's engagement type. |
New from 1 October 2026: If your organisation has turned on Member contacts & dashboard enhancements, an Admin can choose which Helper engagement types your organisation uses in Settings > Helper engagement types (Employees, Contractors and Volunteers). The Volunteer type is turned on at the same time if you didn't already have it. Suppliers (third-party providers) are always recorded as Contractors. Lookout uses these engagement types to populate Subcontractor delivered and Volunteer delivered for DEX, so check that each Helper's type is correct before you report.
Important: For Transport, roster one Visit per trip. DEX counts each transport Visit as one trip.
Top tip: To update the CHSP outlet or session details for many Visits at once, open the Member's Roster in List view and tick the Visits. Then select Actions → CHSP details. Any field you leave blank keeps each Visit's current value.
→ Need help scheduling a Visit? See our Managing Visits (Rostering) guide.
Step 2: Deliver and check out the Visit
- The Helper provides support and checks out of the Visit in the Lookout app.
- Review the checked-out Visit on the Member's Roster. Correct any times or session details before billing.
- For group activities, select the CHSP outlet when creating the group visit. Lookout can't invoice CHSP attendees without one. To change the outlet or session details for one attendee, open the CHSP session details for that Member.
Lookout reports the Visit's actual checked-out duration to DEX as the session time, and the Visit's end date as the session date. Accurate check-outs mean accurate DEX time.
Please note: If a Visit is checked out outside the rostering screen, for example, through the app or a bulk action, its Additional reportable information might still be blank. Lookout flags these gaps in the DEX error report (see Step 4).
Step 3: Generate client contribution invoiceable items with a billing run
- From the main navigation bar, go to Finance and select Billing runs.
- Open the draft for the period, or select Custom draft to create one and choose the period.
- Review the invoices and select View errors to fix anything flagged. Items with errors don't generate invoices and aren't included in reports.
- Select Update draft after making changes.
- When you're satisfied, select Confirm and publish.
Billing runs, found in the Finance section, are how Lookout turns the client contributions recorded against each CHSP client's services into invoicable items for a chosen period, and those amounts then flow through to your DEX reporting.
Each completed CHSP Visit becomes an invoice for the Member's client contribution. DEX treats each invoice as a session and reports the invoice total as the fees charged.
Important: Publish the billing run before you generate the DEX report. The DEX report can also pick up invoices from a draft billing run, and those invoices can change when you select Update draft.
→ Need help with billing runs? See our Overview: Billing and Finance guide.
Step 4: Generate the CHSP DEX report
- From the main navigation bar, go to Claiming and select CHSP DEX.
- Select Generate new report.
- Choose the Report period. Lookout loads every CHSP session in that date range.
- Review the totals at the top: Total clients, Total sessions, Total cases, Total time and Client contributions.
- Check the Exported? column. Untick any session you've already reported or don't want to include. Every session is ticked by default.
- (Optional) Tick Stage 3 defaults to fill in missing session details with Lookout's defaults for the service type.
- Once the list has finished loading, select Generate.
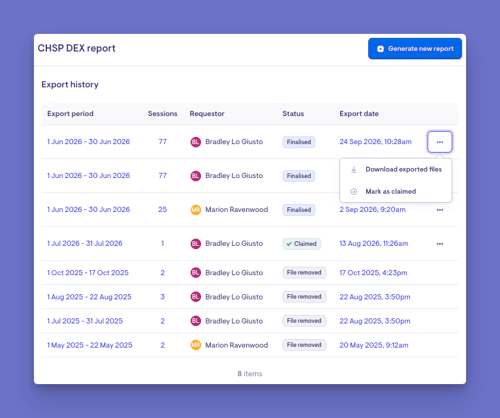
You should now see:
- The message Your DEX report will be sent to your email.
- The new report in the Export history list.
- An email to your account with links to the files, which are ready to upload to DEX.
The download contains:
- The DEX report, a file with the client, case and session records.
- An error report, if anything is missing. It lists each problem by Member, client ID and session, with a link to the Visit or invoice where you can fix it.
→ Visit our article Running the CHSP DEX Report for a detailed guide
Top tip: To fix a session's CHSP service or outlet from the report, click the service type or outlet on that row. To check one outlet, enter its outlet ID in the search bar.
Please note: Stage 3 defaults only affect the file you download. Your Visits aren't changed, and the error report still lists the gaps. Some details, such as transport distance, can't always be worked out and may need entering by hand.
Step 5: Track what you've submitted
- Return to Claiming → CHSP DEX to view the Export history.
- Select Download exported files to get the files again.
- After uploading to DEX, select Actions → Mark as claimed to record that the export was submitted.
- Select an export's period to reopen it and see which sessions it included.
-
The Exported? column in each new report shows whether a session is already in a finalised export. This helps you avoid reporting a session twice. On an invoice, you can also see which DEX exports it was included in.
Reminder: Contact Lookout to remove CHSP funding from a Member. Contact your Lookout representative for support.
CHSP reports use a Member's current funding scheme, even for past periods. That means:
- Removing CHSP takes the Member's past CHSP services out of your reports.
- Changing to CHSP can report their past non-CHSP services as CHSP.
Please note: With Member contacts & dashboard enhancements turned on, the Remove funder and Remove funding scheme options have moved from the dashboard's Danger zone to the Member's Settings under Funding scheme. Don't use these to remove CHSP. Contact Lookout instead, because removing CHSP takes the Member's past CHSP services out of your reports.
What happens next?
After completing this process:
- Completed Visits flow into a billing run, and publishing it finalises the client contribution invoices.
- Lookout notifies you when the billing run has finished publishing. Statements can then be emailed.
- You generate the CHSP DEX report when you need it. It isn't created automatically when you publish.
- Each Member's sessions are grouped into cases by outlet, using their Client ID and the outlet's activity ID.
- Exports you mark as claimed stay in the Export history as a record of what you submitted.
What Staffers, Helpers and Members will see
For Staffers and Admins
- Can roster Visits, record CHSP session details, run billing and view each Visit's CHSP outlet and service.
- With the Claims permission, you can generate the CHSP DEX report, download past exports and mark them as claimed.
For Helpers (Lookout app)
- Can see their rostered Visits and check out to confirm delivery.
- Can't see the Member's funding scheme, DEX client details or billing.
For Members (Lookout app)
- Can view their statements and client contributions, and request Visits.
New from 1 October 2026: With Member contacts & dashboard enhancements turned on, the Member's contacts can each be given their own access. A contact with the view statements permission can also see the Member's statements and client contributions. This replaces the old Billing recipient role.
Troubleshooting
I can't see the CHSP DEX option
- Check that your access role includes the Claims permission.
- Try logging out and back in.
I can't select a rate, service or outlet when rostering
- Check the rate has a valid CHSP service ID. If it doesn't, Lookout shows "is not set up for CHSP".
- Check the Member's CHSP Services and Outlets in their Settings.
- Check the outlet is registered for that CHSP service. Your Admin can check this in CHSP outlets and services.
A Visit is missing from the DEX report
- Make sure the Visit was checked out and invoiced in a billing run.
- Check for errors on the billing run. Items with errors don't generate invoices.
- Make sure the Visit falls within the Report period you chose.
- Confirm the Member's funding scheme is CHSP.
The error report lists a client error
- Check the Member's profile has a date of birth, suburb, postcode and state.
- Check every required field on the CHSP funding scheme is complete, including the Client ID.
The error report lists a session error
- Open the Visit or invoice linked in the error report and complete the missing session details.
- For transport, check the Trip distance (km) is in whole kilometres.
- If a session says no Visit or group session is linked, fix the details on the invoice itself.
Items are highlighted in red with a mapping warning
- These items use a CHSP service ID that changed on 1 July 2025. Select View and edit to map them to the new service before you report them.
I completed the steps, but nothing changed
- Make sure you select Save or Confirm and publish at each step.
- Check for any error messages on the form.
- Check your email inbox. The DEX report is emailed to you, not downloaded on the spot.
- Contact support if the issue persists.
Still need help?
If you're still having issues, please contact our Support Team and include:
- Screenshots, if possible.
- The Member's name.
- The exact steps you took.
- Any error messages you received.