
This guide explains how to record and manage a Helper's compliance checks (such as a National Police Check) in Lookout. It covers what you need before starting, the CHSP considerations at each step, and what to do if something isn't working.
Overview
Worker compliance means tracking the checks, screenings and credentials each Helper needs before they can be matched with Members and deliver support. For CHSP, this usually includes a current police check, along with other certificates and training your organisation requires.
For each Helper, Lookout keeps a record of these items. It shows whether the Helper meets your matching requirements, such as the CHSP requisite you assign to Members, and flags items that are nearing expiration or have expired. You add and update these records from the Helper's profile.
Before you start
To complete this process, make sure:
- You have the correct access permissions. Adding, editing or removing a Helper's verifications requires the Verification permission. Setting up new verification types or requisites requires Workforce access.
- You're logged into the web app.
- The Helper already has a profile in Lookout.
- Your CHSP requisite (for example, Aged Care Verified Support Worker) has been created under ⚙ Settings › Verifications › Requisites, as covered in CHSP: Set up and configuration.
- If you plan to attach a document, such as the Helper's medication administration certification, have the file ready to upload.
Top tip: CHSP screening rules are set by the Department of Health, Disability and Ageing and can change. Check the current requirements for your workers and volunteers before you decide which verifications your CHSP requisite needs.
Step-by-step instructions
Step 1: Open the Helper's Verifications tab
- From the main navigation bar, select Helpers.
- Use the search bar or browse the Helper list to find the Helper.
- Select the Helper's name to open their profile.
- Select the Verifications tab in the row of tabs across the top of the profile.
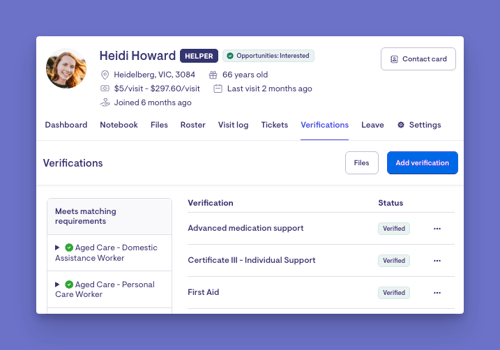
On this screen, you'll see:
- A panel titled Meets matching requirements. Each requisite has a green tick if the Helper meets it or a red cross if they don't. Select a requisite to see which verifications it needs.
- A table of the Helper's current verifications, each showing its Status and, if it has an expiry date, how many days are left until it expires.
CHSP consideration: Use the Meets matching requirements panel for a quick check. For example, if your requisite shows a red cross, the Helper won't appear as an eligible match for Members who have that requisite.
Step 2: Add a verification
- Select Add verification in the top corner of the screen.
- Under Type of verification, choose the verification from the list (for example, National Police Check), then select Save.
- On the next screen, under File to use, either choose an existing file or select Upload a new file.
- If your organisation requires it, enter the Verification document number.
- Set the expiry: either tick No expiry, or enter a date in the Or expires on field.
-
To view uploaded documents, select Files (next to Add verification). To see the change history for a verification, click the ellipsis (...) next to it, then select Changes.
Items commonly recorded for CHSP workers include:
- National Police Check.
- HTLAID001 1 First Aid and CPR certificates.
- Manual handling and infection control training.
- Driver's licence and vehicle insurance, where the Helper provides transport or drives Members.
- Professional registrations or qualifications, for allied health and therapy services.
- Other certificates such as HLTHPS006 Assist Clients with Medication, 11124NAT Safe Handling of Sharps and Infectious Waste, etc.
Please note: Your organisation sets up the available verification types. If a check you need isn't in the Type of verification list, your Admin must set it up first and add it to your CHSP requisite.
Step 3: Save
Select Save.
You should now see:
- A Verification added confirmation.
- The new verification listed in the table.
- A status tag showing Verified, Almost expired or Expired.
- If the Helper now holds every verification a requisite needs, a green tick next to that requisite in the Meets matching requirements panel.
What happens next?
After you add or update a verification:
- The Helper's record shows the new verification and its status straight away.
- Once the Helper holds all the current verifications in your requisite, they can appear as an eligible match for Members with that requisite.
- As the expiry date gets closer, the status changes automatically. It shows Almost expired from 90 days before the expiry date, then Expired once the date passes.
- Expired verifications don't count towards a requisite. Existing arrangements with Members who have that requisite will be flagged.
- Every change is logged. Open Changes for any verification to see what was updated and when.
- You can also download the attached file or remove a verification. Removing a verification deletes only the verification record. The uploaded file stays in the Helper's files.
What Staffers and Helpers will see
For Staffers managing compliance
- Can open any Helper's profile and see all their verifications, statuses and expiry dates in one place.
- With the Verification permission, can add, edit, download and remove verifications, and view the Changes history for each one.
- Can see at a glance whether a Helper meets your CHSP requisite.
- Can open a Helper's renewal ticket from the verification (View ticket), then approve the renewal, ask the Helper to upload it again, or cancel it.
For Helpers (Lookout app)
- Can see their own verifications on their profile in the Lookout app.
- When a verification is close to expiring, you can upload new evidence through a renewal. Their verification record is updated once a Staffer approves the renewal.
Troubleshooting
I can't see the Verifications tab or the Add verification option
- Check your access role. Adding or editing verifications requires the Verification permission.
- Try logging out and back in.
I added a verification, but the Meets matching requirements panel still shows a red cross
- Select the requisite to see which verifications it needs. The Helper must hold all of them.
- Check that none of the required verifications show as Expired.
- Make sure you completed the Save step.
I see "Verification already exists for this helper"
- The Helper already has this verification. Edit the existing one instead, for example, to upload a new certificate or change the expiry date.
I completed the steps, but nothing changed
- Make sure you selected Save on the final screen.
- Check for any error messages, such as a missing file or missing document number. If your Admin has set a verification to require a document number, it won't save without one.
- Contact support if the issue continues.
Wanting to know more about Helpers in Lookout? Visit our collection of articles on Helpers to learn detailed steps, tips and tricks.
Still need help?
If you're still having issues, contact our support team and include:
- Screenshots, if possible
- The Helper's name and email
- The exact steps you took
- Any error messages you received