
This guide explains how to set up a participant's profile, funding, budget, care plan, and matching requirements so that services can be scheduled, delivered, and claimed in accordance with NDIS standards.
Overview
Once your setup and configurations are complete, you can create Members and manage their NDIS information. This article walks a Staffer through setting up a Member's profile and Membership, agreeing on a Service Agreement, recording funding, building a Budget, capturing Goals and Care Planning and matching requirements.
New from 1 October 2026 Two Release Hub items change how you set up NDIS participants:
- Member contacts & dashboard enhancements: a new single-page New membership form, a Key contacts section with separate roles and permissions, a reorganised Member dashboard, and a Matching panel with preference criteria.
- Budgeting & live tracking enhancements: new Budget tabs and views, plus warnings that check a budget before it can be approved. Your organisation turns each one on from Release Hub. Where a step differs depending on whether a feature is on, this article explains both.
--> Want to see what's changed? Visit our What's New section for the latest releases, enhancements, and feature updates.
Before you start
To complete this process, make sure:
-
You have Access role that lets you create and edit memberships
- Your NDIS settings completeds (covered in NDIS: Set up and configuration)
- The participant's details, including their NDIS participant reference number (if known), how their plan is managed, and their plan review date
- The funder's details, for example, the NDIA or the participant's plan manager. You can pick an existing profile or create a new one while you add the membership.
Step-by-step instructions
Step 1: Create the Member and their Membership
- Click on Members from the main navigation bar.
- Select + New membership.
- Enter the Member's personal and contact details to create a new Member, or select to use an existing profile if previously created.
- Fill in other mandatory fields indicated with red coloured asterisk (*) such as Communities (You can create Communities such as VHC Members) and public holiday preferences.
- Select the NDIS Membership Plan configured by your Admin.
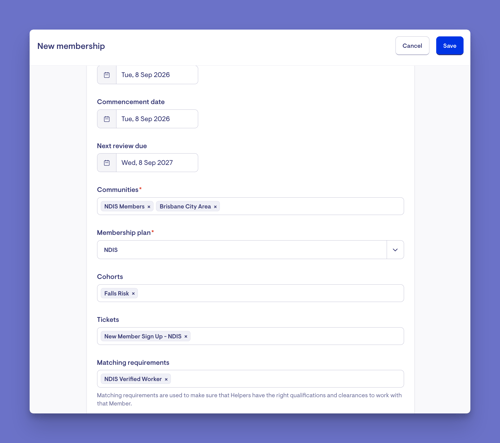
A Member record holds the participant's details, funding, and everything needed to schedule and bill their supports. For NDIS participants, the funding scheme must be set to NDIS, and the plan details must be recorded accurately, as these determine how the participant is scheduled, invoiced, and claimed. The system runs a set of checks and will block scheduling and billing until the record is properly completed.
New from 1 October 2026: With Member contacts & dashboard enhancements on, + New membership opens a single page with four sections:
- Member: the person receiving services. You can make them the primary representative and choose whether they receive statements.
- Contacts: add the people who support the participant, such as a plan nominee or carer, and pick each person's roles and permissions as you go.
- How is this membership funded?: Pick NDIS as the funding scheme first. Lookout then suggests the usual funder. You can enter the NDIS details now, or untick "Set up the funding scheme now and finish it later" in Member's Settings.
- Other settings: important dates (including the plan review date), Community, Membership plan, cohorts, tickets and Matching requirements.
If you complete the funding section here, you can skip Step 3. If you assign matching requirements here, check them in Step 6.
Step 2: Record consent on a Service Agreement
- View the Member's dashboard and scroll to find the Member's Agreement requests panel.
- Select to Create request to generate a new agreement ticket.
- Review the generated Agreement with the Member.
- Select to Approve the agreement once consent has been provided by all parties.
The separate Terms and conditions panel records acceptance of your current agreement template. It shows Accept new terms once the membership has both a Member and a funder.
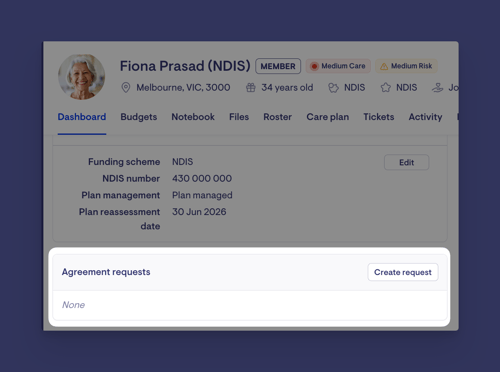
The panel appears once:
- Your organisation has an agreement request ticket template.
- The Membership has a Member.
- The Funder has a funding scheme.
Service Agreement documents the Member's consent to the delivery of support. Create and review the agreement with the Member (and their nominee or representative, where applicable), then approve it once all parties have agreed. A Membership plan must be configured before Agreement requests appear within the Member's dashboard. For NDIS participants, ensure the agreement reflects their plan, funding, and supports, and create a new agreement whenever these change.
New from 1 October 2026: With Member contacts & dashboard enhancements on, the Agreement requests panel on the Member dashboard shows the 5 most recent requests. Click View all to see the full list, which is also in the Member's ⚙ Settings, under Agreement requests.
Top tip: Contacts with the Full access permission can view and sign agreements on the participant's behalf.
Important: Ensure the funding scheme and funder have been configured into the Member's record. If it is not, the Agreements card will not appear in the Member's dashboard.
New to service agreements? This article covers the digital signing add-on. For the underlying service agreement (and the manual, non-digital process), see our Service agreements article. To set up the wording, please see our Agreement templates article.
Step 3: Add the NDIS Funding Scheme
-
From the Member's dashboard, open ⚙ Settings and click on Funding scheme.
-
Select to Link Funder and Search for your NDIS funder profile and select it.
-
Under the Funding scheme, select Add funding scheme and select your configured NDIS scheme.
- Under Further details, complete:
- NDIS Participant Reference Number: optional, up to 20 characters
- How is the participants plan being managed?: choose Agency managed, Plan managed or Self managed (required)
-
Click Save.
New from 1 October: With Member contacts & dashboard enhancements on:
- You may have set the funding scheme already when you created the M embership (Step 1). Check it here.
-
To remove a funder or funding scheme, use the Danger zone at the bottom of the Funding scheme page in the Member's ⚙ Settings.
- The Member dashboard's Funder panel still shows the funder, NDIS participant number and plan management type.
Please note: When creating a Member, you attach a funding source and select NDIS as the scheme. This is what tells Lookout how the Member is funded, how they'll be billed, and how claims are handled, so it must be set from the start.
Ensure you choose one of the three management types: Agency, Plan or Self managed.
This choice affects downstream billing and invoicing behaviour, so it's important to configure it correctly to avoid issues with claiming later.
Important: If a plan is mixed, for example, Self-managed core supports and Plan-managed capacity building, record the arrangement that applies to the supports you deliver.
Step 4: Create the Budget
- From the Member's dashboard, Open the Member's Budgets tab.
- Select the Budget planning tab. If Budgeting & live tracking enhancements isn't on, the tab is called Service planning.
- Select Service planning then + New Budget
- Set the Funding to NDIS - This will populate the correct fields under Income.
- Enter the start and end dates to match the plan period.
- Enter the core supports, capacity building supports and capital supports as mentioned in the NDIS plan.
-
Add income description if applicable for other funding sources outside of NDIS.
Examples include private contributions, other government funding such as Continence Aids Payment Scheme (CAPS) or external insurance payments.
Add a service
-
For each support category, Navigate to Service planning and + Add a Service.
- Enter the support item code, the funded amount, and the expected delivery pattern such as hours, items, or a fixed cost, on chosen days and times.
- Complete the steps and press Save plan.
- Click on Budgets to refresh the page, then Service planning.
- Select the ellipsis (...) next to the Budget created, and click approve.
Before you approve
- Allocation warnings: if Budgeting & live tracking enhancements is on, Lookout checks the plan against the budget's income. Each warning must be fixed or dismissed before you can approve:
- Budget has no planned services
- Budget over allocated: planned services exceed 100% of income
- Budget under allocated: planned services are below 80% of income
- Overlapping budgets: you can't approve a budget whose dates overlap another approved budget that isn't archived. Archive or adjust the other budget first.
After approval
- Choose Share & sign to send the budget for signature, or Share only to share it without asking for a signature.
- To make changes, choose Revert to draft from the action menu. The menu also has Edit, Duplicate, Archive and Delete.
- Use the Current & upcoming, Expired and Archived views to find budgets. The In effect column shows which budget is live. Only approved budgets are compared against spend, and they go live by themselves when the plan period starts.
A budget sets out the funding available and the support intended to be delivered over a defined period, so the system can track spending and make claims correctly. For NDIS participants, it must mirror the participant's NDIS plan, capturing each funded support category (Core, Capacity Building, and Capital) and the supports within them. The system compares planned spending to available funding, so an accurate budget keeps delivery within the participant's plan.
New from 1 October 2026: With Budgeting & live tracking enhancements on, the Budgets screen has new tabs and views for NDIS participants too:
- Budget planning (previously Service planning) is where you create and approve budgets.
- Budget plan vs spend compares the approved budget with what's actually been delivered.
- Budgets are grouped into Current & upcoming, Expired and Archived views. If no budget is live, Lookout says so.
- The allocation warnings listed below appear and must be dealt with before approval.
The separate funding source tracking and the "which funding should this draw from" question are Support at Home only, so they won't appear for NDIS participants.
Important: A Budget left as a draft will not track spend or claim correctly. Approve the Budget once all support categories have been added.
Step 5: Record Goals and Care Planning
- Open the Member's Care Plan tab from the Member's dashboard.
- Add entries to individual care plan categories.
Unfamiliar with Care plans? Visit the Care plans: an overview for detailed guidance on the Care plan and its functionality.
The Care Plan uses custom categories to capture important information about each Member. Because NDIS participants already have their own NDIS plans, these categories can be tailored to capture operational, support, and care information, helping Helpers deliver services safely and consistently.
Care plan considerations
- Align care plan information with the Member's NDIS goals, funded supports, and individual needs so records reflect the supports being delivered.
- Document risks, medications, health conditions, and other relevant clinical information to support safe service delivery and duty-of-care obligations.
- Review and update the care plan whenever the Member's circumstances, support needs, or NDIS plan change, ensuring Helpers are working from current information.
- Consider whether information about a Member's informal, community, and formal support network is more appropriately recorded as Key Contacts, rather than within care plan categories that may be visible to all Helpers supporting the Member.
With the Member contacts & dashboard enhancements switched on:
Record everyone who supports the participant in the Key contacts panel on the Member dashboard.Click New contact to add someone. Each contact can be given any of these roles:
- Registered supporter: helps the participant make and communicate their own decisions, but doesn't decide for them
- Appointed decision maker: holds legal authority, such as guardianship or power of attorney, to make certain decisions for the participant
- Emergency contact: the person your team contacts if something happens. Add as many as you need.
Permissions are set separately:
- Full access: can manage services, view and sign agreements, view and manage visits, and see billing summaries and statements
- Receives statements: receives and can view billing summaries and statements
- Can view visits: can view the participant's schedule and visits
One person must be the primary representative, shown with a Primary tag. Lookout selects this person for any action that needs a single representative.
Contacts added before this change carry over automatically under the new labels.
New from 1 October: Authorised Representatives, Billing recipients and Sharers are now permissions rather than separate roles:
- Authorised Representative is now Full access
- Billing recipient is now Receives statements
- Sharer is now Can view visits
For NDIS participants, a plan nominee usually needs Full access. A correspondence nominee usually needs Can view visits, plus Receives statements if they should also get statements. Registered supporter and Appointed decision maker were added for the Aged Care Act and are optional for NDIS.
Important: Information in the care plan will be visible to all Helpers who are contracted to the Member to provide services - be mindful of the information that is relevant for the Helper to know in order to perform their duties of care.
Step 6: Configure Member Requisites (Matching)
Create the matching requirement from ⚙ Settings
- Navigate to Home Dashboard ⚙ Settings, Under Verifications, Click on Requisites.
- Select + New requisite.
- Enter a title name, such as NDIS Verified Support Worker.
- Select the required verification(s), such as an NDIS Worker Screening Check or NDIS Training.
- Click Save to save the requisite.
The matching requirement can now be assigned to Members.
Add the NDIS specific matching requirement to the Member.
-
View the Member's dashboard and scroll to find the Matching card.
- View Requisites on the card and Click Edit to select your configured NDIS specific requisite (and any other requirements the Member needs).
- Save your changes.
Only Helpers who meet the assigned requirements will be available as eligible matches. Existing arrangements that no longer meet the requirements will also be flagged.
For configuring Member Requisites with Member contacts & dashboard enhancements on:
Use the Matching panel on the Member dashboard to record what the participant needs from a Helper:
- Requisites: qualifications and clearances a Helper must hold. Click Edit to change them.
- Preference criteria
- Helper notes and Schedule notes
When you're ready, click Find helpers to see suitable Helpers.
If the feature isn't turned on, requisites appear in a Matching Requirements card with a Find Helpers button, and notes appear in a separate Matching notes card.
Please note: If no Helpers hold the required verifications, no eligible matches will be returned.
To satisfy the configured matching requirement, Helpers must have the relevant worker verifications recorded and maintained on their profiles →Visit the NDIS: Worker compliance article to apply this to NDIS compliance requirements.
Ongoing management considerations
Keep an eye on plan reassessment timing.
Because the reassessment date is captured, staff should act proactively before it arrives to ensure support continues without a funding gap. The system can also pull an updated reassessment date in from an external data feed.
Handle personal information carefully.
The NDIS participant number and related details are treated as sensitive personal information in the system. It should be entered accurately and handled confidentially.
Maintain an accurate record - changes are tracked.
Edits to the Member's funding details are logged, including a history of what changed. So corrections should be deliberate and accurate, since there's a lasting audit trail.
Be careful when archiving.
A Member can't be archived while they still have active recurring schedules or incomplete surveys, and you can't archive them with a date that falls before their last visit. Loose ends need tidying first.
With Member contacts & dashboard enhancements on:
To archive a participant who has stopped receiving services:
- Open the Member and go to Settings > Administrator > Account.
- Click Archive and complete the details.
Archiving hides the membership from searches and reports. It doesn't cancel schedules or visits automatically, so review them during the archive step. You can reverse it at any time with Unarchive on the same page.
Billing/invoicing reflects the setup.
Invoices and claim exports automatically pull in the NDIS participant number and treat the Member according to their management type - which is exactly why the funding scheme, management type, and participant number all need to be correct up front. Mistakes here surface later as billing or claiming problems.
What happens next?
-
Visits and services delivered to the Member are allocated to the correct budget lines. Refer to
NDIS: Service delivery and claiming for more information.
-
Budget balances are updated as services are delivered, providing visibility of spending against each support category.
-
Reminders are generated before the plan review date, helping ensure the plan remains current.
-
Staffers with access permissions to the Member can view goals, supports, and plan information as required.
-
Reports can be run through the Data export function to analyse NDIS-specific information.
What Staffers, Members and Helpers will see
For Staffers
See the full member dashboard, including Key contacts, Funder, Agreement requests, Matching and visits. What they can change depends on their access role.
For Members on the Lookout app
-
- Can view their own Care Plan and Goals, along with recorded risks, conditions, and other categories, where sharing is enabled.
- Can view their approved Budgets, funding balances, and spending where these have been shared with them.
- Members and their authorised representatives can also manage payment details, respond to surveys, and request visits.
- Members and their contacts see what their permissions allow. Full access lets them manage services, sign agreements, and see visits and statements. Receives statements gives access to statements only. Can view visits gives access to the schedule only.
For Helpers on the Lookout app
- Can open each Member they support and view their Care Plan, including Goals, risks, clinical summary, conditions, medications, allergies, and any custom categories you've set up.
- Can see Member details (address, plus date of birth and contacts only if your organisation enables them) and the wider care team.
- Can view their scheduled visits, the services to deliver, and shared check-out notes or care forms where enabled.
- Cannot see the Member's budget, funding, or plan financials. These are only available to Staffers and, where shared, to the Member and their authorised representatives.
- All care plan information is visible to every Helper contracted to that Member, so only record what a Helper needs to deliver support safely.
Troubleshooting
I cannot see this option
- Check your access role
- Confirm the Member has an active NDIS Membership
- Confirm your NDIS Rates and Membership Plans are set up, as covered in NDIS: Set up and configuration
- Try logging out and back in
I completed the steps, but nothing changed
- Ensure you Click Save on each tab
- Check for validation errors, for example, a missing plan management type or plan review date
- Ensure the Budget has been approved rather than left as a draft
- Contact support if the issue persists
I can't see the Agreement requests panel
Check that your organisation has an agreement request ticket template, the membership has a Member, and the funder has a funding scheme. A Membership plan isn't required.
The New membership screen looks different from this article
If your organisation has turned on Member contacts & dashboard enhancements, New membership opens a single page with Member, Contacts, funding and Other settings sections. See the callout in Step 1.
I can't approve a budget
If Budgeting & live tracking enhancements are on, check for allocation warnings: no planned services, overallocated or underallocated. Fix or dismiss each one first. Also, check that the budget's dates don't overlap with another approved budget.
I can't find Authorised Representatives, Billing recipients or Sharers
With Member contacts & dashboard enhancements on, these are permissions on a contact in the Key contacts panel: Full access, Receives statements and Can view visits.
Still need help?
If you are still experiencing issues, please contact our support team and include:
- Screenshots if possible
- The user's name and email
- The exact steps taken
- Any error messages received