
This guide introduces the ⚙ Settings menu for NDIS providers, in the order we recommend you complete it. That isn't always the order the sections appear on screen. Each section explains its purpose, how it relates to NDIS operations, and whether you need to configure it. By the end, you'll have the core setup in place to begin onboarding participants.
First time navigating NDIS in Lookout? This is the first article in our NDIS series. The series is designed to guide providers through setting up and managing NDIS participants in Lookout, from initial configuration through to service delivery and claiming. View the full series here.
Your organisation turns it on from Release Hub. Until then, these options won't appear in Settings. Once it's on, check your Helper engagement types (step 3) before onboarding Helpers.
Overview
Before you begin managing NDIS participants, it's important to configure the foundations that support NDIS operations in Lookout. This includes setting up your organisation's NDIS provider details, services and support item registrations, pricing and funding settings, and Membership Plans that reflect participant budgets and approved supports.
This guide walks through the key settings areas in the order they appear in Lookout, explaining how NDIS funding, service delivery, budgeting, invoicing, and claiming are configured, and how these settings work together to support compliant participant and service management.
Important: Complete your setup in sequence. Organisation settings underpin your rates and pricing, and Membership Plans rely on your services and rates being configured first.
Before you start
To complete this process, make sure:
- You have Admin access. Most of this setup lives in the ⚙ Settings area and is reserved for Admins.
- You are logged into the web app on a computer, not the Lookout mobile app.
- You have your groundwork ready, including your provider details, staff list, the services you deliver, your NDIS support item codes and pricing, and your worker compliance information.
Essential NDIS configuration
Please complete these configuration steps before onboarding a Member.
Each configuration step flows as follows:
- Your team (accounts and Roles)
- Services in Care (your support catalogue)
- Rates (pricing with support item codes)
- Membership plans in Care (bundle Services and Rates)
- Verifications (Helper compliance checks)
Important: Your Rates rely on your Services being in place, and your Membership Plans rely on both your Services and Rates already being set up.
Non-essential settings for getting started
The following settings are not required for a standard NDIS setup:
- Subscription: - Helpers: View-only information used to review the total number of Helpers and create a new Helper.
- Custom Funding Schemes: Most NDIS providers can leave this setting unchanged, as NDIS is already available by default. Custom funding schemes are used only when creating funding arrangements outside the standard funding models.
- Integrations: Generally not needed for NDIS-only providers. These integrations are primarily designed for aged care workflows.
- Suppliers: Settings for third-party suppliers you broker services through, such as overheads and loadings and supplier worker settings. You only need these if you use purchase orders with external suppliers.
- Technical: Developer-focused settings that are not required for day-to-day platform setup or use.
- Care Settings: Features such as Care Plan Categories, Cohorts, Bulk Should-knows, and Custom Attributes are optional configuration tools that can be introduced as your organisation's requirements evolve.
Focus on completing the core NDIS configuration first. These settings can be reviewed and configured later if your organisation requires additional functionality.
Please note: Your NDIS provider number and ABN are set by Lookout support during onboarding. You can confirm they are in place by generating an NDIS Bulk Payment Export from Reports and checking the Registration Number and ABN columns. Read more in NDIS: Service delivery and claiming.
Navigating to settings
- From your home dashboard, navigate to the overflow menu by clicking the ellipsis (...) next to your name in the bottom left-hand corner.
- The overflow menu will open - click ⚙ Settings.
- You'll see the settings menu, organised into sections. Work through them in order by following the step-by-step instructions.
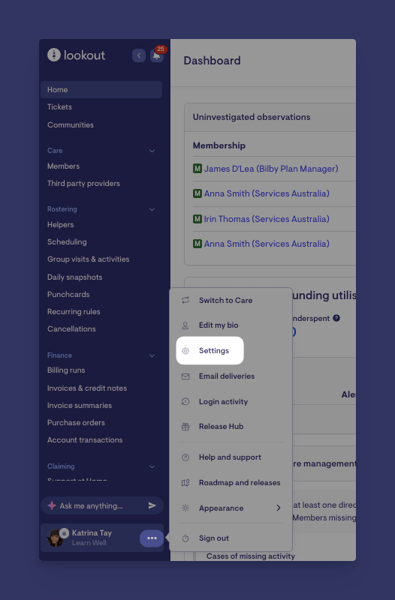
Top tip: If you need help finding your way around Lookout, see our Navigating Lookout article for an overview of the platform's key features and navigation.
Settings overview
The Settings overview is the home page of the ⚙ Settings area. Think of it as your NDIS setup progress board. It doesn't hold any settings of its own; every item on it is a shortcut into the section where the real configuration happens.
What you'll see
The overview groups your key settings into cards, each showing the current state of that area. For example, it shows things like:
- Your admin team: How many Staff members you have and how many Access roles are set up. Staff members shows as configured once you've added more than the default staff member.
- Care: How many Membership plans and Services you have.
- Finance: Your billing run frequency, plus optional settings: automatically generate billing runs, automatically pre-select the first matching rate when rostering visits, and send contract notifications.
- Tickets: Whether your ticket templates for must dos, match requests and referrals are set up. If you have the Verification Renewals add-on, this card also shows whether its renewal ticket templates have someone assigned.
- Rates: How many Visit rates, Provider travel rates and Client transport rates you have.
- Rostering: Your broken shift threshold, plus optional rostering settings.
- Worker options: Optional settings that control what your Helpers can do in the app, such as editing or cancelling visits and skipping check-out notes.
For settings that require configuration, each item displays:
- A status indicator:
- Round tick = Configured
- Round cross = Not configured
- A description showing the current configured value.
For optional settings:
- Blue tick in a square box = Feature is enabled
- Blue cross in a square box = Feature is disabled or not configured
The Settings Overview serves as a visual dashboard, providing a quick snapshot of your current settings, configuration status, and enabled features.
Setting up Lookout for NDIS
Configure the foundational settings your organisation needs before managing Members, services, and claims.
1. Your team
What it is: Your office and admin users, their access levels, and login rules.
NDIS context: Set up the people who will run your NDIS operations.
- Staffers: Add your office and admin people. These appear as Staff members on the Settings overview.
- Access roles: Define what each Role can do, then assign one to each Staffer. This controls who can approve bookings, view participant records, or run claim Reports.
- Login settings: Set your sign-in and security rules.
Please note: Staffers are your office and admin users. Your support workers are set up separately as Helpers.
Visit Using Access roles in Lookout and Role-based access controls (RBAC) in Lookout to consolidate your understanding on Access roles.
2. Care
What it is: Reusable care and service configuration used across your organisation. This is one of the most important setup areas.
- Services: The supports your organisation delivers. Configure these first, as other settings depend on them.
NDIS example: Community Access, Personal Care, Therapy, and Support Coordination. - Custom funding schemes: Create funding types outside the standard funding models. Most NDIS providers will not need this, as NDIS is already available.
NDIS example: A unique funding arrangement not covered by the built-in NDIS scheme. - Membership plans: Reusable participant setup templates that combine funding settings, services, and rates into a standard configuration. Assigning a plan reduces manual setup and helps maintain consistency across participants.
NDIS example: Create Membership Plans that include Core Supports, Capacity Building and Capital supports.
Assigning a plan applies a predefined set of services, rates, and funding settings, ensuring consistent participant setup and reducing manual configuration. - Care plans: Reusable templates for participant goals, strengths, supports, and risks.
NDIS example: A template that includes for recording NDIS goals and participant network. - Matching preferences: Criteria used to match participants with suitable workers based on factors such as skills, language, or personal preferences.
NDIS example: Matching a participant with a female Arabic-speaking worker.
- New from 1 October 2026: Turning on Member contacts & dashboard enhancements also lets you set matching preferences on each Member, using the criteria you set up here. The matching panel also sits higher on the Member dashboard. Set your matching criteria here first so they're ready to use when you onboard participants.
- Referrals: Configure how new clinical referrals are structured to send out referrals for specialised supports as an email template.
NDIS example: Converting a support coordinator referral directly into a participant profile and writing a template to support this.
Please note: The agency-managed, plan-managed, and self-managed management types are not set here. They are recorded for each participant on their Funding tab, as covered in NDIS: Member management.
3. Rostering
What it is: How shifts and Visits are scheduled, and how your Helpers are set up.
NDIS context: Set how your Helpers are scheduled through Helper settings, Breaks and shifts, Helper leave, Helper availability and Public holidays. These settings apply to all Members, whatever their funding scheme.
Helper engagement types: Choose which types of Helper your organisation uses: Employees, Contractors and/or Volunteers. At least one must be selected. Turning off a type hides it when you create Helpers and set up rates. It doesn't change the Helper search filters. It also decides which contractor-only information, such as contract tables, contractor pricing and platform fees, appears on Helper dashboards.
New from 1 October 2026: This setting, and the Volunteer engagement type, appear once your organisation turns on Member contacts & dashboard enhancements in Release Hub.
NDIS tip: If your allied health professionals are set up as contractors, keep Contractors selected so their contract and pricing details stay visible.
Top tip: Set your Public holidays so the correct NDIS holiday pricing applies to Visits delivered on those days.
4. Verifications
What it is: The compliance checks your Helpers must hold, the requirements a Helper must meet before being matched, and the file types you accept.
NDIS context: Set up NDIS-required checks, such as NDIS Worker Screening Check, Working With Children Check, First Aid/CPR, NDIS Worker Orientation Module. Use Requisites to set which checks a Helper must hold. When you record expiry dates, Lookout flags upcoming renewals in the Helper verifications panel on the home dashboard.
Wanting more out of Verifications? Contact Lookout to activate the Verification Renewals add-on and learn how it automates tracking and renewing expiring Helper verifications. Visit our dedicated article on Verification Renewals add-on.
Please note: Setting up Verification types and recording them against Helpers is covered in detail in NDIS: Worker compliance.
5. Templates & configurations
What it is: Reusable documents and building blocks.
NDIS context: Prepare your participant-facing and internal documents.
- Agreement templates for your NDIS service agreement.
- Forms for tracking clinical assessments, custom forms can be configured. Speak to your Lookout representative for this feature.
- Survey templates for tracking Member satisfaction.
- Visit cancellation reasons matched to NDIS short-notice cancellation rules so cancellations are claimed correctly.
Please note: Your Agreement template generates each participant's NDIS service agreement in NDIS: Member management.
Wanting to centralise agreement management in one place? Visit our article Agreement management add-on to learn how to streamline this process and collect signatures and agreements digitally. Contact Lookout to activate the add-on.
6. Rates
What it is: Your pricing, split into Visit rates, provider travel, and client transport.
NDIS context: This is your NDIS pricing, aligned to the NDIS pricing arrangements.
Each Visit rate includes the support item code it applies to, which makes your claim files valid. Add your travel and transport rates here too. Build Rates after your Services and before your Membership Plans.
Visit rates are grouped by funding scheme. Once you create rates for NDIS, they're listed under Visit rates > NDIS. Rates without a funding scheme are listed under Uncategorised. Each Visit rate includes the support item code it applies to, which makes your claim files valid. Add your travel and transport rates here too. Build Rates after your Services and before your Membership Plans.
Important: Make sure your Rates are configured before you create Membership Plans. In the Settings menu, Rates appear after Care, but complete them after Services and before Membership Plans.
7. Finance
What it is: Billing configuration, payment details, and tax treatment.
NDIS context: Use Finance settings to set how Invoices and Billing Runs work, Payment details to enter your payment information, and Taxes to set your tax treatment.
Important: Many NDIS supports are GST-free, so check your Tax treatment carefully.
Please note: Finance settings may include options for Support at Home statements, such as the client contributions summary. These don't affect NDIS participants and can be left as they are if you're NDIS-only.
If your organisation has turned on Fixed statement periods & client contributions summary (released 1 October 2026), Finance settings will show an option to include a client contributions summary on statements. This only applies to Support at Home statements. It doesn't affect NDIS participants, so NDIS-only providers can leave it as it is. The 1 October budgeting and live tracking changes are also Support at Home only.
8. Integrations
What it is: Connections to government portals and third-party applications. There are over 600+ apps ready to connect to Lookout to streamline workflows. To explore more options, contact your Lookout representative.
NDIS context: The only option is the Aged Care Provider Portal, which is for aged care, not NDIS.
Please note: Skip this if you are NDIS-only. NDIS claiming is done by generating an NDIS Bulk Payment Export, covered in NDIS: Service delivery and claiming. To learn how other applications can connect with Lookout, contact your Lookout representative.
9. Technical
What it is: Analytics, API keys, single sign-on, and data feeds. Lookout works with external applications- Contact your Lookout representative to learn how other applications can integrate within Lookout.
NDIS context: There is nothing NDIS-specific to configure here. Review this only if you use single sign-on or connect Lookout to your own systems.
What happens next?
Once your core configuration is complete, your foundations carry through the rest of the platform automatically:
- Every new Member can be attached to an NDIS Membership Plan and inherit the correct Services and Rates, so you don't rebuild pricing for each participant.
- If Automatically pre-select first matching rate when rostering visits is turned on in Finance settings, Visits pick up the first matching Rate based on the day, time and duration rules you set.
- Claim files carry your NDIS provider number and ABN, so your exports are valid for claiming.
- Verifications begin tracking your Helpers' compliance, flagging checks as they approach expiry.
- Your Agreement template is ready to generate each participant's NDIS service agreement during onboarding.
- If Member contacts & dashboard enhancements is turned on, Member contacts are managed in one Key contacts section. Nominees, statement recipients and view-only contacts are set up as permissions on each contact, which is covered in NDIS: Member management.
With your setup in place, move on to NDIS: Member management to onboard your first participant. If you deliver supports and want to run your first claim, see NDIS: Service delivery and claiming.
What Admins and Staffers will see
Once your NDIS configuration is complete, what each person sees depends on their access level, and the Settings overview reflects that finished state.
For Admins
- Can view and manage all Settings, including Services, Rates, Membership Plans, Verifications, Finance, and Rostering.
- Can track setup progress from the Settings overview, with completion status and key values shown on each card.
- Can use incomplete cards as shortcuts to sections that still need configuration.
For Staffers
- Can use configured services, rates, and membership plans, but cannot change Settings without Admin access.
- Can select existing Membership Plans, Services, and Rates when onboarding participants.
- Access is controlled by their assigned role, determining what they can view, approve, and manage.
The Settings overview helps confirm your setup. When the Your admin team, Care and Rates cards all show as configured, your team, Services, Membership Plans and Rates are in place. Verifications don't appear on the overview, so check them separately under Verifications to make sure your NDIS checks have been created. If anything on the overview still shows a round cross, click it to go straight to the section you need to finish.
Top tip: Check the Settings overview before onboarding your first participant. If all essential cards show as done, you're ready to move on to NDIS: Member management.
Troubleshooting
I cannot see a Settings section or option
- Check your access role, as most of this setup is reserved for Admins.
- Confirm the relevant feature is enabled for your organisation.
- Try logging out and back in.
I completed a step but nothing changed
- Ensure you Clicked Save on each screen.
- Check for validation errors highlighted on the form, for example a maximum price set below the minimum, or a missing support item code on a Rate.
- Confirm you followed the correct order, as Membership Plans will not bundle Services and Rates that don't yet exist.
My Membership Plan won't let me add Services or Rates
- Confirm your Services are set up first in the Care section.
- Confirm your Rates exist in the Rates section, each with a valid support item code.
- Build the Membership Plan only after both are in place.
I can't find where to enter my NDIS provider number or ABN
- These are not entered in your Settings area. They are recorded against your organisation by Lookout support during onboarding.
- Confirm they are in place by generating an NDIS Bulk Payment Export from Reports and checking the Registration Number and ABN of Support Provider columns.
- If either is blank, Contact Lookout support to have it recorded.
My Tax treatment looks wrong on NDIS supports
Many NDIS supports are GST-free, so Check the Tax treatment on your Rates and in the Finance section.I can't see a section I expected, such as Custom funding schemes items
- Some sections and items depend on your organisation's setup and enabled features, so what you see may vary.
- For NDIS, remember that funding is already built in, so there is usually nothing to create under Custom funding schemes.
I can't see Helper engagement types, or the Volunteer option
- These appear once your organisation turns on Member contacts & dashboard enhancements in Release Hub.
- Once it's on, check that your Access role has permission to configure Helper engagement types.
- If you still can't see it, contact Lookout support.
Still need help?
If you are still experiencing issues, please contact our support team and include:
- Screenshots if possible
- The user's name and email
- The exact steps taken
- Any error messages received