
This guide takes Admins through the ⚙ Settings menu for Commonwealth Home Support Program (CHSP) providers. Each section explains what the setting does, why it matters for CHSP and whether you need to configure it. By the end, you'll have the core setup in place to start onboarding CHSP Members.
New to CHSP in Lookout? This is the first article in our CHSP series. The series walks providers through setting up and managing CHSP Members in Lookout, from initial configuration through service delivery to DEX reporting. View the full series here.
Overview
Before you manage CHSP Members, you need to set up the foundations that CHSP relies on in Lookout. These are your team and their access, the services you deliver, your CHSP rates, your CHSP outlets and the service types each one is funded for, and Membership plans that bundle services and rates into a standard setup.
CHSP is reported, not claimed. Each Visit becomes a session in your CHSP DEX report, so every Visit needs a valid CHSP service type and outlet. This article follows the order of the Settings menu in Lookout. Because some settings depend on others, complete the essential steps in the sequence shown under Essential CHSP configuration.
Before you start
To complete this process, make sure:
- You have Admin access permissions to Lookout settings & templates.
- You are logged into the web app on a computer, not the Lookout mobile app.
- Your groundwork is ready: your staff list, the services you deliver, your CHSP outlet names and outlet activity IDs, the CHSP service types each outlet is funded for, your pricing and client contribution approach, and your worker compliance requirements.
Top Tip: Your outlet activity IDs and funded service types are listed in your CHSP funding agreement and in the Data Exchange (DEX) portal. Having these to hand before you start will save time.
Essential CHSP configuration
Please complete these configuration steps before onboarding a Member.
Each configuration step flows as follows:
- Your team (Staffers and Access roles).
- Services in Care (Support catalogue).
- Rates (Pricing, each linked to a CHSP service type).
- CHSP outlets and services in Templates & configurations (Funded outlets and service types).
- Membership plans in Care (Bundling Services and Rates).
- Verifications (Helper compliance checks).
Important: Your Rates rely on your Services being in place, and your Membership Plans rely on both your Services and Rates already being set up.
Non-essential settings for getting started
The following settings are not required for a standard CHSP setup:
- Subscription: Shows your subscription details and total number of Helpers, and lets you add a new Helper. It's for information only.
- Integrations: You don't need these for CHSP. The Aged Care Provider Portal connection is for Support at Home claiming, not CHSP reporting. Lookout is flexible with hundreds of other applications - Contact your Lookout representative to go through other application integrations that work with Lookout.
- Custom funding schemes: CHSP is already built into Lookout, so most CHSP providers can leave this alone. It's only for funding arrangements outside the standard models.
- Other Care settings: Care plan categories, Cohorts, Bulk should-knows and Custom attributes are optional. You can add them later as your needs change.
- Suppliers: Only needed if you deliver CHSP services through external suppliers.
- Technical: Settings for developers that aren't needed for day-to-day setup or use.
Top tip: Finish the core CHSP configuration first. You can return to these settings if your organisation needs additional functionality later.
Navigating to settings
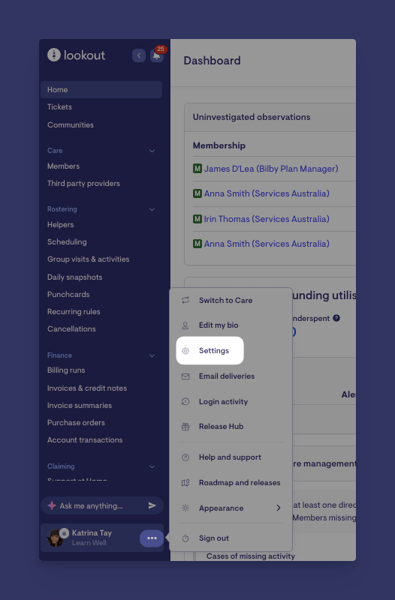
- From your home dashboard, navigate to the overflow menu by clicking the ellipsis (...) next to your name in the bottom left-hand corner.
- The overflow menu will open - click ⚙ Settings.
- You'll see the settings menu, organised into sections. Work through them in order by following the step-by-step instructions.
Top tip: If you need help finding your way around Lookout, see our Navigating Lookout article for an overview of the platform's key features and navigation.
Settings overview
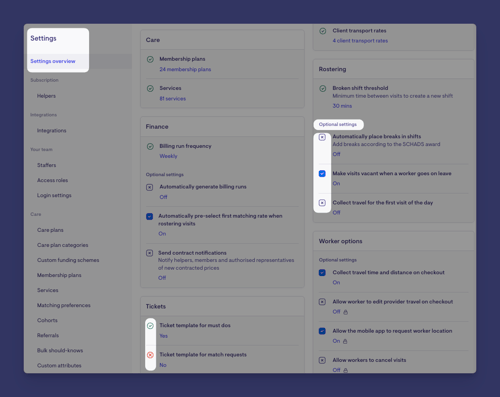
The Settings overview is the home page of the ⚙ Settings area. You can think of it as your setup progress board. It has no settings of its own; every item is a shortcut to the section where you configure it.
What you'll see
The overview groups your key settings into cards, and each card shows the current state of that area. For example:
- How many Staffers you have and whether Roles/permissions are set up.
- Whether your Membership plans and Services exist.
- How many Rates you have (Visit rates, Provider travel rates and Client transport rates).
- Your Finance settings, such as billing frequency.
- Your Rostering and Helper settings.
For settings that require configuration, each item displays:
- Round tick = Configured.
- Round cross = Not configured.
- A description showing the current configured value.
For optional settings:
- Blue tick in a square box = Feature is enabled.
- Blue cross in a square box = Feature is disabled or not configured.
The Settings Overview serves as a visual dashboard, providing a quick snapshot of your current settings, configuration status, and enabled features.
Setting up Lookout for CHSP
Configure the foundational settings your organisation needs before managing Members, services, and claims.
1. Your team
What it is: Your office and admin users, what they can access, and how they log in.
CHSP context: Set up the staff who will run your CHSP operations and control who can manage outlets, rates and DEX reporting.
- Staffers: Add your office and admin users.
- Access roles: Decide what each role can do, then give each Staffer a role. To let someone other than an Admin manage outlets, include the Configure CHSP outlets and services permission in their role.
- Login settings: Set your sign-in and security rules.
Please note: Staffers are your office and admin users. Your support workers are set up separately as Helpers.
Visit Using Access roles in Lookout and Role-based access controls (RBAC) in Lookout to consolidate your understanding on Access roles.
2. Care
What it is: Care and service settings that your whole organisation reuses.
- Services: The support your organisation delivers. Set these up first, because other settings depend on them. CHSP example: Create services such as Domestic Assistance, Social Support (Individual), Transport, Personal Care, or Meal Preparation.
- Care plans: Reusable templates for Member goals, strengths, supports and risks.
CHSP example: A wellness and reablement template that records the Member's goals and the supports agreed with them. - Custom funding schemes: For funding types outside the standard models. Most CHSP providers won't need this, because CHSP is already available as a funding scheme type.
- Membership plans: Reusable templates that bring together funding settings, services and rates. Set these up after your Services and Rates. There can be multiple CHSP Membership plans to suit your business requirements to customise contribution rates- For example, CHSP - Co-Contribution, CHSP-Full payment, CHSP - Full pensior or fee-waiver.
- Matching preferences: Criteria for matching Members with suitable Helpers, such as skills, language or personal preferences.
CHSP example: Matching a Member with an Italian-speaking Helper. -
Referrals: Configure how referral records are structured and managed when new clients are referred to your organisation for services.
CHSP example: Referring a client to an Occupational Therapist for a Functional Capacity Assessment using a standard referral template and tracking the referral outcome within the client record.
Please note: Each Member's CHSP details are not set in the Membership record. You record them on the Member's Funding tab: Client ID, My Aged Care number, DEX SLK and demographic details. You can also limit which outlets and CHSP services a Member can receive in their Membership settings. Both are covered in CHSP: Member Management.
3. Rostering
What it is: How shifts and Visits are scheduled.
CHSP context:
-
Use Helper settings, Breaks and shifts, Helper leave, Helper availability and Public holidays to control how your Helpers are scheduled. These settings apply to all Members, irrespective of their funding scheme.
- Ensure the correct CHSP Product with the accompanying CHSP service ID is selected.
- CHSP outlet is selected where the Visit took place.
-
Complete the additional reporting fields configured within Visits, such as whether the service was delivered by a Contractor or Volunteer, as yes or no questions, to ensure accurate DEX reporting. By selecting no on both, the Visit will report that an employed Helper has delivered the service.
4. Suppliers
What it is: Settings for services delivered by external suppliers, such as Worker settings, Overheads and loading.
CHSP context: You only need this section if you deliver CHSP services through suppliers. If it doesn't appear in your menu, or you'd like to start using suppliers, contact your Lookout representative.
5. Verifications
What it is: The compliance checks your Helpers must hold, and the file types you accept.
CHSP context: Set up the checks your aged care workforce needs, such as a National Police Check, HLTHPS006 Assist clients with medication, HLTAID011 Provide First Aid/CPR, vaccinations and a driver's licence for transport services. If you record expiry dates, Lookout tracks upcoming renewals and flags them on the main home dashboard.
Wanting more? Contact Lookout to activate the Verification Renewals add-on and learn how it automates tracking and renewing expiring Helper verifications. Visit our dedicated article on to learn more: Verification Renewals add-on.
Please note: Setting up Verification types and recording them against Helpers is covered in detail in CHSP: Worker Compliance.
6. Rates
What it is: Your pricing, split into Visit rates and Client transport rates.
CHSP context: Every CHSP Visit rate must be linked to a CHSP service type. Lookout uses this link to report each Visit under the correct service in your DEX report.
Configuration considerations:
- A CHSP option appears under Visit rates in the settings menu after you create your first CHSP rate. It shows only your CHSP rates.
- Under External identifiers, choose the matching CHSP service type from the External ID field. This field is required for CHSP rates.
- Add your pricing, the days the rate applies to and your tax treatment, then click Save.
Top tip: Some CHSP service types are reported by time, by quantity, by total cost or per Visit.
Make sure each rate's pricing unit suits how its service type is reported, for example, per hour for Domestic Assistance.
Important: If a rate isn't linked to a CHSP service type, you can't use it on a CHSP Member's Visits or Purchase orders.
Lookout will display a message stating that the rate must be configured for CHSP.
→ Visit our article on Rates & Products for detailed guidance
7. Finance
What it is: Billing settings, payment details and tax treatment.
CHSP context: Use Finance settings to set how Invoices and Billing runs work for client contributions, enter your Payment details, and set up your Taxes.
Important: Most CHSP services are GST-free, so check your tax treatment carefully on both your Rates and your Membership plans.
8. Templates & configurations
What it is: Reusable documents and building blocks, including your CHSP outlets.
CHSP context: This section holds CHSP outlets and services, which are essential for CHSP.
Want to see more examples? Visit our article on Getting started with CHSP offers an in-depth look at CHSP outlets and services.
CHSP outlets and services
An outlet is a government-registered location or service region from which you deliver CHSP services. Every CHSP Visit is recorded against an outlet, and your DEX report uses the outlet's activity ID to group each Member's sessions.
- Under Templates & configurations, Click CHSP outlets and services, then click + New outlet.
- Enter the Outlet name.
- Enter the Outlet activity ID. This is the outlet activity ID the government assigned to you; it must contain only numbers.
- Under Services, click Add CHSP service and choose a Service type. Service types are shown as the service name, programme activity and ID.
- Repeat steps above for every CHSP service type this outlet is funded to deliver.
- Click Save.
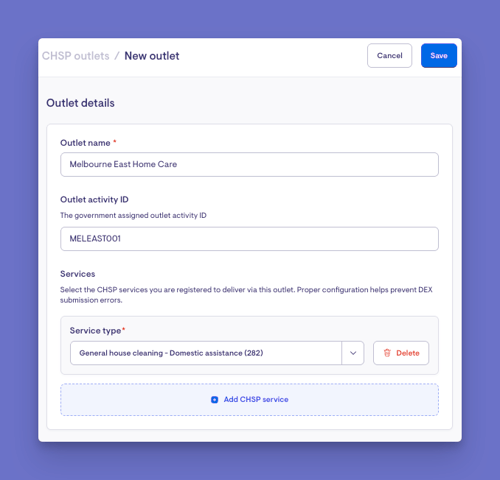
Important: Only add the service types each outlet is registered to deliver. Lookout uses this list to stop Visits being recorded against an outlet that isn't funded for that service, which helps prevent DEX submission errors.
Please note: If an outlet has no service types added, it can be selected for any CHSP service. To retire an outlet without losing past records, archive it rather than editing its details.
Other templates
- Agreement templates for your CHSP service agreement.
- Forms for clinical assessments. Contact your Lookout representative about custom forms.
- Survey templates to track Member data customised to your liking.
- Visit cancellation reasons that match your CHSP cancellation policy, so cancelled Visits are recorded the same way each time.
Please note: Your Agreement template creates each Member's CHSP service agreement, covered in CHSP: Member Management.
Wanting to centralise agreement management in one place? Visit our article Agreement management add-on to learn how to streamline this process and collect signatures and agreements digitally. Contact Lookout to activate the add-on.
9. Technical
What it is: Webhooks, API keys, single sign-on and SCIM.Lookout's open API lets your systems exchange data with Lookout for clients, rostering, invoices, purchase orders, rates and reporting, so it fits into the tools you already use (finance, payroll, CRM and more) without double entry.
CHSP context: There's nothing CHSP-specific to set up here. Only review this section if you use single sign-on or connect Lookout to your own systems.
What happens next?
Once your core configuration is done, it carries through the rest of Lookout automatically:
- You can put each new Member on a CHSP Membership plan, and they'll get the correct Services and Rates without you rebuilding pricing each time.
- Visits carry a CHSP service type from their rate, and Lookout only offers outlets that are registered to deliver that service.
- Depending on the service type, Lookout asks for any extra details DEX needs when you roster or complete a Visit.
- Your CHSP DEX report brings together Members, outlets and sessions, ready to upload to the DEX portal.
- Verifications start tracking your Helpers' compliance and flag checks that are close to expiring.
- Your Agreement template is ready to create each Member's CHSP service agreement during onboarding.
Set up and configuration completed? Move on to CHSP: Member Management to onboard your first Member.
What Admins and Staffers will see
Once your CHSP configuration is complete, what each person sees depends on their access level and permissions.
For Admins
- Can view and manage all Settings, including Services, Membership plans, Verifications, Rates, Finance, CHSP outlets and services, and Rostering.
- Can track setup progress from the Settings overview, with each card showing its completion status and key values.
- Can use incomplete cards as shortcuts to the sections that still need work.
For Staffers
- Can use the Services, Rates, outlets and Membership plans you've set up, but can't change Settings unless their Access role allows it.
- Can choose existing Membership plans and templates, Services, Rates and outlets when onboarding Members and rostering Visits.
- Can only view, approve and manage what their Access role allows.
Troubleshooting
I can't see a settings section or option
- Check your Access role, because most of this setup needs Admin access.
- For CHSP outlets and services, check that your role includes the Configure CHSP outlets and services permission.
- Try logging out and back in.
- If the section still isn't showing, contact your Lookout representative to confirm the feature is turned on for your organisation.
I can't find the CHSP option under Visit rates
This option only appears after at least one rate has its Funding scheme type set to CHSP. Create or edit a rate, set it to CHSP, then refresh the page.
My outlet won't save
- Check that the Outlet activity ID contains numbers only.
- Check that the Outlet name isn't already used by another outlet, including archived ones.
- Check that you haven't added the same Service type to the outlet more than once.
I see "is not set up for CHSP" when choosing a rate
The rate isn't linked to a CHSP service type. Go to Rates, open the rate, set Funding scheme type to CHSP and choose a CHSP service type in External ID.
I see "This outlet isn't set up to deliver the selected service"
The outlet you chose isn't registered for the rate's service type. Either choose a different outlet, or go to CHSP outlets and services, open the outlet and add the service type under Services.
My Membership plan won't let me add Services or Rates
- Check that your Services are set up in the Care section.
- Check that your Rates exist in the Rates section, each linked to a CHSP service type.
- Build the Membership plan only after both are in place.
My tax treatment looks wrong on CHSP services
Most CHSP services are GST-free. Check the tax treatment on your Rates, your Membership plans and in the Finance section.
Still need help?
If you're still having issues, contact our support team and include:
- Screenshots, if possible
- The user's name and email
- The exact steps you took
- Any error messages you received