
This guide explains the building blocks behind Tickets in Lookout - categories, tags, templates, add-ons, and community roles. It covers what each one is, why it matters, and how to set it up, so your team's workflows stay structured, consistent, and easy to manage.
Before you start
To set up categories, tags, and templates, make sure:
- You have the Configure Tickets settings permission. This single permission covers creating and editing ticket categories, tags, and templates (including add-ons and checklists). Staff without it won't see these settings.
- If you're unsure whether you have this permission, contact whoever manages roles and access in your organisation, so they can confirm or grant it.
Top tip: These are set up in Settings, under the templates and configuration area.
Why Tickets Matter
Think of tickets as the way you bring your organisation's policies and procedures to life. They act as a vessel that captures your workflows — making them accessible, actionable, and consistent across your whole team.
When tickets are set up well, they deliver real benefits:
- Everyone stays informed: All updates and decisions are recorded in one place.
- Clear responsibility: It's easy to see what needs to be done and who's accountable.
- Better continuity of care: Accurate records help teams provide consistent, well-informed support, and make handovers smooth.
- Consistency and reduced risk: Templates guide staff through each step so nothing is missed and tasks are done the right way every time.
- Easier reporting: Categories and tags make it simple to filter, prioritise, and report on key activities.
The building blocks in this article - categories, tags, templates, and add-ons - are what make all of this possible. Setting them up thoughtfully is what turns tickets from a simple to-do list into a powerful, reliable system for running your organisation.
Unsure about some keywords or terminology used? Please review our Ticket: Glossary of Terms article.
Understanding the building blocks
Before you start creating and using tickets, it helps to understand the elements that bring structure and consistency to your workflows. Each one plays a different role.
Ticket Categories
What they are: Categories group tickets by broad themes or types of work — for example, intake, clinical, or rostering.
Why they matter: Categories are the backbone of how your tickets are organised. They make it easy to search, filter, and report on the different kinds of work happening across your team, and they determine how your templates are grouped when staff go to create a ticket. Well-chosen categories mean everyone can quickly find the right ticket for the job — and you can see at a glance how much work sits in each area.
Ticket Tags
What they are: Tags are flexible, colour-coded labels you apply to a ticket to highlight a key theme, such as "enquiry," "in progress," or "urgent."
Why they matter: Where categories provide broad structure, tags add a lighter, more flexible layer on top. They help you surface patterns and support more targeted filtering and reporting. For example, quickly pulling up every urgent ticket, or everything still in progress. Because they appear as colourful banners on each ticket, they also give staff an instant visual cue about what they're looking at.
Ticket Templates
What they are: Templates are reusable starting points that provide step-by-step guidance for completing a common task, outlining what needs to be done and in what order.
Why they matter: Templates are where your policies and procedures become real, everyday actions. Instead of relying on staff to remember every step of a process, a template lays it all out - with a preset title, assignees, tags, and a checklist. This helps your team work consistently, reduces the risk of missed steps, and makes it clear what's expected. For regular tasks like onboarding a new member or handling a purchase order, templates save time and protect quality.
The Checklist (To-dos)
What it is: The checklist is the list of steps built into a template that staff work through to complete a ticket. Each step can carry its own notes, and the steps appear in a set order.
Why it matters: The checklist is the heart of a template's guidance. It ensures every step of a workflow is followed and nothing is overlooked, which is especially important for compliance and continuity of care. As staff tick items off, a progress bar shows how far along the ticket is, so anyone looking at it can instantly see what's done and what's left. This shared visibility keeps the whole team aligned.
Add-ons
What they are: Add-ons give a ticket extra, built-in functionality with prebuilt logic to support more complex tasks. Each connects the ticket to another part of the system.
Why they matter: Add-ons extend what a ticket can do beyond a simple checklist. For example, an add-on can surface all the vacant visits for a client directly inside the ticket, so staff can act on them without leaving the workflow. They're designed to support common but more involved tasks, keeping everything in one place.
Make the most of Tickets
To get the greatest value from your building blocks:
- Keep categories broad and meaningful. A small set of clear categories is easier to navigate and report on than dozens of narrow ones.
- Use tags consistently. Agree as a team on a shared set of tags (like "urgent" or "in progress") so filtering and reporting stay reliable.
- Turn your key processes into templates. Ask yourself: how many of our current workflows could be documented as ticket templates? The more of your procedures you capture, the more consistent your team becomes.
- Write clear checklist steps. Add notes to each step where helpful, so even a new staff member can follow the process confidently.
- Review and tidy up regularly. Archive categories, tags, and templates you no longer use to keep everything clean and relevant.
- Match roles to the right work. Set the correct assigned role on each template so tickets automatically reach the right people (see Community Roles below).
Create a category
-
From your home dashboard, navigate to the overflow menu by clicking the ellipsis (...) next to your name in the bottom left-hand corner.
-
The overflow menu will open - click Settings.
-
In the main settings, navigate to the Templates & configurations section, then click Ticket categories.
-
You'll see all active categories and a tab for any archived ones.
-
Click +New Category button in the top-right corner.
-
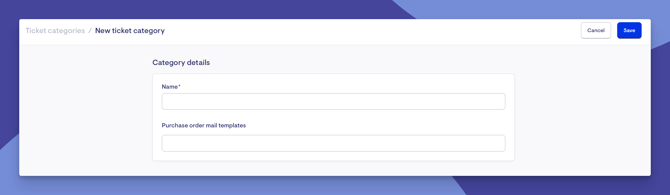
Enter a name for the category and, if prompted, link to a purchase order email template.
- When ready, click the blue Save button.
Top tip: Categories you no longer use can be archived rather than deleted.
Create a tag
-
From your home dashboard, navigate to the overflow menu by clicking the ellipsis (...) next to your name in the bottom left-hand corner.
-
The overflow menu will open - click Settings.
-
In the main settings, navigate to the Templates & configurations section, then click Ticket tags.
-
You'll see all active tags and a tab for any archived ones.
-
Click the +New ticket tag button in the top-right corner.
-
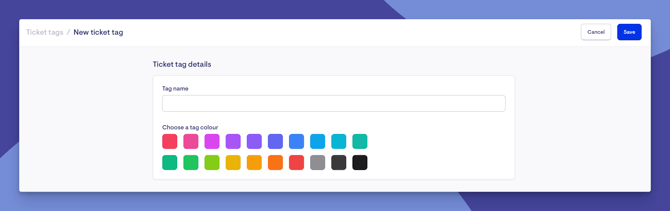
Enter a name and choose a tag colour.
-
When ready, click the blue Save button.
Create a template
-
From your home dashboard, navigate to the overflow menu by clicking the ellipsis (...) next to your name in the bottom left-hand corner.
-
The overflow menu will open - click Settings.
-
In the main settings, navigate to the Templates & configurations section, then click Ticket templates.
-
You'll see all active tags and a tab for any archived ones.
-
Click the +New ticket template button in the top-right corner.
-
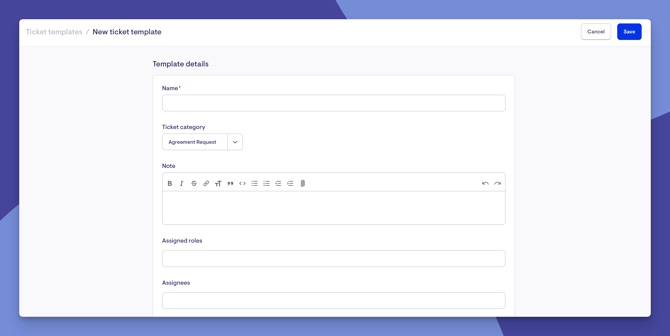
Enter a name (for example, "New Member Sign-up Checklist").
-
Choose the category it belongs to.
-
In the notes section, add any details about the process - you can include links and attachments.
-
Set the assigned roles (for example, care management). You can also add individual assignees.
-
Add any tags.
-
Optionally choose an add-on (see below).
-
When ready, click the blue Save button.
Edit a ticket template
- Once your template is saved, you'll return to the active ticket templates list.
- Click your new ticket template name to open.
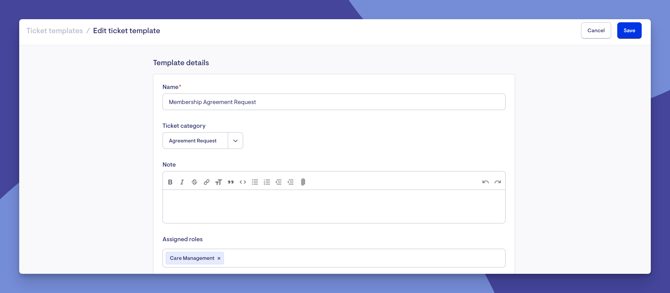
- To edit your template, click the Edit template button in the top-right corner.
- Make any changes, then click the blue Save button to apply them.
Build the checklist (todos)
- Once your template is saved, you'll return to the active ticket templates list.
- Click your new ticket template name to open.
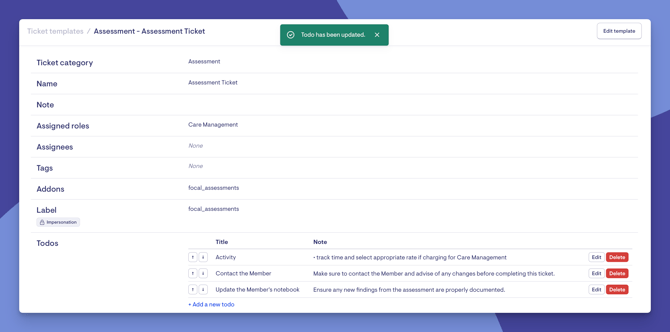
- Here, you can edit the template or add todos.
- Click + Add a new todo to continue.
- A new screen will load. Add each step staff should follow (for example, "Call the member," "Send membership agreement," "Complete the care plan").
- Add notes to any step if needed.
- Use the arrows to reorder steps.
- Edit or delete steps at any time by clicking their dedicated Edit or red Delete buttons.
- Once you save a todo, a green banner will appear confirming your actions.
Add an add-on (optional)
- When creating or editing a template, open the add-ons section.
- Select the add-on that suits the task (for example, Opportunities for a vacant visit request).
- Save the template.
When a ticket is created from that template, the add-on appears as its own panel inside the ticket, giving extra functionality. For example, showing vacant visits for the client so you can invite or broadcast them directly.
What happens next?
Now, when looking at your ticket template, you should see:
- The template is listed under its category
- The assigned role and any individual assignees
- The tags you added
- The full checklist in order
Once your building blocks are set up:
- Categories appear as groupings when staff create a new ticket, and as filters in the inbox.
- Tags become available to add to tickets and to filter by.
- Templates appear under their category when creating a ticket, pre-filling the title, assignees, tags, checklist, and any add-on.
- When a ticket is created from a template, it's automatically assigned to the right staff based on community roles (see below).
Now that you understand the building blocks, discover how they come together in everyday use in our Tickets: Day-to-day use article.
What different users / Staff will see
For staff with the Configure Tickets permission
- Can create, edit, and archive categories, tags, and templates in Settings.
For staff without that permission
- Won't see the ticket configuration settings, but will still use the categories, tags, and templates when creating and working on tickets.
For Members and Helpers
- Have no visibility of any of these building blocks - they are entirely internal.
Community roles: How tickets reach the right people
Community roles decide what a staff member does within a community - such as care management, workforce, or clinical - and act as routing labels.
- Each staff member added to a community is given one role, but can hold other roles in more than one community.
- When a ticket is created, the system looks at the community the Member or Helper belongs to and the role attached to the template, then automatically assigns the ticket to the matching staff.
Example: A template set to the workforce role, used for a Member in the North Zone community, is automatically assigned to all staff holding the workforce role in North Zone.
Staff are added to a community and given a role, along with an access level, in the community settings. To learn more about communities and their importance, please read our dedicated article - Communities: an overview.
Troubleshooting
I can't see the ticket configuration settings
- Check you have the Configure Tickets permission. Without it, categories, tags, and templates won't appear in Settings.
- Try logging out and back in.
My new template isn't assigning to the right people
- Confirm the template has an assigned role set (or specific individual assignees).
- Check that the staff you expect hold that role in the relevant community.
- Remember assignment is based on the Member's or Helper's community plus the template's role— if either is missing, no one is auto-assigned.
I can't archive a template
- Some system templates tied to specific functions can't be archived. If you're blocked, the template is likely reserved for a built-in process.
I created a category/tag but it won't save
- Names must be unique - check one with the same name doesn't already exist (including an archived one).
I added an add-on but don't see its panel
- The add-on panel only appears on tickets created from that template. Existing tickets made before the add-on was added won't show it.
Still Need Help?
If you're still experiencing issues, please contact our Support Team and include:
- Screenshots (if possible)
- The user's name/email
- The exact steps taken
- Any error messages received