
This guide explains how to use Tickets day-to-day in Lookout. Creating them, working through checklists, collaborating in the discussion, tracking time, snoozing, and completing them, along with what you need before starting and what to do if something isn't working.
New to tickets? Please read our Tickets: Building blocks (categories, tags & templates) article first before continuing.
Before you start
To use Tickets, make sure:
- You have access to the community the Member or Helper belongs to. Tickets relating to a Member are only visible to staff with a role in that Member's community (unless you have full access across all communities).
- You have a role that covers the ticket's category. Access to certain tickets is tied to the category they sit in.
- To edit or make changes to a ticket (not just view it), you need full access in the relevant community. Staff with restricted access can view but not change tickets.
Remember: A ticket can only be opened against a Member or a Helper - you can't create one without selecting a person.
Why Tickets matter
Tickets improve collaboration, accountability, and transparency across your team. They provide a clear record of actions, decisions, and communications - making it easy to track progress and demonstrate compliance. And because team members can be mentioned, comment, upload evidence, and share updates in real time, everyone stays informed.
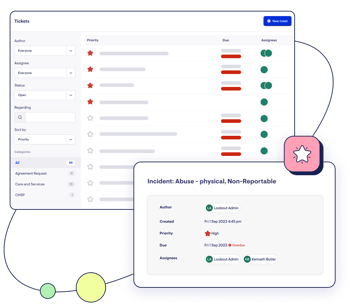
Navigating Tickets
- From the main navigation menu, select Tickets.
This opens your Tickets Inbox - a single view of all your tasks and priorities.
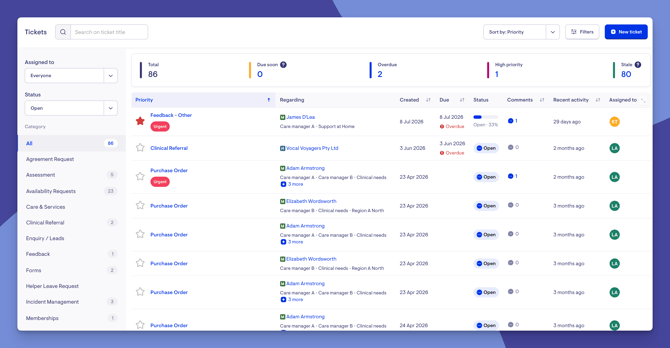
The ticket inbox
The ticket inbox is your central hub and has multiple features to help you streamline your workflows and stay productive.
- Search bar - search for any ticket by its title.
- Assigned to - switch between tickets assigned just to you and everyone's tickets.
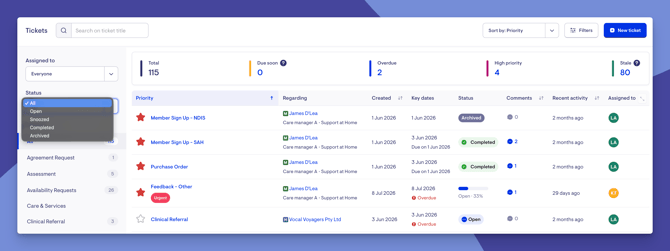
- Status - filter by Open, Snoozed, Completed, or Archived. The status of each ticket is clearly shown in the inbox, with visuals that make them easy to spot at a glance.
-
Category - view all categories or focus on one; the number beside each shows how many tickets it contains.
- Totals - at a glance you'll see all tickets, plus quick counts for:
- Due Soon - due within the next seven days
- Overdue - past their due date
- High Priority - the starred tickets
- Stale - no activity for two or more weeks
- Sort - order tickets by newest, oldest, due date, priority, or recent activity.
- Filters - narrow down by who created the ticket, who it's regarding (a Member or Helper), tags, or communities. Select Apply when done.
Each ticket in the list shows its priority star, title, tags, who it's regarding and their communities, when it was created, any due date (marked overdue if the date has passed), its status and progress, comments, recent activity, and who it's assigned to. Hovering over the assignees shows the full list.
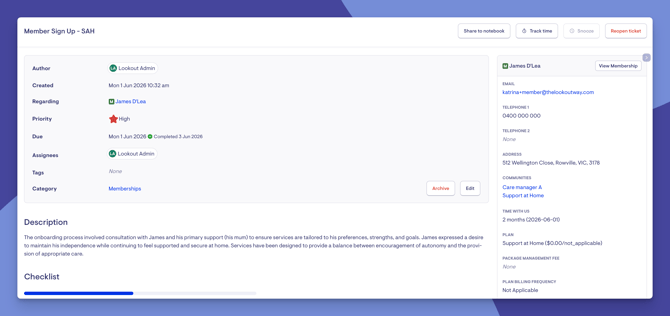
Opening a ticket
Select the ticket title to open it. Inside, you'll see:
-
Header details - who opened it and when, its priority, due date, assignees, and the tag and category it belongs to. Select Edit to change these, then Save.
-
Description - the details of the task.
-
Checklist - your to-do items. Ticking items updates the completion percentage so you can see what's left.
-
Ticket Discussion - where your team collaborates and documents progress.
-
Regarding panel - shows who the ticket is about; select View Membership to jump to that person's dashboard. You can collapse this panel with the arrow for more screen space.
Step-by-step instructions
Create a new ticket
-
From the inbox, click New Ticket.
-
Pick the category - what the ticket is for.
-
Choose a Member or Helper. Start typing to search, select the right person, then click Save.
-
The template fills in the title and assignees automatically. You can add to the title, change or add assignees, switch on high priority, and set a due date. For more information on ticket templates, please read our Tickets - Building blocks article.
-
Add a description and any tags.
-
Click Save.
- A green banner should display to confirm that your new ticket was created successfully.
- You'll also see all the header details you entered and any tags shown as coloured banners.
Work through the ticket
- Tick off each item on the checklist as you complete it - the progress bar updates to show what's left.
- Use the Ticket Discussion to collaborate:
- Add comments and progress notes, then click Add to Ticket.
- Paste screenshots, photos, emails and attachments as evidence.
- Add links by highlighting text and selecting the link icon.
- Attach files using the paperclip icon.
- Mention a colleague with the @ symbol to notify them and give them access.
Please note: You can edit or delete your own comments, but not anyone else's. Edited comments are marked as recently edited.
Ticket Actions
At the top of the ticket, you can:
-
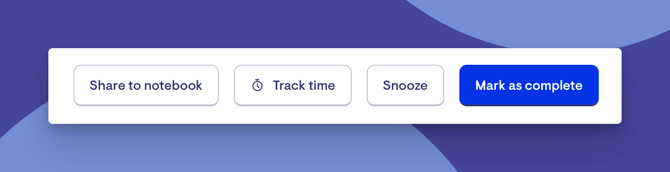
Share to Notebook - save the ticket as a note in the Member's or Helper's notebook. Choose its category, tags, whether to pin it, and set visibility to Internal (staff only) or Shared (visible to the Member, loved ones, and current Helpers). Select View Note to see it.
-
Track Time - record time spent for care management minutes. Enter the date, time, and a description, then track it. You can add more time or edit tracked time later.
-
Snooze - set the ticket aside until a chosen date. Pick the date and click Save; you'll be notified before it wakes up. Unsnooze at any time.
Complete a ticket
Once the checklist is done and everything's documented, mark the ticket complete and confirm. Best practice is to leave a comment explaining why it's being closed so others understand the actions taken. You can still add to the discussion after completing.
After completing a ticket:
- Its status changes to Completed, showing who completed it and when.
- Any snooze on the ticket is cleared.
- You can still add to the discussion after completing.
- Notifications are sent to relevant staff about the status change.
Reopen a ticket
A completed ticket can be reopened at any time; the discussion records that it was reopened.
- From your Ticket Inbox, set the Status filter to Completed.
- Find the ticket you want to reopen. Use the search bar to look it up by title if needed.
- Click the ticket name.
- At the top of the ticket, click the Reopen Ticket button.
- Confirm your action when prompted.
You should now see:
- The ticket's status change back to Open (active).
- A note in the Ticket Discussion showing that it was reopened.
- The checklist and details available to work on again.
Top tip: Add a comment explaining why you reopened it, so the rest of the team understands what still needs doing.
Archive a ticket
If a ticket is no longer needed, archive it. Archived tickets aren't permanently deleted and can be restored at any time.
- From your Ticket Inbox, find the ticket. Use the search bar to look it up by title if needed.
- Click the title to open it.
- At the top of the ticket, click Delete button (this archives it).
- Confirm your action when prompted.
Please note: "Delete" here means archive - the ticket is safely stored, not permanently removed.
You should now see:
- The ticket is removed from your active lists.
- The ticket now appears when you set the Status filter to Archived.
Restoring an archived ticket
If you need a ticket back:
- In your Ticket Inbox, set the Status filter to Archived.
- Open the ticket you want to restore.
- Click the Undelete button and confirm your action.
- The ticket is now restored and active again.
What different users / Staff will see
For staff with full access in the community:
- Can view, create, edit, complete, reopen, and archive tickets for that community.
- Can be assigned, mentioned, and collaborate in the discussion.
- Can view tickets in their community but cannot make changes to them.
- Cannot see the ticket or its discussion. Tickets are an internal, staff-only tool.
- The only exception is a notebook note that has been deliberately set to Shared - this appears in the Member's record and app.
For staff with restricted access
- Can view tickets in their community, but cannot make changes to them.
For Members and Helpers
- Cannot see the ticket or its discussion. Tickets are an internal, staff-only tool.
- The only exception is a notebook note that has been deliberately set to Shared - this appears in the Member's record and app.
Notifications
Tickets keep you informed automatically. You'll be alerted when:
- A ticket is assigned to you
- You're mentioned in a discussion
- A comment is added
- A ticket's status changes or it's updated
- A snoozed ticket wakes up
You can choose to receive these in the app, by email, or both. For more information on notifications and how to manage their settings, please read our dedicated article.
Troubleshooting
I can't see a ticket I expect to see
-
Check you have a role in the community the Member or Helper belongs to.
-
Confirm your role covers the ticket's category.
-
Make sure your status filter isn't hiding it (for example, it may be Snoozed or Completed).
-
Try logging out and back in.
I can view a ticket but can't edit it
Editing requires full access in that community. If you have restricted access, you'll be able to view but not change it. Ask an administrator to review your access level.
I can't create a ticket
A ticket must be opened against a Member or Helper - make sure you've selected a person. Confirm you have access to that person's community.
I can't edit or delete a comment
You can only edit or delete your own comments, not those written by others.
I completed the steps but nothing changed
- Ensure you clicked Save (or Mark as Complete / Add to Ticket).
- Check for any validation errors on the form.
- Contact support if the issue persists.
I archived a ticket by mistake
Nothing is lost. Set the Status filter to Archived, open the ticket, and click Undelete to restore it.