
This guide explains what Helper verifications are, why they matter for compliance and matching, and how to add, renew, and monitor them - including how verifications connect to a Member's matching requirements.
Want the full profile picture? The Files tab is one part of the wider Helper profile. For dedicated articles on the Member dashboard and each of the other tabs within a Helper's profile, please explore the Helpers section within our Help Centre.
The Verifications tab
Helper verifications are the qualifications, certifications, and compliance documents that confirm a Helper is eligible and suitable to provide care - for example, a police check, first aid certificate, or relevant qualification.
They play an important role in keeping your organisation compliant and ensuring the right Helper is matched with the right Member. Verifications are checked against a Member's matching requirements (also called requisites) - so if a Helper is missing something a Member requires, Lookout can flag it during matching and rostering.
Keeping verifications current is central to safe, compliant care. Well-managed verifications help your team:
-
Confirm eligibility - a clear record that each Helper holds the credentials they need.
-
Match safely - Lookout flags when a Helper is missing a credential a Member requires.
-
Stay compliant - an accurate, documented account of qualifications and clearances.
-
Stay ahead of expiries - record expiry dates so renewals can be managed before they lapse.
Before you start
To view and manage a Helper's verifications, make sure:
- You are logged into Lookout as a staff member with permission to manage Helper verifications.
- You have the Helper's documents to hand (for example, a scan or photo of the certificate).
Navigating to the Verifications tab
- From the main navigation menu, click Helpers to open the full list of Helpers.
- Find the Helper you're after - use the search box to type their name, or narrow the list using the filters.
- Click the Helper's name to open their profile. This will load their Helper dashboard.
- From the horizontal menu, select Verifications.
You'll see two panels:
-
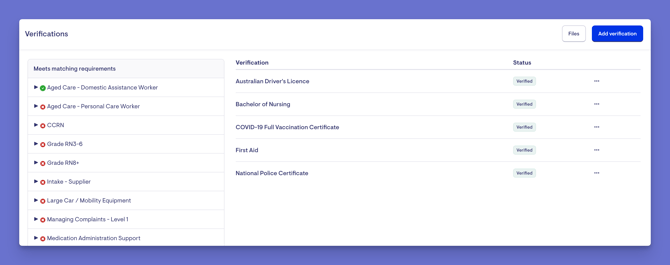
Left panel: The compliance requirements configured in Lookout. Expand each to see the individual verifications beneath it, each marked with a tick or cross showing whether the Helper has that file and whether it's current. This gives you a quick view of what the Helper still needs to supply to be fully compliant.
-
Right panel: The verifications already uploaded to this Helper, each showing its title, a status badge (verified, almost expired, or expired), and expiry information where applicable.
Top tip: To see every file uploaded, select the Files button - you'll see the file name, file type, who uploaded it, and when.
Adding a Verification
- On the Helper's verifications tab, click the blue Add verification button.
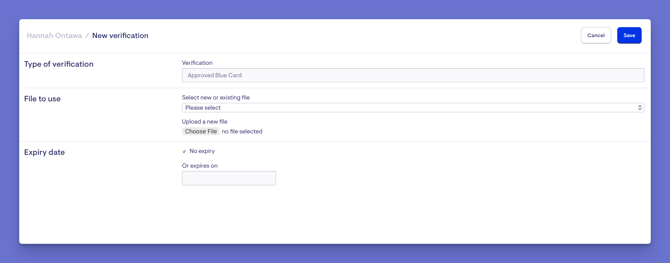
- Choose the type of verification you're adding from the list, then click the blue Save button.
- Select the file to use - there may be several file type options that meet this verification. You can either select a new or existing file to upload. A dropdown list will appear with the existing files you can select from.
- If you need to upload a new file, click the Choose file button to select the file the Helper has provided from your device to upload.
- Enter the document number, if required (this is optional).
- Set an expiry date - or, if the document doesn't expire, tick the no expiry checkbox.
- When ready, click the blue Save button in the top right corner.
- A green banner will appear confirming that the verification has been successfully added. It will now display in the Helper's list.
Renewing or updating a Verification
When a verification is almost expired or expired, you can renew it:
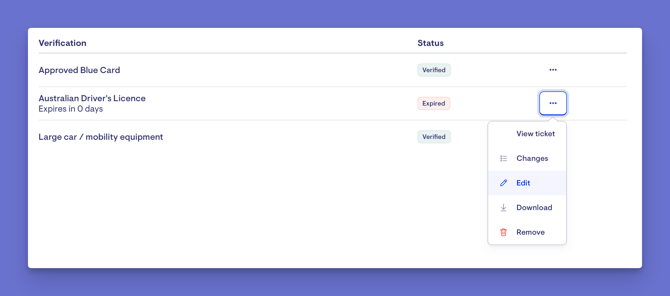
- Select the ellipsis (...) button next to the verification, then Edit.
- Upload a new document to replace the existing file, update the document number if needed, and enter a new expiry date.
- When ready, click the Save button.
The verification updates, and its status returns to verified.
Other actions
Using the ellipsis (...) button next to a verification, you can also:
- View ticket: If a Ticket has been raised in relation to an exipiring verification, this option will appear.
- Changes: View the audit history, showing who changed what and when.
- Download: Download the verification's document file.
- Delete: Permanently remove the verification from the Helper's profile.
Monitoring expiries from the Home dashboard
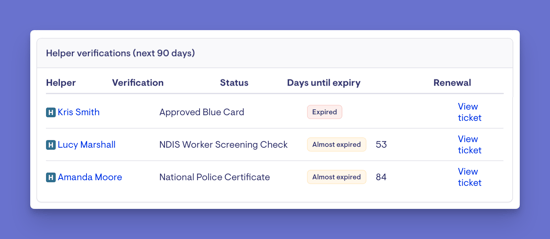
You don't have to open each Helper to keep on top of verifications. From your home dashboard, the Helper verification tile shows all verifications expiring within the next 90 days - including the Helper, the verification, its status, the days until expiry, and the renewal process (if you have the verifications add-on).
You'll also see matches missing requirements (updated hourly) - the active Member-to-Helper matches where the Helper is missing a required verification, showing the membership, the Helper, and what's missing. This gives you a clear picture of any gaps so you can act on them.
Want more from renewals? If your organisation has the Verification Renewals add-on, Lookout can guide and automate the renewal process. See our dedicated Verification Renewals add-on article to learn more.
Making the most of the Verifications tab
- Keep documents current. Upload renewed documents and update expiry dates promptly, so a Helper can keep being matched and scheduled without interruption.
- Use the left panel as a checklist. The tick/cross view shows at a glance what a Helper still needs to be fully compliant.
- Watch the home dashboard. The 90-day expiry view and the missing-requirements list help you stay ahead of renewals and matching gaps.
- Set matching requirements on the Member. A Helper's verification only counts in matching if the requirement is added to the Member's membership first.
Troubleshooting
I can't add, edit, or delete a verification
Managing verifications requires the relevant permission. If the options aren't available, ask an administrator to review your access.
A Helper's verification isn't being recognised during matching
The matching requirement must be added to the Member's membership first (via the Matching tile). Without it, the verification won't be checked during matching.
A verification won't save
Make sure you've chosen the verification type and selected a file. Some verifications also require a document number. If the document has no expiry, tick the no-expiry checkbox rather than leaving the date blank.
A Helper is flagged with missing requirements
Open the Verifications tab and use the left panel to see which requirements aren't yet met, then add or renew the relevant documents.
A verification shows as almost expired or expired
Renew it via the ellipsis (...) button → Edit, uploading a new document and setting a new expiry date.
Still need help?
If you're still experiencing issues, please contact our Support Team and include:
-
Screenshots (if possible)
-
The Helper's name
-
The exact steps taken
-
Any error messages received