
This guide explains how to use a Member's dashboard in Lookout: what each section shows, and how to complete the most common tasks, such as managing contacts, recording matching requirements and preferences, adding Helper notes, and setting incompatibilities.
Unsure about some keywords or terminology used? Please review our Member dashboard & tabs: Glossary of terms article.
Before you start
To work with a Member’s dashboard, make sure:
- You have Administrator or Staffer access with permission to view and edit members.
Most editing buttons only appear if your role permits changes. If you have view-only access, you will see the information but not the edit or add controls.
- The Member record already exists. To access a Member’s dashboard, open the Member from the Members list.
The Member dashboard
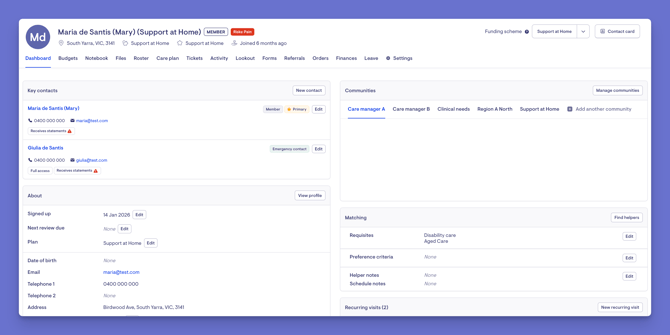
The Member dashboard provides a comprehensive overview of an individual's membership and care-related information.
It is organised into two main sections:
- Header banners displayed at the top of the dashboard, providing key Member status and alerts.
-
Information panels arranged in two columns, containing important details and records related to the Member's care and membership.
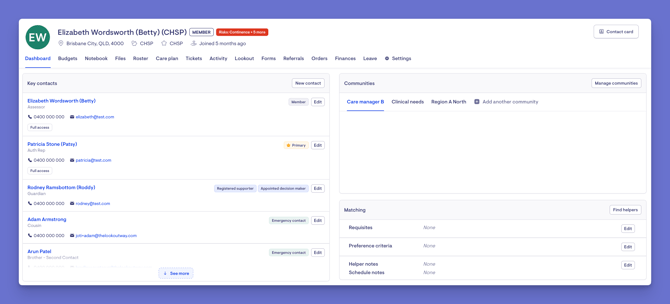
Top tip: To keep the dashboard clean and easy to scan, some panels show a see more option to expand and reveal their full contents.
What are Banners?
Member dashboard banners are alerts that appear at the top of a Member's profile.
Each one reacts independently to a specific condition, and only shows when that condition is currently true.
They fall into five groups:
- Funding risk insights (Support at Home members only): Flag overspent funding, significantly underspent funding, or a gap in care management delivery. Refreshed daily by background processes.
- Leave banner: Appears when today falls within a recorded leave period. Veteran Members get an additional related alert.
- Setup checklist: Appears while any key detail is missing (emergency contact, primary contact, sign-up date, or recorded requirements), listing only the incomplete items.
- Data warnings: Flag specific inconsistencies, such as an overdue review, a visit dated before billing began, a missing funding reference, an archived community, a package without its subsidy, or incomplete plan details.
- Archived notice: Shows if the Member has been archived, with the reason, date, and an option to reverse it.
In short, the banner area is a live summary of what's missing, at risk, or off for that Member right now.
Information Panels
The main panels include:
- Key contacts: Everyone connected to the Member - the Member, their representatives, and others - all in one place, each showing badges for their role and access.
- About: Core information such as sign-up date, commencement date, next review date and plan.
- Funder: Information about the funding provider and scheme.
- Agreement requests: The service agreement and its signing status.
- Terms and conditions: The accepted service agreement on record, showing its version, who accepted it, and the date accepted.
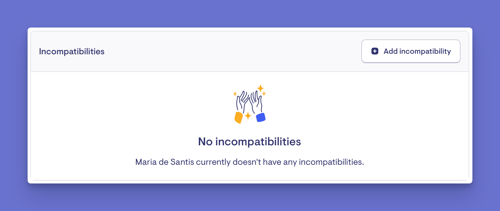
- Incompatibilities: Care workers who must not be scheduled with the Member.
- Communities: The communities the Member belongs to, separated into tabs within the panel.
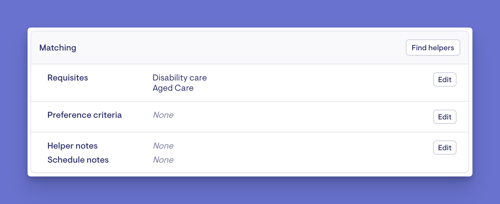
- Matching: Requirements, preferences and notes used to match the Member with suitable care workers.
- Recurring visits: The Member's repeating visits, with the number of visits set up shown in the panel title.
- Exceptional visits: One-off visits that sit outside the regular schedule.
- Cohorts: Any groups the Member belongs to.
- Primary Helpers: The Helper (or Helpers) designated as the primary Helper for this Member.
Please Note: Contract information now lives in the Member's Settings rather than on the dashboard. See our Member Settings article to learn more.
The following sections provide step-by-step instructions for common tasks. Each task can be accessed from the relevant panel on the Member’s dashboard.
Accessing the Member dashboard
- From the main navigation menu, click Members to open the full list of Members.
- Find the Member you're after - use the search box to type their name, or narrow the list using the filters.
- Click the Member's name to open their profile. This will load their Member dashboard.
Managing key contacts
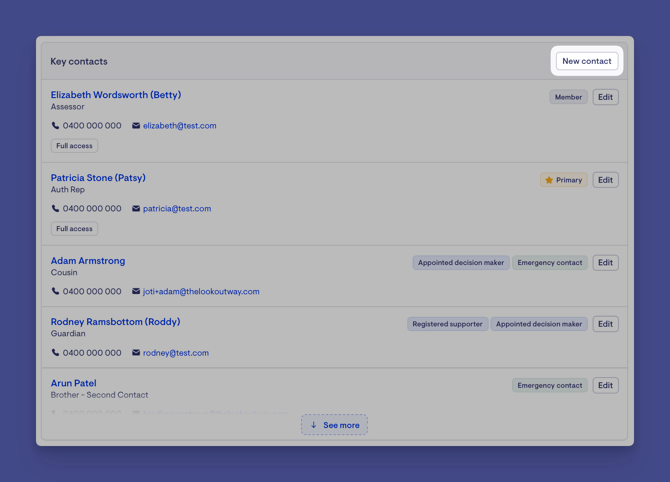
All the people connected to a Member - their representatives, emergency contacts, and anyone who receives statements or can view visits - are managed together in the Key contacts panel. Each contact holds a combination of roles (who they are) and permissions (what they can do), shown as badges so you can see everyone's involvement at a glance.
To add a contact:
- In the Key contacts panel, click the New contact button.
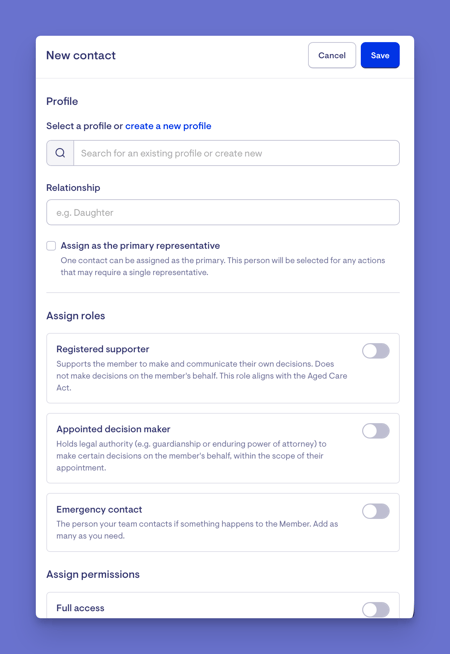
- A side window will open. Select an existing profile or create a new one, and set their relationship to the Member. For more information on creating a profile, please read our dedicated article.
- Tick whether they're the primary representative. Only one contact can be assigned as the primary.
- Assign their roles (Registered Supporter, Appointed Decision Maker, Emergency Contact) and permissions (Full access, Receives statements, Can view visits). A contact needs at least one.
- When ready, click the Save button.
- A green banner will appear confirming your actions, and you’ll return to the Member dashboard screen.
A couple of things to know:
- Full access and Can view visits can't both be on - selecting one disables the other, as Full access already includes visits.
- Can view visits covers the schedule and visits only. To let a contact see statements too, also turn on Receives statements.
- Permissions need an email address so the contact can be invited to the app. If there's no email, you'll be prompted to add one (you can do this here). Once an email and a permission are set, Lookout offers to invite them as a user.
To update or remove a contact, select their Edit button - the side panel lets you change their details, roles, and permissions, or remove them. If you remove (or unset) the primary representative, Lookout will ask you to choose a replacement, so the membership always has one.
Want the full details on key contacts? For everything about setting up contacts - what each role includes, how permissions work, recording a conflict of interest or scope of legal authority, and how existing access carries over - see our dedicated Key contacts article.
Remember: There's always one primary contact/ representative - the main point of contact for the Member. It can be the Member themselves or one of their contacts, and it's shown with a primary badge.
Add or edit the Funder
The Funder is managed in its own Funder panel (funders aren't part of Key contacts).
-
Navigate to the Funder panel.
-
Select the option to add or edit the funder, and choose the funding provider.
-
When ready, click Save.
Top tip: When you set the funding scheme, Lookout selects the most common funder for you - for example, choosing Support at Home automatically adds Services Australia as the funder.
Set Matching requirements (requisites)
Requirements (sometimes called "requisites") are the background checks or competencies a care worker must hold to be matched with this member, for example, a specific clearance or skill.
-
On the Member's dashboard, find the Matching panel. Next to Requisites, click Edit.
-
Tick each required check or competency from the list.
-
Click Save.
What this affects: These requirements are used when you search for care workers.
Only workers who meet them will be suitable matches. If a matched worker is missing one, the Member will appear in the "Matches missing requirements" area of the Home Dashboard.
Setting Matching Preferences
Matching preferences are desirable criteria (not strict requirements) that help you find the best-suited care worker. The system returns them in search results to help you choose.
-
In the Matching panel, next to Preference criteria, click Edit.
-
Select the preferences that apply to this Member.
-
Click Save.
Add Helper Notes and Schedule Notes
The Matching panel also holds free-text notes to guide matching and scheduling:
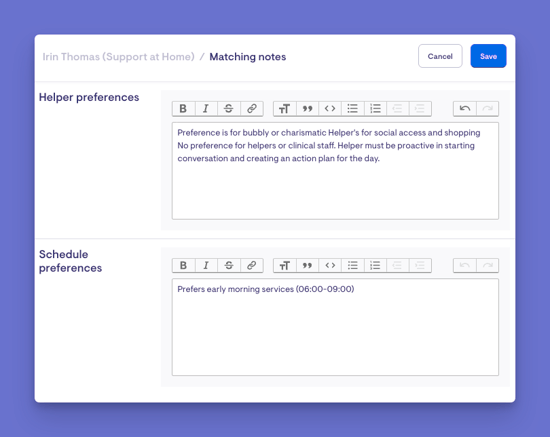
- Helper notes: Notes about the kind of care worker who suits this Member.
- Schedule notes: Notes about scheduling considerations.
-
In the Matching panel, next to Helper notes, click Edit.
-
Type your notes for both the Helper preferences and schedule preferences.
- Click Save.
Recording an Incompatibility
An incompatibility records that a specific care worker must never be scheduled with this Member.
-
On the Member's dashboard, find the Incompatibilities panel.
-
Click Add incompatibility.
-
Choose the Helper who should no longer be scheduled with this Member.
-
Select the reason, and optionally add extra details.
- Click Save.
Important: Adding an incompatibility has immediate effects. Any scheduled visits and recurring visit rules involving that worker are automatically set to vacant, and their contract with the Member is ended (up to their latest in-progress or completed visit). You'll be warned about this before you confirm.
What happens next?
After you make changes to a Member's dashboard:
-
The dashboard updates immediately to reflect your change, and you'll see a brief confirmation message.
- Contacts appear in the Key contacts panel with their role and access badges, and the primary representative is marked.
- Any documents attached to a contact, such as a Registered Supporter's or Appointed Decision Maker's supporting files, also appear in the Member's Files tab. They are labelled as a direct upload, showing which contact they came from. These are kept as snapshot copies, so they remain even if the original is later removed.
- Requirements and preferences feed directly into the Helper search, changing which Helpers are considered suitable matches.
- Incompatibilities take effect straight away, vacating affected visits and ending the relevant contract as described above.
- Setup reminders at the top of the dashboard clear as you complete the outstanding items (such as adding an emergency contact or start date).
What Users / Staff / Members Will See
For Admins / Staff (with edit permission)
See the full dashboard and all the add, edit, and remove controls described above.
For Staff (view-only)
See the same information, but the add/edit/remove buttons are hidden.
Staff can review a Member's setup without changing it.
For Members and Representatives (Lookout App)
They don't see this staff dashboard - they experience the results of it, such as the visits scheduled for them, the Helpers matched to them, and any agreements shared with them.
What a contact can access in the app depends on their permissions: Full access and Canview visits behave exactly as the old Authorised Representative and Sharer did - this release renames and consolidates them, it doesn't change what they grant.
Troubleshooting
I can't see the add/edit buttons
- Your role may be view-only - editing controls only appear with the right permission.
- Confirm you're on the correct Member and that the record isn't archived.
- Try logging out and back in.
A whole panel is missing
- Some panels only appear when a related feature or integration is enabled for your organisation (for example, package details, veterans' affairs plans, or direct-debit payments).
- Some panels only appear once prerequisites exist (for example, a funder must be linked before certain agreement options show).
I can't find the Authorised Representative panel
Contacts are now managed together in the Key contacts panel. What used to be an Authorised Representative is now a contact with the Full access permission. See our Key contacts article.
I saved but nothing changed
- Make sure you clicked Save and didn't navigate away first.
- Check for validation messages highlighting a required field.
- Refresh the dashboard to confirm the update landed.
- I added a requirement but a worker still shows as a match
- Requirements affect the worker search. Confirm the requirement was actually saved in the Matching panel, and re-run the search.
A contact can't see statements, only visits
Can view visits covers the schedule and visits only. To let a contact see statements too, also turn on Receives statements, or give them Full access, which includes both.
I invited a contact to the app but they can't see anything
If they only hold a role (Registered Supporter, Appointed Decision Maker, or Emergency Contact) and no permission, they can sign in but won't get past the landing page - roles don't grant access. Add Full access or Can view visits permissions.
I set an incompatibility, and visits disappeared
This is expected. Adding an incompatibility deliberately vacates affected visits and ends the relevant contract.
Still need help?
If you're still experiencing issues, please contact our Support Team and include:
- Screenshots (if possible)
- The user's name/email
- The type of notification affected
- The channel you expected it on (in-app, email, or push)
- The exact steps taken