
This guide explains how to deliver and claim NDIS supports in Lookout, what you need before starting, and what to do if something is not working. It covers rostering and delivering supports, recording support coordination time, generating invoices through a billing run, producing the NDIS bulk payment export, and monitoring budgets ahead of a plan reassessment.
Overview
Delivering and claiming NDIS supports in Lookout follows a single path from start to finish. You roster a visit for a Member; the support is delivered and recorded; any support coordination time is tracked; a billing run turns that delivered work into invoices; and the NDIS bulk payment export produces the claim file you send to the NDIS. Alongside this, you can monitor each Member's budget to see how much funding remains before their next plan reassessment.
Before you start
To complete this process, make sure:
-
You have the correct access permissions for rostering visits, tracking time, running billing, and generating reports
-
You are logged into the web app
-
The Member has an active budget, and their NDIS details are recorded, including their NDIS number and their plan management type
-
Your organisation's NDIS registration number is set up, so it can appear on the claim file
-
If your organisation claims support coordination, the setting that generates invoices for NDIS support coordination based on tracked time has been switched on
Step-by-step instructions
Step 1: Roster and deliver the support
- From the main menu navigation bar, select Members.
- Search for and select the Member.
- Open the Member's dashboard.
- Select the option to add a new Visit and create the required roster (exceptional or recurring)
- Choose the Helper, the date and time, and the Service and rate being delivered.
- Select Save to place the Visit on the roster.
Top tip: Visits are managed from the Member's weekly roster, where you can drag, adjust, or reassign them as plans change. Once the Visit takes place, it is checked out to confirm the support was delivered.
Step 2: Record support coordination time
- Open the relevant record for the Member, such as a Notebook note or Care plan item.
- Select Track time.
- Enter the date, the duration, and choose the correct rate for the support coordination work.
- Select Save to record the tracked time.
Top tip: Tracked time for support coordination is separate from rostered Visits. It captures the behind-the-scenes hours you spend coordinating a Member's support.
Where to track support coordination time
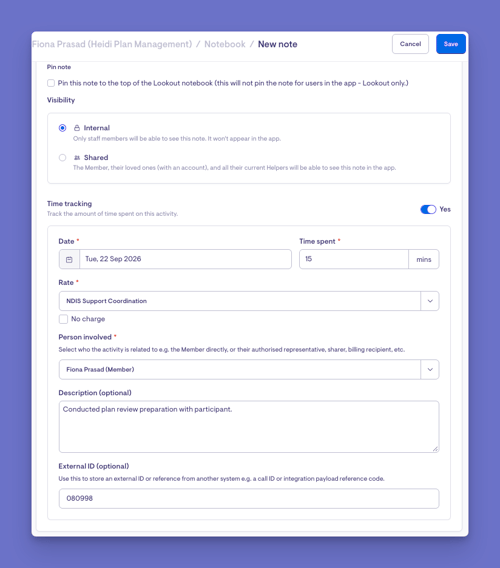
Support coordination time is recorded using the Track time feature, which is available throughout a Member's record. If your organisation is configured to bill support coordination from tracked time, you can log time from any of the following locations.
The Track time button is available throughout the Member's record, allowing you to log time in the context of the work completed, including:
-
Tickets for tasks or requests being managed on the Member's behalf. ◷ Track time is located at the top of the ticket.
-
Observations recorded in the Lookout tab about the Member's health, well-being, or circumstances.
Generate a New note from the Lookout dashboard and track your time.
-
Care plans updates. ◷ Track time is located at the top right of the Care plan dashboard.
-
Progress notes recorded in the Member's Notebook or Activity Tab.
Time tracking appears at the bottom of the New note. Click the toggle button to turn it on.
Once switched on, the toggle button will appear purple and extra fields will appear to log Support Coordination time.
Visits or appointments delivered to the Member under the Support Coordination rate.
How the billable amount is calculated
The invoice amount is based on: Support coordination service rate × hours recorded.
Because time is entered in 15-minute increments, the billed quantity reflects the recorded duration. For example, a 45-minute entry is billed as 0.75 hours. This will appear as its own Time Tracking (Support Coordination) billing category for easy identification when creating billable items for future claims.
Key things to know:
- Each time entry records who completed the work, the date it occurred, and the duration. Time must be entered in 15-minute increments.
- To be billable as NDIS support coordination, the entry must be linked to a valid support coordination service, and your organisation must be configured to invoice support coordination from tracked time.
- Time entries can be marked as No Charge when the work should not be invoiced.
- Once a time entry has been invoiced, it is locked and can no longer be edited or deleted.
Step 3: Generate invoices with a billing run
The billing run is where an NDIS provider turns everything delivered to their participants into claimable invoices. It sweeps up all completed visits and tracked support coordination time for the period, converting them into billable items ready to feed into your NDIS bulk payment claim.
- From the main navigation bar, navigate to the Billing runs area under Finance.
- Select Create a custom draft to start a new billing run and choose the report period for the run.
Lookout gathers all delivered Visits and tracked support coordination time during that period, turning them into billable items. - Once it has been processed, review the invoices and any errors flagged against the run.
- When you are satisfied, publish the billing run to finalise it.
Top tip: Billing runs stay in a draft format until published. If your organisation has support coordination invoicing switched on, the hours you tracked in Step 2 are automatically included as invoice lines in the billing run.
Need help with billing runs? See our guide on Overview - Billing and Finance to get a detailed breakdown of these two functions.
Step 4: Produce the NDIS claim file
- Navigate through the main navigation bar on the left-hand side and select All Reports.
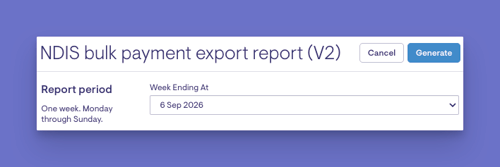
- In the financial group, select the NDIS bulk payment report (v2).
- Choose the report period, which covers one week, Monday through Sunday. It appears as a drop-down box (Week Ending at).
- Select the Generate button to create the report.
Lookout prepares the file in the background and emails it to the account you are logged in with, rather than downloading it on the spot.
You should now see:
- A confirmation that your NDIS bulk payment export report will be sent to your email.
- A file containing each claim line, with the Member's NDIS number, the support item code, the dates supports were delivered, the quantity, the price, and your organisation's registration details.
Important: If you don't see the NDIS report in the financial reports list, it usually means either your access role doesn't include claiming reports, or the NDIS report isn't switched on for your organisation. Check both before contacting support.
Top tip: This is the file you upload to the NDIS to request payment for the supports you delivered and claimed.
Step 5: Monitor budgets to plan reassessment
- Open the Member's dashboard and click on Budgets.
- Review the active budget to see how much funding has been used and how much remains.
- Check the Member's plan reassessment date to see when their current plan is due to be reviewed.
→Please view our dedicated article on Creating and managing Budgets for detailed guidance
NDIS considerations:
- Watch for funds running low. If a Member's remaining funding is dropping faster than expected, flag it early. This gives time to adjust supports or arrange a plan review before they run out mid-plan.
- Don't let funding go unspent. Underspending can leave a Member short of the support they were funded for. Reviewing the budget regularly helps you keep delivery on track across the life of the plan.
- Plan ahead for the reassessment date. Use the reassessment date as your cue to review how the plan tracked and gather evidence of supports delivered, so the Member's next NDIS plan reflects their real needs.
- Keep your records aligned. Because the budget is drawn down based on delivered and checked-out visits, make sure delivery is recorded accurately and promptly. Accurate records are what keep your budget view, your claims, and your NDIS reporting consistent.
Example of Overspend
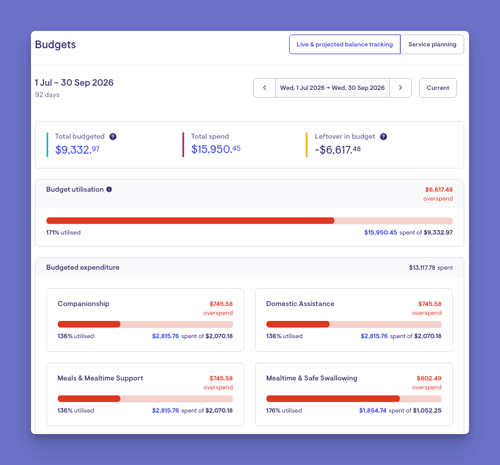
Scenario: Funding is overspent, meaning the current budgeted service plan exceeds the available funding. Because services are being used at a higher frequency or volume than funding allows, the Budgets area shows this in Red. This visual can enable Staffers to review and change current service planning to remain within the budgeted funds.
Example of underspend
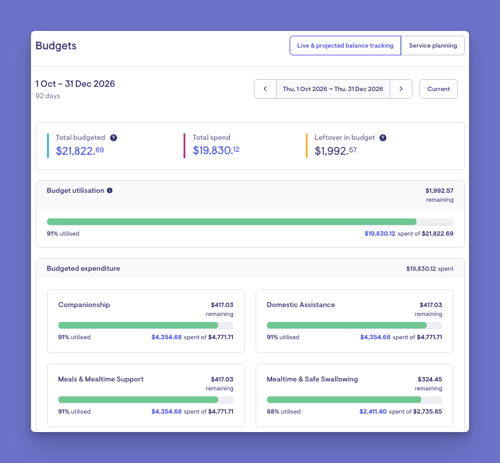
Scenario: The Member's funding is being used at a lower rate than anticipated. This may reflect changes in support needs, service frequency, temporary interruptions to delivery, or planned intensive supports later in the plan period. Reviewing budget utilisation alongside the Member's goals and upcoming services can help ensure supports remain aligned with their plan.
What happens next?
After completing this process:
- Delivered visits and tracked support coordination time that flow into a billing run. Publishing the billing run finalises those invoicable items, locking them in.
- Sending statements to Members is a separate step you trigger yourself once the run is published. It doesn't happen automatically.
- When you need it, you can request the NDIS bulk payment export for the relevant week from the reports area. It's then emailed to you as a file ready to submit to the NDIS. This is a report you generate on demand, not an automatic result of publishing.
- If budget tracking is switched on, each Member's remaining funding is kept current throughout. Booked and planned supports already reduce it as estimates, and publishing the billing run replaces those estimates with the confirmed invoiced amounts.
What Staffers and Members will see
For Staffers and Admins
Can roster and deliver Visits, track support coordination time, run billing, generate the NDIS claim file, and view each Member's budget and plan reassessment date.
For Members (Lookout care app)
If live budget tracking is enabled for your organisation, Members can view their own budget in the care app to see how their funding is being used.Troubleshooting
I cannot see this option
- Check your access permissions for rostering, billing, or reporting.
- Confirm the relevant feature is switched on, such as support coordination invoicing or the NDIS report.
- Try logging out and back in.
The support coordination time is not appearing on an invoice
- Confirm the setting that generates invoices for NDIS support coordination based on tracked time is switched on.
- Make sure the tracked time falls within the period covered by the billing run.
- Check the tracked time was saved against the correct Member and rate.
I ran the billing run, but the claim file looks incomplete
- Confirm the Member has an NDIS number recorded.
- Check that the support item codes are set up, since these appear on the claim file.
- Make sure the Visits fall within the report period you selected, which runs from Monday through Sunday.
- Review any errors flagged against the billing run before publishing.
I completed the steps, but nothing changed
- Make sure you selected Save, or published the billing run, at each step.
- Check for any validation errors on the form.
- Contact support if the issue persists.
Still need help?
If you are still experiencing issues, please contact our support team and include:
- Screenshots (if possible).
- The Member's name.
- The exact steps taken.
- Any error messages received.