
Overview
A budget sets out the funding available to a Member over a set period and how that funding is planned to be spent. As a Care Partner, you use it to record the Member's funding source, plan their services, project costs, and confirm the plan with the Member.
Each Member can have several budgets, and every budget moves through clear stages: it starts as a Draft, can then be Approved, and can be shared with the Member for signing. Budgets you no longer need can be archived rather than deleted.
Please note: Budget enhancements won't switch on automatically. They’re enabled by your organisation through the Release Hub when you're ready, so you have time to read these articles, attend a Q&A webinar, and become familiar with what's new before enabling them.
First time working with Budgets? If you're not yet familiar with what Budgets are and why they matter, start with our Budgets: An overview article for an introduction before following the steps below.
Before you start
To create or manage a budget, make sure:
-
You have the correct access permissions to view and edit budgets (Care Manager, Staffer, or Admin level access).
-
You have the correct Member open, so the budget is created against the right person.
-
You have the Member's funding details ready, including their funding type, any funding classification, as well as the budget's start and end dates.
Remember: Budget planning (the point-in-time plan) and live and projected balance tracking are shown separately. This article covers how to create and manage the plan. For how live and projected balance tracking, see Budgets: an overview.
Step-by-step instructions
Step 1: Create a new budget
- From the main navigation menu, click Members to open the full list of Members.
- Find the Member you're after - use the search box to type their name, or narrow the list using the filters.
From the Members list, new filters help you find Members based on their funding and budget information, including funding source category, budget plan type, budget plan date/range, and budget plan insights (empty plan, allocation over funds, or allocation under funds).
This is useful for finding, for example, all Members with an active ongoing funding source before bulk-generating budgets.
- Click the Member's name to open their profile. This will load their Member dashboard.
- Click the Budgets tab along the top of the Member's profile.
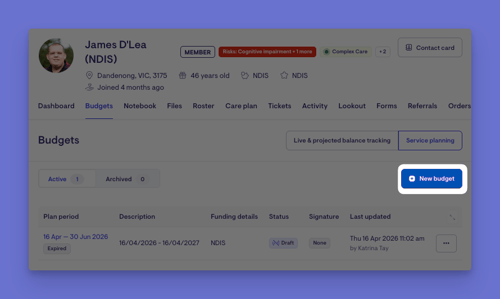
- Click on Service planning and then the + New Budget button to create a new budget.
Please note: The Budgets area is within the Member's profile, so everything you do here applies only to that Member.
Step 2: Fill in the budget details
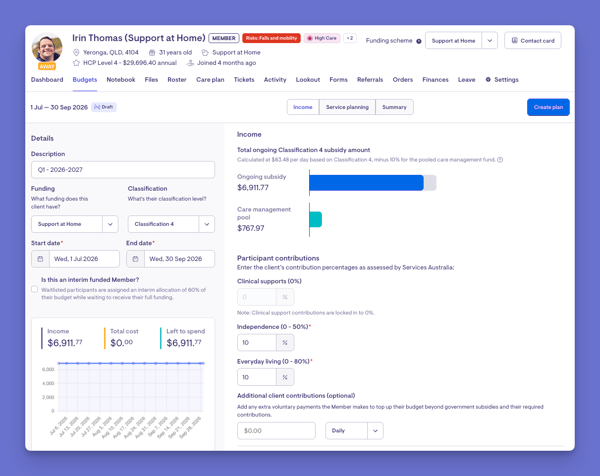
The budget editor has a details panel on the left. Complete the following:
- Enter a description so the budget can be distinguished from others.
- Choose the funding type and, where it applies, the funding classification.
- Set the start and end dates for the budget period.
As you make changes, a graph in the details panel updates to show the balance between income and planned spending. A message also appears when you have unsaved changes.
Please note: If this is an interim budget plan while final funding is being confirmed, select the interim check box.
Step 3: Fill in the income details
The budget editor is split into tabs across the top: Income, Service planning, Other expenses, and Summary.
You begin on the Income tab:
- Review the funding lines that have been pre-filled, such as the subsidy and any supplements for Support at Home. The income shown will vary depending on the Member’s funding type.
- Enter or adjust the amounts, and add a description to each line where needed.
- Record any voluntary additional contributions the Member agrees to makes toward their care.
- When the income is complete, use the highlighted Next step button, or select the Service planning tab, to move on.
Step 4: Complete Service planning details
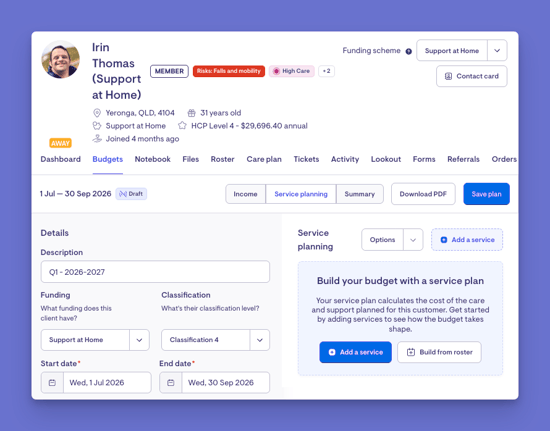
Use the Service planning tab to define the services and items the funding will cover. You can either:
- Add services manually
- Build the plan from the Member's existing roster
- Use a combination of both
Option A: Add a service manually
On the Service planning tab, select Add a service. The Add a service plan panel opens.
1. Complete the What section
-
Select the service or item to be funded.
-
Enter a short description. Use the item name, type, or primary purpose.
-
Enter a quantity and select a unit.
Note: Only hours are multiplied by an hourly rate. All other units are treated as per-visit charges.
2. Complete the When section
-
Select the service date. For one-off items, this is the date the expense is allocated to the budget.
-
(Optional) Enable Delivery window to set the preferred start and end times for delivery.
-
(Optional) Enable Repeat to create recurring services. Choose a daily, weekly, monthly, or custom pattern, and set an end date or continue for the budget period.
3. Complete the Cost section
-
Confirm the cost allocation.
-
If travel applies, enable and enter the relevant amounts for:
-
Provider travel distance: Distance travelled by the support worker.
-
Provider travel time: Time spent travelling by the support worker.
-
Transport for the Member: Transport costs provided as part of the service.
-
-
Save the service
-
Select Add to plan.
Make changes if needed.
Add as many services as required. You can also:
-
Edit a service and select Update plan
-
Remove selected services
-
Remove all services from the plan
-
Use Select all to select every service
Option B: Build from roster
If the Member already has scheduled care, you can create the service plan from their roster.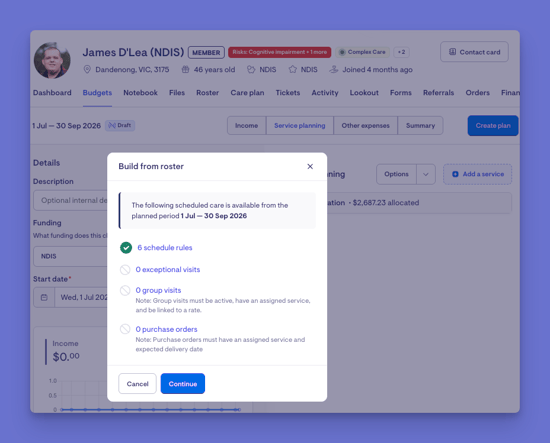
1. Open Build from roster
-
If the plan already contains services, select Options > Build from roster.
-
If the plan is empty, select Build from roster from the prompt displayed on the page.
2. Review available scheduled care
The Build from roster window displays available services and items for the budget period, including:
-
Schedule rules: Recurring scheduled care
-
Exceptional visits: One-off visits outside the regular schedule
-
Group visits: Active visits with an assigned service and rate
-
Purchase orders: Orders with an assigned service and expected delivery date
-
Invoice items (where applicable): Billable items not already linked to a visit, group visit, or purchase order
Each category shows whether eligible items are available to import. Select a category to review the available items.
Before generating the budget plan, you can select or deselect items to include or exclude them. A running count and total are shown as you make your selections. Build from roster now accurately copies what's in the roster, including weekend and variant rates, which pull through as their own line items. Rate variants apply to Support at Home only.
3. Import the services
-
Select Continue to add the selected items to the service plan.
-
Select Cancel to close the window without importing.
4. Review and update
Imported services appear in the plan like manually added services. You can:
-
Edit services
-
Add additional services
-
Remove selected services
-
Clear the entire plan
Top tip: Building from roster is a quick way to create a service plan when the Member already has scheduled care. You can then adjust imported services or add anything not included in the roster.
Option C: Use a combination of both
You can combine Build from roster and Add a service in the same plan. A common approach is to import scheduled care first, then add any missing services manually.
1. Build from roster
Follow Option B to import the Member's scheduled care into the plan.
2. Add missing services
For any services, items, or costs not included in the roster, select Add a service and follow Option A.
-
Select Add a service.
-
Complete the What, When, and Cost sections.
-
Select Add to plan.
Repeat as needed.
Note: You can add services before or after using Build from roster. Importing from the roster adds services to the existing plan and does not replace services already entered.
Step 5: Edit or remove a service from Service planning
-
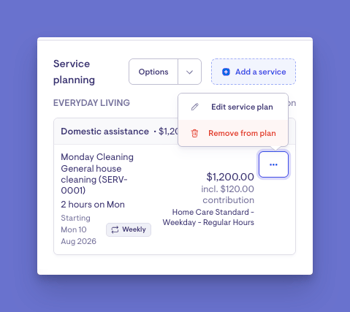
Click on the ellipsis (...) on the service you'd like to edit, and click on Edit service plan.
-
Update the details you'd like to change.
-
Click Update plan to save your changes or click Cancel to discard them.
To remove a service:
-
Click on the ellipsis (...) on the service you'd like to remove, and click on Remove from plan
Step 6: Complete any other expenses
If the funding type uses a separate expenses tab, select Other expenses.
- Add each additional or one-off cost that is not already covered as a planned service.
-
Enter an amount and a description for each.
Typical examples may include:
- A one-off administrative or setup charge.
- An equipment or consumable cost that isn't delivered as a scheduled service.
- A subscription or membership cost paid from the budget.
- A third-party or supplier cost.
Step 7: Review the Summary
-
Click the Summary tab to review the overall Budget Plan. The Summary brings together:
-
The total value of the plan.
-
All planned services, including the number of services and their total cost.
-
All other planned costs.
-
Any known client contributions for Support at Home.
-
Any residual balance remaining after planned costs.
Review the totals for income and planned spending against the available funding. If the plan is over or under the available funding, a warning banner appears, prompting you to review the income and planned services before continuing.
Step 8: Save the Budget
-
Select Create plan for a new budget, or Save plan when updating an existing budget.
-
A green banner appears to confirm that the budget has been saved.
-
The budget is listed under the Member's Active budgets, showing its period, funding details, and Draft status.
-
To continue managing the budget, select the ellipsis (...) to open Budget actions.
Generating budgets in bulk
From the Members list, you can select multiple Members and generate budgets in bulk. You now choose the budget type to generate (for example, ongoing), and you can generate for now or for a future period. For a future period, Lookout estimates the income from the Member's current funding, since Services Australia doesn't confirm future funding until the period begins.
After a bulk run, budgets may carry insight warnings - for example, an empty service plan, allocation exceeding available funds, or allocation well under available funds - so you can find and fix them before sending.
Reading and Managing an existing budget
Open and read a budget
- From the Budgets tab, select the budget's period in the list, or use its actions menu and choose Edit.
- The editor opens with the same tabs (Income, Service planning, Other expenses, Summary) so you can review every part of the plan.
- To get a shareable copy, select Download PDF from the top of the editor.
Manage and edit the budget
Each budget in the list has an actions menu with the following options, depending on its current state:
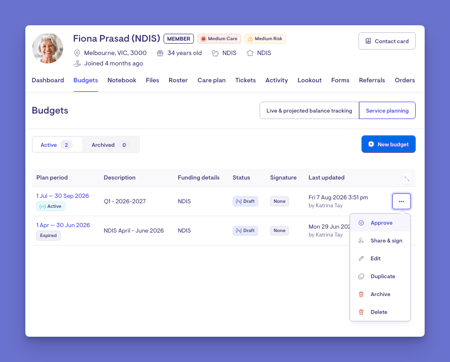
- Approve or Revert to draft: Mark the budget as Approved once you are happy with it, or return it to Draft. Approved budgets show who approved them and when.
- Share and sign: Send the budget to a chosen recipient for electronic signing, protected by an access phrase, or record a signature manually if you are holding a signed hard copy or other supporting evidence.
- Share only: Record that signing has been waived, where that option is available.
- Edit: Reopen the budget editor to make changes.
- Duplicate: Create a copy, which is useful when preparing a similar budget for the next period.
- Archive or Unarchive: Move a budget you no longer need into the Archived view, or bring it back.
- Delete: Permanently remove a budget. This is only available while the budget has not yet been shared for signing.
How to Publish (Approve) a Budget
Once a saved version of the budget is created, the budget will need to be approved to be made live. By approving it, it allows the budget to track live spending and expenditure that displays.
Before you approve
Make sure the budget is complete and saved:
- The funding period, funding type, income, and any fees are entered correctly.
- The service plan is built out with all the services and items the funding will cover.
- The overall figures look right, with no unresolved funding issues flagged.
Approving a budget is what moves it from a working draft into a live plan, so it's worth a final check before you do it.
Steps to approve
- Open the budget you want to publish. While it's still a draft, it will show a Draft status label.
- From the budget's actions, select Approve.
- The system runs a final check and, if everything is in order, the budget is approved. You'll see a confirmation that the budget has been approved, and its status label will change from Draft to Approved. The budget is now live.
Important: A generated or edited budget can carry an error or warning status (for example, "the service plan is empty - no funding allocated").
You can't approve a budget while it has an error - you must either fix the issue (for example, add services) or dismiss the warning with a note explaining why( for example, the budget is intentionally empty). The same applies to bulk approvals - budgets with unresolved errors won't approve.
What happens once a budget is approved
- It becomes the active, live budget. From this point, the budget begins tracking actual spending and expenditure against the funds allocated, so you can see how the plan is tracking in real time.
- Its status changes to Approved. The status label updates so anyone viewing it can see at a glance that it's finalised rather than a draft.
- It can be shared for sign-off. Only an approved budget can be sent to the Member (or their authorised representative) to review and sign. Sharing and signing is a separate step after approval.
- It becomes visible to the Member once it has been approved and signed off (or formally recorded as agreed). Drafts are never shown to Members. Only finalised, signed budgets appear in their view.
Making changes after approving
- You can revert the budget back to draft at any time by choosing to unapprove it. Doing this returns it to an editable draft state so you can make changes, then approve it again.
- If the budget won't approve, the system will tell you why (for example, an unresolved funding or allocation issue). Resolve the flagged item, save, and try approving again.
Choosing a funding source when funding overlaps
Where a Member has overlapping ongoing and restorative care funding, Lookout asks you to choose which one an item is funded under when you roster, raise a purchase order, or create an ad hoc invoice.
Managing spending from live tracking
From the live tracking expense view, bulk actions let you act on forecast services directly.
- Edit the service - service code or rate.
- Change the service state - for example, move it to another quarter.
- Switch the funding source - for example, move an item from ongoing to restorative care.
- Switch to private funding - where the Member has a private funding profile.
- Exclude from claiming, or cancel services.
How to use Share & Sign
When you open Share & Sign on a budget, the first step is to choose the signing method.
Everything else on the panel changes depending on which method you pick.
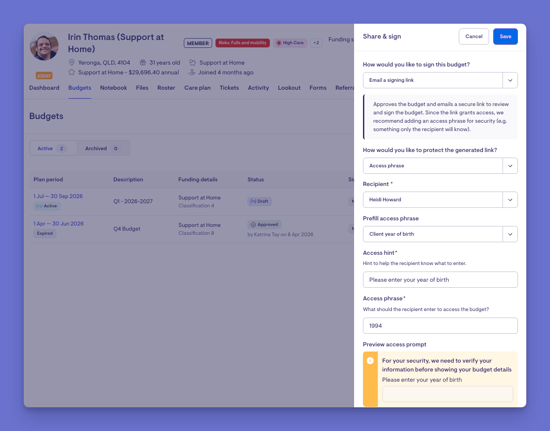
How would you like to sign this budget? will appear to prompt you to make a decision.
This is a dropdown with two choices:
- Email a signing link: send the Member a secure link to review and sign online.
- Attach evidence of acceptance: record sign-off you've already captured another way.
Option 1: Email a signing link
Choosing this approves the budget and emails a secure signing link. The following items appear for you to complete:
- An information note. A message explains that this option approves the budget and emails a secure link to review and sign it, and recommends adding an access phrase for security.
- How would you like to protect the generated link? A dropdown where you choose the link's security. Options are:
- Access phrase (recommended): the recipient must enter a phrase before they can open the budget.
- No protection (not recommended): anyone with the link can open it until it expires.
- Recipient. A dropdown listing the people you can send to. The Member and/or their authorised representative. Only people with an email address on file appear here. Pick who should receive and sign the budget.
If you chose "Access phrase" above, these additional items also appear:
- Prefill access phrase: (Only shown when more than one prefill option is available.) A dropdown where you can pick a ready-made verification detail — the recipient's year of birth, postcode, or telephone — or choose "I'll enter my own access phrase" to set a custom one. Selecting a prefill fills the hint and phrase fields for you.
- Hint: A text box for the wording that tells the recipient what to enter (for example, "Please enter your postcode"). This is required.
- Access phrase: A text box for the exact answer the recipient must type to open the budget (for example, their postcode). This is required.
- Preview access prompt: A read-only preview showing exactly what the recipient will see when they open the link — the reassurance message, your hint, and an entry box. Nothing to fill in; it updates as you type.
Finally, select Save to approve the budget and email the link.
Option 2: Attach evidence of acceptance
Choosing this approves the budget and marks the signing as complete using proof you already have, without sending anything to the Member. The following items appear:
- An information note: A message explains that you should upload a file confirming the authorised person(s) have reviewed and accepted the budget, and that doing so will approve the budget and mark the request complete. Nothing to fill in - just read it.
Do you have a hard copy of a signed budget plan?: A Yes/No choice.
What appears next depends on your answer:
-
If you select "Yes":
-
Attach signed budget plan. A file upload where you attach the signed budget document. This becomes the recorded evidence of acceptance.
-
-
If you select "No":
-
Attach other supporting evidence. A file upload for any other proof of acceptance (for example, saved email correspondence).
-
-
Notes:
- A text box to describe how the budget was accepted. For example, "Accepted via email correspondence."
Finally, select Save to approve the budget and mark the signing request as complete, keeping your uploaded file as the evidence.
Note on availability: If the Member has no eligible recipient with an email address, the "Email a signing link" method can't be used. The panel will show a note explaining this, and you'll need to use "Attach evidence of acceptance" instead.
What Users / Staff / Members will see
Admins
Admins have full access to budgets and are the only users who can create and manage them:
- Create and edit budgets, including funding periods, funding types, income sources, fees, services, items, quantities, dates, and travel costs.
- View budget totals, allocations, projected spending, and funding surpluses or shortfalls.
- Manage the budget lifecycle by saving drafts, approving, duplicating, archiving, or deleting budgets.
- Send budgets to Members for sign-off via a secure link or record sign-off collected through another method.
- Track sign-off status and resend requests if required.
- Download budgets as PDF documents.
Helpers and other non-admin users
Budget management is restricted to admin users.
- No access to budget planning screens or budget details.
- Contribute indirectly through the services and visits they provide, which are reflected in budgeting and reporting.
Members (Lookout app)
Members and authorised representatives have a simplified, read-only view of approved budgets.
Can:
- View approved budgets only. Draft and in-progress budgets are not visible.
- Browse current, upcoming, and historical budgets.
- See a summary of funding, projected spending, and remaining balances.
- Access the signed budget document.
- Review and sign budgets when requested by an admin.
Cannot:
- Create, edit, approve, or delete budgets.
Summary: Admins manage the entire budgeting process, staff have no access to budgeting features, and Members can view approved budgets and complete sign-off when requested.
Troubleshooting
I can't save the Budget - it's asking for dates
- Every Budget needs a start date and an end date. Make sure both are filled in.
- Check that the end date isn't before the start date - the period has to run forwards.
I'm getting an "overlapping budget" warning
A Member can't have two approved budgets covering the same period for the same funding type. Check for an existing approved budget that overlaps the dates you've chosen, and adjust the dates or update the existing budget instead of creating a new one.
I can't approve the Budget
- Approval is blocked if the planned spending doesn't fit within the available income (an allocation warning). Review the planned services and expenses against the income, resolve the shortfall, then try approving again.
- Double-check the budget's period and funding type are correct, as these affect the figures.
Please note: You can dismiss these warnings, should you wish, and then carry on to approve the budget.
I can't delete a Budget
A budget can't be deleted once it has been sent for signing. If it's no longer needed, consider archiving it instead, or contact support if you believe it should be removed.
The "left to spend" figure doesn't look right
- This figure is the income minus planned services and expenses. Check that all income, services, and expenses are entered correctly and that none are missing or duplicated.
- Confirm the period dates are right, as the figures are calculated across the budget's date range.
My changes to an approved Budget aren't taking effect as expected
Editing an approved budget doesn't re-approve it. If you've made significant changes, you may need to review and re-share or re-approve it depending on your process.
The contribution rates won't save (Support at Home)
Support at Home budgets have set limits on contribution rates. If a rate is rejected, check it falls within the allowed range and try again.
The Budget looks different to what I expected
The way budgets display depends on the funding type. Support at Home budgets are organised by quarter and show a funding sources breakdown, which looks different to other schemes. See our Budgets: an overview article for more on this.
Still have a question? Take a look at our Budgets: FAQ, where we answer the most common questions in one place.