
This guide explains what incident management is, why it matters, and how to capture and track an incident in Lookout using a ticket. It covers navigating to and creating an incident, recording the key details, and best-practice tips - plus troubleshooting for common issues.
Incident Management
Incident management is how your organisation records and tracks incidents - anything that happens during care that needs to be documented and followed up on.
In Lookout, an incident is captured on a ticket. The ticket contains the incident details and provides your team a place to work through it, document what happened, and maintain a clear record. This means incidents live alongside your other tickets, so they're tracked, assigned, and actioned in the same familiar way.
Please note: Core Incident Management gives you a reliable way to capture and track incidents. Assessing, categorising, and formally investigating them is done manually by your team. If you'd like Lookout to guide and automate more of that process, that's what the Incident Management add-on provides.
How Incidents work in Lookout
An incident is always tied to a ticket:
- The ticket is where your team works through the incident - assigning it, discussing it, and tracking it to completion, just like any other ticket.
- The incident details are captured in that ticket, recording what happened.
Because it's a ticket, everything you already know about tickets applies - checklists, comments, assignees, and status all work the same way. If you need a refresher on what Tickets are and how they work, please explore the Tickets section within our Help Centre.
Before you start
To complete this process, make sure:
-
You are logged into Lookout as a Staffer with Admin access. Creating and editing incidents requires an admin-level role. If you can't create or record an incident, ask an administrator to review your access.
-
You have access to the Member or Helper the incident relates to.
-
Your organisation has an incident report ticket template set up (recommended - see below), or you can create a ticket to record the incident against.
Important: Ensure you have the Incident management template configured for the Incident management card to appear with steps within a Ticket.
Setting up an Incident report template
Because incidents are captured on a ticket, it's worth having a dedicated incident report ticket template. This gives your team a consistent starting point every time: the same title, assignees, and checklist steps, so nothing gets missed.
To set up an Incident report template:
-
From your home dashboard, navigate to the overflow menu by clicking the ellipsis (...) next to your name in the bottom left-hand corner.
-
The overflow menu will open - click Settings.
-
In the main settings, navigate to the templates and configuration area, then click Ticket templates.
-
Click the blue + New ticket template button.
-
Give it a clear name (for example, "Incident Report") and choose a category (such as Incidents), add any notes, and set the assigned roles so incidents route to the right team.
-
Add a checklist of the steps your team should follow when handling an incident.
-
Save the template.
-
A green banner will appear confirming your new ticket template has been created.
Note: For full details on building templates, categories, and tags, see our guide on Tickets: Building Blocks (Categories, Tags & Templates). Setting up templates requires the relevant configuration permission.
Create an incident report
Recording an incident happens in two parts:
- First, create the incident ticket - this is where the incident lives.
- Then, complete the incident report - built up across four steps on the ticket:
- Raise the incident - record what happened.
- Incident response and categorisation - categorise the incident and its severity.
- Corrective actions - record how it was assessed and responded to.
- Incident investigation and analysis - capture the analysis, consultation, and response.
You complete these steps in order, as each one unlocks the next. Everything is saved against the ticket tied to the client involved, and each step is automatically logged with your name and a timestamp.
Open or create the incident ticket
Create a ticket for the incident against the relevant Member or Helper, ideally using your incident report ticket template, so the right steps and details are prompted.
There are two ways you can create a new Ticket:
-
From the Home dashboard, click Tickets and click + New Ticket.
-
From the Member dashboard, click their Tickets tab, then click + New Ticket.
-
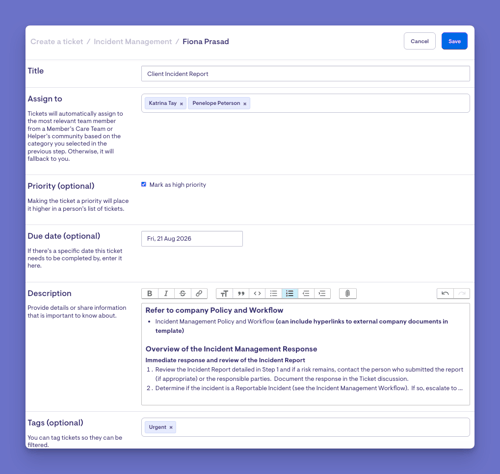
Open the ticket, fill in the details (Title, Assign to, and Description are mandatory. Optionally, add priority, due date and tags.)
-
When ready, click Save.
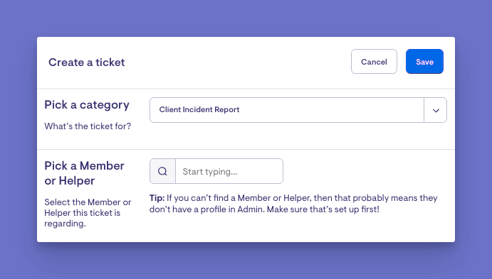
Top tip: For instructions on creating a ticket, please see our Tickets: Day-to-day use article.
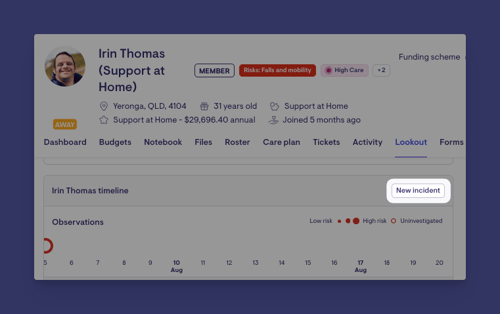
Alternatively, create an incident from the Lookout tab:
-
Navigate to the Member dashboard and click on their Lookout tab.
- Scroll down to view the Member's timeline, and click the New incident button.
Completing the incident report
Once the ticket exists, the incident report is built up across four steps on the ticket. You complete them in order, as each step unlocks the next. Everything is saved against the ticket, and each step you complete is automatically logged with your name and a timestamp.
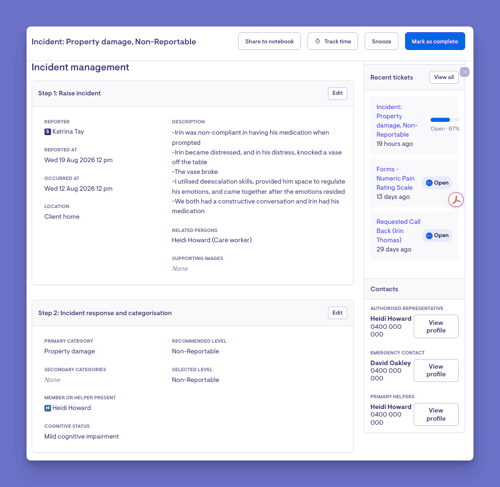
Step 1: Raise the incident
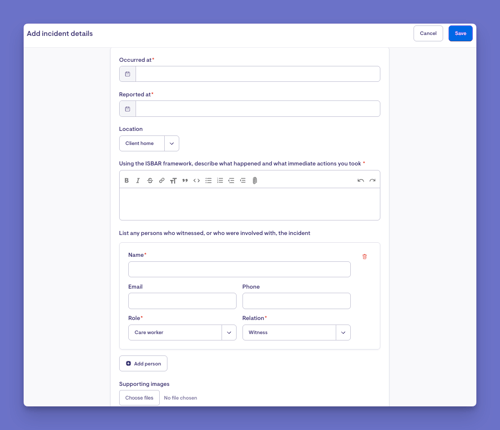
This first step captures the details of what happened. On the incident ticket, record:
- When it occurred and when it was reported.
- The location - for example, the client's home, the community, the hospital, respite, or another location.
- A clear description of what happened.
- Any related people - those involved in or connected to the incident, with their details.
- Any supporting evidence, such as photos or documents.
When you're happy with the information, click the blue Save button. This raises the incident and unlocks the next step.
Step 2: Incident response and categorisation
Categorisation records what type of incident occurred and how serious it is, which helps determine whether it's reportable.
- Open the Incident response and categorisation step.
- Select the primary category that best describes the incident (for example, fall, injury, medication error, or property damage). You can also add secondary categories if more than one applies.
- Record whether cognitive impairment was a factor, and answer any qualifying questions shown (such as whether an injury was caused or whether it should be reported to police).
- Based on your answers, Lookout indicates a report level. Confirm the selected level for the incident.
- When ready, click Save.
Once saved, you'll see a confirmation that the incident has been categorised, and the next step unlocks.
Step 3: Corrective actions
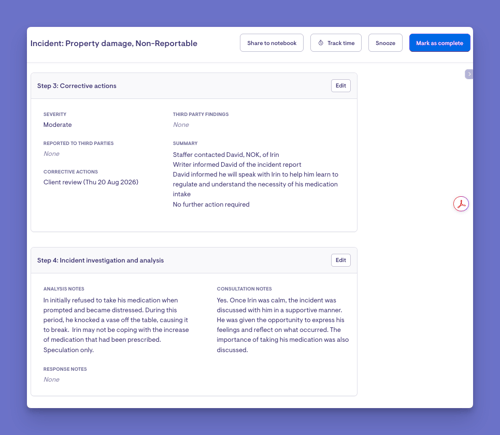
The corrective actions stage is where you capture how the incident was assessed and what was done in response. This is also where you can send the incident to the Member's care plan.
To record the corrective actions:
- On the incident, navigate to the Corrective actions stage and select Action.
- Set the likelihood and impact - Lookout uses these to calculate the incident's severity (for example, low, moderate, high, or catastrophic).
- Add a summary of the corrective actions taken.
- Record any authorities the incident was reported to (such as the police, the WHS safety authority, the next of kin, or a relevant commission), along with the date it was reported and any findings.
- Record any other actions taken - such as a client review, referral, debrief, or coaching - and the dates they took place.
- Add a third-party identifier if you use one for your own records.
Sending the incident to the care plan
- To feed the incident through to the Member's care plan, tick the Update care plan checkbox and set the date the corrective action took place.
- When you're happy with the details, click Save.
Please note: Ticking Update care plan sends the incident to the Member's care plan as an event to review. This only applies to incidents raised against a Member (not a Helper). If your organisation uses Lookout Assist, it can then propose care plan updates based on this - see our Updating and maintaining care plans with Lookout Assist article.
Step 4: Incident investigation and analyisis
This final step is where you capture the investigation and analysis of the incident - closing the loop on what happened, who was consulted, and how it was responded to.
- Open the Incident investigation and analysis step.
- Record your analysis - your review of what happened and why.
- Record any consultation - who was involved or consulted as part of the review.
- Record the response - the outcome and how the incident was responded to.
- When complete, click Save.
Once saved, you'll see a confirmation that the incident analysis has been added, completing the incident workflow.
Please note: Together, these steps build a complete, audit-ready record of the incident from start to finish.
Working through and completing the ticket
Alongside the four incident steps, the incident ticket works like any other ticket, so you can collaborate and keep everything in one place:
- Assign it to the right people.
- Document progress, decisions, and actions in the ticket discussion.
- Attach any further evidence.
- Complete the ticket once the incident has been fully handled.
Top tip: The incident details stay editable, so you can add more information as things develop.
What happens next?
After completing each stage:
-
The incident record updates to show the details you entered.
-
A confirmation message appears (for example, "Incident details added", "Incident has been categorised", "Corrective actions have been added" or "Incident analysis has been added").
-
A history note is recorded showing who made the change and what they did, so there is a clear trail of activity.
-
Completing one stage unlocks the next stage in the workflow.
-
Where relevant, corrective actions such as updating a care plan can feed information through to the Member's care plan for review.
What Admin / Staffers / Members will see
For Admins
-
Can raise, categorise, action and summarise incidents, and can edit any stage.
For Staffers
-
Can view the incident record and its history. Making changes to the incident stages requires Admin access.
For Members and Helpers
-
Do not manage incidents through the Admin website. Incident management described here is an internal process for your organisation's staff.
Troubleshooting
I cannot see the option to raise an incident
- Confirm incident management has been switched on for your organisation.
- Check that you have Admin access.
- Try signing out and back in.
I cannot categorise, action or summarise an incident
These stages must be completed in order. Make sure the previous stage has been finished first. Confirm you have Admin access, since these actions are limited to Admins.
I completed the steps but nothing changed
Make sure you selected Save. Check for any highlighted fields or error messages that need attention before the record can be saved.
How do the core incident management features differ from the incident management add-on?
-
Built-in core Incident management features give organisations a single, structured process for recording, managing, and reviewing incidents, replacing disconnected notes, spreadsheets, and emails.
-
The incident management add-on provides regulation-aware guidance, including priority ratings, deadlines, reporting links, and guided decision-making to support compliance with aged care serious incident reporting requirements.
Still need help?
If you are still experiencing issues, please contact our Support Team and include:
- Screenshots (if possible).
- The name or email of the person affected.
- The exact steps taken.
- Any error messages received.