
Survey templates are reusable questionnaires you build once in settings and assign to Members as many times as you need. This article walks you through creating one from scratch as a Staffer, entering the survey details, choosing who can respond and who gets notified, setting how often it repeats, and adding your questions. It also covers editing a survey and how to resolve common problems.
Before you start
To complete this process, make sure:
- You have permission to "Configure survey templates and bulk-assign surveys to Members." With it, you can view, create, edit, and bulk assign surveys. Without it, the survey templates option will not appear in your settings menu. If you cannot see it, ask an Admin within your organisation to grant this permission through your access role or as an individual override.
- You have planned your questions ahead of time, including their wording, the order you want them in, and which of the five question types suits each one.
Important: Visit our Surveys: Glossary of Terms and Surveys in Lookout articles to get an overview before proceeding.
Create a survey template
A survey template is the reusable master version of a survey that defines its structure and questions, while a survey is the live copy created from that template and assigned to a Member for completion. All survey templates are stored and managed in the Survey Library within Settings.
Before a survey can be assigned, a survey template must first be created in the Survey Library. Creating a template involves two steps: setting up the survey's overall details and then adding the questions that recipients will answer.
Step 1: Create a new survey
-
From your home dashboard, navigate to the overflow menu by clicking the ellipsis (...) next to your name in the bottom left-hand corner.
-
The overflow menu will open - click ⚙ Settings.
-
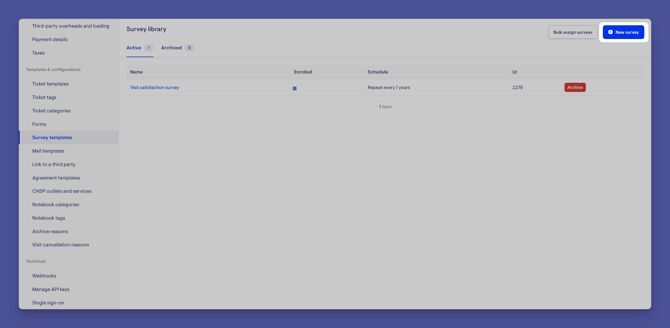
In the main settings, navigate to the Templates and configurations section, then click Survey templates.
- Click the + New survey button in the top-right corner.
Step 2: Fill in the survey details
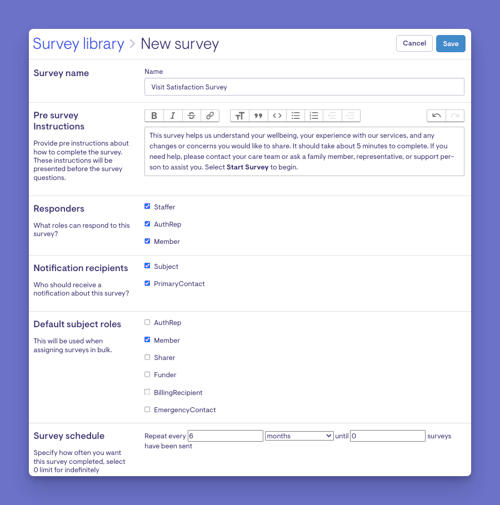
Complete the following:
- Survey name: Give the survey a clear name so it is easy to recognise when assigning it later.
- Pre-survey instructions: Write any introduction you want people to read before they begin. This appears on the opening screen, ahead of the questions.
- Responders: The respondent is the person who completes the survey. Choose which types of people are allowed to answer this survey (for example, the Member, someone who represents them, or a staffer). Respondents are limited to the following types:
- Member
- Authorised Representative
- Staffers
- Notification recipients: Choose who should receive an alert when the survey is sent.
- Default subject roles: The subject is the person the survey is about. Choose who the survey is about by default. This is used when assigning the survey to many people at once. Depending on the survey configuration, this may be:
- A Member
- An Authorised Representative
- A person the Member shares access with
- A person funding the Member's care
- A Billing Recipient
- An Emergency Contact
- Survey schedule: Set how often the survey should repeat and how many times it should be sent. You choose an interval (for example, every month) and a limit for how many times it goes out. Setting the limit to zero means it repeats indefinitely, and setting it to one makes it a one-off survey.
-
Click Save to create the survey.
Step 3: Add your questions
- Once you've hit Save, a green banner will confirm your actions, and you'll be on the surveys main page. You will see all of the survey details you previously entered, plus a Questions section.
-
To start adding in your survey questions, click the Add a question button.
-
The New question screen will load, and you can start creating your first survey question. The following fields need to be completed:
-
-
Question type: Select how respondents will answer the question. Available types are:
-
Free text: Respondents enter their own answer.
-
Visual Analog Scale: Respondents select a point on a sliding scale between two endpoints.
-
Multiple choice: Respondents choose from a list of options.
-
Date: Respondents select a date.
-
Number: Respondents enter a numeric value.
-
-
To fully learn about the question types, please see our Surveys in Lookout article.
-
- Name: The question text shown to respondents.
- Answer required: Determines whether the question must be answered before the survey can be submitted.
- Instructions: Additional guidance to help respondents answer the question.
- Key: A unique identifier used to recognise the question in exported survey data.
Exporting survey response data.
-
When ready, click the Add button in the top-right corner to save your question.
-
Repeat this process to add as many questions as you need for this survey.
-
You can reorder questions to change the sequence people see them in, edit them, or remove them.
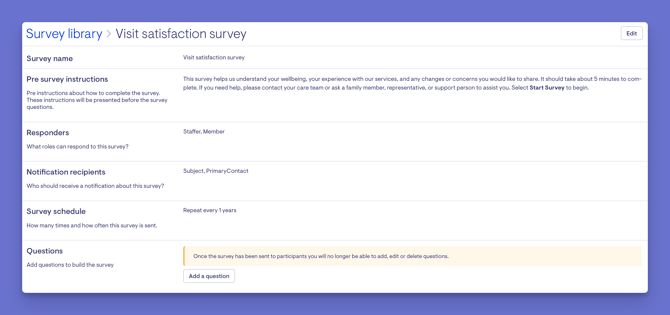
Important: Questions can only be added, edited, or removed before the survey is sent for the first time. After it has been sent, the questions are locked to keep responses consistent and comparable. You'll see a banner on the survey screen outlining this too.
Step 4: Review and confirm the survey
Once you are satisfied with the survey details and questions, it will appear in your active surveys list and be ready to assign to recipients. Surveys can be assigned individually from a person's profile or distributed to multiple recipients using the Bulk Assign feature.
When assigning a survey, you can choose who is eligible to respond and who will receive the survey invitation. Invitations can be sent to:
- The Subject: The person the survey relates to.
- The Primary Contact: The primary person responsible for coordinating the Member's care or services.
By default, both the Subject and Primary Contact are available as invitation recipients. This flexibility allows organisations to direct survey invitations to the most appropriate person while ensuring responses are collected only from approved respondent types.
What happens next?
After you create your first survey template:
-
It is saved in the Survey library and appears under the Active tab, ready to assign.
-
You can keep editing it, including adding, reordering, or removing questions, until it is sent for the first time. After that, the questions are locked.
-
Assign it to a single Member from their Membership, or use bulk assign to send it to many people at once.
-
Once assigned, it sends on its schedule in the recipient's time zone, or right away if you choose, and recurring surveys repeat until they reach the number of rounds you set.
-
Completed answers are saved against each Member's record, and anything that falls outside the ranges you set is flagged with an observation raised for the care team to follow up.
What Users, Staffers, and Members will see
For Admins
Can do everything a Staffer can, plus grant the survey permission to others through a role or individual override.
For Staffers
- Can open the survey library in settings, where surveys appear under active and archived tabs.
- Can create templates, build questions, and assign a survey to one Member or bulk assign to many.
- On a Member's record, can see each round's status (pending, scheduled, completed, or observation raised) and view history to review past answers and who responded.
- Can be set as a responder and complete surveys themselves.
For Members and their representatives
- Get a notification when a survey is sent to them.
- See the pre-survey instructions, then answer each question by its type and submit. Required questions must be answered first.
- If a Member cannot respond, an approved responder such as their authorised representative can complete it for them, and the record notes who did.
Troubleshooting
I can't find the option to add a survey
- Check your access role, as only certain roles can assign and manage surveys
- Make sure you are in the correct person's settings area
- Try logging out and back in
Why can't I add or edit questions anymore?
- Once a survey has already been sent out to at least one person, its questions are locked. This keeps the questions the same for everyone who has already answered.
- If you need different questions, create a new survey rather than changing the existing one.
Why does it say a question identifier is already used?
If you give questions a stable reference label (used for reporting), each one within the same survey has to be unique. Reusing the same label twice in one survey will block saving.Why won't my rating-scale question save?
- A rating scale needs both a low end and a high end, and each end needs its own label - if any of these are missing it won't save.
- If you set a "concern" threshold, it has to sit between the low and high ends. A threshold outside that range will be rejected.
Why can't I set a start date in the past?
A survey's start date has to be in the future. Choosing today or an earlier date will be rejected — pick a later date instead.
Still need help?
If you're still experiencing issues, please contact our support team and include:
- Screenshots (if possible)
- The person's name and email
- The exact steps taken
- Any error messages received