
This guide explains how to assign, manage, edit, and remove surveys in the web app, what you need before starting, and what to do if something is not working.
Overview
Surveys enable your organisation to collect regular feedback from the individuals it supports and those connected to them. A survey can be directed at a Member, a Staffer, or an Authorised representative, depending on how it is set up.
As a Staffer, you can decide how often a survey is sent, choose who answers it and who gets notified, and then assign it to one individual at a time or to many at once. You can also review the responses, resend requests, fill out a survey on someone's behalf, and retire surveys you no longer need.
There are two main areas involved:
- A central survey library, where you view and maintain your survey templates.
- Each individual's own survey section, where you assign surveys to them and review their responses.
Before you start
To complete this process, make sure:
- You have permission to configure surveys. Without this access, the survey library and its options will not appear for you.
- If you plan to assign a survey, it must already be built and active (not archived).
- If you plan to edit a survey, ensure the survey is new and has not been issued.
If it has been issued, the survey will be locked and unavailable to change.
Managing the Survey library
Understanding the survey library list
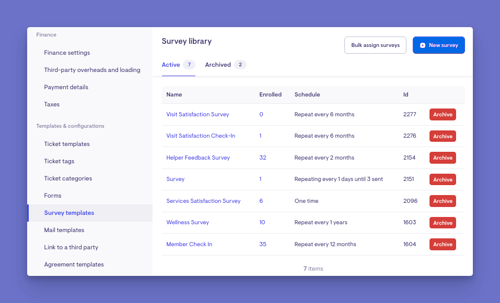
- Each survey shows its name, an Enrolled count (how many people are signed up to receive it), and its Schedule (how often and how many times it goes out).
- The Enrolled number is clickable and takes you straight to the list of everyone currently scheduled to receive that survey.
- Clicking a survey's name opens its full detail page.
Survey details page
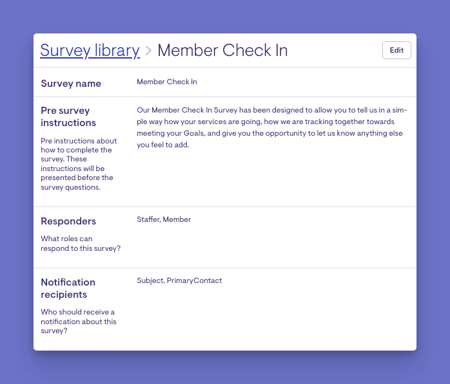
- The detail page shows the survey's name, its pre-survey instructions (the guidance shown to people before they begin), and its Responders (which roles are allowed to answer).
- It also shows Notification recipients (who will be alerted about the survey) and the Survey schedule (how often and how many times it repeats).
-
All the survey's questions are listed in order at the bottom, and there's an Edit button up top to change the survey's details.
Bulk assign surveys
-
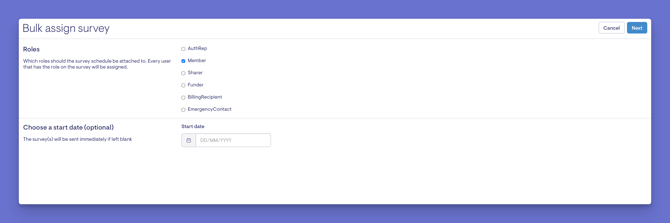
In the Survey library, choose Bulk assign surveys.
-
Under Choose a survey, select the survey you want to send, then click the Next button in the top-right corner.
-
Choose the Roles it should be attached to, optionally set a Start date, then when ready, click the Next button again. Leaving the date blank sends it immediately.
-
Use the filters to narrow down the list (for example, by communities, care plan, or Does not have survey), then tick everyone you want to include.
-
Choose Assign to send the survey to all selected.
Editing a survey
-
From your home dashboard, navigate to the overflow menu by clicking the ellipsis (...) next to your name in the bottom left-hand corner.
-
The overflow menu will open - click ⚙ Settings.
-
In the main settings, navigate to the Templates and configurations section, then click Survey templates.
-
Click on the survey you want to edit to open its main page.
-
Navigate to the top-right corner and click on the Edit button.
-
A new screen will load, where you can edit or update the survey's name, pre-survey instructions, responders, notification recipients, default subject roles, or survey schedule.
-
Once you've made any changes here, click the blue Save button in the top-right corner.
-
A green banner will appear confirming your survey has been successfully updated.
Edit survey questions
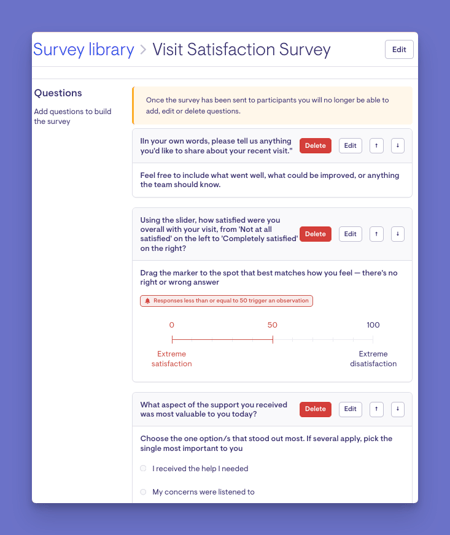
Important: Once a survey has already been sent to recipients, its questions can no longer be added, edited, or deleted. This protects the answers already collected. You will see a notice on the survey page when this restriction applies.
If you want to make changes to your survey questions prior to sending it to recipients:
-
From the Survey templates screen, click on the survey you want to edit to open its main page.
-
Navigate to the questions section, where you'll see each question has some buttons available.
- To delete a question, click its Delete button and confirm your actions.
- To edit a question, click its Edit button and make any changes you wish. Remember to click the Save button to save any changes.
Reordering questions
The order of your questions is the order in which they appear when the survey is answered.
- Use the up arrow ↑ button on a question to move it earlier in the survey, or the ↓ down arrow button to move it later.
- Repeat until the questions are in the order you want. Each move is saved as you go.
Please note: If a survey has already been sent to participants, the ordering buttons will not be available.
Archiving a survey
Surveys are never permanently deleted. Instead, they're archived - so past responses are always preserved, and any survey can be brought back later.
The survey library separates surveys into two tabs:
- Active - surveys currently in use and available to send or assign.
- Archived - surveys that have been retired but kept on record.
Switch between them at any time by clicking the Active or Archived tab.
To archive a survey:
- Open the survey library and make sure you're on the Active tab.
- Find the survey you want to retire and click its Archive button.
- Confirm when prompted.
- A green banner will confirm your actions.
The survey moves to the Archived tab and can no longer be assigned. Any responses already collected are kept.
Unarchiving a survey:
To bring a retired survey back, open the Archived tab, find the survey and click Unarchive. It returns to the Active tab and can be assigned again.
Top tip: To stop one individual's ongoing survey without affecting anyone else, open their Surveys section and choose Make inactive for that survey. Their existing responses are kept.
The Member's Surveys page
Assigning to one individual
- Open the Membership of the Member you want to survey and navigate to ⚙ Settings, then to the Surveys section.
- Click on + Add a Survey.
- Select a survey to choose the survey, choose who it is directed to, and optionally set a start date. If you leave the start date blank, the survey is sent immediately.
- Click on Assign survey to confirm.
Whom you can select vs. who can respond
When setting up a survey, the system allows you to select from six types of people connected to a Membership as survey recipients:
- The Member
- An Authorised Representative
- A Sharer
- A Funder
- A Billing Recipient
- An Emergency Contact
However, only the following recipient types can actually access and complete a survey:
- The Member
- An Authorised Representative
- A Staff Member
Sharers, Funders, Billing Recipients, and Emergency Contacts cannot complete surveys, even though they may appear as selectable recipient options during survey setup. If a survey is assigned to one of these roles, they will not be able to access or submit a response.
Sending, resending, and filling in on someone's behalf
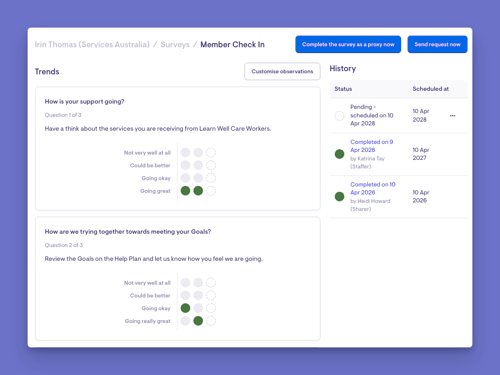
- At the top of a person's survey page, you can Send request now to trigger a survey immediately, or Complete the survey as a proxy now to fill it in on their behalf.
- In the History list, any request that isn't finished can be Resent (to nudge the person again) or filled in for them using the Complete the survey as a proxy action.
- You can also Customise observations here, adjusting the thresholds that decide when an answer raises an alert for this particular person.
Warning: Immediate sending won't work if the survey is archived or if that person's survey run has already finished (for example, it reached its repeat limit).
Trends and History
- Opening a survey for a specific person splits the screen into two halves: Trends on the left and History on the right.
- Trends show how their answers have changed over time, question by question; for scale and number questions, this appears as an easy-to-read chart, so you can spot patterns at a glance.
- History lists every individual survey request for that person, showing its Status and the date it was scheduled, newest first.
Understanding survey statuses
- Each request carries a status shown as a coloured dot with a label: Pending (not yet answered), Completed survey (finished), and Observation raised (an answer triggered an alert worth attention).
- Completed requests also show who answered and when, so you can see at a glance who responded and the date.
- A key/legend on the page explains what each colour means, so you don't have to memorise them.
Customising observation preferences
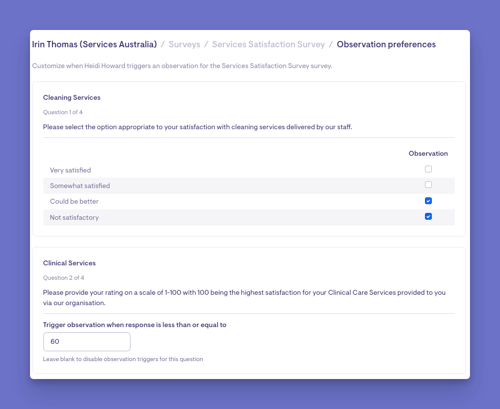
Customising Observation Preferences lets you define which survey responses should be flagged as potential concerns for a specific Member, helping Staffers identify and review important changes or risks more effectively.
- When viewing a specific survey from a Member's Active surveys, the Customise observations button will appear to the right-hand side of Trends.
-
This button sets which answers on this survey will flag a concern for this member. You go question by question.
-
Multiple-choice: Tick the checkbox next to any answer that should raise an observation. Leave normal answers unticked.
-
Rating/scale: Enter a number; an answer at or below it raises an observation. Leave blank to turn it off.
-
Text, date, and number questions: Can't be customised; they never raise observations.
-
Click Continue to save. When the member completes the survey, any flagged answer raises an observation in their Health section for staff to review.
How recurring surveys behave
- For a repeating survey, the next request is created automatically once the repeat interval has passed - you don't need to reassign it.
- Once a survey reaches its set number of repeats, its schedule completes itself and stops sending. A one-off survey simply finishes after its single request.
- Scheduled requests go out at a set time of day in the member's own time zone, and the system checks on a short recurring cycle - so a small delay between the scheduled moment and delivery is normal.
- To stop a repeating survey early for one person, use Make inactive on their Surveys page; their existing responses are kept.
What happens next?
Once a survey is assigned, the process is managed across the Survey library (where the template and schedule are stored) and the individual's Surveys page (where requests and responses are tracked).
- Request created: If no start date is set, the first request is sent immediately. If a start date is set, the request is automatically sent on that date in the member's local time zone.
- Recipients notified: Selected notification recipients are alerted when the survey is ready. Primary contacts are only notified if they are also an eligible survey responder.
- Appears in History: The request is added to the individual's History list with a Pending status, where you can monitor progress, resend the survey, or complete it on their behalf.
- Survey completed: Once responses are submitted, the status changes to Completed. Responses are also included in the survey's Trends data.
- Observation raised (if applicable): If a response meets an observation threshold, an Observation is created automatically and appears on both the survey request and the member's Health section.
- Recurring surveys continue automatically: Repeating surveys generate new requests at each scheduled interval and stop once the configured number of repeats is reached. To stop a recurring survey for an individual, use Make inactive from their Surveys page.
- Enrolled count updates: The Enrolled count in the Survey library shows how many people are currently scheduled to receive each survey.
What Staffers, Members and Authorised Representatives will see
For Staffers
Can view and edit surveys in the library, assign them individually or in bulk, review responses, resend requests, and fill in surveys on someone's behalf.
For Members, Staffers, or Authorised representatives being surveyed
Receive a notification when a survey is available and can complete it, seeing any pre-survey instructions first.
Troubleshooting
I cannot see the survey library or the assign option
- Check that you have permission to configure surveys.
- Try logging out and back in.
I cannot add, edit, or delete questions
This happens once a survey has been sent to participants. To change the questions, you would need to build a new survey instead.
I completed the steps, but the survey was not sent
- Confirm you saved or assigned the survey.
- Check whether a future start date was set — if so, it will send later, at a set time of day in the member's time zone.
- Make sure the survey is active and not archived.
- Check whether the person's survey run has already finished (for example, it reached its repeat limit).
- Check for any validation messages on the form.
A contact didn't receive their notification
- Confirm they were selected as a notification recipient.
- Check that their role is also one of the survey's permitted responders — if it isn't, they are skipped automatically.
Still need help?
If you are still experiencing issues, please contact our support team and include:
- Screenshots (if possible)
- The individual's name or email
- The exact steps taken
- Any error messages received