
This guide explains how a care manager creates a care plan for a Member from a template, fills in each category, and manages it over time - including adding items, tracking care management time, viewing history, and keeping the plan current.
New to care plans? For the bigger picture on what care plans are and who can see them, start with our Care plans: an overview article. You may also find our Care plans: Glossary of terms helpful.
Creating care plans manually
A care plan captures the what and how of the support you'll provide a Member, in partnership with them, to help them achieve their goals. It's both a guide for Helpers and your agreement with the Member about what they can expect.
Creating a care plan manually means a care manager builds it themselves - choosing a template, then working through each category and filling in the details, drawing on information gathered with the Member and their Authorised Representative, their support plan, and any assessments.
Top tip: A well-written care plan means a Member can see exactly what services will be provided and when, and a Helper can pick it up and understand everything they need to deliver safe, high-quality care on any given day.
Before you start
Before reviewing this article, please ensure you meet these prerequisites:
- You are logged into Lookout as a staff member.
- The Care plans (Clinical care) feature is enabled for your organisation.
- You have workflow or care management permissions to create and edit care plans. Read-only users can view a care plan but can't make changes — if you can view but not edit, ask an administrator to review your access.
- At least one care plan template exists to build from. Please see our Creating care plan templates article to learn more.
Real-time visibility
When you save any section of a care plan, it becomes immediately and automatically visible to the Member, their loved ones with care app access, and the Helpers currently providing services to the Member. There's no manual resending - changes are published in real time. Always be sure you're satisfied with a section before saving it.
Creating a care plan
Step 1: Navigate to the Care plan tab
- From the main navigation menu, click Members to open the full list of Members.
- Find the Member you're after - use the search box to type their name, or narrow the list using the filters.
- Click the Member's name to open their profile. This will load their Member dashboard.
- From the horizontal menu, select the Care plan tab.
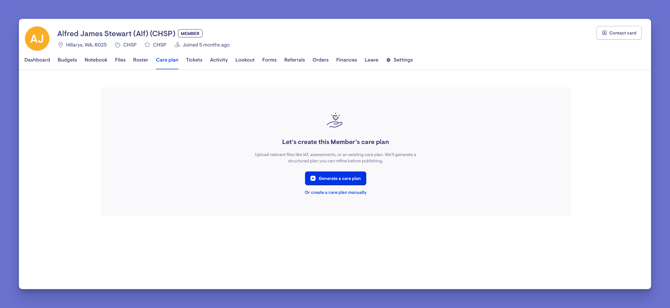
- If no care plan exists yet, you'll see a prompt: "Let's create this Member's care plan."
Step 2: Start a new care plan
-
Depending on if you have Lookout Assist enabled, may change what you see.
-
If you don't have Lookout Assist enabled, click the Create a care plan button.
- If you do have Lookout Assist enabled, but still want to manually create the care plan, click the blue Or create a care plan manually text under the Generate a care plan button (seen in the image above).
-
-
Select a care plan template from your library - this defines the categories and structure for the plan.
-
Once selected, click the blue Create care plan button.
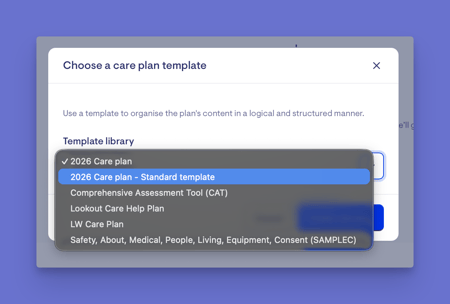
Please note: In the standard setup, three categories are mandatory - "Who I am," "Goals," and "How to support me" - and must be completed before the plan can be saved. Other categories are optional, so the plan can still save if they're left empty.
Step 3: Fill in each category
-
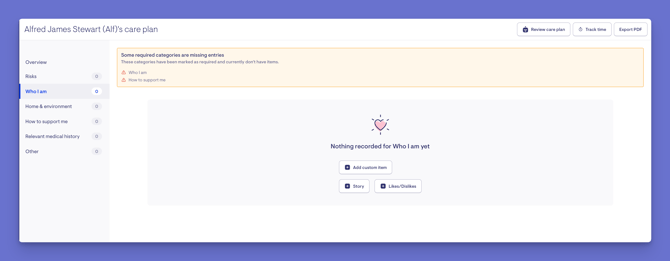
You'll land within a category after clicking the create care plan button, however, on the left, you'll see the list of categories.
-
Click a category to open it and start adding information.
-
Inside the category, the items set up in the template appear as buttons you can select to add, each labelled with the item's name. Selecting one adds that item to the care plan, ready for you to complete.
-
Care plan templates often include prompts and guides - questions to ask the Member or their Authorised Representative - to help you capture the right information.
-
Complete the item's content, then when happy, click Save.
Step 4: Add custom items (optional)
Each category has an Add custom item option for anything extra you'd like to capture.
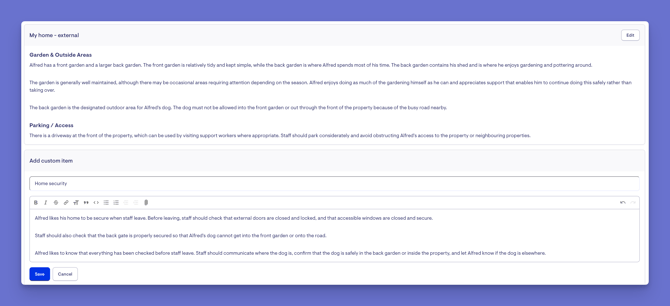
- Click the + Add custom item button.
- Give it a title and complete the body with the detailed content.
- Use the built-in tools to format your content: bold, italics, strikethrough, font size, headings, quotes, code, and bulleted or numbered lists. You can also add web links (highlight text, select the link icon, paste, and link), attach files (the paperclip icon), and undo or redo.
- When happy, click Save.
Step 5: Reorder sections and track your progress
As you complete sections, you'll notice numbers appear next to each category in the left-hand list. These show how many items have been filled in for each section, giving you an at-a-glance view of what's been captured and how much detail each category holds.
You can also change the order of the sections within a category, so the most important information appears first. This is useful when a particular detail needs to stand out. For example, within a "Home and environment" category, you might move Home security up first when there's an entry code or key safe that a Helper must know to get into the home.
To reorder the sections within a category:
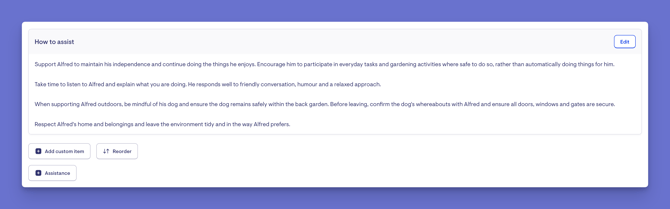
- Open the category and click the Reorder button.
- Use the grab handle (the six dots) to drag a section into the position you want.
- Click the Update button to save the new order.
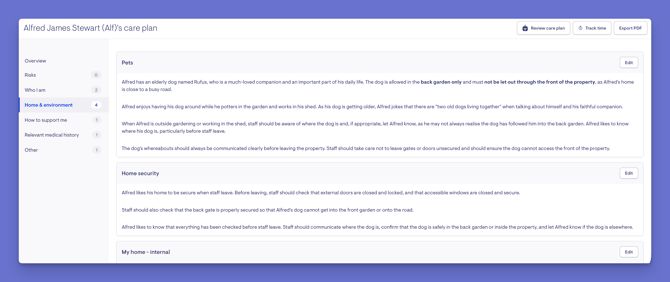
Please note: You can reorder the sections within a category, but the categories themselves listed on the left-hand side of the care plan can't be reordered - that order is set in the care plan template. So it's worth making sure the template's category order is right from the start.
Step 6: Editing existing items
To update a section within a care plan as new information becomes available:
- Navigate to the Member's care plan tab, open the relevant category, and find the section/item you want to change.
- Select the Edit button to update the title or body, add links, attach files, or add new items.
- When you've made your updates or changes, click the Save button to confirm, or Cancel to discard.
All updates are captured in the audit log (see View history below). Remember, changes are visible in real time as soon as you save in the care plan.
Tracking Time, Exporting, and History
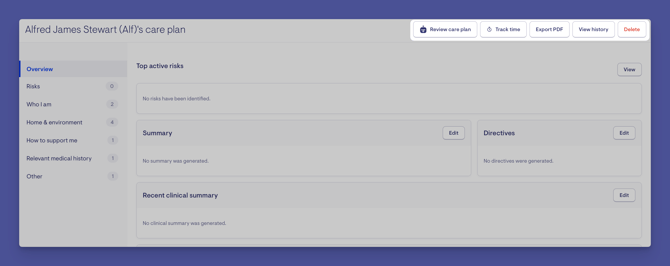
The care plan has some helpful action items at the top:
Track time
Log care management minutes directly from the care plan. Choose the date and time spent (in 15-minute increments, minimum 15 minutes), select whom the time was spent on, and add a description or external ID.
For Support at Home Members, you can select the service (care management or nursing) and the applicable rate, or choose not to charge and simply record the time. For CHSP Members, time is recorded for internal time tracking only. You can edit tracked time or add more later.
Export to PDF
Produce a PDF of the care plan to download, print, email, or upload to the Member's Files tab or a ticket.
View history
See an audit trail of changes: who made each change, what changed, and when. Select See details to view the specifics.
Finding care plans that need attention
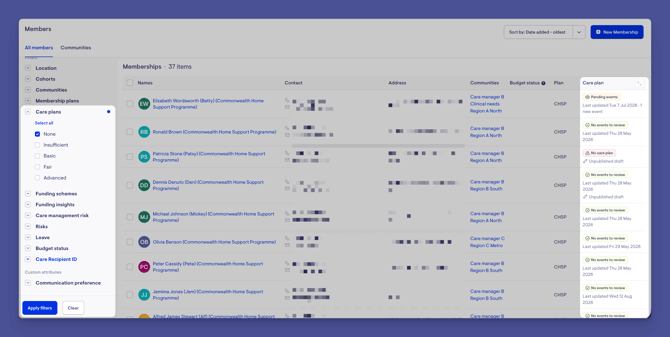
From the Members list, you can filter by care plan content to see which plans need work.
- On the Members list, open the filters and find the Care plans section.
- Filter by how much content a plan has - for example, select none to surface Members who don't yet have a care plan.
This helps care managers quickly see which care plans need more information or review, and which are already sufficiently detailed.
What happens next?
After you create or update a care plan:
- The plan is organised into its categories, with the number of items shown against each.
- Saved changes are immediately visible in the app to the Member, their loved ones with access, and their current Helpers.
- The care plan overview surfaces the Member's top active risks, summary, directives, clinical summary, conditions, medications, and allergies.
- The plan continues to form part of the ongoing health record between the Member and your organisation.
Prefer to let Lookout Assist help? If your organisation has Lookout Assist enabled, it can generate a care plan draft from documents rather than building it from scratch. See our Generating a care plan with Lookout Assist article.
Making the most of care plans
Write for the next person. A good care plan lets any Helper pick it up and know exactly how to deliver safe, quality care that day.
Use the prompts. The template's prompts guide you to capture the right information in the right place - lean on them rather than starting from a blank page.
Keep it current. Update the plan whenever new information comes in, so it stays an accurate, living record.
Be sure before saving. Because changes are published in real time, review a section before saving rather than after.
Track your time. Logging care management minutes from the care plan keeps your records accurate and your funding properly documented.
Troubleshooting
I can't create or edit a care plan
Creating and editing require workflow or care management permissions. If you can view but not edit, ask an administrator within your organisation to review your access.
I can't save the care plan
The mandatory categories ("Who I am," "Goals," and "How to support me") must be completed before the plan can be saved. Check that these are filled in.
A change I made is already visible to the Member or Helper
This is expected - changes publish in real time as soon as you save. Be sure you're satisfied with a section before saving it.
A care plan isn't showing on a Helper's app
The plan only becomes available within 7 days of a Helper's first scheduled visit. It also won't show if they haven't completed a visit in the past 30 days with none upcoming, or if the Member has multiple memberships and the plan sits on a different membership than the visit.
I can't track care management minutes as a charge
For CHSP Members, time is recorded for internal tracking only. The option to select a service and rate appears for Support at Home Members.
Still have a question? If this hasn't answered it, take a look at our Care plans: FAQs, where we answer the most common questions about care plans in one place.