
This guide covers everything Admins and Care Managers do with Clinical forms: enabling the feature and permissions, setting up and managing templates, submitting forms from a Member's profile, attaching forms as must-dos on visits, services, and purchase orders (including in bulk), viewing responses and history, and using Lookout Assist to interpret responses and drive care plan updates.
New to Clinical forms? For an overview, start with our dedicated Clinical forms article.
Unsure about a term? See the Clinical forms: glossary of terms.
Before you start
- Clinical forms must be enabled for your organisation through Release Hub. Once enabled, "Clinical care plan and forms" appears in your Enabled features.
- To manage templates, you need the Configure form templates permission; to submit and view responses, you need Form responses – Read and write.
- To review and publish care plan updates from form events, you'll also need Care plan permissions.
Moving from Focal Assessments? Previous assessment records aren't automatically brought across. Read our dedicated article first: Migrating focal assessments to forms.
Enabling and setting up Clinical forms
Step 1: Enable the feature
- From your home dashboard, navigate to the overflow menu by clicking the ellipsis (...) next to your name in the bottom left-hand corner.
- The overflow menu will open - click Release Hub.
- Enable Clinical care plan and forms.
- Once enabled, it appears in your Enabled features.
Step 2: Turn on the Lookout Assist agent (optional)
If you want AI insights, click Lookout Assist in the main navigation menu. If all sections are expanded, you may need to scroll to find it.
Make sure the Care Plans and assessments agent is turned on in the active agents. (It's on by default.)
Step 3: Check permissions on your access roles
- From your home dashboard, navigate to the overflow menu by clicking the ellipsis (...) next to your name in the bottom left-hand corner.
- The overflow menu will open - click Settings.
- In the main settings, navigate to the Your team section, then click Access roles.
- For the relevant role, click its ellipsis (...) button and choose Edit.
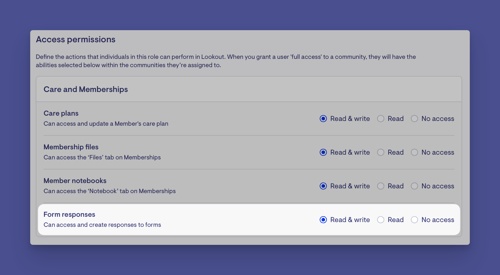
- Under Care and memberships, navigate to Form responses, and set:
- Read - view submitted forms (granted to all staff by default)
- Read and write - submit new responses from the admin view (granted to administrators and care management roles by default)
-
Then, under the Templates section within the same role, make sure Configure form templates is toggled on (granted to administrators and care management roles by default).
-
When ready, click Save to apply your changes.
Managing form templates
Once enabled, the pre-built templates are loaded into your organisation's Forms settings.
- From your home dashboard, navigate to the overflow menu by clicking the ellipsis (...) next to your name in the bottom left-hand corner.
- The overflow menu will open - click Settings.
- In the main settings, navigate to the Templates and configurations section, then click Forms.
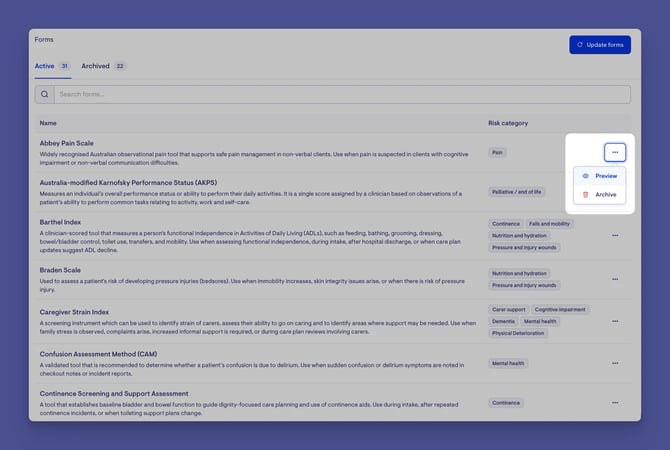
- From here, you can search for forms by name or switch between the Active and Archived tabs.
- Use each form's ellipsis (...) button to open up a small options menu:
- Preview - see what the form looks like when filled out
- Archive - stop a form being available for new submissions (existing responses are kept)
- Unarchive - move a form from the Archived tab back to Active
Submitting a form response
- From the main navigation menu, click Members to open the full list of Members.
- Find the Member you're after - use the search box to type their name, or narrow the list using the filters.
- Click the Member's name to open their profile. This will load their Member dashboard.
- Click the Forms tab. You'll see previously submitted forms here.
- Click the + Submit a form button and choose a form from the list. Click a blue Select this form button to continue.
- Complete the required fields. Some forms include calculated scores, and some show additional questions depending on earlier answers - you can navigate back to review or update answers as you go.
- When happy, click Submit.
- A green banner will appear confirming your form was submitted.
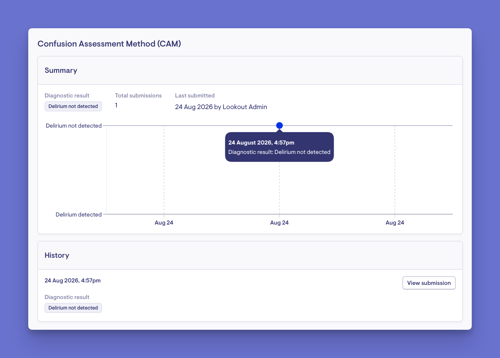
Once submitted, the form shows a blue dot to indicate it has a response. From there you can view the submission details, see the submission history, or Edit the responses. If the form has a tracked score, the summary shows a graphed timeline (e.g. high risk trending to low risk).
Important: A form submitted directly by an admin does not automatically create a ticket. If your team needs a ticket or notebook entry, copy the form URL or export the PDF and add it to your usual workflow.
Attaching forms to visit must-dos
A must-do is a required task completed during checkout. There are three ways to attach a form: on an exceptional (one-off) visit, on a recurring visit, or at the service level (auto-assigned for specific service types).
Exceptional (single) visit:
- From the Member dashboard, click the Roster tab and select the visit.
- In the must-do section, click Add a must-do.
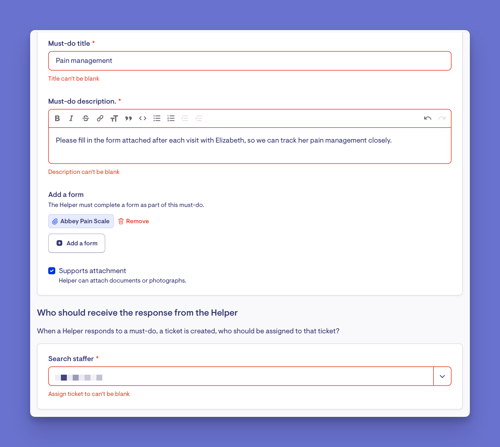
- Enter a title and description, and use the notes to explain why the form is required and what to capture.
- Click + Add a form and select the template.
- Choose who should receive the response ticket. Scroll or type to search for the appropriate staffer, then click their name to select.
- When ready, click the blue Save button.
Recurring visit:
- From the Member dashboard, click the Roster tab and select the visit.
- In the must-do section, click Add a must-do.
- Enter a title and description, and use the notes to explain why the form is required and what to capture.
- Click + Add a form and select the template.
- Choose who should receive the response ticket. Scroll or type to search for the appropriate staffer, then click their name to select.
- When ready, click the blue Save button.
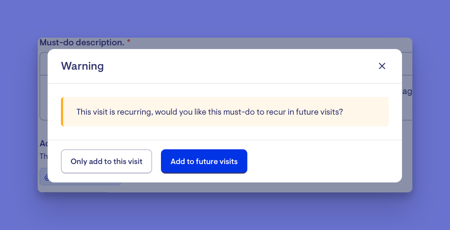
- A confirmation window will appear, asking whether the must-do should apply to all future visits or only this visit— choose accordingly.
Service-level must-do:
- From your home dashboard, navigate to the overflow menu by clicking the ellipsis (...) next to your name in the bottom left-hand corner.
- The overflow menu will open - click Settings.
- In the main settings, navigate to the Care section, then click Services.
- Find the service, click its ellipsis (...) button, and choose Edit.
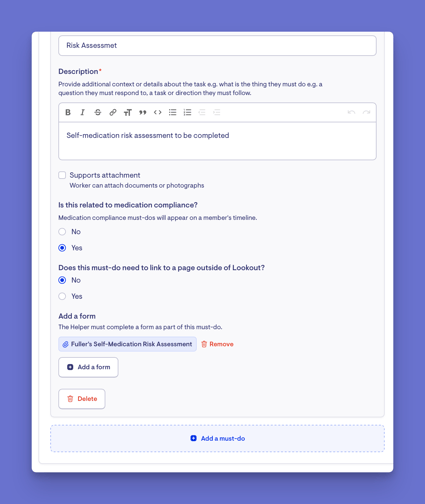
- In the must-do section, select Yes to add a must-do, then enter a title and description.
- If relevant, mark whether it's related to medical compliance.
- Click Add a form and select the template. You can add multiple must-dos to a service.
- When ready, scroll up and click Save.
- The service will then show its must-do count.
Editing or removing a form from a must-do
- Navigate to the must-do in question.
- Click Edit to change the details or swap the form (Remove, then Add a form), or delete the must-do entirely.
Adding or removing must-dos in bulk:
- Go to the Member Roster tab and switch to list view.
- Choose a date range and search to list the visits.
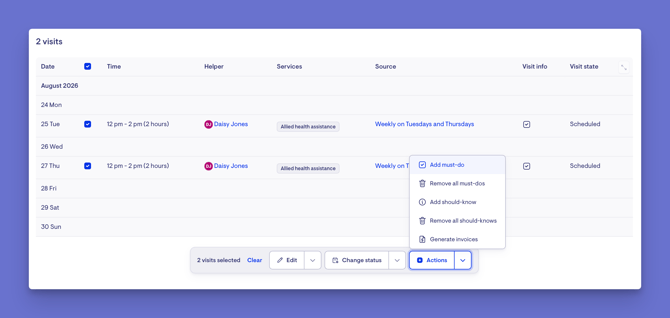
- Select the visits you want to change - the bulk actions menu appears.
- Click the + Actions button to bring up a small dropdown menu.
- Choose Add must-do (enter title, description, form, and the staffer to be alerted) or Remove all must-dos, then confirm.
Attaching forms to purchase order lines (for Suppliers)
If Connected Care is enabled, forms can be attached to purchase order lines as supplier must-dos.
- Navigate to the purchase order and, from the line item, click the ellipsis (...) button.
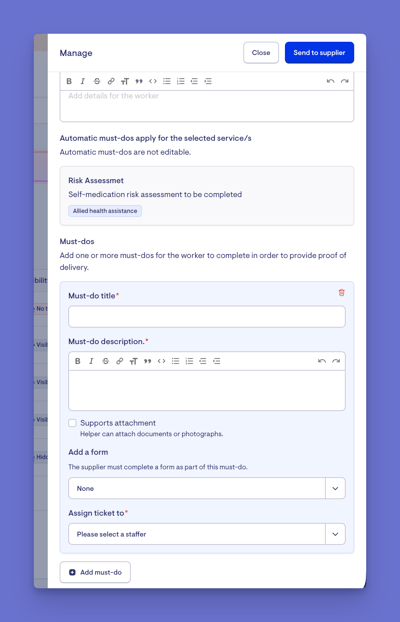
- Choose Manage checkout. A side modal window will appear.
- You'll see the email preview to the supplier by default. Select the Additional visit info tab.
- Enter anything the supplier should know and click the + Add a must-do button.
- Enter a title, description, and any notes/instructions.
- Tick supports attachments if you want the supplier to add supporting documents (for example, photos).
- Choose the form from the drop-down options menu.
- Select the staffer from the dropdown list to assign the ticket.
- When ready, click the blue Send to supplier button in the top-right corner to publish to the supplier.
You can reopen Manage checkout and select Additional visit information later to view or update the must-do. Remember to always save changes to publish any updates.
Please note: Suppliers complete the form during check-out in the Supplier Portal or via a secure checkout link. Suppliers cannot submit standalone forms - they only see forms attached to a must-do.
Must-do response ticket
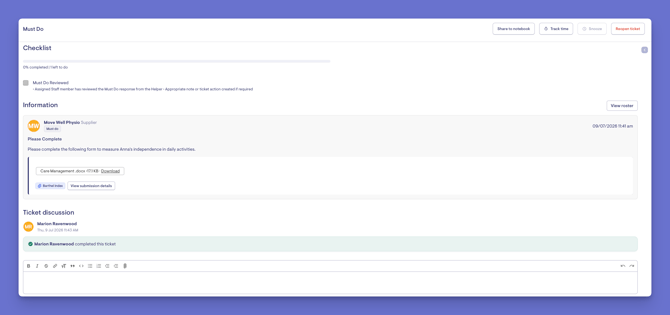
When a Helper or Supplier completes a form attached as a must-do, the response is stored against the Member's profile and a response ticket is created for the assigned staffer, who is notified.
From the ticket, the staffer can review the completed form (View submission details), see the responses, and Mark as completed once actioned. The submission is also visible on the Member's Forms tab.
Viewing form responses and History
All submitted forms appear on the Member's Forms tab, regardless of whether they were submitted by an Admin, Helper, or Supplier.
- From the main navigation menu, click Members to open the full list of Members.
- Find the Member you're after - use the search box to type their name, or narrow the list using the filters.
- Click the Member's name to open their profile. This will load their Member dashboard.
- Click the Forms tab.
- Forms with responses are marked with a blue dot; hovering over a point on a graph shows brief details of that submission.
- Click a response to open the submission details and see all answers.
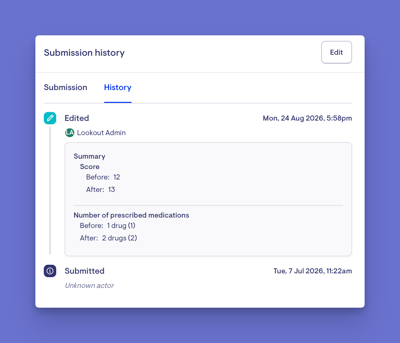
- Use the History tab to see the audit log - who changed what, and when.
- From here, you can also create a ticket, export to PDF, or edit the response.
Scores and tracking
Some forms have promoted properties - key scores tracked over time. When available, you'll see the score (e.g. "15 / 100") and, if supported, a chart showing how it's changed across submissions (for example, high risk trending back to low risk). This helps care managers review trends rather than relying on a single result.
Lookout Assist and Clinical forms
When the Care Plans and assessments agent is enabled, forms gain extra intelligence.
Individual response interpretation: Each submission is analysed and summarised in plain language, compared against the previous response for the same form and Member. This appears as a "Lookout Assist generated summary" on the response.
History summary (rolling): A higher-level overview across all interpreted responses for that form and Member, surfacing trends, changes, and key insights, shown on the Forms tab overview.
Connection to care plans: Form responses can trigger care plan update events and contribute to risk assessments. The Care Planner agent can factor responses into proposed care plan updates.
Risk categories: Some forms are linked to specific risk categories (e.g. Falls Risk Assessment → "Falls"), so results feed into the Member's risk assessments.
Please note: AI-generated interpretations and summaries only appear when the Care Plans and assessments agent is enabled. If it's disabled, forms still work normally - you just won't see the summaries.
Reviewing Care plan events
When Lookout Assist is enabled, submitted forms can appear as care plan events for review. Care managers can open the Member's Care Plan, review events since the last update, select which form submissions to consider, add extra information, generate a draft update, review changes and sources, and publish once approved.
Updating the Care plan manually
When Lookout Assist is not enabled, form results don't automatically update the care plan. To update it manually: review the completed forms, then open the Member's care plan and edit the relevant section (summary, clinical notes, conditions, or category entries) to reflect what the form revealed. If risk has changed, update the risk ratings in the care plan's risks section.
Troubleshooting
I don't see the Forms tab on a Member's profile
Check that Clinical Forms is enabled for your organisation and that you have the Form responses – Read permission.
I can't submit a form - I'm seeing validation errors
Check all required fields are filled and numerical fields contain valid numbers within the allowed range. The messages indicate which fields need attention.
I don't see Lookout Assist-generated summaries
The Care Plans and assessments agent must be enabled in Lookout Assist settings. If it was recently enabled, only new submissions going forward will receive interpretations.
A form I need isn't available
It may have been archived - check the Archived tab. If it isn't in the pre-built library, speak to your Lookout account manager about custom templates.
The score/graph isn't showing
Not all forms have trackable scores - only forms configured with promoted properties show scores and graphs.
Still need help?
If you're still experiencing issues, please contact our Support Team and include:
- Screenshots (if possible)
- The Member's name/email
- The exact steps taken
- Any error messages received