
Learn how to create, send and manage referrals from a Member's Membership, including referral invitations, secure access links, previews and closing a referral.
Overview
What is a referral?
A referral is how your organisation connects a Member with an external clinician or provider for specialised services such as physiotherapy, occupational therapy, or other allied health supports. It provides a secure way to share information, invite providers, track responses, and keep a record of the process.
A referral is a request for a service on a Member's behalf, shared securely with one or more providers. The Referrals tab is where you create referrals, invite providers, monitor responses, and close referrals once arrangements are in place.
Visit Referrals: Glossary of terms that explains the key terms within referrals.
Referral lifecycle
- Create the referral
Record the service required, purpose, budget, contacts, and service location. A linked ticket is created automatically. If a preferred provider is selected, they are invited immediately. - Invite providers
Send secure referral invitations to one or more providers. Each invitation includes a private link that expires after 30 days. - Provider reviews the referral
Providers access the referral using a one-time passcode, review the details, and contact your referral acceptance address if they wish to proceed. Referral activity is tracked for visibility. - Confirm a provider
Once a provider is selected, revoke any remaining invitations to prevent further access. - Manage delivery
Use the linked ticket to coordinate and track the service. Closing or archiving the ticket automatically closes the referral and removes provider access. - View referral history
Closed referrals remain available in the Referrals tab, along with a complete audit trail of changes and activity.
Warning: Reopening a completed ticket does not reactivate the referral.
Before you start
To create a referral, make sure:
- You have permission to edit the Member's record (Staffer access with edit rights on the Membership).
- The service you want to refer to already exists in your settings. The referral type list is pulled from your pre-configured services.
- If you want to invite a provider who is already in the system, that provider must be set up as a Helper with the Clinician role. Without the Clinician role, they will not appear in the provider search.
New to referrals? Visit The Referrals tab to gain an understanding of its purpose and key functionality before exploring the more detailed processes covered in this guide.
Referral Settings
- From the home dashboard, click on the ellipsis icon (...) on the bottom left-hand side of the navigation bar, then click on ⚙ Settings
- Look to the left-hand side of the ⚙ Settings navigation bar to find the Care settings, then click on Referrals
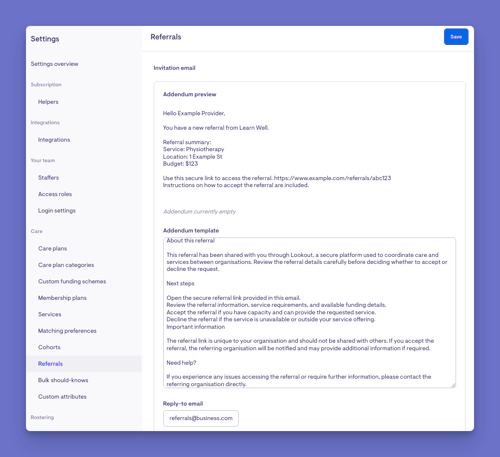
This controls the wording and contact details used when you refer work to an external provider.It contains the following fields for configuration:
The Invitation email
When you send a referral to a provider, Lookout automatically sends an invitation email. It includes a greeting, a summary of the referral (service, location, and budget), and a secure link to view and accept the job. Lookout writes this core message for you. What you control is the note added at the bottom and where replies are sent.
Addendum preview
A live view of the invitation email using sample details, plus your addendum shown beneath it. If you haven't added a note, the addendum shows as empty.
Addendum template
Your own custom message added to the bottom of every invitation, ideal for standing instructions like invoicing directions. Set it once, and it applies to all referrals. Leave it blank for no extra note.
Reply-to email
Where a provider's reply goes if they reply to the invitation. Set this to a monitored inbox so responses reach the right people.
Acceptance email
The address that receives notice when a provider accepts a referral. Set it to a monitored inbox so your team can act on newly accepted work. It must be a valid email address, or left blank.
Customise Copy for the "What's Next?" Section
After a provider accepts, Lookout shows them a "What's Next?" guide with five steps:
- Accept the offer
- Contact the client
- Schedule the service
- Set up billing
- Review outcomes
Each step already has default wording, so you don't need to change anything unless you want to. To use your own text, choose Customise text for a step and type your wording; use Revert to default text to undo. Preview default steps text shows the standard wording as a provider sees it.
Please note: Default steps can automatically include contact information for the relevant people. Customising a step removes that automatically generated detail, so only do so if you're happy to supply it yourself.
Saving
Use the Save button at the top of the page to apply your changes. Lookout confirms when settings are updated, or flags anything that needs correcting.
Quick recap
| Setting | What it controls |
|---|---|
| Addendum preview | Live look at the invitation email plus your note |
| Addendum template | Message added to the bottom of every invitation |
| Reply-to email | Where provider replies are sent |
| Acceptance email | Where provider acceptances are directed |
| "What's Next?" copy | Optional custom wording for the five steps |
Create a new referral
Step 1: Navigate to the Referrals tab and start a New referral
-
View the Referrals tab in the Member's Membership from the Member dashboard
If you're unsure, follow our guide regarding the Referrals tab
Tip: From this list, selecting the description or service name opens the referral preview, and selecting the ticket opens the ticket view
- Click on New referral
Step 2: Complete the referral form
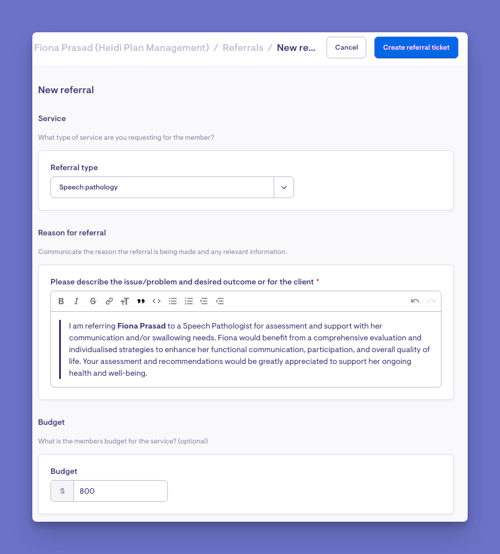
Work through each section:
-
-
Service
What type of service are you requesting for the Member?
Select the referral type from your configured services. Services not covered by the Member's package appear greyed out and cannot be selected. -
Reason for referral
Communicate the reason for the referral and any relevant information.
Enter the purpose of the referral and the desired outcome. This field is required and does not support attachments
-
-
-
Budget
What is the Member's budget for the service? (optional)
Enter an optional budget amount. If provided, it must be greater than zero. -
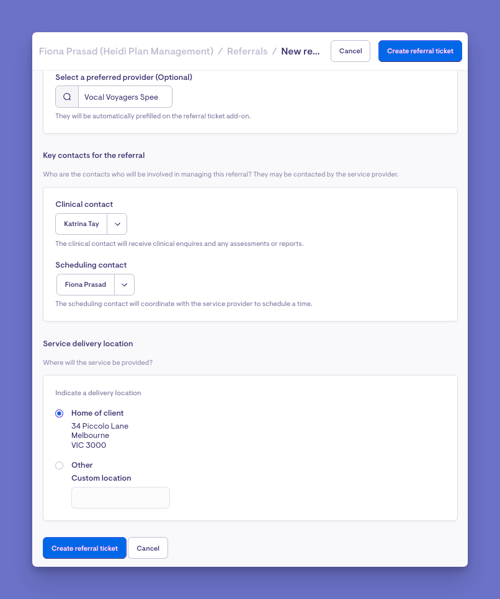
Preferred provider
Does the Member have a preferred provider for this service?
Available only when creating a referral. Selecting a provider automatically creates an invitation for them. Search for a provider by typing their name in the search bar. -
Key contacts for the referral
Who are the contacts involved in managing this referral? -
Select a Clinical Contact and a Scheduling Contact.
The Scheduling Contact may be pre-filled. Select the contact name or the dropdown arrow to choose another contact. -
Service delivery location
Where will the service be provided?
-
-
Choose either the Member's home address or Other. Selecting Other requires you to enter an address.
-
Use Create Referral Ticket to save the referral, or Cancel to exit without saving.
Step 3: Create the referral ticket
- Select Create referral ticket.
- You should now see:
-
A green confirmation banner.
-
A new referral ticket, pre-filled from the referral template, ready for you to review.
-
The referral is listed under open referrals on the Referrals tab.
-
You can now review the ticket, adjust the title, remove any unnecessary assignees, add detail to the description, and save
Managing a referral after it's created
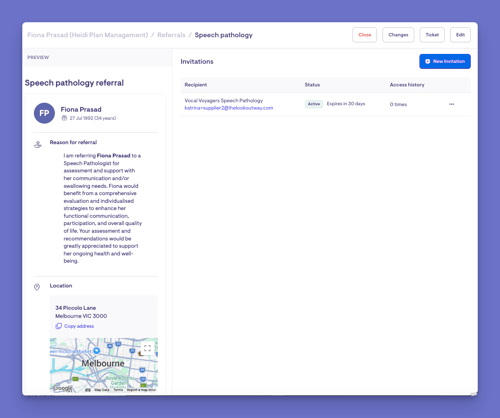
Once you've created a referral, it becomes a living record that you manage from the referral preview - a single screen that shows everything about the referral on one side and the people you've invited on the other. You can reach this screen in two ways: from the referral panel inside the ticket it belongs to, or directly from the Referrals tab on the Member's dashboard. Both lead to the same place and offer the same tools. Here's how to work with a referral through its full lifecycle.
Reviewing what's on the referral preview
To view a referral itself (not the ticket) from a Member's Membership profile:
- Open the Member's Membership profile and view their Member dashboard
- Click the Referrals tab along the top
- You'll see two lists: Open Referrals and Closed Referrals. Find the one you want.
- Click that referral's row to open its detail page.
This opens the referral's own page, which shows a live preview and its list of invitations. This is separate from the associated ticket. (If you clicked the "Ticket" button on that page, it would take you to the ticket instead, so avoid that button.
The referral preview shows a summary of everything the referral captures, including:
- The client the referral is for
- The service being requested
- The reason for the referral (a free-text description)
- A budget, if one applies
- The location where the service should be delivered - either the client's home or a custom address you specify
- Points of contact for clinical questions and for scheduling
- A preferred provider, if you have one in mind
Take a moment to review these details before you invite anyone, since this is the information providers will see when they receive their invitation.
Editing the referral
If anything needs to change, you can edit the referral to update the service, reason, budget, location, contacts, or preferred provider.
-
To edit the referral, click Edit in the top right corner.
- Edit the fields that create a referral: Service, Reason for referral, Budget, Key contacts for the referral, and Service delivery location.
- Once changes have been made, click on Update referral (top right or bottom left)
- If wanting to cancel any changes, click Cancel (top right or bottom left)
After making changes, be sure to save - nothing is updated until you do. Every edit is recorded (see the change history below), so there's a clear trail of what was adjusted and when.
Managing invitations
Inviting providers
The main way you act on a referral is by inviting providers to take it on. You can create an invitation in two ways:
- Choose a provider already in your system using the provider search, which looks through your third-party providers set up in a clinician role. The preferred provider is configured when creating a new referral.
- Add a new provider by entering their name and email address. An invitation goes out as long as the details are valid.
- Each provider you invite gets a secure access link that's valid for 30 days.
Visit our article: Viewing and accepting referrals as a Provider to learn more.
Sending a New Invitation on a referral
Invitations are how you give a service provider secure access to a referral. Below are two step-by-step guides for the most common situations:
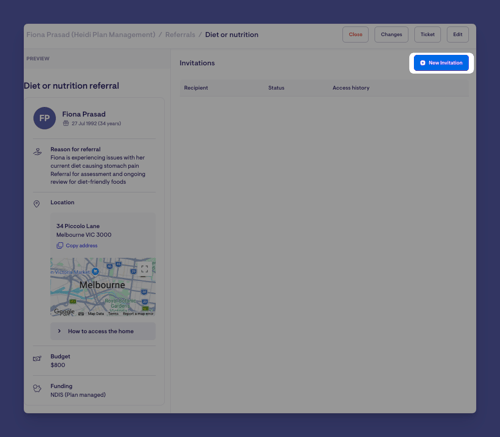
1. When a referral has no provider attached yet
When a referral was created without a preferred provider, it starts with no invitations.
- Open the ticket and find the referral section.
- You'll see an empty state with a note that no invitations have been sent yet.
- Select the option to add a + New Invitation.
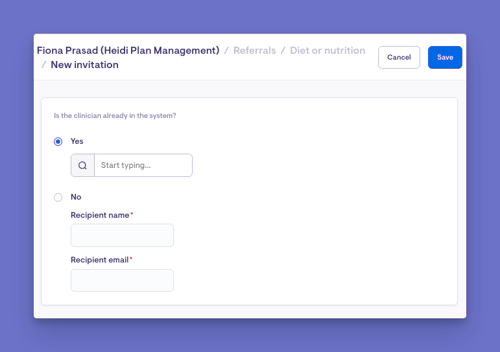
- Choose how to identify the provider:
- Pick an existing Clinician: search for them by name; their name and email fill in automatically.
- Enter details manually: type the provider's full name and email address.
- Select Save: The invitation is created, and you're returned to the ticket.
Use the email action next to the invitation to send it to the provider.
2. A preferred provider invitation was already sent
If a preferred provider was chosen when the referral was set up, an invitation for that provider already exists. You can add more invitations alongside it (for example, to reach out to another provider).
- Open the ticket and find the referral section.
- The existing preferred provider invitation is shown in the list with its current status.
- Select the option to add a + New Invitation (available at the top of the list).
- Choose the provider the same way as before - pick a clinician or enter a name and email.
- Click Save. The new invitation is added to the list without affecting the existing one.
- Both invitations now appear together, each with its own status and expiry.
- Send each invitation individually using the email action beside it.
Caution: Adding a new invitation does not cancel or replace the earlier one. If you want to cancel the original provider's access, revoke it separately.
Sending invitation emails
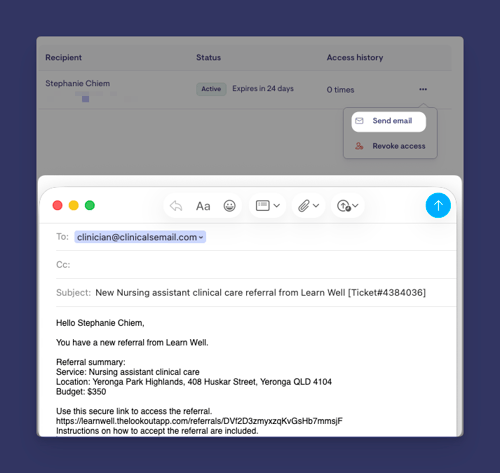
- In the invitation list on the referral page, find the provider's row and click on the ellipsis (...), then the Send email button.
- This opens a pre-filled email in your own email program, already addressed to the provider.
The email automatically includes:- A greeting to the provider by name.
- A note that they have a new referral from your organisation.
- A referral summary - the service, the location, and the budget.
- A secure link that the provider clicks to view the full referral and instructions on how to accept it.
- Any standard closing note your organisation has set up (for example, invoicing instructions). This is configured once in your referral settings.
- The reply-to address is set to your organisation's referral contact email.
- The subject line references your organisation, the service, and the referral ticket number.
- Review and send the email from your email program as you normally would.
Tracking invitations
For every invitation, the referral preview shows you:
- The provider's name and email
- Its current status - active, expired (the 30-day window has passed), or revoked (access was manually removed)
- How much time remains on the access link, if it's still active
- How many times the provider has opened the referral, and when they last did
This gives you an at-a-glance view of who's engaging with the referral and who might need a follow-up.
Resending or revoking access
Each invitation has a small set of options:
- Resend the email: available while the invitation is still active. This opens a ready-to-go message in your preferred email application so you can send it to yourself.
- Revoke access: This immediately cuts off the provider's ability to view the referral. Once an invitation is revoked, it can't be resent. If you want to give that person access again, simply send a fresh invitation.
Checking the change history
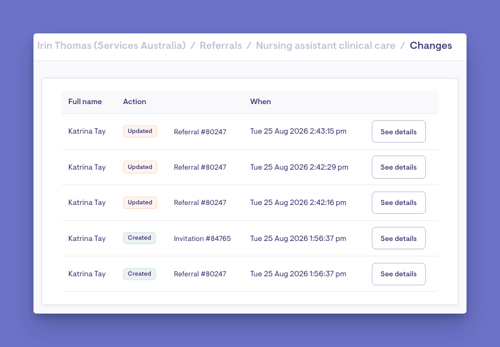
Every referral keeps a change history (an audit log) that records updates made to it over time. If you ever need to confirm what changed, when, or which invitations were added or revoked, this is where to look.
-
Click on Changes within the referral to visit the change history.
-
Click on See details to see what exactly changed, and the previous entry.
Closing the referral
When a referral is complete or no longer needed, you can close it. Closing does two things:
- It revokes all invitations, cutting off every provider's access at once
- It prevents any new invitations from being added
A referral will also close automatically if the ticket it belongs to is completed or archived. A closed referral stays on record for reference, but it can't accept new invitations - if the work needs to resume, you'd create a new referral
What happens next?
After creating a referral
- A referral and linked ticket are created automatically, and you're taken to the ticket.
- The referral appears under Open referrals in the Referrals tab.
- If a preferred provider was selected, an invitation is created using their saved details.
- A referral preview is generated with care plan information, support details, funding, budget, and your organisation's What's next instructions.
- No email is sent automatically. Invitations are sent manually using the referral's email action.
After sending an invitation
- The provider receives an email with a secure link that expires after 30 days.
- They access the referral using a one-time passcode. Referral views and last access times are tracked.
- Providers can accept the referral, which sends an email to your organisation's referral acceptance address. Referral status and access permissions must still be managed manually.
When the referral is closed
- Closing the referral, or completing/archiving the linked ticket, closes the referral and revokes all invitations.
- The referral moves to Closed referrals and cannot accept new invitations.
- Anyone using a referral link after closure will see a message that the referral is closed, with no Member information displayed.
What Staffers and Providers will see
For Staffers
Staffers can:
- Create, edit, preview, and close referrals from the client's Referrals tab.
- View open and closed referrals.
- Invite providers from the clinician search or by entering their name and email.
- Resend or revoke invitations and view the audit history.
- Use the linked ticket discussion for internal notes and file attachments (not visible to providers).
For Providers
Providers access referrals via a secure link in any modern web browser. After entering a one-time passcode, they can view:
- The requested service.
- The referral reason, client goals, and preferred communication channel.
- Budget details, including the client's budget where applicable.
- Location details, including address, map link, and any home access notes.
- Required next steps, including accepting the referral, contacting the client, invoicing, and sharing outcomes.
- Current care plan information, including goals, equipment, devices, and relevant medical history, with a timestamp showing the latest update.
- A 14-day summary of support services, showing service types and total hours only.
Providers can also print or save the referral as a PDF for their own records.
Top tip: If a provider is a first-time user, this article provides the information they need to view and accept referrals independently. Visit our article on Viewing and accepting referrals as a Provider to learn more.
Troubleshooting
I cannot see the Referrals tab or the + New referral button
- Check that your access role allows you to edit the client's record.
- Confirm you are on the correct client's profile.
- Try logging out and back in.
It says no Members found and will not let me create a referral
- A Member must be set up on the client's profile before a referral can be created. Add one, then try again.
The provider I want is not in the clinician search
- The provider must be set up as a helper with the clinician role. If they are not, either assign that role, or use the manual option and enter their name and email address.
An invitation still shows the old email after I changed it
- When an invite is sent, the email on the clinician's profile is copied at that moment. To use a new email, revoke the existing invitation, update the email on the profile, then invite the clinician again. Alternatively, add them manually with the correct email.
Can an invitation last longer than 30 days?
- No. Invitations always expire after 30 days to protect the client's sensitive information. If a provider needs more time, simply invite them again.
I completed the form, but nothing happened
- Make sure you selected Create referral ticket.
- Check the form for highlighted errors, such as a missing reason for referral.
- If the issue persists, contact support.
Still need help?
If you are still experiencing issues, please contact our support team and include:
- Screenshots, if possible.
- The client's name and the Member the referral is for.
- The exact steps taken.
- Any error messages received.