This guide explains how to create a purchase order for a third party supplier and configure Connected Care delivery confirmation options.
Before you start
- You have permissions to create purchase orders
- Your supplier is connected via the supplier portal, with their rates and services configured
- If using Lookout Assist, the feature has been enabled with the Handover summaries agent
Important: Publishing a purchase order line item to the supplier portal means the job is confirmed for the supplier to complete. Connected care does not currently provide an accept/reject workflow for draft purchase orders.
Step-by-step instructions
Step 1: Create a purchase order ticket
- Navigate to the Member's profile.
- Go to Orders, or create the purchase order through the relevant ticket workflow.
- Click New purchase order.
- Enter the ticket title, assignee, priority, due date, description and tags as needed.
- Create the ticket.
For further information on how to create a purchase order ticket, take a look at our dedicated article here.
Step 2: Add the Purchase order details
- Click Add purchase order.
- Select the third party supplier.
- Select the service. If the supplier is configured correctly, only applicable services should be available for selection.
- Confirm the service details and delivery address.
Step 3: Configure delivery options on the Purchase Order
When setting up or editing a purchase order, you can configure delivery-related options:
- Delivery address: Where the service will be delivered
- Delivery instructions: Any special instructions for the supplier
- Checkout window: Set how many hours before and after the estimated delivery date where a third-party worker can check in or out of the service. Select between plus/minus 2 days, plus/minus 7 days or plus/minus 30 days.
- Publish checkout links automatically: Enable this to automatically publish checkout links to the supplier a set number of days before the delivery date (configurable from 0 to 30 days). If unchecked, links can be sent manually for each line item. You can change this option later, if needed.
- Check-in enabled: Toggle this on if you want the third-party worker to check in (record their arrival) before checking out. Workers will be prompted to check-in when they arrive at the Member’s location. Note that check-out is always required.
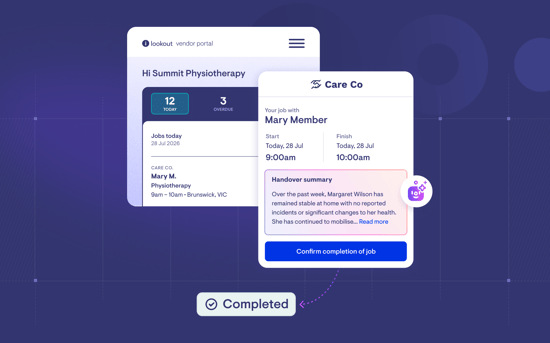
- Generate handover summary (Lookout Assist enabled): Optionally toggle this on if you want to add a generated summary of the Member’s care plan. The summary must be reviewed and approved before it will be visible to external workers.

When generating a handover summary:
- Ensure this option is ticked to utilise this feature.
- Lookout Assist will generate a service-specific care plan summary for the third-party workers.
Step 4: Add Must-Dos, Should-Knows, and forms
On each purchase order line item, through Manage Checkout, you can now add:
- Must-do: Tasks the supplier worker must complete and respond to during checkout (including form responses)
- Should-know: Key context the worker should be aware of before arriving
- Supports attachments: Third-party workers will have the option to upload documents relevant to the must-dos
- Automatic must-dos: If you've configured service-level must-dos, these will be automatically applied to the line item based on the selected services
These mirror the same capabilities already available for visits.
On the purchase order line item, click the ellipsis, Manage checkout and Additional visit info to add these details.
Step 5: Send the checkout link
- On the purchase order line item, click the ellipsis and Manage checkout.
- Enter or confirm the supplier's email address.
- The supplier will receive an email with a secure link to check out.
The line item's status will change to Published.
Top tip: You can also resend the link or revoke it if needed.
Step 6: Save the purchase order
- Click Save.
- Review the purchase order number, helper/supplier information, delivery address, checkout window and checkout link status.
- If needed, use Options > Edit to update the purchase order settings.

Step 7: Review and approve the Lookout Assist summary (if enabled)
Review the generated Lookout Assist summary before it is shared with the supplier worker
- Select Review now if a summary was generated.
- Check the summary only includes relevant care plan information for the service.
- Edit if required.
- Select Approve and apply.
Before you create a purchase order line item, you must review and approve the Lookout Assist summary.
For more information on handover summaries and how they work, please review the dedicated article.

Connected Care currently publishes confirmed jobs. It does not currently support sending a draft purchase order to the supplier for accept/reject within the portal.
Step 8: Track the delivery status
Each purchase order line item now shows a clear delivery status:
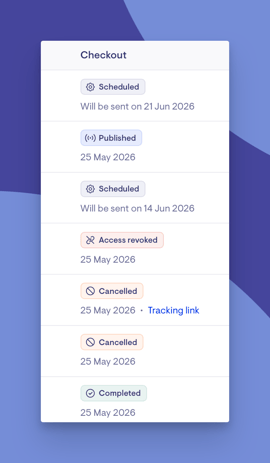
| Status | Meaning |
| Scheduled | The line item has been created and has been scheduled to be sent on the date displayed |
| Published | The link has been sent to the supplier email and published to the supplier portal |
| Access revoked | The link was revoked before checkout |
| Checked in | The supplier has checked in (if check-in is enabled) |
| Tracking link | A courier tracking link has been added |
| Completed | The supplier has confirmed delivery (checked out) |
| Cancelled | The service was cancelled |
What happens next?
- You can add purchase order line items for the supplier to complete.
- If automatic publishing is enabled, eligible purchase order line items will be sent to the Supplier Portal based on the configured timing.
- If manual publishing is enabled, you will need to publish each line item when ready.
- Once a supplier has completed checkout, a confirmation of delivery is received.
To learn more about confirmation of delivery, please view its dedicated article.
Troubleshooting
The service I need is greyed out
- Check the services configured on the supplier record
- Confirm the supplier rate is linked to the correct service
The checkout link is manual, but I expected it to be automatic
- Open Options > Edit on the purchase order
- Enable automatic publishing and choose the publishing timing
- Save the purchase order
Purchase order line items
Before you start
- A connected care purchase order has been created.
- Supplier rates are available on the supplier record.
- You know the estimated delivery date, quantity and pricing approach for the service or product.
- If using must-dos or Clinical Forms, the required tasks/forms are ready to select.
Important: For recurring services, duplicate the relevant line item. If a service occurs on multiple days each week, create separate line items for each day before duplicating.
Step-by-step instructions
Step 1: Add a purchase order line item
- Open the purchase order.
- Click Add new line.
- Select the supplier rate.
- Review the auto-filled rate, tax treatment, description, service and claiming code.
- Enter the required extended description.
- Enter the quantity.
- Choose the pricing approach, such as dynamic unit price, fixed/custom price or pass-through.
- Enter the estimated delivery date and optional delivery time.
- Click Save.
Step 2: Duplicate a line item for recurring services
- Open the ellipsis menu on the line item.
- Select Duplicate line.
- Enter how many duplicates to create.
- Choose whether to include existing must-dos and notes.
- Choose whether to auto-fill estimated delivery dates.
- Select the start date, repeat pattern and weekday.
- Create the duplicate lines.

Step 3: Add should-know information, must-dos or forms
- Open the ellipsis menu on the line item.
- Select Manage checkout, open Additional visit information.
- Add should-know notes for helpful visit context.
- Add must-dos for tasks the worker must complete during checkout.
- Enable attachments if the worker needs to upload a photo or document to support checkout.
- Attach a Clinical Form if required and select who should be notified when the must-do response is submitted.
- You can add multiple must-do items if required.

Step 4: Publish or manage checkout access
- Open the ellipsis menu on the line item.
- Select Manage checkout.
- Click Publish to portal to immediately make the job visible in the supplier portal (otherwise the automatic publishing will push the line item to the supplier portal).
- Click Publish to portal and email link if the supplier should also receive an email link.
- Suppliers can forward the tokenised link to an individual worker for confirmation of service delivery.
- Use Revoke checkout link access if access should be removed.
Step 5: Add a tracking link for product deliveries
- Open the ellipsis actions menu on the purchase order line item.
- Select Add tracking link.
- Enter the tracking URL.
- Save the link.
- The tracking link can be visible to the Member in the Care App.
![]()
Step 6: Cancel a service
- Open the ellipsis actions menu on the line item.
- Select Cancel service.
- Choose the cancellation reason.
- Add additional notes.
- Confirm the cancellation.
- For same-day or late cancellations, contact the supplier directly and document the communication in the ticket discussion.

Step 7: Mark a service as complete (if required)
- Open the ellipsis actions menu on the line item.
- Select Mark as complete.
- Use this when the supplier confirms completion outside the checkout window and can no longer complete check out themselves.
- Review the completed line item and any provisional claim item created.
Important: If a supplier service is cancelled at short notice, contact the supplier directly and document the communication in the ticket discussion. Do not rely only on the portal status for urgent changes.
Cancel purchase order line items when adding Member leave
- Open the membership and navigate to the Leave tab.
- Create or edit the Member leave period.
- Enter the start date, end date, leave type and reason.
- Review any purchase order conflicts that appear.
- Select the purchase order lines to cancel or manage according to your business policy.
- Choose the cancellation reason and additional note.
- Confirm the cancellation.
Top tip: Cancelled services will appear as Cancelled on the Supplier portal.
Reminder: A Supplier cannot cancel services from the supplier portal. They will need to contact you as the provider to action in Lookout.
Review purchase orders on the roster
- Open the Member's roster.
- Review all-day purchase order items in the top all-day section.
- Review timed purchase order items in the roster schedule.
- Use the colour/status indicators to identify scheduled, cancelled and completed services.
- Open the purchase order item to view details or manage the related ticket.
Use bulk actions from Purchase orders
- Open Purchase orders menu.
- Select the relevant purchase order lines.
- Select Actions from the pop up menu.
- Use bulk actions such as add tracking link, remove tracking links, mark as complete, remove services, or remove and add must-dos where available.
- Review selected items carefully before applying bulk changes.
What happens next?
- Published jobs appear in the Supplier Portal according to the checkout window and publishing settings.
- Completed jobs can create provisional claim items where third party invoicing is enabled.
- Cancelled jobs remain auditable and visible with cancellation status and reason.
- Cancelled services remain auditable and visible with their cancellation reason.
- Completed services are reflected on the roster and in purchase order status.
- Teams can manage high-volume updates more efficiently using bulk actions.
Troubleshooting
The supplier cannot action an upcoming job
- Check whether the job is outside the checkout window.
- Publish the job manually if it needs to be visible earlier.
- Confirm whether the job requires check-in or check-out only.
The worker cannot upload a photo for a must-do
- Edit the must-do and ensure attachments are enabled.
- Republish the updated checkout information if required.
The supplier needs to accept or reject the purchase order
- Connected Care currently publishes confirmed jobs. It does not currently support a draft accept/reject workflow.
- Use your organisation’s existing communication process outside Lookout if acceptance is required before publishing.
A product delivery is appearing on the roster
- Purchase order items with an estimated delivery date can appear as all-day items on the roster.
- Other visits can still be scheduled around all-day purchase order items.
I need to hide a purchase order from the member roster
- Open the line item menu.
- Select Hide from member roster where available.
- Confirm whether the item should remain hidden from the Care App.
Want to learn more about Connect Care and its new features? Read our article.