
This guide explains what cohorts are, why they matter, and how to create and assign them in Lookout. It covers what you need before starting, where cohorts appear across the platform, and what to do if something isn't working.
Before you start
Before reviewing this article, please ensure you meet these prerequisites:
- You are logged into Lookout as a staff member.
- To create, rename or archive cohorts, you need the "Configure cohorts globally" permission. This sits within the Workflow Management area of access roles - typically held by Administrators and workflow/template managers.
- To assign a Member to a cohort, you need edit access to that Member, which means access to the communities that Member belongs to.
- You've agreed internally within your organisation on your cohort naming conventions before creating them (we will provide some tips below).
Unsure about some keywords or terminology used? Please review our Cohorts: Glossary of terms article.
What is a cohort?
A cohort is a label you attach to a group of Members who share something important in common.
Think of it like a set of coloured stickers you can put on Member records. A Member can carry several stickers at once, and you can add or remove them at any time.
Cohorts are your own categories - you decide what they mean. Common examples used by providers include:
- Falls risk
- Lives alone
- Chronic illness
- High risk / complex needs
- Recently discharged from hospital
- Dementia support
- Newly onboarded (first 90 days)
Cohorts are deliberately different from communities and membership plans:
| Concept | What it's for |
|---|---|
| Community | Where a Member sits organisationally (region, team, service branch) |
| Membership plan | What the Member is funded and enrolled for |
| Cohort | A characteristic, risk factor or care theme the Member shares with others |
Why cohorts matter
There are numerous benefits that utilising cohorts can bring to your organisation:
Find the right people instantly
You can filter your Member list by one or more cohorts. "Show me everyone who lives alone and is a falls risk" becomes a two-click search instead of a spreadsheet exercise.
Better clinical and care decisions at the point of contact
Cohorts appear directly on the Member's record and on the Member panel beside tickets. Whoever picks up a task can immediately see the risk context — no digging through notes.
Reporting and analytics
Cohort membership is included in Member reports, data exports and analytics dashboards. In the Data Exporter, you can filter by cohort to report on a specific group. For example, only Members who live alone. You can compare outcomes, incident rates, service usage or funding utilisation across cohorts - for example, whether falls-risk Members are receiving more or fewer visits than intended.
Targeted communication
Cohort labels are shared with your messaging and marketing tools, so you can send the right updates to the right group — a wet weather safety message to Members who live alone, or an education campaign to a chronic illness cohort.
A historical record, not just a snapshot
Lookout records the date a Member joins a cohort and the date they leave it. You keep a timeline of how a person's risk profile changed over time, which is valuable for audits, reviews and continuous improvement.
Consistency across a growing team
Instead of every care manager inventing their own shorthand in notes, cohorts give everyone one agreed vocabulary.
Automation and integration
When a Member joins or leaves a cohort, Lookout can notify connected systems automatically — so your other tools stay in step without manual work.
Getting the most out of cohorts
-
Keep the list short and meaningful. Twelve well-understood cohorts beat eighty overlapping ones. If nobody can explain what a cohort means, it won't get used consistently.
-
Write down what each cohort means and when it should be applied and removed. Cohorts are only as good as the discipline behind them.
-
Review regularly. Set a rhythm - quarterly, say - to check that cohort assignments still reflect reality.
-
Archive rather than accumulate. When a cohort stops being useful, archive it. History is preserved and your assignment lists stay clean.
-
Start with your reporting questions. The best cohorts are the ones that answer a question your leadership team keeps asking.
Create a cohort
Step 1: Navigate to the cohort settings
-
From your home dashboard, navigate to the overflow menu by clicking the ellipsis (...) next to your name in the bottom left-hand corner.
-
The overflow menu will open - click Settings.
-
In the main settings, navigate to the Care section, then click Cohorts.
Top tip: If you don't see Cohorts in the Care section of Settings, your access role doesn't include the cohort configuration permission.
Step 2: Add a new cohort
-
Click the + New cohort button in the top right.
-
In Cohort details, enter the Name - this is the only field, and it's what everyone across the platform will see.
-
Click Save.
-
A green confirmation banner will appear, indicating that your new cohort was successfully created.
-
The new cohort is listed alphabetically on the Cohorts page, under the Active tab.
Important: Cohort names must be unique within your organisation. If a name is already in use, including by an archived cohort, you'll be asked to choose a different one.
Add cohorts to Members
There are two ways to assign a cohort to a Member:
Option A: On an existing Member
Open the Members list and select the Member.-
From the main navigation menu, click Members to open the full list of Members.
-
Find the Member you're after - use the search box to type their name, or narrow the list using the filters.
-
Click the Member's name to open their profile. This will load their Member dashboard.
-
Scroll to the Cohorts section within their dashboard and click its Edit button.
-
Tick the checkbox for each cohort you wish to assign to the Member. Untick any that no longer belong to them, if already assigned.
-
When ready, click the blue Save button.
- A green banner will display to confirm that you have successfully updated their cohorts.
You should now see the updated list of cohorts on the Members dashboard.
Option B: When creating a new Member
You don't have to wait for a Membership to exist before assigning cohorts. When you create a Member from scratch, assigning their cohorts is part of the intake. Select any that apply, and they'll be visible as soon as the Membership is created.
Please note: The full onboarding process for a Member is covered in our Onboarding a Member article.
Search/ filter Members by cohorts
Once Members are assigned to cohorts, you can search everyone in a cohort in just a couple of clicks - no spreadsheets required.
- From the main navigation menu, click Members to open the full list of Members.
- Using the filters available, locate the Cohorts filter and click its arrow to expand.
- Your active cohorts will display here - any archived cohorts won't.
- You'll see a checkbox for each cohort; tick the ones you wish to apply as a filter.
- If you tick more than one cohort, the list will show only Members who match all of the cohorts you've selected (for example, "Falls risk" and "Lives alone").
- When ready, click the blue Apply filter button.
- You'll now see the Members list narrowed to only those in your chosen cohort(s).
- You also have the ability to combine cohorts with other filters (community, funding schemes, and so on) for a more precise view.
- To remove all your filters, click the Clear button.
Report on cohorts in the Data exporter
The Members list filter is great for a quick on-screen view. To export a list of Members in a specific cohort, use the Data exporter.
New to the Data exporter? See our Data exporter article for how to create templates, add fields and apply filters.
- Create or edit a data export template using the Memberships data set.
- Add a cohort field to your template. The Memberships data set includes three cohort fields:
- Membership current cohorts – all of the Member's current cohorts in a single cell, separated by commas. Useful for display, but can't be filtered on.
- Membership current cohort names – the Member's current cohorts as a list. This field can be filtered on, and you can choose how it displays in your export (comma, semicolon, colon or pipe separated).
- Membership current cohort IDs – the same as above, using each cohort's ID instead of its name. Also filterable.
- To narrow your export, add a filter on Membership current cohort names (or IDs):
- Contains – include only Members in that cohort (e.g. "Lives alone").
- Omits – exclude Members in that cohort.
- Add a separate filter for each cohort you want to include or exclude. For example, filter on "contains Lives alone" and "contains Falls risk" to get Members who are in both.
Please note: The cohort name in your filter must match the cohort name in Lookout exactly. Only a Member's current cohorts are included, so cohorts they've left and archived cohorts won't appear.
For more on building and running export templates, including formatting options and scheduling, see our Data exporter article.
Archive/ unarchive a cohort
Archiving is the process of retiring a cohort you no longer use. It's the safe alternative to deleting - the cohort's history is kept, and you can bring it back at any time.
-
From your home dashboard, navigate to the overflow menu by clicking the ellipsis (...) next to your name in the bottom left-hand corner.
-
The overflow menu will open - click Settings.
-
In the main settings, navigate to the Care section, then click Cohorts.
-
By default, the Active cohorts tab will load, which lists every cohort currently in use.
-
Find the cohort in the list, and click its ellipsis icon (...) on the right-hand side.
-
From the options menu, select Archive. This option will show in red because it's a retiring action.
-
A green banner will display confirming your cohort has been archived. It will now appear in the Archived tab, with an unarchive button should you wish to unarchive at any time.
If you unarchive a cohort, you'll see a confirmation that the cohort has been unarchived, and it will return to the Active tab, ready to assign again.
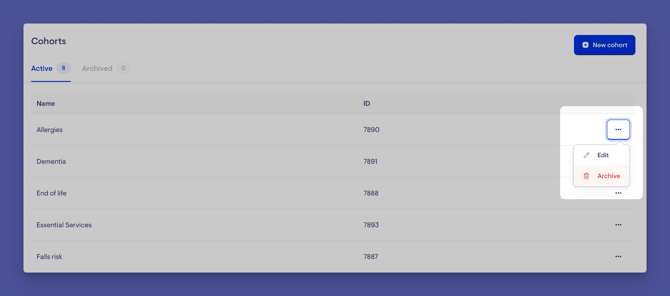
Please note: There's no separate confirmation screen, so double-check you've picked the right cohort before clicking archive or unarchive.
When you archive a cohort:
- It no longer appears as an option when assigning cohorts to Members or during new Member intake.
- It stops counting as a current cohort for everyone - so it won't show in the Cohorts panel on Member records, in the Members list filter, or flow to your connected messaging tools as an active label.
- Existing history is preserved. Records of who was in the cohort, and when they joined and left, are kept for reporting and auditing.
- Its name stays reserved - you can't create a brand-new cohort with the same name while the archived one exists.
What happens next?
After assigning cohorts to a Member:
- Lookout records the date and time the Member joined each newly ticked cohort
- For any cohort you unticked, Lookout records an exit date rather than deleting the record - so your history stays intact
- The Member immediately becomes findable using the Cohorts filter on the Members page
- The cohort names appear on the Member's record and in the Member summary shown alongside tickets
- Cohort information flows into Member reports, data exports (where you can filter by cohort) and analytics dashboards
- Cohort labels are synced to your connected messaging tools, making the Member available for targeted communications
- Connected external systems are notified automatically that the Member has joined or left a cohort
If you rename a cohort, every Member currently in it is automatically re-synced so the new name flows through to your connected tools.
If you archive a cohort, it stops appearing as an option when assigning cohorts and is no longer treated as a current cohort for anyone. It moves to the Archived tab where it can be unarchived later. Historical records are preserved.
What Different People Will See
For Administrators and Workflow Managers
- Can create, rename, archive and unarchive cohorts in Settings
- Can see both Active and Archived cohort lists
- Can assign cohorts to any Member they have community access to
For Care Managers, Rosterers and Support Staff
- Can see the cohorts a Member belongs to on the Member's record
- Can see cohorts in the Member summary panel beside tickets, giving instant risk context
- Can filter the Members list by cohort
- Can update a Member's cohorts if they have edit access to that Member
- Cannot create or rename cohorts unless their access role includes the cohort configuration permission
For Members and Family (the Care App)
- Cohorts are an internal organisational tool. They are not displayed to Members, their families, or Helpers in the mobile apps
- Members may notice the effect of cohorts — for example, receiving communications relevant to their situation
For Connected Systems
- Your messaging and marketing platform receives cohort labels against each Member
- Other integrated systems receive an automatic notification whenever cohort membership changes
Troubleshooting
I can't see the Cohorts option in Settings
Check your access role includes the "Configure cohorts globally" permission (part of Workflow Management). Ask an Administrator to review your role and try logging out and back in.I can't see the Edit button on a Member's Cohorts panel
You need edit access to that Member, which depends on the communities you're assigned to. Ask an Administrator to confirm your community access.
The cohort I want isn't in the list when assigning a Member
Only active cohorts can be assigned. Check the Archived tab in cohort settings and unarchive it if needed. Confirm the cohort was actually saved - it should appear on the Cohorts page in Settings.
I get an error saying the name is already taken
Cohort names must be unique across your organisation. Check the Archived tab — an archived cohort still holds its name. Unarchive it instead of creating a duplicate.
I completed the steps but nothing changed
- Make sure you clicked Save — ticking checkboxes alone doesn't apply the change
- Check for validation messages at the top of the form
- Refresh the Member's record
- Note that changes flowing to connected messaging tools happen in the background and can take a few moments
A Member appears in a cohort they were removed from
Removing a cohort records an exit date rather than erasing history, so the past association may still show in historical reports. Current cohort views should update immediately.
My cohort filter on the Members list returns nothing
Selecting multiple cohorts narrows the results. Try one cohort at a time. Confirm Members have actually been assigned to that cohort.
I can't see an Archive option next to the cohort
Archiving requires the "Configure cohorts globally" permission (part of Workflow Management). Ask an Administrator to check your access role.
I archived a cohort by mistake
Nothing is lost. Open the Archived tab and unarchive it. It returns exactly as it was, with its history intact.
The cohorts filter returns no Members
If you've selected several cohorts, remember that it only shows Members in all of them at once. Try one cohort at a time to widen the results. Confirm Members have actually been assigned to that cohort — check a Member's record if unsure.
A cohort I expected isn't in the filter list
Only active cohorts appear. If it's been archived, it won't show — restore it from Settings → Care → Cohorts → Archived if needed.
I want to keep this list for reporting
Filtering the Members list shows results on screen. To take the data with you, use the Data exporter's Memberships data set and filter on the cohort names field - see Report on cohorts in the Data exporter section above.
My cohort filter in the Data Exporter returns no Members
Check that the cohort name in your filter exactly matches the name in Settings → Care → Cohorts, including capitals and spacing.
Make sure you're filtering on the cohort names or IDs field, not the comma-separated cohorts field. Only current cohorts are included, so Members who have left the cohort or cohorts that have been archived won't appear.
Still need help?
If you're still experiencing issues, please contact our Support Team and include:
- Screenshots (if possible)
- The Member's name/email
- The exact steps taken
- Any error messages received