
This guide explains how to bill a privately funded Lookout membership, what you need before you start, and what to do if something is not working.
Overview
Billing for privately funded Members works differently to government-funded programs. Lookout tracks the services delivered and works out what's owed, but it does not create or send invoices for private Members. Instead, you export that billing data from Lookout and raise the actual invoice in your own finance system (such as Xero or MYOB).
In short:
- Lookout does: Track services, calculate what's owed, and let you export that data.
- Your organisation does: Create and send the invoice, collect payment, and (optionally) record that payment back in Lookout.
"But Lookout already shows invoices - why can't I just send those?"
Lookout can produce invoice records internally (and you'll see a download or print option), but these aren't set up to be sent to private Members the way government claims are. For private billing, the invoice that actually goes to your Member is the one you raise in your own finance system, using the data you export from Lookout.
Before you start
To complete this process, make sure:
- You have finance settings access - but only if a Private plan doesn't exist yet and needs to be created. If a Private plan is already set up, you don't need this. Please see our separate article on creating membership plans,
- You have finance account editing access - but only if you want to open a transaction account for the Member (an optional step, explained below).
Important: Invoices vs. transactions
Lookout treats these as two different things, and it helps to know the difference before you start:
- An invoice (made up of invoice lines) is a record of the services delivered and what they cost. This is what you'll export for billing.
- A transaction is a record of money movement - such as a payment received - and only exists if you open a transaction account for the Member.
For billing, you work with invoices. Transactions only come into play if you choose to record and reconcile payments inside Lookout.
Setting up a privately funded Member
Before you can bill a privately funded Member, complete these steps:
Step 1: Assign the correct funder
When creating the membership, identify who is responsible for paying. This is usually the Member themselves, but it could be a third party such as another provider, an insurer, or a family member. If someone other than the Member is paying, select or create that person or entity as the funder.
Top tip: A profile must exist before it can be assigned as the funder, so create it first if needed. Please see our Creating a profile article to learn more, if needed.
Step 2: Choose a membership plan set to Private
The membership plan controls settings like fees, GST, and travel charges. A typical private plan has no care management fees and no package management fees, and you choose whether to charge GST - unlike government funding, which is always GST-free. For private, this is your business decision. Travel and transport settings work the same way; just set your preference.
For further guidance on setting up a membership plan, please refer to the dedicated article.
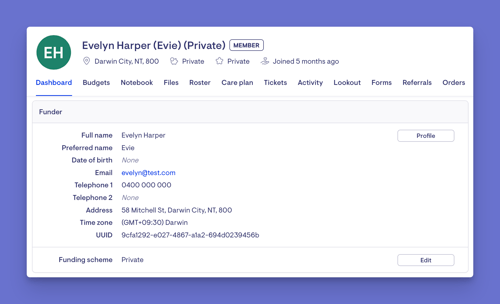
Step 3: Set the funding scheme to Private
Under the funding scheme section, select Private. There are no extra fields to complete - Lookout keeps this simple because there are no government scheme details to configure.
Top tip: If you have different types of private Members and want to tell them apart, you can create a custom funding scheme name. This is simply a "Private" scheme with your own label on it.
Step 4: (optional) Open the transaction account
Opening a transaction account lets you view a financial statement for the Member inside Lookout and record payments against their account. It's optional - you only need it if you want to manage statements or reconcile payments within Lookout. Many providers instead track payments in their own finance system, in which case you can skip this step.
A transaction account only shows data from the day it's created onward. If you open one late, earlier activity won't appear in its in-Lookout statement.
Importantly, this doesn't affect your billing. Because you bill from the invoice lines export(which pulls from invoices, not the transaction account), you can always capture historical services simply by setting the date range on your export - whether or not a transaction account exists.
The only reason to backfill is if you want the transaction account's statement in Lookout to look complete. If so, you can add the earlier activity using a separate Account Transaction Import.
How billing a Private Member works
Once the Member is set up, here's the end-to-end process.
Step 1: Services are provided and recorded
Visits are completed and Lookout tracks them as part of the normal workflow. Purchase orders and ad hoc invoices can also be captured for private memberships if needed.
Publishing invoices: optional, but recommended. You don't strictly need to publish invoice line items before exporting them. However, we recommend publishing to keep your records stable. If you leave invoices unpublished, their invoice numbers can change when a billing run is updated, which can cause mismatches if you're using those numbers as references in your finance system. If you use billing runs with invoice imports, you'll also need to publish before the billing run can be finalised.
Step 2: Export the billing data
Use the Data Exporter to pull out the invoice line items for your private Members.
-
From the main navigation menu, click Data export. If all sections are expanded, you may need to scroll to find it.
-
Assuming you have not made a data export template applicable already, click the blue + New data export template button in the top-right.
-
A new window will pop up. Here, we will select the relevant data sets for this billing data.
-
Name your template.
-
Now we will choose the type of data you want to export. This determines which fields/records are available to include in your template.
-
Use the search bar to filter or scroll to the Finance data sets and click Member invoice lines.
-
Click the blue Create button.
-
Now we will add the appropriate columns to our template. Click the + Add column button, then from the small drop-down options that present, click Data column.
-
Use the search bar to quickly find each data column you will need. As you type, the list will automatically filter to show matching columns. To add several columns at once, search for and tick each column you want (they'll stay selected as you go). The data columns you choose can be renamed.
-
Once you've ticked all the columns you need, click the blue Add * columns button to include them all in one step.
- Navigate to the * column and select its ellipsis (...) button, and click Filters.
- Set the rule to if the funding scheme is equal to Private, then click Save filters.
- Navigate to the top-right corner of the screen, select your date range, then click the blue Export button.
This example illustrates the types of data columns that may be selected to generate the required output for a finance system. As finance systems can vary significantly in structure, configuration, and terminology, the mappings shown below are intended for illustrative purposes only and should not be considered a definitive or prescriptive approach.
|
Common fields/data columns |
Data columns in Lookout |
|---|---|
|
ContactName |
|
|
EmailAddress |
|
|
POAddress |
|
|
InvoiceNumber |
|
|
InvoiceDate |
|
|
DueDate |
|
|
Description |
|
|
Quantity |
|
|
UnitAmount |
|
|
AccountCode |
|
|
TaxType |
|
|
TaxAmount (optional) |
|
|
InventoryItemCode |
|
|
Currency |
|
Top Tip: Customise your export to match your finance system
One of the key advantages of the Data Exporter is its flexibility. Admins have full control over the columns included in the export and can choose the fields that best align with their finance system requirements. Additionally, exported column names can be customised to match the naming conventions used within their finance system, helping to ensure seamless integration and user familiarity.
Step 3: Upload the export into your accounting software
Import the exported file into your external finance system, such as Xero or MYOB, where you create and send the actual invoice to the Member.
Step 4: (optional) Reconcile payments back
If you've opened a transaction account, you can record a received payment in Lookout using an Account Transaction Journal. This keeps the Member's Lookout balance aligned with your finance system.
Whether you do this is a business decision. Note that if you later export transactions (a separate export from invoice lines), the date range only captures transactions within that period - it won't pull in outstanding balances from earlier. Member deposits and payments are included when no date filter is applied.
Remember: Opening a transaction account is about viewing statements and reconciling payments inside Lookout - it's not required for billing. Your billing always comes from the invoice lines export.
Common pitfalls
| Pitfall | Why it matters |
|---|---|
| Assuming Lookout sends invoices automatically | Lookout does not send invoices for private Members — they'll never go out unless you raise them in your own finance system |
| Using the wrong pricing column in the export | You could bill the Member the supplier or Helper cost instead of what they actually owe, creating incorrect invoices |
| Leaving invoices unpublished when using billing runs | Invoice numbers can change and billing runs can't be finalised, causing reference mismatches with your finance system |
| Opening a transaction account late (if you use one) | It only shows data from its creation date onward, so earlier activity won't appear and would need backdating |
What happens next?
After you complete this process:
- Lookout continues to track the services and calculate what is owed
- The exported data is used in your accounting software to create and send the invoice
- Lookout does not send any invoices to the Member automatically
- If you choose to reconcile, the recorded payment keeps the Member's account balance accurate
When Switch Funder is involved
Switch Funder lets staff change who pays for a visit, moving it from one funding source to another. It's used when a visit was recorded under one funder but should actually be billed to another, and it updates the pricing and billing arrangement accordingly. You can do this for a single visit or in bulk.
Some Members have both government funding (such as Support at Home) and private funding - for example, when their government budget runs out, but they want to keep receiving services. In these cases, individual visits can be switched from the government-funded membership to the private one. This means:
- The Member profile has two memberships in the system: one government-funded and one private.
- Visits are moved to the right membership so that the correct funding source pays for them.
- The private portion still requires the manual billing process described above.
Top tip: For Support at Home, small or occasional overspends (say, fifty dollars in a short month) may not be worth switching plans for. These are automatically raised as client contributions within the Support at Home claim instead.
What different Users/Staff will see
For Admins and Staff
- Can set up the private membership, plan, funding scheme, and transaction account
- Can view the Member's financial statement once the transaction account is open
- Can export invoice line data through the Data Exporter and switch funders on visits
For Members
- Do not receive an invoice from Lookout automatically
- Receive their invoice from your external accounting software
Troubleshooting
I can't see finance options or open a transaction account
- Check your access role. Creating a Private plan needs finance settings access, and opening a transaction account needs finance account editing access - both are separate from membership access.
- Confirm you're on the correct Member's profile.
- Try logging out and back in.
I cannot open the transaction account or see finance options
- Check your access role, as opening the account needs finance account editing access, which is separate from membership access
- Confirm you are on the correct Member's profile
- Try logging out and back in
My import into my finance system is erroring
Your finance system expects specific column names and formats. Check that your export columns are renamed and formatted to match its import requirements.
My export is missing services
If you're using the Member invoice lines export, missing services are usually due to missing or unpublished invoices - check the invoices exist and are published for that period, and check your date range.
Only if you're using the separate Transactions export, check when the transaction account was opened, as that export only shows data from its creation date onward.
The export is missing historical services
- Check when the transaction account was opened, as it only shows data from that day onward
- Run a separate data export for the historical period to capture the backlog
The amounts in my export look wrong
- Confirm you selected the Member charge columns, line_price and line_gross_amount, rather than the supplier or Helper cost columns
- Verify the column reflects what the Member should be charged before billing
- Confirm your funding scheme filter is set to Private
I set everything up, but no invoice was sent to the Member
This is expected, as Lookout does not send invoices for private Members automatically. Create and send the invoice from your accounting software using the exported data.
Still need help?
If you are still experiencing issues, please contact our Support Team and include:
- Screenshots (if possible)
- The Member's name
- The exact steps taken
- Any error messages received