
This article explains how to use the Member Notebook to view a Member's complete history, including staff notes, observations, assessments, incidents, condition reports, and visit activity. You'll learn how to navigate the Notebook, search and filter information, create and manage notes, add attachments, set visibility, track time, work with comments, and understand the difference between the Notebook and Checkout Notes tabs - along with what's visible to staff, Members, and Helpers, and troubleshooting tips for common issues.
Member Notebook vs Helper Notebook: This article covers the Member Notebook, found on a Member's profile. Helpers have their own separate Notebook on their profile, which works in a similar way but is covered in its own article — see The Helper Notebook.
Overview
The Notebook is the central timeline on a Member's profile in Lookout, bringing together staff notes, assessments, observations, incidents, condition reports, and visit activity into one searchable record. Staff can filter, search, categorise, tag, pin, and time-track notes, while also controlling whether notes are kept Internal or Shared with Members, loved ones, and Helpers.
The Notebook also includes a separate Checkout Notes tab that displays information automatically captured from Helpers when they complete visits. After a note is saved, it appears in the timeline, can generate notifications, records any tracked time, and becomes visible to the appropriate users based on its visibility settings.
The Notebook is also a two-way communication space: Members and Helpers can comment on notes shared with them, and those comments flow back to your team as a Ticket so nothing is missed.
Before you start
To use the Notebook, make sure:
- You have the correct access permissions for viewing and adding notes (for example, Admin or Staffer)
- The Member whose Notebook you want to view already exists in the system
Step-by-step instructions
Navigate to the Notebook tab
- From the main navigation menu, click Members to open the full list of Members.
- Find the Member you're after - use the search box to type their name, or narrow the list using the filters.
- Click the Member's name to open their profile. This will load their Member dashboard.
- Click the Notebook tab.
Reminder: The Member's Notebook lives within their profile, not in a global menu.
Notebook vs. Checkout notes
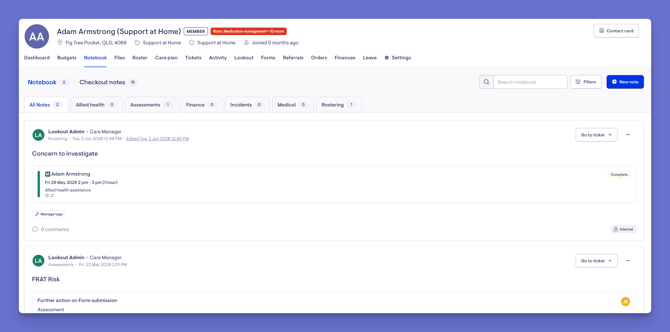
At the top of the page, you will see two tabs sitting side by side, each showing a count: Notebook and Checkout notes.
Notebook: This is the main timeline. It shows the notes your team writes, along with related activity such as observations and assessments. It is the place to record and read ongoing information about a Member.
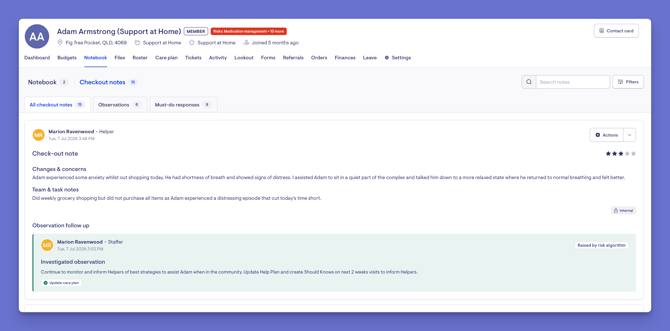
Checkout notes: This is a separate view focused on what Helpers recorded at the end of their completed visits. It gathers feedback, observations raised by Helpers, and Must Do responsescaptured when a Helper checked out of a visit. You switch to it using the Checkout notes tab, and it can be filtered by source and date range.
The key difference is that the Notebook is where staff actively write and manage notes, while Checkout notes is a read view of information that flowed in automatically from Helpers completing their visits.
Please note: Checkout notes are only shared between admin staff and Helpers - they are not visible to Members.
How notes are populated
The Notebook is populated from multiple sources, so you are seeing a combined picture rather than only what your team typed.
Entries can come from:
- Notes written directly by staff in the Notebook (progress notes)
- Condition reports raised by Helpers
- Incident notes
- Observations recorded during care, including those that have or have not been investigated
- Focal assessments
- Activity tied to visits, such as completed visits and cancellations
Because of this, the Notebook acts as a running history that both records what staff enter and reflects what happens in the field.
Filter and search the Notebook
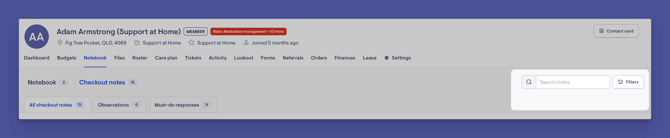
At the top of the Notebook you have a search box and a Filter button. The Filter button shows a count of how many filters are currently active.
Options include:
- Search by keyword to find notes containing specific text
- Tags, so you can narrow to notes with a particular label
- Source, so you can choose which types of entries appear (for example progress notes, pinned progress notes, condition reports, incident notes, and assessments)
- Date range, using a From and Until date
- Sort order, choosing between newest notes first or pinned progress notes first
There are also categories, such as Medical, Allied health, Incidents, Assessments, Finance, and Rostering, which help group notes by theme. Categories are fully customisable by your organisation, so the ones you see may differ. Each category shows a count of the notes filed within it.
Create a new note
-
From the main navigation menu, click Members to open the full list of Members.
-
Find the Member you're after - use the search box to type their name, or narrow the list using the filters.
-
Click the Member's name to open their profile. This will load their Member dashboard.
-
Click the Notebook tab.
-
Click the blue + New note button on the Notebook.
-
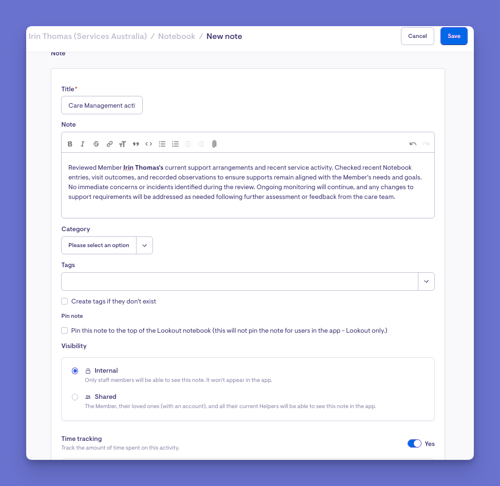
Enter a title and write your note content.
-
Choose a category to group the note.
-
Add one or more tags. You can pick existing tags or create new ones as you type.
-
If you have permission, choose whether to pin the note so it stays at the top of the Notebook in Lookout.
-
Set the visibility (see the next step).
-
Optionally choose who should be notified about the note and any comments it receives.
Top tip: You can also add files and images to a note - for example, documents or screenshots - by opening the note and attaching your file.
Choose who can see the note
When creating a note, you decide on its visibility:
- Internal: only staff can see the note, and it will not appear in the app for Members or Helpers. Internal notes are marked with a lock icon in the timeline.
- Shared: the Member, their loved ones with an account, and their current Helpers can see the note in the app.
If you choose Shared, you can also select specific people to notify - including ticking the checkbox to notify a Helper.
Track time on a note
When creating a new note, you can turn on Time tracking to record how long was spent on the activity. Turn it on by clicking the toggle. When enabled, it will turn purple and reveal more fields to enter.
Once enabled you can:
- Enter the amount of time spent
- Set the date it took place
- Select the service (such as care management or nursing) and pick the rate, or select No charge if applicable
- Record additional details relevant to the Member's funding scheme - for example, a Support at Home membership shows scheme-specific options, while an NDIS membership shows options for support coordination
- Add a description or external ID for your reference
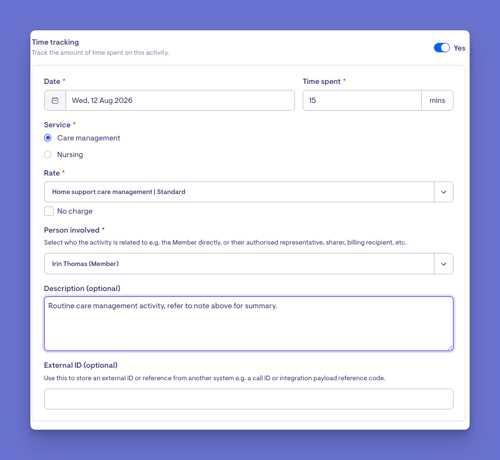
Please note: By default, a new time entry starts at fifteen minutes on today's date, which you can adjust. If you leave time tracking switched off, no time is recorded against the note.
Save the note
When ready, click Save to add the note. You should now see:
- A confirmation that the progress note was successfully added
- The new note appears in the Notebook timeline
- The Notebook count at the top increases
What happens next?
After you save a note:
- The note appears in the Member's Notebook timeline in the chosen sort order
- If you marked it Shared, it becomes visible in the app to the Member, their loved ones with an account, and their current Helpers
- If you selected people to notify, they receive a notification about the note and any comments
- If you pinned it, it stays at the top of the Notebook in Lookout, although pinning does not pin it in the app
- If you tracked time, that time is recorded against the activity
Managing and adding to the Notebook
Editing a note: To make changes, select the ellipsis (…) on the note and choose Edit. Make your changes and select Save.
Managing tags: On a saved note, select Manage Tags to quickly change the tags if needed.
Pinning and unpinning: Pinned notes stay at the top of the Notebook in Lookout. To unpin, select Unpin on the note.
Creating a Ticket from a note: If a note needs to kick off a workflow, select Create Ticket to open one directly from the Notebook.
Sharing a Ticket to the Notebook: From a Ticket, select Share to Notebook to capture important information in the Member's Notebook. Give it a title and description, choose a category and tags, pin if needed, set visibility, and track time if required.
Sharing a Visit to the Notebook: From a Visit, use the action button and select Share to Member's Notebook. Complete the same details (title, description, category, tags, visibility, and time tracking) and Save.
Comments and responding to notes
When a note is Shared, Members and Helpers can add comments to it from the app.
- When a Helper or Member comments, Lookout automatically opens a Ticket (via the Lookout bot) so your team is notified and can respond.
- You can reply through that Ticket, and the Helper is notified through the app.
- Once the matter is resolved, you can mark the Ticket as complete.
This keeps every conversation about a note tracked and actioned, rather than lost in the timeline.
What different Users/Staff will see
For Admins and Staffers
- Can view the full Notebook timeline, including internal notes
- Can create, tag, categorise, pin, and time track notes
-
Can review Checkout notes captured by Helpers
For Members and Helpers (Lookout app)
- Can view notes that were marked Shared
- Cannot see notes marked Internal
- Pinned notes are not pinned for them in the app
Troubleshooting
I can't see the Notebook tab or the option to add a note
- Check your access role, as viewing and adding notes depends on your permissions
- Confirm you are on the correct Member's profile
- Try logging out and back in
I added a note but it isn't showing in the app
- Confirm the note was set to Shared rather than Internal, since Internal notes never appear in the app
- Check that you clicked Save
I completed the steps but nothing changed
- Ensure you clicked Save
- Check for any validation messages on the note form, such as a missing title or content
- Review your active filters and search term, as they may be hiding the note from view
I can see the Notebook but can't add or edit a note
- Viewing and adding notes are controlled by separate permissions. You may have read access (to view) but not write access (to create or edit). Ask an administrator to review your permissions.
- Note that adding notes also depends on having the right access within the Member's community - if you can view the Member but not edit their notes, this is usually why.
I can't pin a note (or the pin option is missing)
- Pinning requires write access to the Notebook. If you don't see the pin option, your permissions may allow viewing but not editing. Ask an administrator to review your access.
The service or rate I need isn't showing when tracking time
- The available services and rates depend on the Member's funding arrangement, so you'll only see the options that apply to their scheme. If a rate is missing, check the Member's funding setup, or select No charge if the activity shouldn't be billed.
The funding-specific time tracking fields aren't appearing
- The extra options (such as Support at Home funding sources or NDIS support coordination) only appear for Members on the relevant funding scheme. If you don't see them, the Member may be on a different funding type.
A very long note is slow to load or shows a "load more" prompt
- Extremely large notes are loaded separately to keep the page responsive. This is expected behaviour - select the option to load the full note content when prompted.
I created a new tag but it didn't save
- New tags are only created if you've chosen to add them as you type. If a tag doesn't appear, re-open the note, add the tag, and make sure you save.
Still need help?
If you are still experiencing issues, please contact our Support Team and include:
- Screenshots (if possible)
- The Member's name
- The exact steps taken
- Any error messages received