
This guide explains what the Helper Notebook is, why it matters, and how to use it - including creating notes, using categories and tags, pinning, viewing edit history, and sharing items from other parts of Lookout into a Helper's Notebook.
Member Notebook vs Helper Notebook: This article covers the Helper Notebook, found on a Helper's profile. Members have their own separate Notebook on their profile, which works differently (including sharing options and comments) - see The Member Notebook tab.
What is the Helper Notebook?
The Helper Notebook is a space on a Helper's profile for keeping notes and important information about them in one place. It gives your team a clear, categorised record of a Helper - everything from progress notes to key items shared from their visits and tickets.
Notes are organised into categories and can be labelled with tags, making it easy to find what you need. You can also pin important notes to the top, and every note keeps a full edit history so you can see what changed and who changed it.
Good to know: The Helper Notebook is an internal, staff-facing record. Unlike the Member Notebook, it doesn't have shared notes or comments - it's for your team's own record-keeping about the Helper.
Why it matters
The Helper Notebook keeps everything you need to know about a Helper together and easy to find. It helps your team:
- Keep a clear history - notes, categories, and edit trails give you an accurate record over time.
- Stay organised - categories and colour-coded tags make information easy to locate.
- Work with context - important items from a Helper's visits and tickets can be pulled into one place.
- Support accountability - every note tracks who added or changed it and when.
Before you start
To view and manage a Helper's Notebook, make sure:
- You are logged into Lookout as a staff member.
- You have access to view the Helper whose Notebook you want to use.
Navigating to the Notebook
- From the main navigation menu, click Helpers to open the full list of Helpers.
- Find the Helper you're after - use the search box to type their name, or narrow the list using the filters.
- Click the Helper's name to open their profile. This will load their Helper dashboard.
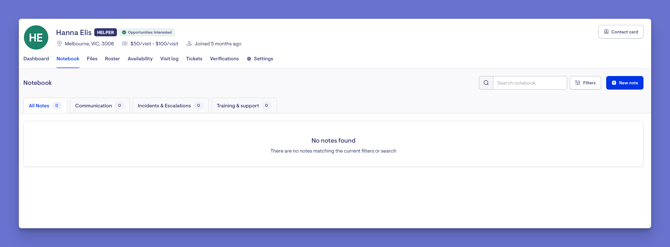
- From the horizontal menu, select the Notebook tab.
- You'll see the Notebook, organised into categories. Categories are customisable by your organisation - we'll discuss this below.
Creating a note
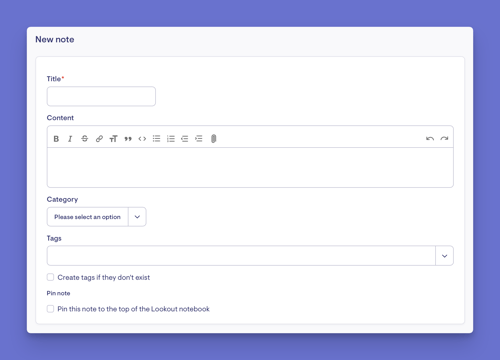
- To add a new note, within the Helper's Notebook, click the blue + New note button on the right-hand side.
- Enter a title and add your content.
- Choose a category for the note.
- Apply any tags - one or more colour-coded labels. You have the option to create tags if they don't already exist.
- If you'd like the note to stay at the top of the Notebook, select the option to pin it.
- When ready, click the blue Save button in the top-right corner.
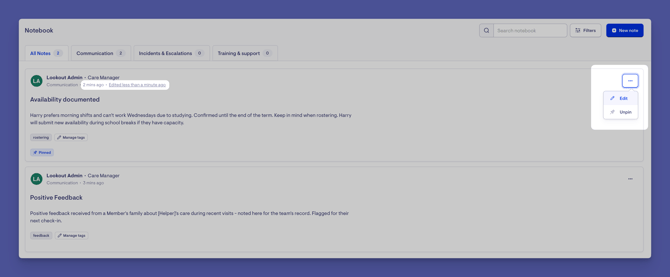
Once saved, the note shows its title and content, along with who added it and when. A pinned note always appears first, no matter how many notes are added.
Editing, pinning, and viewing history
- Edit a note: Select the note's ellipsis (...) button and choose Edit to change its title or content, then save.
- Unpin a note: Select the ellipsis (...) button and choose Unpin - it will no longer stay at the top.
- View edit history: Every note tracks its full edit history. Select the note's edited timestamp, then See details, to view what was changed and who changed it - a helpful audit trail.
Sharing items into the Notebook
One of the Notebook's most useful features is the ability to share items from other parts of Lookout directly into a Helper's Notebook. This creates a note that links back to the original item, so you can jump straight to it.
Sharing a visit:
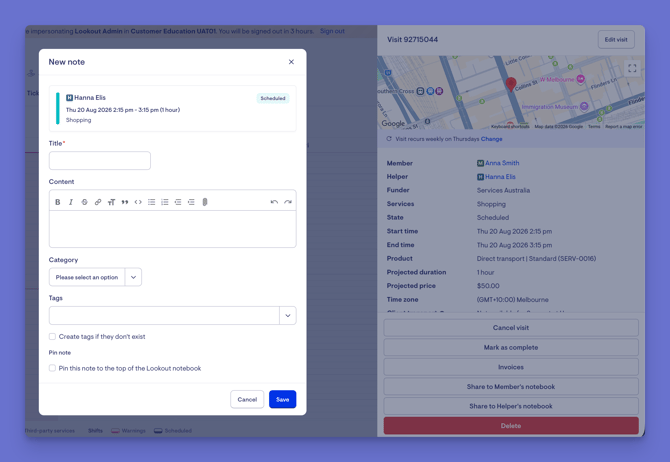
- Open the Helper's Roster and select a visit.
- Choose Share to Helper's Notebook.
- Add a title and content, choose a category, add any tags, and pin if needed.
- Click Save. The visit now appears in the Notebook - clicking it takes you straight to that visit.
Sharing a ticket:
- Open a ticket that relates to the Helper.
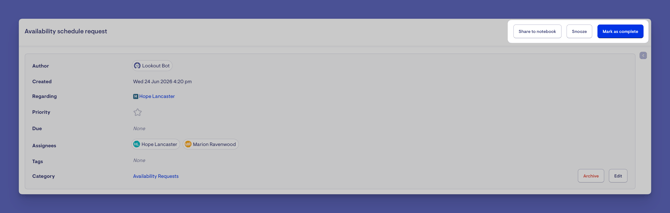
- From the action items at the top, select Share to Notebook.
- Add a title and content, choose a category, add any tags, and pin if needed.
- Click Save. Select View note to jump to the Notebook, where clicking the item links back to the ticket.
Managing categories and tags
Categories and tags are customisable by your organisation, and are kept separate for Memberships, Helpers, and Third-party providers.
To manage categories:
- From your home dashboard, navigate to the overflow menu by clicking the ellipsis (...) next to your name in the bottom left-hand corner.
- The overflow menu will open - click Settings.
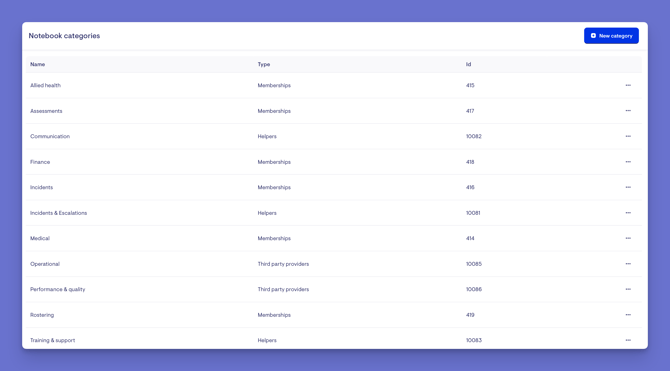
- Scroll to Templates and configuration and select Notebook categories.
- Here you can see all active categories. Click the + New category button.
- Give it a name, choose which Notebook it applies to (Memberships, Helpers, or Third-party providers), and save.
- Use the ellipsis (...) button next to a category to edit or delete it.
To manage tags:
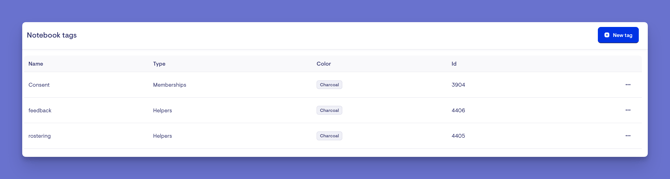
- In Settings, under Templates and configuration, select Notebook tags.
- Click the + New tag button.
- Give it a name, choose where it applies (Memberships, Helpers, or Third parties), and pick a colour, then save.
Top tip: On a note, you can select Manage tags at any time to quickly add or remove tags.
Making the most of the Helper Notebook
The Helper Notebook works best when it's kept current and used consistently across your team. Here's how to get the most out of it:
Agree on how you use categories and tags
Because categories and tags are customisable, decide as a team what they mean and use them the same way every time. Consistent categories keep notes easy to find, and shared tags (like "follow-up" or "training") make filtering reliable across your whole team.
Pin what matters most
Use pinning for the handful of notes people always need to see first - such as an important instruction or an ongoing situation. Keep it to the essentials, so the most important information genuinely stands out at the top.
Pull key items into one place
Rather than hunting across the system, share important visits and tickets straight into the Notebook. Because these create a link back to the original, you get the context in the Notebook and one-click access to the full item whenever you need it.
Write notes for the next person
A good note makes sense to a colleague who wasn't involved. Give it a clear title and enough detail that someone else can pick it up cold - this is what makes the Notebook valuable for continuity and handovers.
Lean on the edit history
Every note keeps a full record of what changed and who changed it. If there's ever a question about a note, check the edit history rather than guessing - it's your built-in audit trail.
Keep it tidy
Review your categories and tags periodically and retire any that are no longer used, so the Notebook stays clean and relevant for everyone.
Top tip: Treat the Notebook as a living record, not a one-time entry - the more consistently your team uses it, the more useful it becomes.
Troubleshooting
I can't see the Notebook tab
Confirm you have access to view the Helper. If you still can't see it, ask an administrator to review your access.
A category or tag I want isn't available
Categories and tags are set up per Notebook type (Memberships, Helpers, or Third-party providers). Make sure the one you need is set up for Helpers (or Third-party providers, if the Helper is one). You can add new ones in Settings.
My note isn't staying at the top
Only pinned notes stay at the top. Open the note, select the ellipsis (...) button, and pin it.
I need to see what changed on a note
Select the note's edited timestamp and choose See details to view the full edit history and who made each change.
A shared visit or ticket isn't linking back
Shared items link back to the original. If a link isn't working, check that the item still exists and that you shared it from the correct Helper's visit or ticket.
Still need help?
If you're still experiencing issues, please contact our Support Team and include:
- Screenshots (if possible)
- The Helper's name
- The exact steps taken
- Any error messages received