
This guide explains the new access roles and permissions experience in Lookout, why it’s changing, what’s new, and how it impacts existing users. We will also go through step-by-step instructions on how to best utilise.
Before you start
Before reviewing these changes:
-
You should be familiar with your current access role setup
-
You may want to review the existing access roles guide or training resources
-
Ensure you have Administrator or relevant permissions to view/manage roles
Please note: This new system replaces the older mechanism. If your organisation has recently switched over, your existing staffer roles will have been automatically mapped to corresponding permissions in the new system.
What’s changing?
We’re introducing a major upgrade to how access roles and permissions are managed in Lookout.
Why this change?
The new system is designed to:
- Make permissions more flexible and easier to understand
- Provide more control at a granular level
- Improve visibility and auditing of changes
- Support growing teams with more complex access needs
When RBAC is enabled, existing staff permissions are automatically migrated, ensuring everyone retains their current level of access. This means there are no immediate changes or disruptions when RBAC is switched on. From that point forward, permissions can be refined with greater granularity as needed.
Please note: One area works slightly differently from the rest. Ticket categories are not automatically locked down when RBAC is switched on - your existing categories remain visible to everyone until you deliberately link them to a role. See "Ticket category restrictions" in this article for details on how this works.
Key features
More granular permissions
Previously, users had one role with a fixed set of permissions. Now, users still have one role as a starting point, but there is now no limit to the number of roles a user can hold. Permissions are:
- Broken into clear sections (e.g. Rostering, Finance)
- Controlled by Read & Write / Read Only / No Access
- Supported by individual toggles for specific actions
New “Staffer Access” permission
We’ve introduced a new permission: Staffer access. This grants the ability to manage access roles and permissions and replaces the previous dependency on the Human Resources role. This new access role will be required for any staff who previously managed roles.
Important: Only the Administrator role can assign roles and manage high-level permissions.
Pre-Built role templates
To make setup easier, we’ve introduced pre-configured access role templates. These will be especially useful for complex areas like Finance and hopefully give a consistent starting point for teams going forward.
For more information, please view our downloadable access role templates breakdown.
Permission overrides
You can now override permissions at an individual level. This means a staff member can have a role plus customised exceptions. Overrides can be applied via the staff profile.
Some common use cases:
- Gradual onboarding of new staff
- Temporarily restricting access (e.g. overdue training)
- Giving team leads additional permissions
Improved auditing & history
A new Permissions History feature allows you to:
- See who made changes
- View what was changed
- Track when changes occurred
This creates a full audit trail (currently retained indefinitely).
Ticket category restrictions
You can now control ticket visibility by role, so staff only see the ticket categories they're meant to. This is especially useful for sensitive tickets, such as medical or incident-related ones, which can be limited to specific teams.
It's important to understand the principle behind how this works:
- Categories are open by default. If a ticket category isn't linked to any role, everyone can see it.
- Linking a category to a role is what creates the restriction. The moment you link a category to one or more roles, it becomes "protected" - from that point on, only staff who hold one of the linked roles can see tickets in that category. Everyone else has it completely hidden.
- A single category can be linked to multiple roles. A staff member only needs one of the linked roles to gain access.
- Administrators always see everything. The Administrator level can see every ticket category, including protected ones, so administrators can never accidentally lock themselves out of ticket data.
In short, you don't switch restrictions on with a separate toggle - linking a category to a role is the act of restricting it. Access is always granted by inclusion (giving the right roles access), never by exclusion.
Expanded control across the platform
Additional improvements include:
- More detailed controls in Lookout Settings & Templates
- Ability to hide memberships based on permissions
- Greater flexibility in Data Exporter
- Ongoing improvements to areas like the Files tab on Member profiles
No disruption to existing users
- All current users will retain their existing access levels
- Changes are applied in the background before release
- Ticket categories are the one exception: they stay visible to everyone until you link them to a role, so any sensitive categories you want to lock down must be set up deliberately (see Ticket category restrictions section above).
Please note: The ability to add staffers via the API remains unchanged, however, the ability to assign an access role or RBAC permissions is no longer possible via the Staffer Role API. Refer to the developer documentation for further details.
Enhanced Data export controls and permissions
We have a new data export dimension called “Permissions”, which provides a point-in-time snapshot of who has what access and why; capturing user details, permission names, role sources, overrides, and scoped records, and is only available when the permissions system is enabled.
Access to the Data Exporter is now controlled by granular permissions (view/download vs. create/manage), replacing broad admin roles with a simpler, unified access model.
Security has been strengthened, with stronger download security. Export files now require explicit permission to access and shared download links no longer bypass access controls.
DEX exports used for CHSP compliance have now been updated; access is controlled by the "finance claims" permission rather than the old broad "finance admin" role.
Creating and configuring access roles
Step 1: Navigate to Access roles
- From your home dashboard, navigate to the overflow menu by clicking the ellipsis (...) next to your name in the bottom left-hand corner.
- The overflow menu will open - click Settings.
- Under the Your Team section, click on Access roles.
You'll see a table listing all of your organisation's access roles, including each role's name, description, a summary of its permissions, and the number of users assigned to it.

Step 2: Create a New Access role
On the Access Roles page, click the New access role button in the top right corner.
Fill in the following fields:
- Access role name - Give the role a clear, descriptive name (e.g. "Administrator", "Care Manager", "Rosterer", "Support Coordinator").
- Access role description (optional) - Describe what staffers assigned to this role can do in Lookout. Make it clear enough so that others know which roles to assign to a new staffer in the future.
Click Save to create the role.
Tip: When you grant a Staffer ‘full access’ to a community, they will have the abilities selected within the communities they’re assigned to.
Step 3: Configure permissions for the role
After saving the role, you'll see the Access roles section. This is where you define what individuals in this role can actually do in Lookout.
Permissions are organised into clear categories:
|
Category |
What it controls |
|
Care and Memberships |
Access to care plans, membership files, notebooks, form responses and related care records |
|
Workforce management |
Managing Helpers, verifications, notebooks, payroll awards, leave, availability, and archiving |
|
Rostering |
Access to rosters, purchase orders, group visits, vacant visit broadcasting, and visit pricing |
|
Account & features |
Managing the subscription, Release Hub features, and paid-feature seats |
|
Data & reports |
Data exports and data import tools |
|
Financial access |
Invoices, accounts, billing runs, claims, Member finances, Helper pricing, and financial reporting |
|
Login & access management |
Community access, staffer management, permission configuration, and login/security settings |
|
Lookout settings & templates |
Care delivery settings, rostering settings, finance settings, and various template configurations |
|
Developers & IT |
Webhooks, API keys, provider portal integration, SSO, and task history |
For each permission, you'll see one of two types of controls:
- Toggle switches - For permissions that are either on or off (e.g. "Manage group visits", "Billing runs").
- Multi-level options - For permissions with different levels of access. You can choose between:
-
- Read & write - Full access to view and make changes.
-
- Read - View only; no ability to make changes.
-
- No access - The permission is not granted.
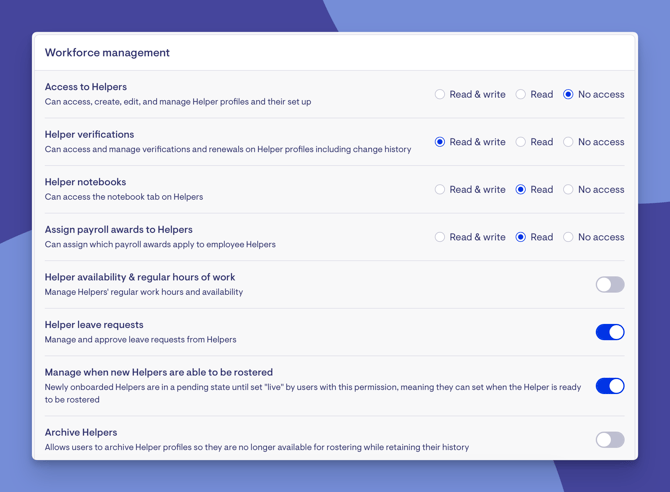
Each permission shows a clear name and description so you can understand exactly what it controls.
Once you've configured the permissions, click Save.
Important: If the role is already assigned to staff members, a note at the top of the page will show you how many people will be affected by any changes you make. Always review this before saving.
Assign Staffers to the role
Each access role has three tabs:
- Access role Settings - Where you configure the role name, description, and permissions (covered above).
- Staffers - Where you assign and remove admin staff members.
- Ticket categories - Where you link ticket categories to the role (more on this below).
To add staff members to a role:
-
From your home dashboard, navigate to the overflow menu by clicking the ellipsis (...) next to your name in the bottom left-hand corner.
-
The overflow menu will open - click Settings.
-
Under the Your Team section, click on Staffers.
-
Click the +Add staffers button.
-
A search window will appear - search for the staffer by name.
-
Select the staff members you'd like to add.
-
Click the Add button.
-
The assigned staffers will appear in a list showing their name and avatar.
To remove someone, click the remove action next to their name and confirm.
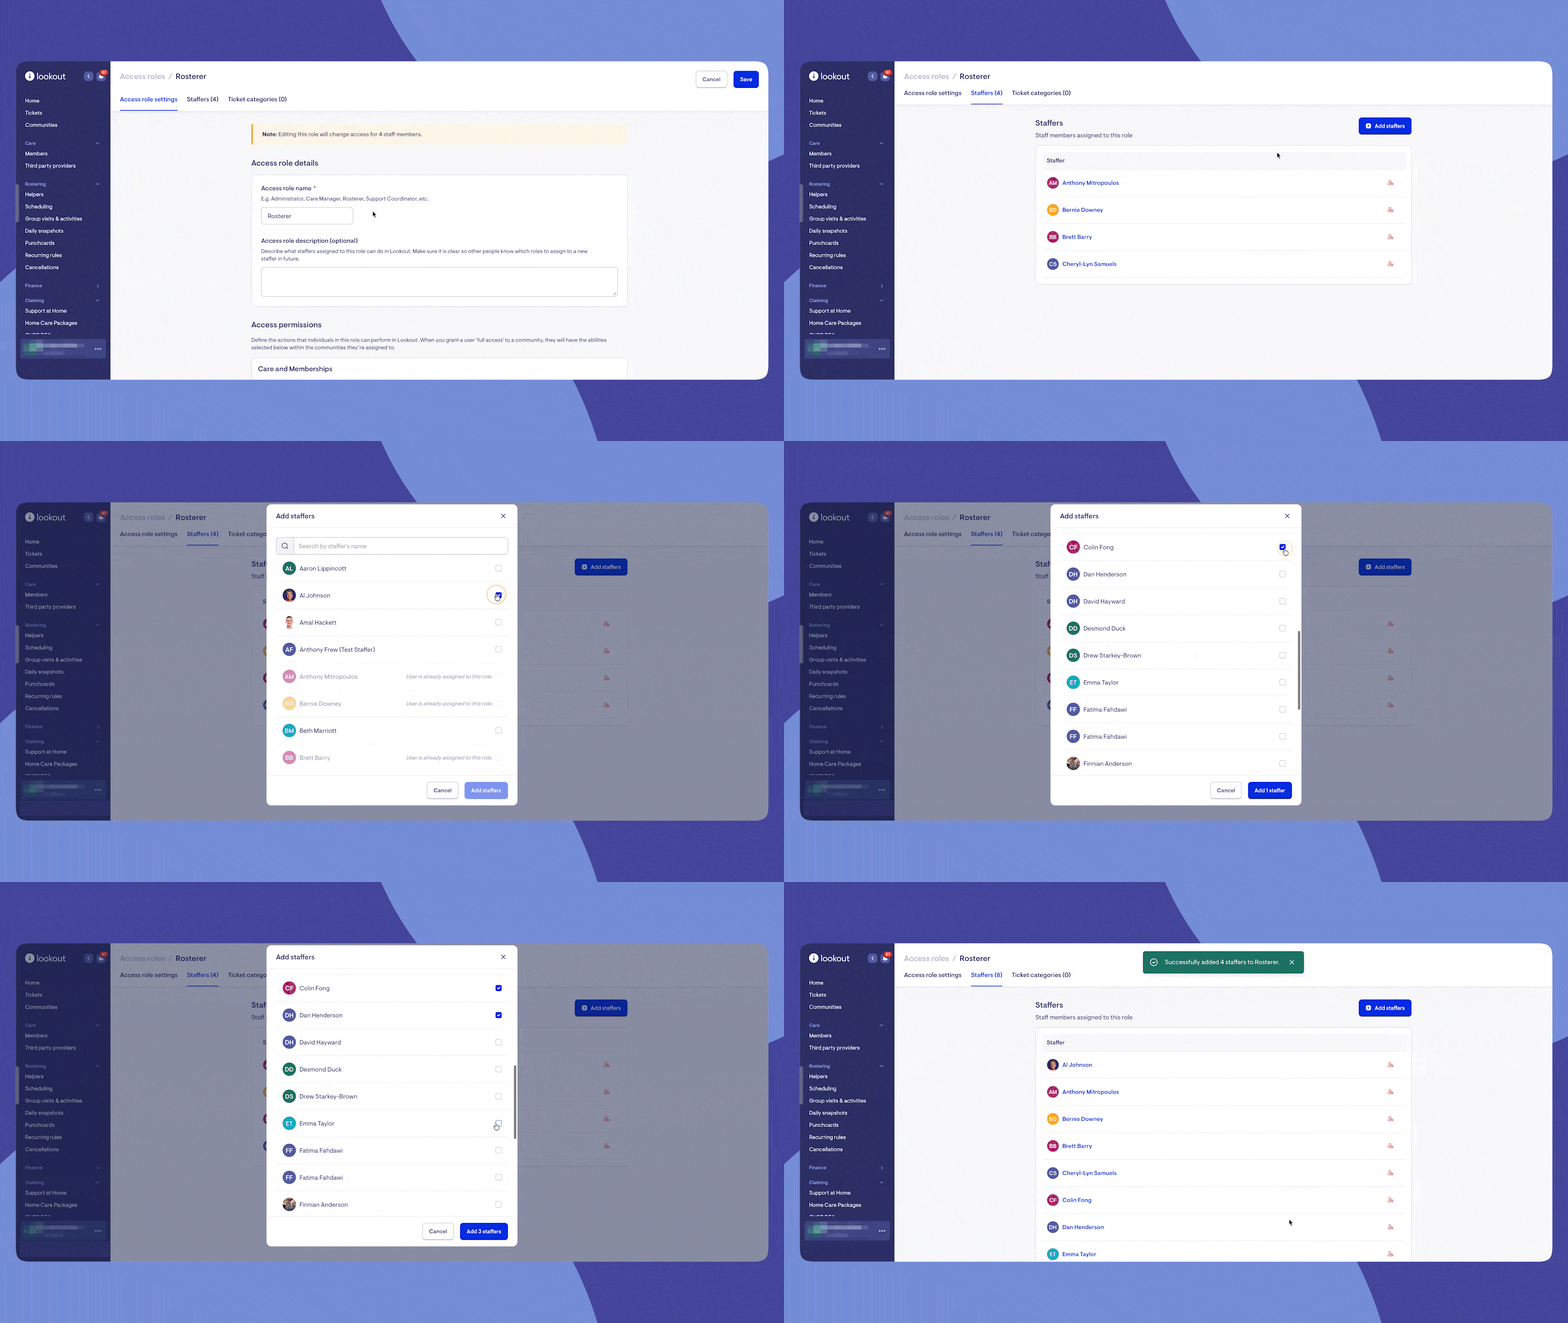
Top tip: A staffer can be assigned to multiple roles. When a staffer has more than one role, their permissions are combined - meaning they get all the permissions from all of their roles added together.
Link ticket categories to a role (optional)
If your team uses tickets, you can control which ticket categories a role has access to:
-
Click the Ticket categories tab on the role.
-
Click Add ticket category.
-
Select the ticket category from the dropdown list.
-
Click the blue Add button.
This lets you grant access to specific ticket types. For example, allowing a care coordinator role to manage incident tickets but not finance-related tickets.
A few things worth knowing when setting this up:
- You can manage these links from either direction - from the role's Ticket categories tab, or from the category's own detail page.
- The same category can be linked to more than one role. If sensitive incident tickets should be seen by two different teams, link that one category to both roles - a staff member only needs one of the linked roles to gain access.
- Removing a link is instant. Once a category is unlinked from every role, it reverts to being visible to everyone again.
Top tip: Remember that access is granted by inclusion, not exclusion. The safest way to lock down a sensitive category is to link it to the specific role(s) that should see it, not to try to exclude the people who shouldn't.
What restricted categories look like in practice
Once a category is protected, the restriction applies consistently everywhere tickets appear - not just in one place. For staff who don't have access, a restricted category behaves as if it doesn't exist at all:
- The main tickets area/inboxes: Restricted categories don't appear in the list of ticket inboxes. The "All tickets" view also only counts and shows tickets from categories the person can access, so hidden tickets never leak into totals or search results.
- Tickets on a Member's profile: When viewing an individual Member, staff only see tickets in categories they're permitted to see. Sensitive tickets linked to a Member simply won't appear for staff who lack access.
- Tickets linked to a Helper/worker: The same filtering applies to tickets attached to staff and helper records.
- Creating a new ticket: When a staffer goes to raise a ticket, the list of available ticket templates is filtered too. They can only start tickets in categories they have access to, so they can't accidentally create a ticket in a restricted category.
- The Files areas (on both Member and Helper profiles): Files and attachments tied to tickets are filtered by the same rules, so restricted ticket content stays hidden in the files views as well.
- Direct links:If someone tries to open a specific restricted ticket they don't have access to (for example via a shared link), the system blocks it rather than showing the content. Access is checked at the point of viewing, not just when browsing lists.
A worked example
Suppose you have an "Incidents" category containing sensitive safeguarding tickets:
- Today, before you do anything, that category is visible to every staff member because it isn't linked to any role.
- You create (or choose) a "Safeguarding Team" role and, on that role, add the Incidents category under its Ticket categories tab.
- Instantly, the Incidents category becomes protected. Only staff assigned to the Safeguarding Team role continue to see incident tickets - in the inbox list, on member profiles, in file views, and when creating tickets.
- Everyone else loses sight of the category entirely; they won't even know it's there.
- Administrators still see everything, so oversight is never lost.
View and manage an individual's permissions
To see exactly what a specific staff member can and can't do:
-
From your home dashboard, navigate to the overflow menu by clicking the ellipsis (...) next to your name in the bottom left-hand corner.
-
The overflow menu will open - click Settings.
-
Under the Your Team section, click on Staffers.
-
Find and open the staffer's profile by clicking their name.
-
Select the Permissions button from the top right-hand corner. This will show a counter when individual permissions are applied.
- Alternatively, instead of clicking on the Staffer's name, navigate to the right-hand side of the screen and click their responding ellipsis (...) button.
- From the short options menu, click Permissions.
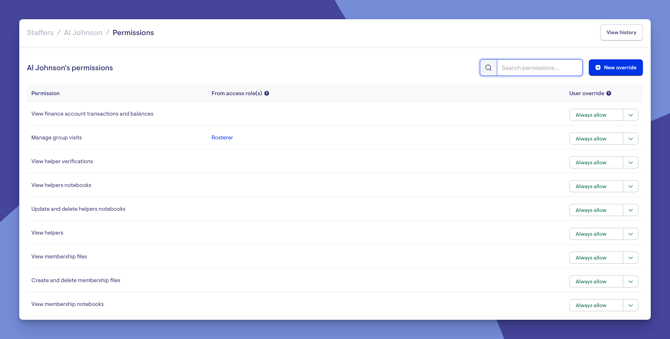
You'll see a full table of every permission, showing:
- Permission - The name of the permission.
- From access role(s) - Which of their assigned roles grant this permission (with clickable links to each role).
- User override - Whether any individual override has been applied.
Top tip: Use the search bar at the top to quickly filter through the permission list.
Apply individual overrides (optional)
Sometimes you need to grant someone permissions their access role doesn't include or revoke a permission they'd normally have. Overrides let you fine-tune access at the individual level.
On the staff member's permissions page, each permission row has a User override dropdown with three options:
- No override - The person keeps whatever access their roles give them (this is the default).
- Always allow - The person gets this permission regardless of their roles.
- Always deny - The person loses this permission even if their roles include it.
Changes take effect immediately when you select a new option, so no extra save step is needed.
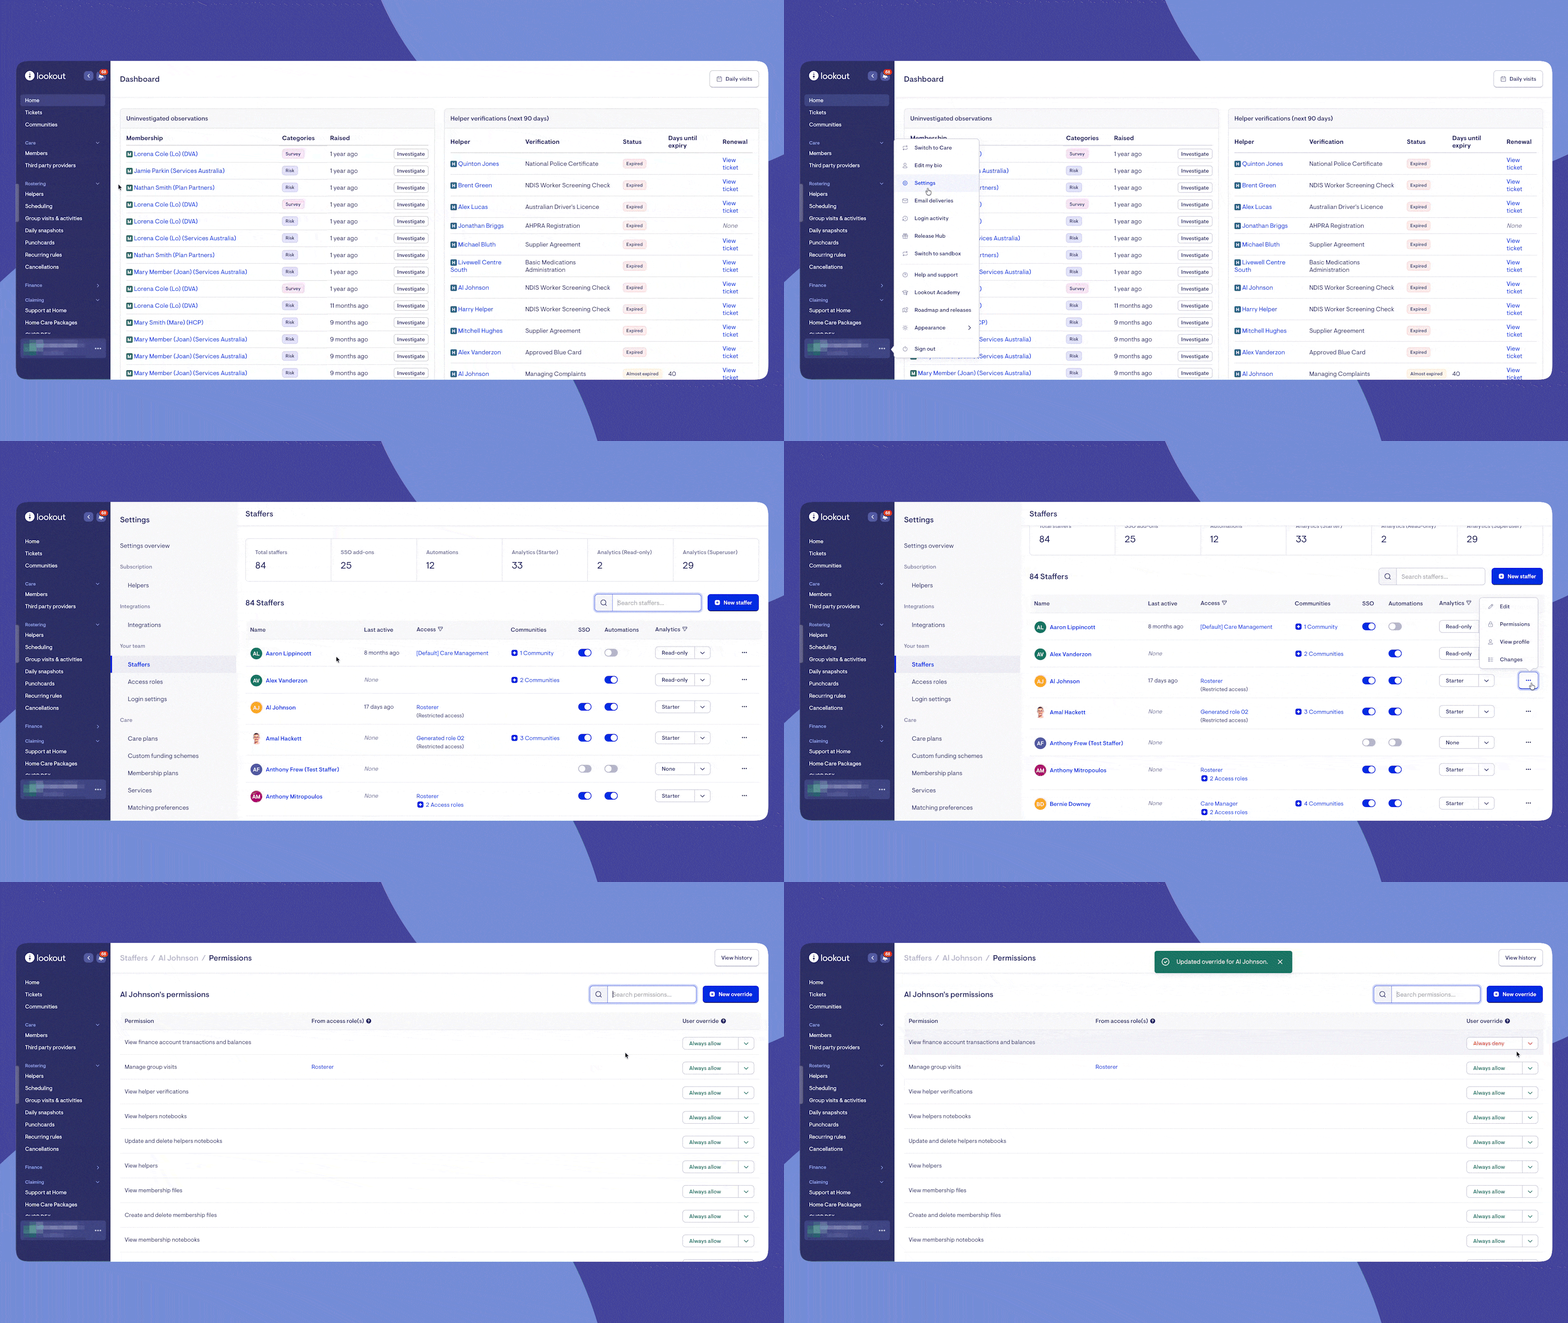
You can also click New override to add an override for a permission that isn't currently showing.
What happens next?
After setting up access roles, Staff members assigned to a role will immediately have the permissions defined in that role.
If a role is updated, all users assigned to that role are affected by the change.
Every permission change - whether to a role or to an individual override - is recorded in the Permission History log.
The system protects against accidentally locking everyone out. At least one staffer must always hold the "Staffer access" permission. If a change would remove this from all users, the system will block it.
Accessing the permission history log
To see exactly what permission changes have been made in your organisation:
-
From your home dashboard, navigate to the overflow menu by clicking the ellipsis (...) next to your name in the bottom left-hand corner.
-
The overflow menu will open - click Settings.
-
Under the Your Team section, click on Access roles.
-
At the top of the Access Roles page, you'll see a View history button. Click it to open the Permissions History page.
You will see a table showing all permission changes including:
-
Timestamp – when the change happened
-
User – who was affected
-
Event – what type of change occurred (e.g., Added to role, Removed from role, or Overrides were updated)
-
Location – where the change was made from
-
Changed by – the person who made the change
Click the Details button next to any entry to expand it and see additional information such as:
-
Which permissions were added or removed
-
Which access was granted or revoked
-
The browser used and the request location
You can narrow down the results using the sidebar filters:
-
User – Search by the name of the person whose permissions changed
-
Changed by – Search by the name of the person who made the change
-
Event – Filter by the type of change (e.g., added to role, removed from role, overrides updated)
After setting your filters, click Apply to update the results. To reset, click Clear.
What Admin / Staffers / Members will see
For Admins
- Can see and manage the full list of access roles from Settings > Access roles.
- Can view how many users are assigned to each role.
- Can assign/remove staffers from roles and apply individual overrides.
- Can review the full Permission History showing who changed what, when, from where, and which permissions were added or removed.
For Staffers
- Staff members experience Lookout based on the combined permissions from all their assigned roles (plus any individual overrides).
- If a permission is not granted, the related menu item, button, or feature area will simply not be visible or accessible.
- Staff members do not see the access roles settings page unless they have the appropriate permission.
For Members (The Member App)
The access roles feature does not directly affect what Members see on the mobile app. Members continue to see their care information, visits, and budgets as usual.
Troubleshooting
I can't see the "Access roles" option in Settings
- This feature must be enabled for your organisation. If you see the older "Staffer roles" option instead, the new granular access control hasn't been turned on yet.
- Check that your own account has the permission to configure access management.
- Contact your Lookout representative to have the feature enabled.
I updated a role, but a staff member's access hasn't changed
- Make sure you clicked Save after editing the role.
- Check if the staff member has an individual override that might be overruling the role's settings (look at their permissions page for any "Always allow" or "Always deny" entries).
- If the staff member has multiple roles, remember that permissions are additive — removing a permission from one role won't take it away if another role still grants it.
I can't delete a role
- Roles can be deleted, however, the system prevents deleting a role if it would result in nobody having the "Staffer access" permission. Make sure at least one other user (outside this role) has that critical permission.
- Check the error message - it will explain why the deletion was blocked.
I can’t archive a role
Roles cannot be archived; they can only be deleted. When deleting a permissions role, be sure to confirm within your team and wider business beforehand, as there is no recovery once it has been deleted.
A staff member can see things they shouldn't
- Review their permissions page to see exactly which roles and overrides contribute to their current access.
- Check for "Always allow" overrides that may be granting extra access.
- Remember that permissions from multiple roles are combined, so check all of their assigned roles.
A sensitive ticket category is still visible to everyone
- Remember that categories are open by default. A category only becomes restricted once you link it to a role - if it isn't linked to any role, everyone can still see it.
- Check that the category has been linked to the specific role(s) that should have access, via the Ticket categories tab on those roles.
A staff member can't see tickets they used to see
- Check whether the category has recently been linked to a role. Once linked, only staff holding one of the linked roles can see it.
- Confirm the staff member holds at least one of the roles the category is linked to. They only need one of the linked roles, but they must have at least one.
- Remember that removing the category's link from every role will make it visible to everyone again.
The Permission History shows changes I didn't make
- The history log records all changes, including automated system updates. When the feature was first enabled, your existing staffer roles were automatically converted to the new permission system.
- Use the filters on the history page to search by specific user, by who made the change, or by the type of event.
My Staffers now can't see purchase orders?
- By default, staffers will not have access to purchase orders.
- Read-only access to POs will be granted automatically to Staffers holding the old “Finance” permission.
- Full access to POs (read and write) will be granted automatically to Staffers holding the old “Finance admin” and “rostering” permissions.
- Grant access with the new Purchase orders permission.
Still need help?
If you're still experiencing issues, please contact our Support Team and include:
- Screenshots (if possible)
- The Member's name
- The exact steps taken
- Any error messages received