
This guide explains how to move around Lookout including the full navigation menu, overflow menu, where to find Settings, The Release Hub, Lookout Academy, Help and Support, plus so much more.
Before You Start
To follow this guide, please make sure:
- You have an access role that allows you to view the areas you're trying to reach. Several menu items appear only if your role includes the corresponding permission.
- Some items may only appear once your organisation has been given access.
The main navigation menu
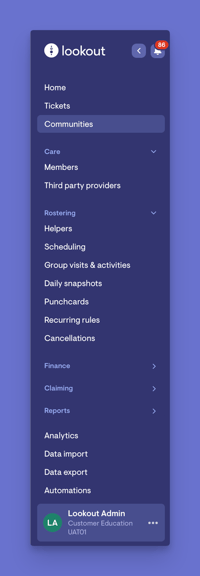
The main navigation menu is grouped into sections you can expand or collapse individually:
- Home
- Tickets
- Communities
- Care - Members and third-party providers
- Rostering - Helpers, scheduling, group visits and activities, daily snapshots, punchcards, recurring rules, cancellations
- Finance - billing runs, invoices and credit notes, invoice summaries, purchase orders, account transactions
- Claiming - Support at Home, Home Care Packages and CHSP DEX
- Reports
- Standalone items such as Analytics, Data import, Data export, Automations, Lookout chat, and Profile search
- Just above your name there's also an "Ask me anything…" button, which opens the in-app support chat.
The overflow menu
At the very bottom of the main navigation menu, you'll see your name, your organisation's name, and your profile picture. Next to it will be an ellipsis icon.
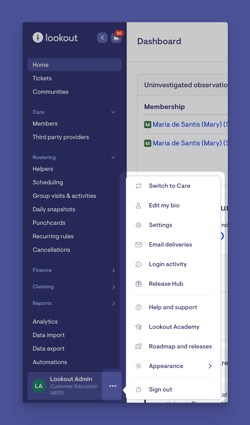
- Click your name or the ellipsis (...) button to open the overflow menu.
- A menu will open with all your account-level and support options.
The overflow menu is split into three groups.
Your account and organisation
- Switch to Care - moves you into the Care view (only shown if your organisation uses it)
- Edit my bio - opens your own staff profile
- Settings - opens the Settings overview for your organisation
- Email deliveries - a record of emails Lookout has sent
- Login activity - a history of sign-ins to your account
- Release Hub - new and upcoming features
- Switch to sandbox / Leave sandbox - moves you between your live environment and your practice environment, if you have one
Help, learning, and what's coming
- Help and support - opens the Lookout support site in a new tab
- Roadmap and releases - opens Lookout's public roadmap portal in a new tab
- Appearance - switch between Light, Dark, or System (default)
Signing out
- Sign out
Settings
To access the settings menu:
- Click your name or the ellipsis (...) icon next to it to open the overflow menu.
- Click ⚙ Settings
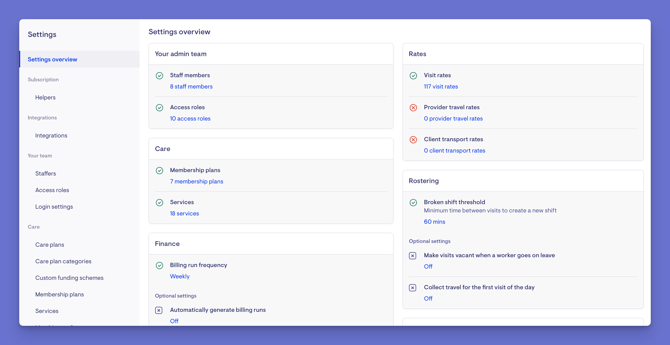
This will show the Settings overview, which shows the key configuration for your organisation at a glance, with a tick or cross beside each item so you can see what's set up and what still needs attention. Required items show a green tick or an orange warning mark; optional items show whether they're on or off.
The overview is organised into sections, covering:
- Your admin team - staff members and access roles
- Care - membership plans and services
- Finance - billing run frequency, plus optional settings like automatic billing runs, automatic rate selection, and contract notifications
- Tickets - the templates used for must-dos, match requests, referrals, availability requests, and verification renewals
- Rates - visit rates, provider travel rates, and client transport rates
- Rostering - broken shift threshold, automatic shift breaks, scheduling during helper leave, and travel collection
- Worker settings - list of optional controls covering what helpers can see and do, including editing or cancelling visits, viewing dates of birth and contacts, raising observations, skipping check-out notes, viewing check-out notes, and anonymising helper names
Each item is clickable and takes you straight to the screen where you change it.
Once you're inside Settings, a secondary navigation panel appears on the left with everything grouped by area:
- Subscription - subscription and helper seats
- Integrations
- Your team - staffers, access roles, and login settings
- Care - care plans, care plan categories, custom funding schemes, membership plans, services, matching preferences, cohorts, referrals, bulk should-knows, custom attributes
- Rostering - helper settings, breaks and shifts, helper leave, helper availability, helper engagement types, public holidays
- Verifications - file types, verifications, requisites
- Rates - visit rates (with a breakdown by funding scheme), provider travel, client transport
- Finance - Finance settings, third-party overheads and loading, payment details, taxes
- Templates & configurations - ticket templates, tags and categories, forms, survey templates, mail templates, third-party links, agreement templates, CHSP outlets and services, notebook categories and tags, archive reasons, visit cancellation reasons
- Technical - webhooks, API keys, single sign-on, SCIM
Top tip: Only the sections your access role permits will appear.
If you see a padlock icon next to a setting on the overview, that link is locked for your role - clicking it shows a "Setting locked" message telling you to contact your administrator.
Navigating to Release Hub
- Click your name or the ellipsis (...) icon next to it to open the overflow menu.
- Click Release Hub.
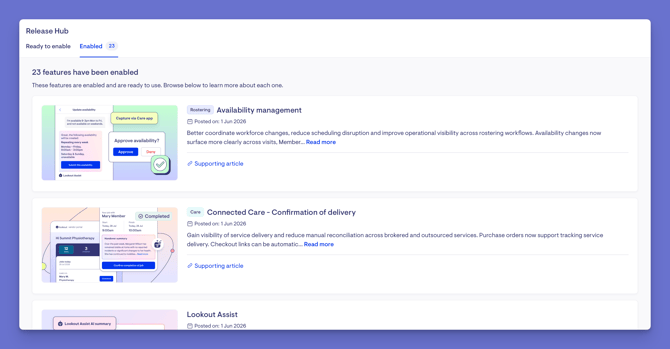
The Release Hub is where your organisation manages new Lookout features.
It's organised into three tabs, each showing a count: - Ready to enable - features available to you now that you can switch on or schedule
- Enabled - features already live, so you can read up on what each one does
Each feature appears as a card with an image, a category tag, the date it was posted, a description, and any related links. Where a feature has an automatic rollout date, that's shown too, along with a note explaining that it will switch on by itself on that date unless you opt in earlier.
Click a feature's name (or "Read more") to open a detail panel on the right with the full description and the enablement options.
Enabling a feature
If your access role includes the Release Hub permission, the detail panel gives you two choices when enabling a feature:
- Pick a date and click Set opt-in date to schedule the feature to go live on a future date. You can clear a scheduled date later
- Enable now to switch the feature on immediately for your organisation
Both actions ask you to confirm first, with a reminder to make sure your team is prepared before the feature goes live.
If you don't have that permission, you'll instead see a note explaining that only users with the Subscription & billing role can turn features on and suggesting you speak to your team.
Lookout Academy
- Click your name or the ellipsis (...) icon next to it to open the overflow menu.
- Click Lookout Academy.
- The Academy will open in a new tab and sign you in automatically - no separate password required.
Please note: Because the Academy is linked to your email address, your progress and registrations follow you across any Lookout environment you use that email in.
Please take a look at our dedicated article on Lookout Academy to learn more.

Support
Your success is our priority, and we are dedicated to ensuring continuity and support as you utilise Lookout day-to-day. That’s why we offer ongoing, day-to-day support designed to help you stay productive, confident, and in control.
In-app chatbot
- Navigate to the main navigation menu, just above your name.
- Click "Ask me anything…" to open the support chat.
- Our helpful chatbot will do it’s best to help answer your questions, giving you linked support articles to view for further information.
Help and support
- Click your name or the ellipsis (...) icon next to it to open the overflow menu.
- Click Help and support - the Lookout Help centre opens in a new tab.
The Lookout Way Help Centre is your go-to resource on utilising Lookout. It is continually updated with new articles and information as the product evolves.
Roadmap and releases
You'll be able to see what we're currently working on, what's coming up next quarter, and how to submit new ideas.
- Click your name or the ellipsis (...) icon next to it to open the overflow menu.
- Click Roadmap and releases.
You can also give us brand new ideas, including telling us how important they are to you. We appreciate your feedback, as it helps us understand which aspects are most important to you, our customers.
Status updates
Be sure to subscribe to status updates of the Lookout platform to be automatically notified of any incidents or issues impacting services. You can sign up at status.thelookoutapp.com.
The Customer Portal
You can submit a support request by going to and clicking on File a Support Ticket within our Help Centre.
We suggest an internal escalation process to ensure your team are raising questions with you initially.
The customer portal lets you view, respond to and close your support tickets. It will also allow you to see tickets opened by other members of your organisation.
View our article on Accessing the Customer Portal for more information.
Additional features
- Collapsing the navigation is remembered for your next visit, as are the sections you leave expanded or collapsed
- Choosing an appearance mode (Light, Dark, System) applies immediately and is remembered. This is accessed in the overflow menu
- Scheduling a feature in Release Hub shows a confirmation that the feature will be enabled on your chosen date, and records who scheduled it and when
- Enabling a feature immediately shows a message that the feature is being enabled and that it may take a few minutes. While that's happening, a spinner and an "activating" banner appear at the top of Release Hub and on the feature's card. Once complete, the feature moves to the Enabled tab
- If activation fails, an orange warning appears on the affected feature and on the Release Hub tab, with a Retry activation button
- Switching to sandbox moves you into your practice environment. Nothing you do there affects your live data
What Different Users Will See
Administrators / Subscription & billing role
Can see the full Settings menu, and can enable features immediately or schedule them in Release Hub.
General staff members
Can open Settings and Release Hub to read about features, but options they aren't permitted to change appear with a padlock, and Release Hub shows a note asking them to speak with someone who has the Subscription & billing role. All staff members can reach Help and Support, the Roadmap, and Lookout Academy.
Organisations without the Care suite
See a shorter navigation with promotional links inviting them to explore Care, Rostering, Finance, Workflows, and Reporting and analytics.