
This guide explains what the Member settings area contains, what each section is used for, real examples of when to use them, and what to do if something is not working.
Member ⚙ Settings
The Settings area is where you manage the underlying setup and record for an individual Member. You'll find it on the Member's profile, accessed from the Settings tab.
It brings together their personal details and contacts, their Membership plan and key dates, their funding and payment arrangements, which services apply to them, a history of changes, surveys, and administrative actions such as archiving or deleting. It's grouped into three areas: Information, Finance, and Administrator. Most day-to-day Member setup and record-keeping happens here.
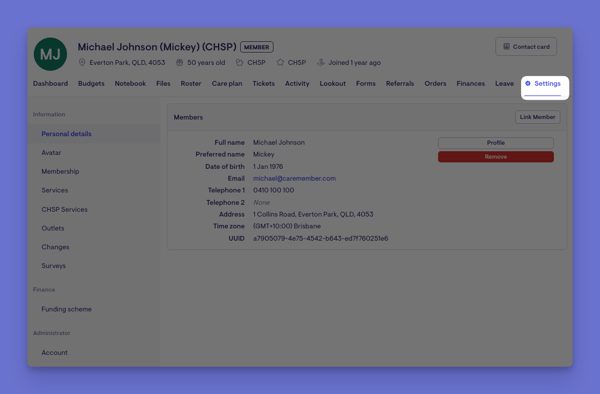
Want to learn more about Members? The Settings tab is just one part of a Member's profile. For dedicated articles on the Member dashboard and each of the other tabs within a Member's profile, please explore the Members section within our Help Centre.
Please note: A Member's contacts - their representatives, emergency contacts, and anyone who receives statements or can view visits - are managed in the Key contacts panel on the Member's dashboard, not in Settings. See our Key contacts article to learn more.
Before you start
To use this area, make sure:
- You have the correct access permissions. Any Staffer or Admin who can open the Member can view ⚙ Settings, but making changes requires editing access to that Member. Some specific actions, such as editing custom values or managing surveys, have their own permissions.
- The Member already exists in the system. Some sections only appear depending on the Member's funding type, for example, the CHSP services and Outlets sections only show for CHSP Members.
Navigate to Member settings
- From the main navigation menu, click Members to open the full list of Members.
- Find the Member you're after - use the search box to type their name, or narrow the list using the filters.
- Click the Member's name to open their profile. This will load their Member dashboard.
- At the top of the Member's profile, select the ⚙ Settings tab. It opens on the personal details section by default.
- Once inside, you'll see a new menu display on the left side of the screen. This lets you move between the different sections within the settings, grouped under Information, Finance, and Administrator.
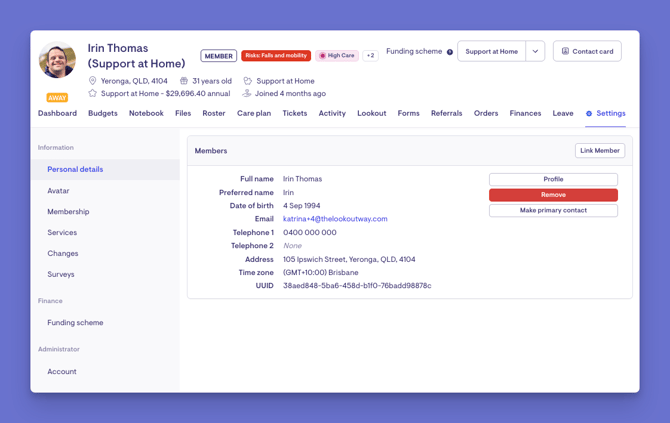
The Settings sections
The ⚙ Settings menu is organised into three groups:
1. Information group:
- Personal details: The Member's own personal and contact information.
- Avatar: Uploads or removes a profile picture for the Member.
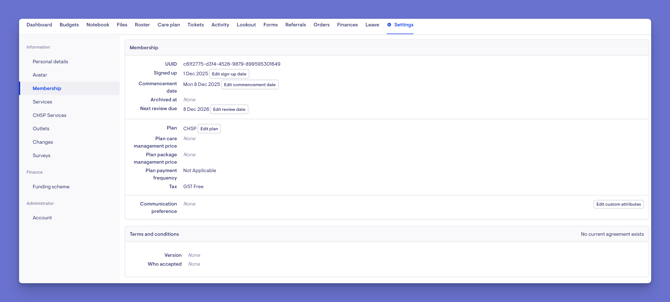
- Membership: Shows key membership information and lets you edit important dates and plan details. This includes the unique membership reference, the sign-up date, the commencement date, the archived date (if applicable), the next review date, the membership plan and its pricing, the payment frequency and tax setting, any custom values your organisation uses, and the service agreement, including creating a new agreement.
- Agreement requests: Where digital agreement requests are managed, when the agreement workflow is available for your organisation.
- Services: Controls whether this Member is limited to specific services or can access all of them. When restricted, you choose exactly which services apply.
- CHSP services and Outlets (CHSP Members only): Manage the CHSP-specific services and the outlets tied to the Member.
- Changes: A history log of edits made to the Member's record, showing who changed what and when.
- Surveys: Sets up and manages recurring surveys scheduled for the Member, showing both active and completed schedules.
2: Finance group:
- Funding scheme: Manages who funds the Member and how they are billed. You can add or remove the funder, open their profile, set or change the funding scheme, and (where your organisation uses the integrated direct debit system) add or view payment details.
- Contracts: Manages the Member's contract arrangements. Contract information lives here, in Settings, rather than on the Member dashboard.
3. Administrator group:
- Account: Contains the sensitive actions for the Member, including archiving, unarchiving, and deleting the Member record.
Examples and use cases
Here are some common situations and which ⚙ Settings section handles them:
A Member is moving onto a different plan, or their commencement or review date needs correcting:
-
-
Use Membership to update the plan, pricing, and key dates, and to issue a new service agreement.
-
A Member's photo needs adding or updating so Helpers can recognise them:
-
-
Use Avatar to upload or remove the picture.
-
A Member is moving onto a different plan, or their commencement or review date needs correcting:
-
-
Use Membership to update the plan, pricing, and key dates, and to issue a new service agreement.
-
A Member should only ever receive certain services:
-
-
Use Services to restrict them to the specific services that apply.
Rather than every Member being open to every service the organisation offers, you can attach a specific set of services to an individual Member. Once you do that, the Member is effectively "restricted" to those services. For example, a Member who receives help with washing and dressing but is not approved for driving trips can have personal care attached but not transport.
-
You need to record and manage CHSP-funded services or the outlet a CHSP Member is linked to:
-
-
Use CHSP services and Outlets.
-
Someone asks who changed a Member's plan or date and when:
-
-
Use Changes to review the record's history for auditing.
-
A Member should receive a regular wellbeing or feedback survey:
-
-
Use Surveys to schedule it and track completion.
-
A new funder needs adding, or the funding scheme or direct debit payment details need updating:
-
-
Use Funding scheme.
-
You need to review or manage a Member'scontract arrangements:
-
-
Use Contracts, under the Finance group.
-
A Member has left your service and their record should be hidden from active lists but kept:
-
-
Use Account to archive them. If a record was created in error and must be removed entirely, use Account to delete it (this cannot be undone).
-
Top tip: To add a contact - such as a family member as a representative or the main point of contact - use the Key contacts panel on the Member's dashboard, not Settings. See our Key contacts article to learn more.
What happens next?
After you make a change in ⚙ Settings:
- The updated information is reflected across the Member's profile and anywhere else it is used, such as their plan details, funding, or contacts.
- Changes are recorded in the Member's change history for auditing.
- Archiving a Member removes them from active lists while keeping their record; deleting a Member removes the record entirely and cannot be undone, which is why it asks you to confirm.
What Users / Staff / Members will see
For Admins
- Can view all settings sections and make changes, including the sensitive account actions such as archiving and deleting, subject to their permissions.
For Staff
- Staffers with editing access to the Member can view and change settings. Staffers without editing access can view the information but will not see the controls to change it. Some sections, such as editing custom values or managing surveys, depend on additional permissions.
For Members
- The settings area is part of the internal admin desktop website used by Staffers and Admins. Members do not manage these settings themselves.
Troubleshooting
I cannot see a settings section
- The CHSP services and Outlets sections only appear for CHSP Members, and Contracts only appears where enabled for your organisation.
- Confirm the Member's funding type is set up correctly.
- Try logging out and back in.
I cannot see the controls to make a change
- Check your access role. Viewing is broadly available, but changing settings requires editing access to that Member.
- Some actions, such as editing custom values or managing surveys, need their own specific permission.
I can't find Contracts on the Member dashboard
Contract information now lives in the Member's Settings, under the Finance group, rather than on the dashboard.
I made a change but nothing updated
- Make sure you selected save, and that any confirmation prompt was completed.
- Look for any on-screen messages pointing to details that still need attention.
- Check the change history to confirm whether the change was recorded.
- Contact support if the issue persists.
I want to update a Member's contacts, but they're not in Settings
Contacts are managed in the Key contacts panel on the Member's dashboard, not in Settings. See our Key contacts article to learn more.
Still need help?
If you are still experiencing issues, please contact our Support Team and include:
- Screenshots (if possible)
- The Member's name or email
- The exact steps taken
- Any error messages received