
This guide explains how to record a Member's leave in Lookout (such as a hospital stay, respite, or time away), what you need before you start, how leave affects their scheduled visits and roster, and what to do if something isn't working.
Before you start
To complete this process, make sure:
-
You have permission to update Member records (this is available to Admins and Staffers with editing access to a Membership). If you can only view a Member but not edit them, you won't see the option to add or change leave.
-
You are logged into the web version of Lookout (leave is managed from the Member's profile, not the mobile app), and have understood the Home dashboard navigation.
-
The Member already exists in the system with an active Membership.
Step-by-Step Instructions
Step 1: Open the Member and navigate to their Leave section
- From the main navigation menu, click Members to open the full list of Members.
- Find the Member you're after - use the search box to type their name, or narrow the list using the filters.
- Click the Member's name to open their profile. This will load their Member dashboard.
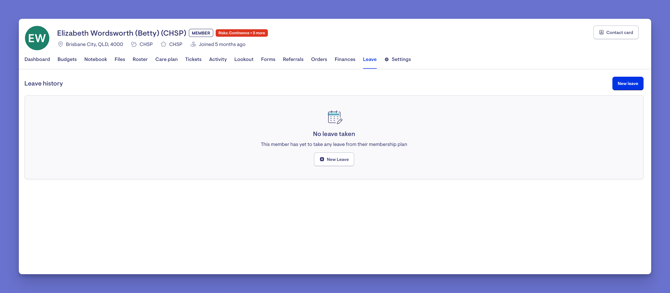
- Navigate to the Leave tab for that Member in their Membership.
Top Tip: This section shows the Member's complete leave history, and for Home Care Package Members it also displays their tracked leave balances (hospital, respite, transition care, and other/social leave).
Step 2: Start a New Leave entry
- Select either New Leave on the top right corner. If the Member has not had any history of leave, there will be a + New Leave button central to where the history of Leave would ordinarily be stored.
- If the Member has never taken leave before, you'll see a prompt inviting you to record their first leave period.
Step 3: Complete the required details
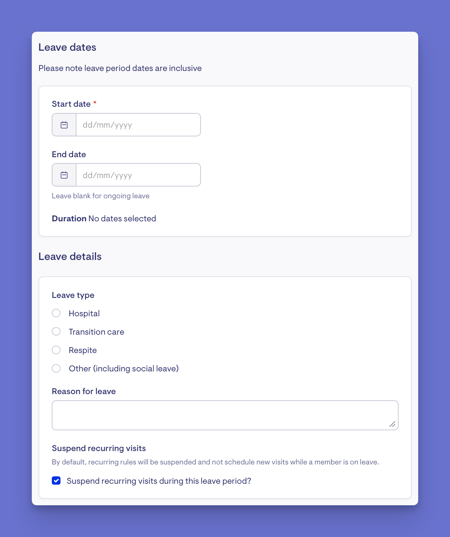
Leave dates:
- Enter the Start date.
- Enter the End date or leave it blank if the Member is going away for an unknown length of time. Leaving it blank creates "ongoing" leave with no set return date.
- Keep in mind leave dates are inclusive, meaning both the start and end days count as leave. Lookout will show you the total duration as you fill this in.
Leave details:
- Choose the Leave type: Hospital, Transition care, Respite or Other (which includes social leave).
- If you choose Other, a box appears asking you to specify the reason.
- Optionally add a Reason for leave description.
Recurring visits:
- By default, Lookout will pause the Member's recurring booking rules so that no new repeat visits are created while they're away.
- You can turn this off if you want repeat visits to keep being scheduled during the leave.
Step 4: Review visit conflicts
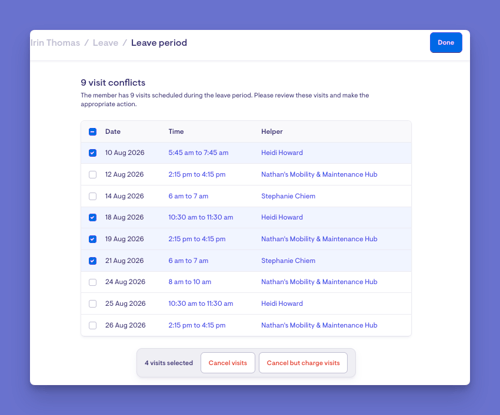
- Before you save, Lookout shows you any visits already scheduled that clash with the leave dates. It is termed as a visit conflict.
- For a set leave period, it lists every visit booked during those dates.
- For open-ended (ongoing) leave, it shows visits booked in the two weeks after the leave begins.
- You can select those clashing visits and either cancel them, or cancel-but-still-charge them, directly from this screen. By selecting the checkbox, you can multi- select and click on either Cancel visits or Cancel but charge visits
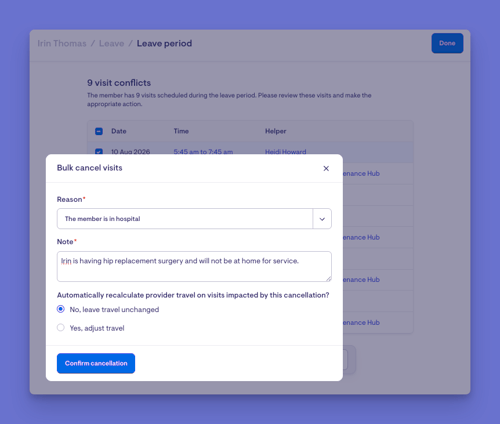
- When you select Cancel Visits you will be prompted to select a Reason, leave an optional note and adjust any provider travel if impacted.
Step 5: Save
- Select Save.
- You should now see a confirmation that the leave period was created.
- The new leave period will appear in the Member's leave history, showing its status (Current, Future, or Complete) and the number of days on leave.
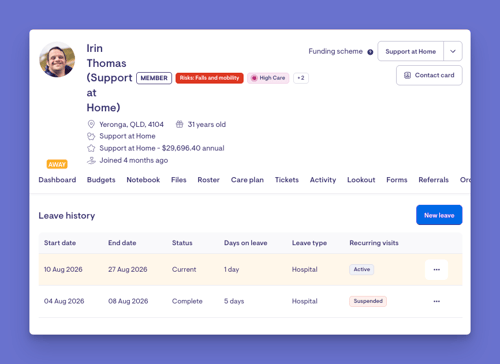
Additional considerations for Member leave
Supplier service conflicts during leave
In addition to checking for visits, the system checks for scheduled supplier service deliveries (purchase order lines) that fall within a Member's leave. These appear in their own conflicts section on the leave screen, so you can deal with them before the leave begins.
Each supplier conflict shows:
- The estimated delivery date
- The supplier
- A reference for the service
To manage them:
- Select the supplier services you want to clear
- Cancel them in bulk using the cancel option
- For open-ended (ongoing) leave, the system flags supplier services scheduled in the 14 days after the leave starts, the same way it does for visits
Reviewing this section stops a Member being charged for, or expecting, deliveries they will not receive while they are away.
Two ways to cancel a conflicting visit
When clearing visits that clash with leave, the system gives you two separate choices. Choosing the right one matters, because they behave differently for billing:
- Cancel visits: cancels the visit outright, with no charge applied
- Cancel but charge visits: cancels the visit but still applies the relevant charge, treated as a late cancellation
Use "cancel but charge" when your cancellation policy means the visit should still be billed even though it is not going ahead. Use the plain cancel option when no charge should apply.
Leave periods cannot overlap
A Member can only have one leave period covering any given date. If you try to save leave whose dates overlap an existing leave period for that Member, the system will block the save and ask you to adjust the dates.
If a save is rejected for this reason:
- Check the Member's leave history for an existing period covering those dates
- Edit the existing period if you meant to extend or change it, rather than creating a new one
- Adjust your start or end date so it no longer clashes, then save again
What happens next?
After you record a Member's leave:
- New repeat visits are blocked during the leave.
As long as the "suspend recurring visits" option is on, Lookout will not automatically create any new recurring visits that fall within the leave dates. - Existing visits are not cancelled automatically
Manually decide whether to cancel them using the review screen described above. Visits cancelled this way are marked with a reason that matches the leave type (for example, "Member in hospital" or "Member on respite"). - The Member's profile shows an alert banner letting everyone know they're away, including the reason and expected return date (or that the return date is unknown).
- The leave period is recorded in the Member's history and can be edited or deleted later.
What Users / Staff / Members will see
For Admins
- Can add, edit, and delete leave for any Member.
- Can see a report of all Members on leave, and view Members currently on leave broken down by community and by funding type on the main dashboard.
For Staffers / Managers
- Staffers with edit access to a Member can add and manage that Member's leave just like admins.
- Staffers with view-only access can see that a Member is on leave (via the alert banner and history) but cannot add or change it.
On the Roster / Scheduling screens
- When a Staffer tries to book or edit a visit that lands on a day the Member is on leave, an alert banner appears on the visit warning that the Member is away.
- Members currently on leave are flagged with a leave status indicator where their name or avatar appears.
For Members (Lookout App)
- Leave is set up and managed by your organisation's staff, not by the Member in the app. The Member's booked visits are affected according to the choices made when the leave was recorded.
Troubleshooting
I can't see the option to add or edit leave
- Check that you have editing (not just viewing) access to that Member. The add/edit/delete buttons only appear for people with permission to update the Member.
- Try logging out and back in.
I set leave but visits are still being scheduled during it
- Check that the "suspend recurring visits" option was left switched on for that leave period. If it was turned off, repeat visits will keep being created.
- Remember that existing visits are not cancelled automatically. You need to cancel clashing visits from the review screen yourself.
The dates look wrong / a day is missing or extra
- Remember leave dates are inclusive, so both the first and last day count. Double-check the start and end dates you entered.
The system says the leave overlaps
- A Member can't have two leave periods that cover the same dates. Check the leave history for an existing period that clashes and edit that instead.
I completed the steps but nothing changed
- Make sure you selected Save and that there were no validation messages highlighted in red.
- Refresh the Member's profile to confirm the leave now appears in their history.
- Contact support if the issue persists.
Still Need Help?
If you're still experiencing issues, please contact our Support Team and include:
- Screenshots (if possible)
- The Member's name
- The exact steps you took
- Any error messages you received