
This guide explains how to manage an incident using the incident management add-on in Lookout, what you need before starting, and what to do if something is not working.
Overview
The incident management add-on gives your organisation a structured way to capture and work through an incident - from the moment it's raised to its final review.
It's made up of two parts:
- The incident form - used to report the incident.
- The incident ticket - where your team works through it.
A Helper raises an incident from the Lookout Care app. Once submitted, an incident ticket is automatically created in Lookout, guiding your team through four steps:
- Raising the incident
- Incident response and categorisation
- Corrective actions
- Incident investigation and analysis
Each step builds on the one before it, and every step stays editable — so you can add more information later if needed.
How it compares to Core Incident Management
Lookout's core Incident Management lets you capture, record, and track incidents reliably. However, assessing, categorising, reporting, and analysing those incidents is largely manual, which adds administrative effort for your team.
The Incident Management add-on builds on that foundation by adding structure, guidance, and automation across the whole incident lifecycle - streamlining assessment, reporting, risk management, and investigation.
| Capability | Core Incident Management | With the Add-on |
|---|---|---|
| Capture & track incidents | Included | Included |
| Guided, consistent workflow | Manual | Automated four-step ticket |
| Reporting priority guidance | Manual | Recommended by Lookout |
| Risk assessment | Manual | Built-in risk rating |
| Investigation & analysis | Manual | Dedicated stage |
| Audit trail | Manual effort | Single source of truth |
What the Add-on unlocks
This is where incident management really comes to life. The add-on gives you an end-to-end workflow built around a dedicated incident form and a purpose-built incident ticket - so nothing gets missed and every incident is handled the same way.
Key features and benefits:
- Raise incidents at the point of care - Helpers can report an incident directly from the Lookout Care app, capturing key details, related people, and supporting evidence such as photos or documents.
- Automatic, structured tickets - each incident becomes a ticket that guides your team through a consistent four-step workflow.
- Smart reporting guidance - based on the Member's funding scheme and incident category, Lookout recommends a reporting priority level, helping teams decide while keeping full control.
- Built-in risk assessment - an objective risk rating (from low to catastrophic) is generated from two simple questions.
- Everything in one place - record reporting details, document corrective actions, and start a Lookout assessment directly from the incident ticket.
- Dedicated investigation stage - supports analysis, consultation, and response review for complete, audit-ready records.
- A single collaborative workspace - all updates are tracked together, giving a clear audit trail and one source of truth for the entire incident lifecycle.
Why it matters
For organisations committed to strong governance, duty of care, and quality and safety outcomes, the add-on delivers:
- Greater consistency - every incident is handled the same way.
- Less administrative burden - structure and automation replace manual effort.
- Confidence and compliance - a complete audit trail for every incident, from start to finish.
Before you start
To complete this process, make sure:
- You have the correct access permissions to manage incidents (for example, Admin or Staffer)
- The incident management add-on has been set up for your organisation
Top tip: The incident management add-on is an optional feature. If you do not have it yet, contact Lookout to set it up for your instance.
Manage an incident with Incident Management Add-on
Step 1: Raise the incident
An incident is most commonly raised by a Helper from the Lookout Care app. They log in, go to the Schedule Action section, and choose Report client incident. This opens a form where they record:
- The Member involved
- The date and time the incident occurred
- The date and time the incident was first reported
- Where the incident occurred
- A description of the incident
- The details of any related people involved
- Any supporting images or documents
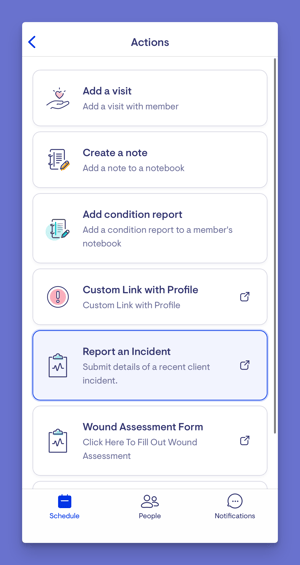
Once the form is submitted, an incident ticket is created in Lookout. The first step of the ticket contains all the details submitted in the form, and you can amend them within the ticket if needed.
Step 2: Complete the incident response and categorisation
- Open the incident ticket.
- In the incident response and categorisation step, categorise the incident.
- Depending on the Member's funding scheme and the category selected, complete any additional information the form asks for.
- Review the recommended priority level for reporting that the ticket generates based on the category and your responses.
- Accept the recommendation or change it.
Once saved, the incident ticket title updates to reflect the incident category and the priority level.
Step 3: Complete the corrective actions
This step becomes available once the incident has been categorised.
- Complete the risk assessment by answering the two questions about the severity and the impact of the incident. Based on your responses, a risk rating is calculated, which can be low, moderate, high, or catastrophic.
- Record which parties the incident was reported to, along with any additional notes or identifiers.
- Record the corrective actions taken as a result of the incident.
Top tip: If assessment is selected within this section, a Lookout assessment can be started directly from the ticket.
Step 4: Complete the incident investigation and analysis
In the final step, use the three optional free-text areas to record:
- Your analysis of the incident
- Any consultation that took place as a result of the incident
- Any issues with the incident response
Step 5: Save
Save your work at each step.
You should now see:
- Each completed step saved within the incident ticket
- The ticket title reflecting the incident category and priority level
- The next step becoming available once the previous one is complete
What happens next?
After you work through an incident:
- The incident and all four steps are held together in a single ticket
- The ticket title updates to show the category and priority level once categorised
- A recommended reporting priority is generated based on the Member's funding scheme, the category, and your responses
- Each completed step remains editable, so you can add more information later
- The full record is kept in one place for your team to track through to resolution
What Users / Staff / Members will see
For Admins and Staff
- Can open the incident ticket and work through all four steps
- Can categorise the incident, review and adjust the recommended priority, complete the risk assessment, and record corrective actions and analysis
- Can amend the submitted details and edit any completed step
For Helpers (Lookout Care app)
- Can raise an incident from the Schedule Action section by choosing Report client incident
- Can complete the incident form, including the details and any supporting images or documents
For Members
- Do not complete the incident management workflow themselves
- May be recorded on the incident as the Member involved
Troubleshooting
I can't see the option to raise or manage an incident
- Check your access role, as managing incidents depends on your permissions
- Confirm the incident management add-on is set up for your organisation
- Try logging out and back in
I can't start the next step
- Confirm the previous step is complete, as each step becomes available only once the one before it is done
- The incident must be categorised before corrective actions can be completed
I completed the steps, but nothing changed
- Ensure you saved your work
- Check for any validation messages, such as a missing category or risk assessment response
- Contact support if the issue persists
Still need help?
If you are still experiencing issues, please contact our Support Team and include:
- Screenshots (if possible)
- The Member's name
- The exact steps taken
- Any error messages received