
This guide explains how suppliers manage team access and how third-party workers check in and check out of Connected Care jobs.
Before you start
- You have received an email invitation from a care provider using Lookout.
- You have a valid email address and access the email account for verification.
- You'll need a device with a web browser (the supplier portal works on phones, tablets, and computers).
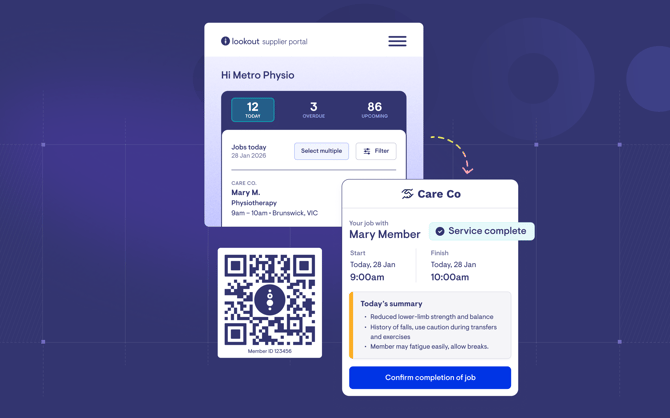
Step-by-step instructions
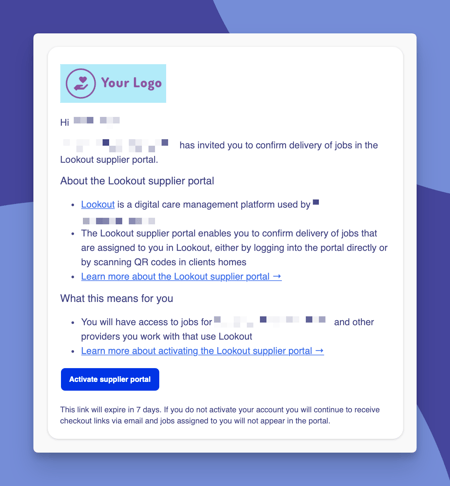
Step 1: Accept your invitation
- Open the invitation email from Lookout.
- Click the link to set up your account.
- Create a secure password (minimum 14 characters).
- You'll then be asked to verify your email using a one-time passcode sent to your inbox.
Step 2: Log in to the Portal
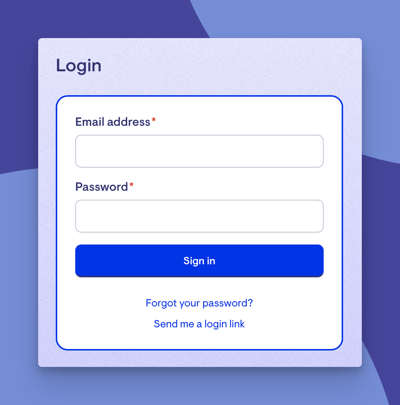
- Go to the supplier portal login page.
- Enter your email address, you’ll be emailed a one-time code. Enter the one-time code.
- Read and accept the terms and conditions to continue.
- You can set a password in the supplier portal for future logins, or continue to log in using one-time codes.
Step 3: Set up your organisation (Owners and Admins only)
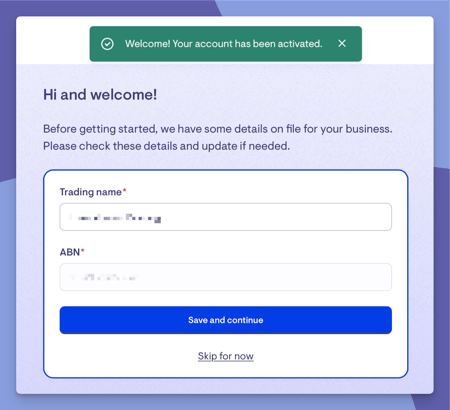
- Edit your organisation details - trading name and time zone if required.
- Add workers - create contacts for each verified worker in your team, assign them a role, and set their details.
- Import workers in bulk - upload a spreadsheet to add multiple workers at once if required.
- Archive or unarchive contacts as your team changes.
Top tip: Each worker you add has their own login to view and complete jobs via the supplier portal.
Step 4: View your jobs
After completing the previous step, you'll land on your main screen within the Supplier portal. Your jobs sit front and centre - this is where you'll spend most of your time.
Your work is organised into tabs across the top, each showing a count:
- Scheduled - upcoming work you're due to carry out
- Overdue - work that was due but hasn't been actioned yet
- Upcoming - jobs scheduled for a future date
- Cancelled - work that's been cancelled
For each job, you'll see the client's name, the service description, which care provider it relates to (helpful if you work with more than one), and the scheduled time and location.
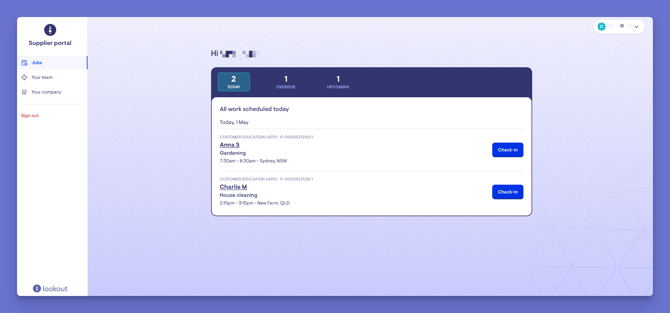
For a full tour of your main screen - including the navigation menu, adding team members, and editing your company details - see the Understanding your main screen section below.
Step 5: Check in to a job (when applicable)
Some jobs may require you or your workers to check in on arrival.
-
Open the relevant job from Today or from the QR/tokenised email link.
-
Tap Check In.
-
Allow location access if prompted - this records your arrival location.
-
Review Member, delivery and service details.
-
Review any Lookout Assist care summary and Should know notes.
-
Use Undo check-in only if needed and only before checkout.
-
Your job status changes to In Progress.
Top tip: Check-in is only available within the delivery window set by the care provider (typically 48 hours before and after the scheduled time).
Step 6: Complete Must-Dos
If the care provider has assigned must-do tasks to the job, a list of tasks will show that need to be completed.
Respond to each task as required - this might include:- Selecting a response (e.g. Yes/No)
- Adding a comment
- Uploading a file or photo
- Filling in a form (assessment)
All responses must be completed before you can check out.
Step 7: Check out and confirm delivery
- After completing tasks, tap Check Out.
- Add a checkout note describing the delivery or any relevant concerns.
- Confirm the delivery date.
- The location is captured automatically.
- Tap Confirm.
The job is now marked as Completed , and the care provider will be able to see delivery notes and responses.
What happens next?
- Your delivery is recorded in Lookout and visible to the care provider.
- The care provider can review your checkout notes, must-do responses, and location.
- The care provider will process the delivery through their claiming and invoicing workflows.
- You'll continue to see new jobs as they're assigned to you.
Understanding your main screen
Your main screen is built around three things: the navigation menu on the left, your jobs in the centre, and your account and settings options.
The navigation menu
- Jobs: Your scheduled and completed work. This is your default landing area.
- Your team: The people in your organisation who can use the portal.
- Your company: Your company details.
- Sign out: Log out when you're finished.
Your jobs
Your jobs are grouped across the Scheduled, Overdue, Upcoming, and Cancelled tabs. Completed work is kept separately under Completed jobs, so your day-to-day scheduled work stays distinct from your finished history.
Roles
The Supplier portal gives each team member one of four roles. Your role controls what you can see and do:
| Your role | What you can do |
|---|---|
| Owner | Manage the organisation, all team members, and all jobs |
| Admin | Invite team members and view/action all jobs |
| Worker | View and complete jobs assigned to you (across all providers) |
| Worker (limited access) | View and complete jobs only by scanning a client's QR code (access expires after 24 hours). This option is great for freelance/gig workers. |
Managing your team
Please note: Only Owners and team members with Admin access can see and manage this section of the Supplier portal.
From the Your team section, Owners and Admins can:
- Add a team member individually or bulk-import several at once (imported members start with the Worker role, which you can change afterwards).
- Edit a team member's details and role.
- Archive a team member to immediately revoke their access, and unarchive them later if access is needed again.
- Transfer ownership to another team member (there can only be one Owner - when you transfer it, you become an Admin).
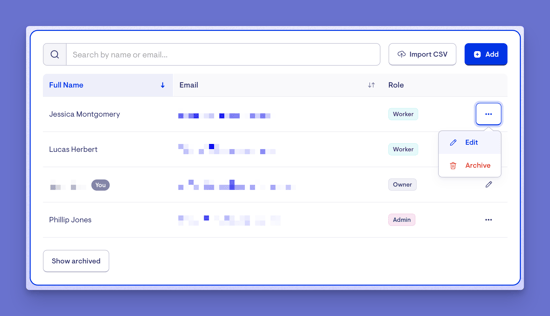
Adding a team member individually
- In the left-hand menu, click Your team.
- Click the blue + Add button. A pop-up window will appear with information to fill in.
- Fill in the new team member's details:
- Full name (required)
- Email (required) - this is where their invitation to activate their account will be sent
- Time zone (required)
- Role - choose from Admin, Worker, or Worker (limited access), using the on-screen descriptions to pick the right level of access. Each option briefly explains what that person will be able to do.
- Notification settings - you'll also see an option to opt out of job checkout link emails. Tick this if you don't want that team member to receive emails containing checkout links for scheduled jobs. They'll still be able to see their jobs in the portal and via QR code - they just won't get the email notifications.
- When you are ready, click the blue Create button to add your new team member.
- A green banner will appear confirming your actions and the new team member will appear in your team list, and they'll receive an email inviting them to activate their account.
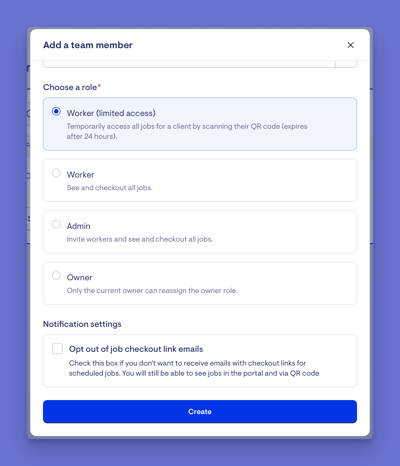
Top tip: If you need to add several people at once, use the bulk import option instead - everyone imported this way starts on the Worker role, which you can adjust afterwards.
Editing a team member's role or details
- In the left-hand menu, click Your team.
- Find the person you want to update - scroll the list or use the search box to search by name or email.
- Click the ellipsis (...) button next to their name and choose Edit. Their Edit details screen will open.
- Update whatever you need - their name, contact details, or Role. When you change the role, the on-screen description updates to show what that level of access allows.
- Click the blue Save changes button to apply the changes.
- A green banner will appear confirming your actions.
Please note: You can't change your own role. To hand over the Owner role to someone else, open their details and use the Transfer ownership option - there can only be one Owner, and once you transfer it, you'll become an Admin.
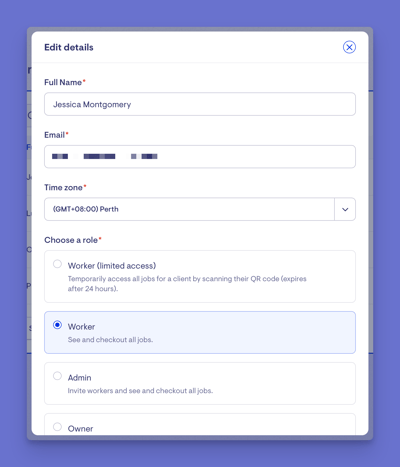
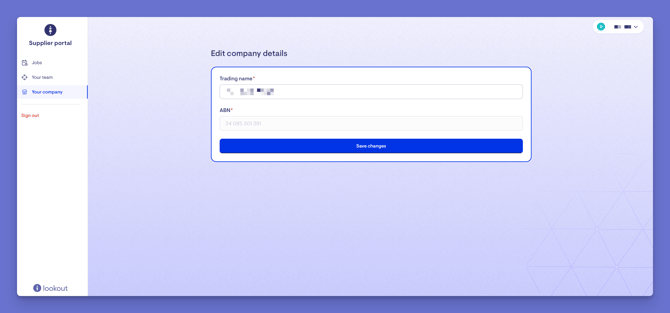
Editing your company details
Please note: Only Owners and team members with Admin access can see and manage this section of the Supplier portal.
From the Your company section, Owners can update the organisation's details. The description you set here is visible to the care providers you're connected with, so it's worth keeping accurate and up to date.
Additional settings
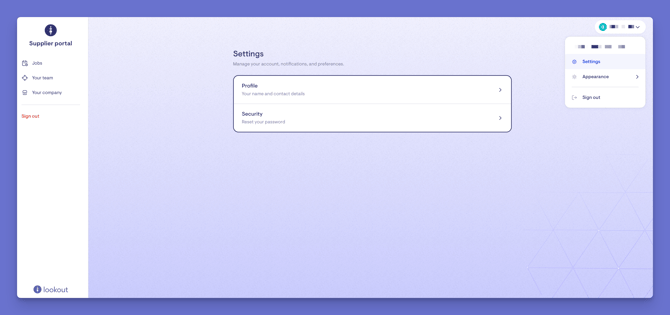
Click your name tor the arrow in the top-right corner to open your a short additional settings menu. From here, you'll find three options:
- Settings - manage your own account, including your profile and contact details, notification preferences, and security (such as changing your password).
- Appearance - switch between light and dark mode to suit your preference, or set the supplier portal to match your system defaults.
- Sign out - log out of the Supplier portal.
Troubleshooting
I can't log in
-
Make sure you're using the correct email address
-
Check the supplier portal status to ensure you have full access to the portal
-
Try resetting your password using the "Forgot password" link
-
If your account has been disabled, contact your organisation's admin
I can't see any jobs
- Check the timeframe filter - you might be looking at past jobs instead of upcoming ones
- If you're a Limited Worker, jobs can only be accessed by scanning a QR code at the client's home
I'm supposed to have access, but my email isn't working
We have added visuals within Lookout to show when a portal has been claimed by another profile with a different email address.
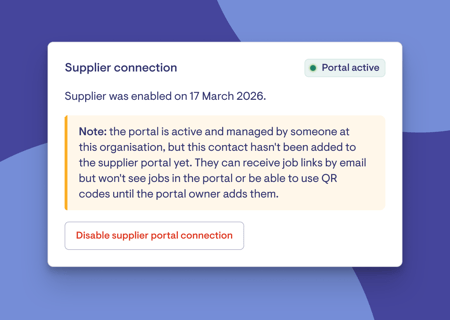
If you also want access, please contact the profile linked to the portal, and they can add your details for you within the portal.
The check-in or checkout button isn’t visible
- You may be outside the checkout window (the allowed time period around the scheduled delivery)
- Check with your care provider about the timing
My invitation link has expired
Contact the care provider who invited you to resend the invitation
A worker only needs one-off access
- Use Worker Limited access with QR code scanning, or provide a tokenised link if appropriate.
- Worker Limited users only access relevant job/member information for the session.
The job is showing as overdue
- Overdue jobs show when the scheduled completion has passed without checkout.
- If the checkout window has closed, the provider may need to manually mark the job as complete. Ensure you contact the required provider
Still need help?
If you're still experiencing issues, please contact our Support Team and include:
- Screenshots (if possible)
- The Member's name
- The exact steps taken
- Any error messages received