Introduction
This guide covers how to utilise our new Custom Cancellation and archive Reasons features within the platform. These features give organisations more control and flexibility to define their own reasons for cancelling visits or archiving records, based on their specific workflows. Helpers can cancel visits directly from the Care App using a tailored list of cancellation reasons, while organisations can customise what options are available and how they're displayed. In this guide, we will also explain how archive reasons can be set up and managed to support consistent and transparent record-keeping.
Archive reasons
Archive reasons are used when ending a membership or helper relationship. These reasons are shown in the archive form and can now be fully customised. Navigate to Settings by clicking the ellipsis next to your name in the navigation bar, and then select Archive reasons under the Templates & configuration section.

A new page will load, listing all of your active archive reasons. You will see it’s name and also who it is visible to.

Add a new archive reason
You can create a new archive reason from this page by clicking the blue + New archive reason button.

Then, fill out the required Reason Text, and optionally add a Reporting Code if you want to include it in reporting or the Data Exporter.

Next, choose the Visibility settings to determine who can see the reason. You can make it visible to Memberships, Helpers, or mark it as Shared to make it available to both.

Once all details are entered, click Save in the top right-hand corner. A green pop-up will appear to confirm your new reason has been successfully created.

Edit or archive an existing archive reason
From the list of archive reasons, navigate to which reason you wish to edit and click the ellipsis icon on its right-hand side. This will load a few options for you – Edit or Archive. Select Edit first. This will bring up a similar screen to what we just saw when creating a new archive reason.

Here, you can update the text shown, adjust the visibility scope, and modify the reporting code. Be sure to click the blue Save button to keep any changes.

Note: Some legacy reasons may include an internal code used for API compatibility, but this is not required when creating new reasons.
Archiving a reason removes it from the archive dropdowns. To archive, navigate to the reason in question and again, select it’s ellipsis icon on the right-hand side. Choose Archive from the options presented.

You will have a pop-up window appear for you to confirm this action.

Once confirmed, the reason is immediately hidden from users and will appear in the archived tab on this screen.

You can unarchive a reason by navigating to the Archived tab and selecting the reasons Unarchive button on the right-hand side.

As an example, we will archive the reason Terminated - charged with an unrelated criminal offence. This particular reason only shows when archiving a Helper – so let’s navigate to a Helpers dashboard and scroll to the archive section.

You will now see when giving a reason for archiving a Helper – the reason we archived does not appear within the list of selectable reasons.

Cancellation reasons
Cancellation reasons are used when staff, helpers, or members cancel scheduled visits. These are now fully editable and support role-specific wording. Navigate to Settings by clicking the ellipsis next to your name in the navigation bar, and then select Visit cancellation reasons under the Templates & configuration section.

A new page will load, listing all of your active visit cancellation reasons. You will see it’s name, who it’s selectable by and its observation category.

Add a new visit cancellation reason
You can create a new cancellation reason from this page by clicking the blue + New visit cancellation button.

Then, fill out the new Reason name, and optionally add a Reporting Code if you want to include it in reporting or the Data Exporter.

Next, choose who is able to select this reason. You can make it available to Staff, Helper or Members. You can select all or just one or two to see the reason.

If your organisation uses observations from cancellations, you can assign an Observation Category to a cancellation reason. This means that if a cancellation reason triggers an observation (e.g. based on note text), this category will be applied automatically.
Example: “Helper missed the visit” triggers an observation categorised as “Attendance Concern”.
You can also alter the reason wording shown to Helpers and Members when they select the reason. For example:
- Staff – “Helper was absent”
- Helper - “I cannot attend”
- Member - “Helper didn’t show up”

Once all details are entered, click Save in the top right-hand corner. A green pop-up will appear to confirm your new reason has been successfully created.

Edit or Archive an existing visit cancellation reason
From the list of Active reasons, navigate to which reason you wish to edit and click the ellipsis icon on its right-hand side. This will load a few options for you – Edit or Archive. Select Edit first.

This will bring up a similar screen to what we just saw when creating a new visit cancellation reason. Make any changes you wish, and don’t forget to press the blue Save button in the top right-hand corner once changes are complete.
To archive a visit cancellation reason, navigate to the reason in question and again, select it’s ellipsis icon on the right-hand side. Choose Archive from the options presented.

You will have a pop-up window appear for you to confirm this action.

Once confirmed, you will see a green pop-up box confirming the reason has been successfully archived.

The reason is immediately hidden from use and will appear in the archived tab on this screen.

You can unarchive a reason by navigating to the Archived tab and selecting the reasons Unarchive button on the right-hand side.

Visit cancellation dashboard
You can now view all cancellations via the dedicated Visit Cancellation Dashboard. It is accessible via the Rostering section in the main side menu.

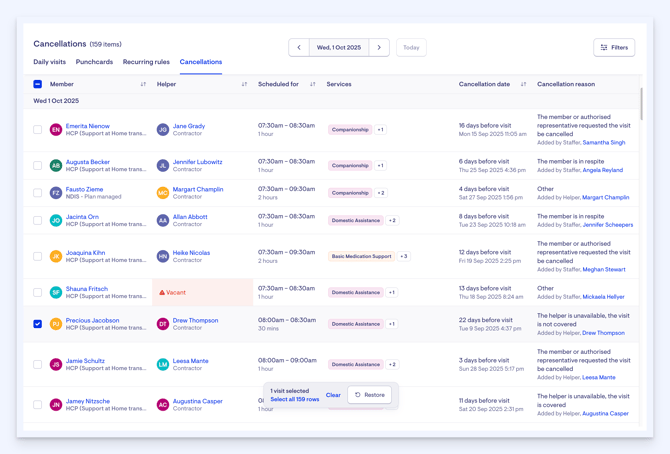
The cancellations tab includes:
- Member and helper
- Scheduled date and time
- Actual cancellation time
- Who cancelled
- Cancellation reason used
- Notes (hover to preview)
Integration Notes: The Reporting Code for custom reasons is included in both the Data Exporter and the API, where applicable. The Internal Code is only relevant for legacy reasons and is not required for any new reasons. API support for archive reasons is planned for an upcoming release, where they will be exposed via the API.
Restore a Cancelled Visit
From the Cancellation Dashboard, you can also restore a cancelled visit back to a Scheduled status if needed. Using the bulk select boxes, select the visit you want to restore. You will see a pop-up box appear with a Restore button.

You can utilise the bulk select tool here also and restore multiple cancelled visits at once.
Helper visit cancellation via the Care App
Helpers can now cancel their scheduled visits directly from the Care App by selecting from a customisable list of cancellation reasons.
Once created, new cancellation reasons will immediately become available for Helpers to select within the Care App.
On the other hand, if a cancellation reason is archived, it will no longer appear as a selectable option in the app. This allows your organisation to keep the list relevant and aligned with your workflows by controlling which reasons are visible to Helpers.
Cancelling a visit via the Care App
When enabled, helpers will see a "Cancel Visit" button in the edit visit screen of the Care App.
- With the Care app open, navigate to a scheduled visit.
- Tap the Cancel visit button.
- Select a cancellation reason from the list.
- Add any additional notes – this is optional.
- Confirm the cancellation.

This cancellation will now appear in our new Cancellations tab for Staff to see and review all relevant information linked to the cancelled visit.

Customising the Care App cancellation list
Suppose you'd like to replace the generic cancellation reason “Other” with something more specific and meaningful. To do this, navigate to Settings, Visit Cancellation Reasons on Lookout.
Archive the existing “Other” reason to remove it from the list of selectable options. This will ensure it is now also removed from the Care App and no longer a selectable option.
Next, click the + New visit cancellation reason and enter a more descriptive label, such as "Unable to provide service due to emergency." Make sure to check the box for "Selectable by Helper" so that this reason will be available in the Care App.
If you'd like the label shown to helpers to be different from the internal name, you can also add a custom helper-facing label at this stage (this step is optional). Once you're done, click the blue Save button on the right-hand side.
The newly added reason will now appear in the helper’s list of cancellation options, while the archived “Other” reason will no longer be visible in the app.

FAQs
Q: Can I restrict cancellation reasons to staff only?
Answer: Yes, just uncheck "Helper" and "Member" under selectable roles when editing a reason.
Q: What happens to archived reasons?
Answer: They are hidden from users but retained for reporting and API compatibility.
Q: Where can I see reporting codes in use?
Answer: They will appear in Data Exporter reports and API payloads where reasons are included.