
This guide explains what a membership plan is, why it matters, and how to set one up. It covers the key settings - fees, GST, and travel - how to add services and rates, how plans differ for government-funded versus private Members, and how to archive plans.
What is a membership plan?
A membership plan groups services and rates under one umbrella and defines the default charging rules for the Members on it. It's the foundation behind Lookout's smart rates, which help staff pick the correct rate when creating a visit, based on the plan, the visit's services, and the visit time.
In short, a plan is a reusable template for charging. Rather than setting rules for each Member individually, you set up a plan once and apply it to any Member it suits. A plan controls:
- Care management and package management fees
- Whether GST applies
- Whether travel and transport can be charged
- The services and rates available to Members on the plan
Why it matters
Well-set-up plans mean Members are charged correctly and consistently. They save time (apply the same rules to many Members), reduce errors (rules are defined once), and keep funding types straight (government-funded and private Members follow different rules).
Good to know: For government-funded plans such as Support at Home, key settings are fixed by the program - no care or package management fees, no GST, and no travel charges. Lookout applies these automatically and hides those options. For private plans, many of these are your organisation's business decision.
Before you start
- You are logged into Lookout as a staff member.
- You have finance settings access. If you can't see Membership Plans, your access role may not include it - ask an administrator within your organisation to review your permissions.
Creating or editing a plan
Step 1: Open Membership Plans
- From your home dashboard, navigate to the overflow menu by clicking the ellipsis (...) next to your name in the bottom left-hand corner.
- The overflow menu will open - click Settings.
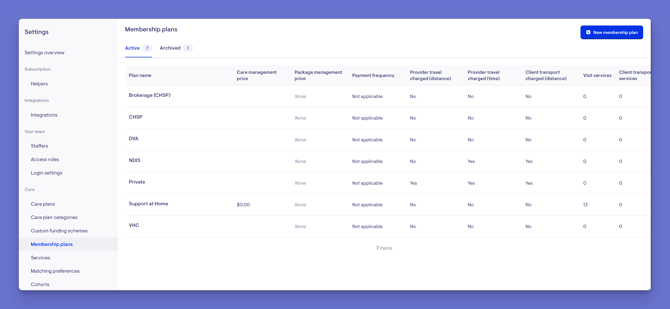
- In the main settings, navigate to the Care section, then click Membership plans.
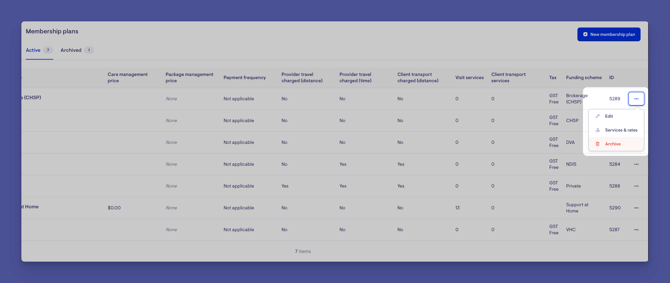
- You'll see your existing plans. To create a new one, click the blue + New membership plan button; to change one, select its ellipsis (...) and choose Edit. You may need to horizontally scroll to locate a plan's ellipsis (...) button.
Step 2: Enter the plan details
-
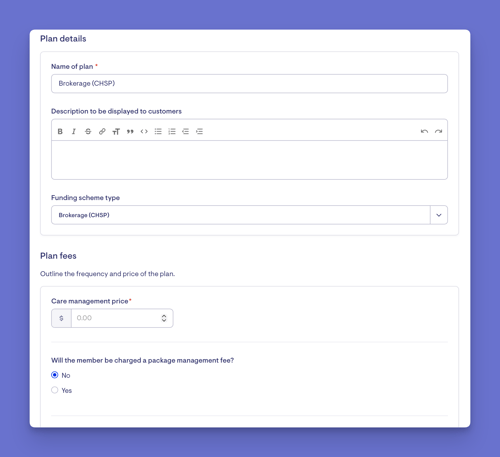
Enter a name and an optional description, so other staff can easily identify the right plan.
-
Choose the funding scheme type if applicable (for example, Support at Home). This shapes the rest of the form.
Please note: This sets the funding scheme type for the plan, which determines its charging rules. Adding a funding scheme to an individual Member's membership - with the details needed for claiming and reporting — is a separate step done on the Member's profile. For more information, see our dedicated article: Managing funding schemes from memberships.
Top tip: If you select a government scheme like Support at Home, Lookout automatically sets fees to zero, turns off GST, and turns off travel charges - and hides those fields, since the program fixes them.
Step 3: Set plan fees
(These options appear for private and other non-government plans.)
-
Enter the care management price. If there's no care management fee, set it to $0.
-
Choose whether a package management fee applies, and if so, enter the price.
-
Set the payment frequency.
-
Set the GST type.
Important: Care and package management fees are only automatically invoiced for plans with a weekly payment frequency. For other frequencies (such as twelve-weekly or annual), these fees need to be invoiced manually.
Step 4: Set travel and transport charges
Further down, you'll reach the travel and transport settings:
- Provider travel: Whether Members can be charged for a Helper's travel time and distance. Toggle to Yes if applicable, and optionally set a maximum distance.
- Client transport: Whether Members can be charged for being transported during a visit, with an optional maximum distance.
Top tip: To actually charge provider travel, you also need a provider travel rate set up in your Rates settings. Set that up first so the charge can be applied. To learn more about rates, please read the dedicated article.
Step 5: Set plan options (if applicable)
In the Plan options section, you can enable self-management for this plan - allowing Members to send Helper requests, negotiate, and approve visits from the app. This section appears if your organisation has that feature enabled.
Step 6: Save
When ready, click the blue Save button in the top-right to create the plan. A banner will display confirming your actions. and a new screen will load to add your services and rates.
Adding services and rates
Plans group services and rates together.
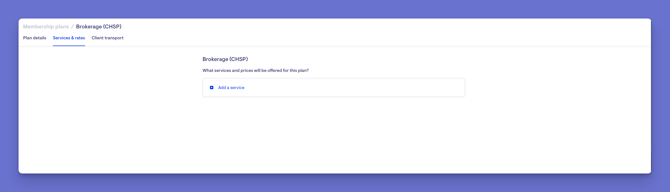
- If you are not following along with the steps above, navigate back to Membership plans in Settings, select the plan's ellipsis (...) button, and choose Services & rates.
- Click + Add a service and select the services for this plan, then Save. (Use the red trash icon to remove a service.)
- For each service, click Add rates to this service, select the relevant rates, and Save. (Use the red trash icon to remove a rate.)
For setting up rates and products themselves, see our dedicated article on Rates & Products.
Customising at the individual Member level
A plan sets the defaults, but you can adjust some settings for an individual Member if their arrangement differs.
- From the main navigation menu, click Members to open the full list of Members.
- Find the Member you're after - use the search box to type their name, or narrow the list using the filters.
- Click the Member's name to open their profile. This will load their Member dashboard.
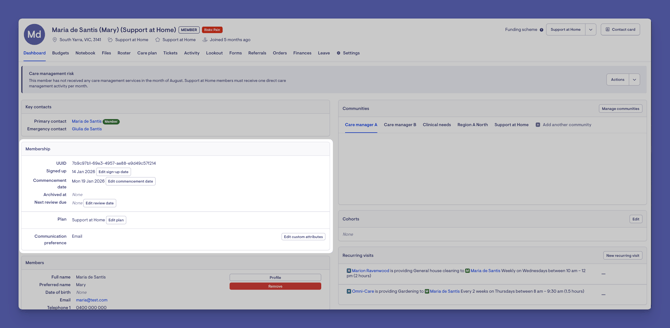
- Look for the Membership panel on the left side of the dashboard. Click the Edit plan button.
- Adjust the available options - for example, toggling off provider travel for a Member who shouldn't be charged for it.
- When ready, click the blue Save button.
- A green banner will display confirming your changes have applied.
Updating plan fees
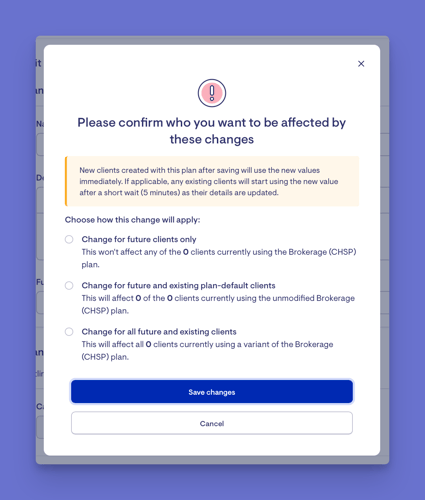
Plan fees are charged through the billing run. When you change fee-related settings on a plan, Lookout asks how far you want the change to apply - for example, only going forward, or also to past periods, or to all Members currently on the plan. Choose the option that suits your situation, so the change applies exactly where you intend.
Archiving a plan
- Select the plan's ellipsis (...) button and choose Archive.
- This doesn't affect existing Members - they stay on the archived plan until switched to another. It simply stops the plan being used for new memberships.
To bring it back, open the Archived tab and select the refresh/restore option.
Troubleshooting
I can't see Membership Plans in Settings
This needs finance settings access. Ask an administrator to review your access role.
I can't set fees, GST, or travel on a plan
Check the plan's funding scheme type. Government plans like Support at Home have these fixed by the program, so the options are hidden and can't be changed.
Provider travel isn't being charged even though I turned it on
-
Charging provider travel also needs a provider travel rate set up in your Rates settings. Make sure the rate exists.
-
Check that the individual Member's plan hasn't overridden the setting to "not charged".
A Member's charges differ from the plan
The Member's individual plan may have been customised. Open their plan and select Edit plan to review any overrides.
Fees aren't being invoiced automatically
Automatic invoicing of care/package management fees only happens on weekly plans. Other frequencies must be invoiced manually.
Still Need Help?
If you're still experiencing issues, please contact our Support Team and include:
- Screenshots (if possible)
- The Member's name/email
- The exact steps taken
- Any error messages received