
The Department of Health is requiring providers to report additional information about the CHSP services they deliver. This guide explains what's changing, the steps you can take right now to prepare, the new details you'll be able to record from 11 August, how to update services you've already delivered in July, and how the "Apply defaults" option can help you complete your July reporting quickly while you transition.
Have a specific question? We've pulled together answers to the most common CHSP DEX Stage 3 questions in one place - see the CHSP DEX Stage 3 changes: FAQs.
Background
CHSP is a block-funded program: providers receive funding up front to deliver an agreed amount of services, and report back to the government each month on what they actually delivered. The government uses this information to make future funding decisions.
This update -Stage 3 of the government's changes - asks providers to capture more information about each service they deliver. In practice, that means answering a few extra questions about certain services (for example, how much time a participant spent socially engaging with the worker, or whether a meal was prepared on-site or off-site). Our job is to ensure that when you deliver these services, Lookout provides a place to capture everything you need, so your DEX report is complete and meets the government's requirements.
Most of the new information is entered by admins at the rostering stage, meaning very little (if anything) needs to come from Helpers in the field.
Before you start
To be ready for this change, make sure:
- Every CHSP Member has their My Aged Care (MAC) ID recorded on their profile
- Each Helper is correctly marked as an Employee, Contractor, or Volunteer on their profile
Lookout will flag any Members or Helpers that are missing these details, so you can find and fix them easily.
Top tip: These two steps are worth doing now, before the rest of the change arrives, as they underpin the new reporting and don't depend on any of the new features being switched on.
What's changing and when
- From 11 August, the new feature becomes available in Release Hub, so you can switch it on for your organisation whenever you're ready.
- On 31 August, the feature switches on automatically for everyone, as this is a regulatory requirement that applies to all providers.
- Because reporting for these changes applies from 1 July, you'll be able to go back and update services already delivered earlier in the period.
Top tip: If you deliver a lot of CHSP services, it's worth enabling the feature early (from 11 August), so your team can get comfortable with the new fields before the automatic switch-on date. If you only deliver a small amount of CHSP, keep an eye out - the new fields will appear on your rosters from 31 August, whether or not you've opted in earlier.
New information to capture
From 11 August, depending on the service being delivered, you'll be able to record additional details. Not every provider will see every field - you'll only be asked for the information that's relevant to the services you actually offer.
| New information | Applies to |
|---|---|
| Session location (Home or Community) | Flexible respite, Individual social support, Meal delivery |
| Whether a meal was provided | Community cottage respite, Home/community general respite |
| Whether meals were cooked on- or off-site | Meal delivery |
| Texture-modified meals | Meal delivery, or where a meal is provided |
| Meal types (main meal, light meal, dessert, beverage, snack) | Meal delivery, or where a meal is provided |
| Social engagement time | Meal delivery, Transport |
| Travel distance and travel time | Transport |
These fields will appear when you roster visits, raise purchase orders, and set up group visits — wherever they're required.
Most of this information is best entered up front when rostering, since details like where a meal was cooked or what type of meal it was are usually known in advance. Social engagement time and travel distance/time for transport are the exceptions - these can be captured during delivery, and social engagement time is optional.
Please note: During development, we found discrepancies between the Department of Health specifications for DEX reporting and the DEX portal. We are in contact with them and will provide further updates if this becomes an issue.
Updating delivered services (Backfilling)
Many organisations delivered CHSP services throughout July before these fields existed. To make the transition easier, you'll be able to:
- Bulk update July services with the new information
- See exactly which visits are missing required information before you submit DEX
- Download an issues report identifying the records that need attention
Visits
You can bulk update individual visits from either the Daily snapshots or Punchcards screen under Rostering:
-
From the main navigation menu, click Daily snapshots or Punchcards under the Rostering section.
-
Use the date range picker and filters button in the top left to surface the visits you wish to update. For example, CHSP funding scheme only visits.
-
Use the bulk select function to select either all surfaced visits or specific visits from the list.
-
An action bar will appear. It will remind you how many visits you have selected and present you with further action buttons.
-
Click the Edit button to display a list of drop-down options.
-
Click CHSP details.
-
A side window will load. Update any of the fields you want to change.
-
When ready, click the blue Save button in the top right corner.
-
A green banner will display confirming your visits were updated successfully.

Reminder: Only the fields you fill in will change; anything left blank keeps its existing value.
Recurring rules
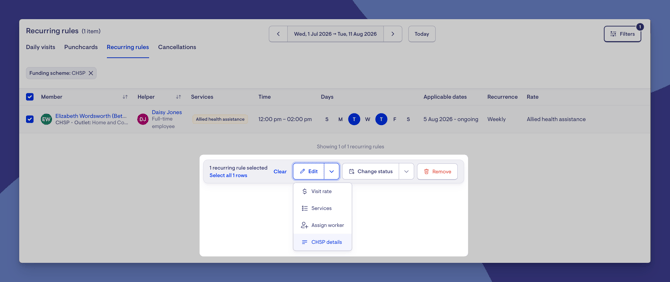
For recurring rules, you can bulk update the CHSP details from the Recurring rules section under Rostering:
-
From the main navigation menu, click Recurring rules under the Rostering section.
-
Use the date range picker and filters button in the top left to surface the recurring rules you wish to update.
-
Use the bulk select function to select either all surfaced or specific recurring rules from the list.
-
An action bar will appear. It will remind you how many you have selected and present you with further action buttons.
-
Click the Edit button to display a list of drop-down options.
-
Click CHSP details.
-
A side window will load. Update any of the fields you want to change.
-
When ready, click the blue Save button in the top right corner.
-
A green banner will display confirming your recurring rules were updated successfully.
Again, only the fields you fill in will change.
Group visits and CHSP details
- From the main navigation menu, click Group visits & activities under the Rostering section.
- Choose between the Group visits or Events tabs to locate your event.
- You can also use the search and status filters to help you locate.
- Click the group activity name to open it and view its details. You can then click the Edit group activity button in the top right corner to edit its details.
- Alternatively, before opening the group activity, click its ellipsis (...) button and Edit from the short options menu that appears. This will take you to the same edit details page.
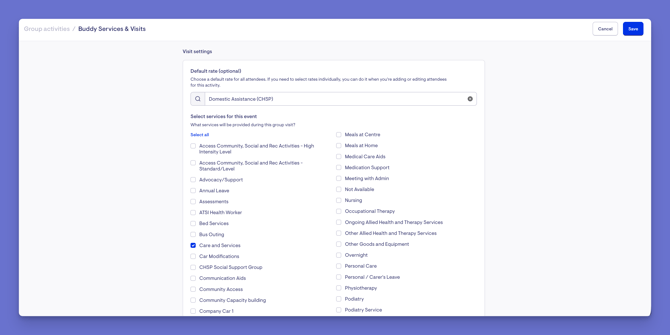
- CHSP details are managed here within the group visit itself, under Visit settings.
- Remember to click the blue Save button to apply any changes.
Why some group visits only show the Outlet
Just like individual visits, the CHSP fields on a Group Visit are driven by the selected rate. If the service doesn't require any extra Stage 3 information, the Group Visit will only show the Outlet - this is correct, not a fault. The form changes depending on what the service actually needs, so different group visits can show different fields.
For example, a service like Flexible respite will show the additional fields that the service requires (such as location and meal questions), because the rate calls for them.
Managing CHSP details per attendee
Where needed, CHSP details can be managed at the attendee level, so individual attendees can carry different details from the group default.
Backfilling attendees
When you update the CHSP fields for a Group Visit, you'll be offered the option to update the attendees for existing event times as well. You can choose a date to backfill event times from an earlier point - as you do, the confirmation will update to show how many attendees will be affected.
Please note: Backfilling won't change any invoices that have already been published. The confirmation will let you know if any attendees already have published invoices; for those, you'll need to update the invoices or the DEX report directly.
Invoices
You can bulk update invoices from the Invoices and credit notes screen under Finance:
-
From the main navigation menu, click Invoices and credit notes under the Finance section.
-
Use the filters or sort by options to surface the invoices you wish to update.
-
Use the bulk select function to select either all surfaced or specific invoices from the list.
-
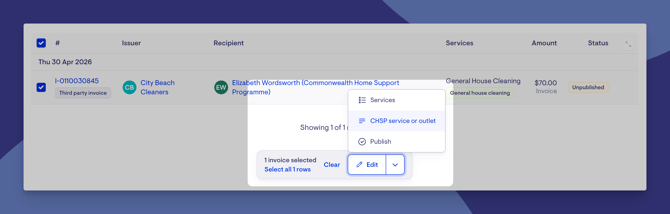
An action bar will appear. It will remind you how many you have selected and present you with an Edit button.
-
Click the Edit button to display a list of drop-down options.
-
Click CHSP service or outlet.
-
A side window will load. Update any of the fields you want to change.
-
When ready, click the blue Save button in the top right corner.
-
A green banner will display confirming your invoices were updated successfully.
Reminder: Only the fields you fill in will change.
Please note: The invoice import template keeps the same name and version even after Stage 3 is enabled. The new Stage 3 columns are added to the file when you download it, so if you had a copy open beforehand, it will look unchanged. Download a fresh copy after enabling the feature to get the updated columns.
Purchase orders
You can add or update CHSP details directly on the purchase order. For CHSP members, new purchase orders start with Subcontractor delivered: Yes and Volunteer delivered: No (since the work is delivered by an external supplier) - you can change either before saving.
Purchase order limitations
A few things to be aware of when using CHSP with purchase orders:
- CHSP fields apply to the whole purchase order (the header) - they don't exist at the individual line level.
- Suppliers can't see the CHSP fields in the Connected Care supplier portal.
- If services on one order need different CHSP reporting details, you may need to raise separate purchase orders.
How a Helper's engagement type sets answers
For visits, the Helper's engagement type automatically sets the CHSP worker answers:
| Helper engagement type | Resulting CHSP answer |
|---|---|
| Employee | Subcontractor delivered = No |
| Contractor | Subcontractor delivered = Yes |
| Volunteer | Volunteer delivered = Yes |
These are starting values based on the Helper, but you can still override them on the visit where needed.
This section covers how the subcontractor and volunteer answers are set for visits. For purchase orders, these are set automatically - see the Purchase Orders section above for clarity.
Why changing a Helper's type doesn't update older visits
The engagement type only sets the answer for new answers created through the admin rostering form, and only for sessions dated on or after 1 July 2026. It won't retro-fill answers on visits that already exist, or ones created another way (such as bulk actions, check-out, recurring rules, or an integration). For those, set the answer directly on the visit.
DEX error workflow
How to find and fix missing information before submitting DEX.
Lookout does not validate your data live inside the DEX screen before you generate the report. Instead, missing information is surfaced through an error report that's produced alongside your DEX report. The process is:
- Generate the DEX report
- Download the accompanying error report (CSV)
- Review the missing fields - the error report names the specific attribute that's missing and links you to the visit or invoice
- Correct the records using the backfill tools, via:
- Visits
- Recurring rules
- Group Visits
- Invoices
- Regenerate the DEX report
The error report is the fastest way to see what's outstanding, because not every service type needs every field - it only surfaces the gaps that actually matter for each service, rather than making you scan the whole report preview.
Expecting Lookout to check your data before you submit? Validation occurs after you generate the report, not as a live check on the DEX screen. Generate, review the error report, fix, and regenerate.
Reading your error report
Not every message in the report comes from Lookout. Some are Lookout flagging gaps in your own data (like a required field left blank). Others come from the DEX portal when you upload your XML (like a service type you're not registered for, or an address DEX can't verify). Knowing the source tells you where to fix it.
Each row has an error type:
- Error - must be fixed for that session to be accepted.
- Warning - informational; the record is still accepted, usually with a sensible default applied. Generally no action needed.
- Information - a notice only (for example, an address DEX has tidied up). No action needed.
What you fix in Lookout
The most common and most fixable errors are Stage 3 fields that haven't been filled in. They read as "[Field] is a required field. Please provide an answer":
| Message | What it's asking for |
|---|---|
| ServiceLocationSettingCode | The session location (Home or Community) |
| IsOvernightSupportIncluded | Whether overnight support was included |
| IsMealProvided | Whether a meal was provided |
| IsItemsTextureModified | Whether the meal was texture-modified |
Resolve these with the backfill tools (visit, recurring rule, group visit, or invoice) and regenerate, or use Apply defaults to fill in blanks quickly (see below).
You may also see a meal-count warning - "IsMealProvided is yes and a value is not provided… the default value of zero (0) is set." This just means a meal was recorded but a specific count (e.g. snacks) was left blank, so DEX recorded it as 0. If 0 is correct, do nothing; if not, update the count and regenerate.
What comes from DEX, not Lookout
Some errors are the DEX portal checking your file against its own records, and won't be fixed by filling in fields in Lookout:
- "Service Type Id [number] does not exist or you do not have access to it" - the service isn't one your organisation is registered/funded for at DEX. This is a registration/setup issue on the DEX side.
- Address messages - DEX verifying client addresses. Information means it tidied the address (no action); Error ("Address details are invalid") means it couldn't verify it - correct the client's address.
- "Estimated date of birth must contain Day and Month values of 01 and 01" - a DEX formatting rule; correct the Member's date of birth details to match.
Top tip: A record can appear once per missing field. Fixing all required fields on a single visit or invoice clears all related errors for that session at once.
Completing July reporting quickly
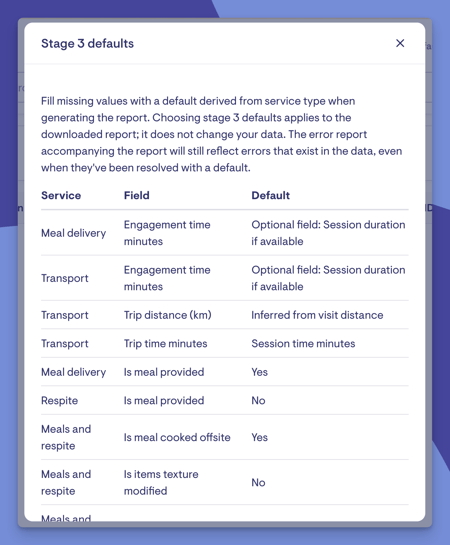
If you'd rather not manually update every service delivered between early July and August, you can choose Apply defaults when generating your DEX export. This is designed to help you complete your July reporting quickly while you transition to capturing the new information.
Apply defaults is deliberately simple. It's a single checkbox - there are no service-level defaults, configurable settings, or automatic mappings to set up. When you tick it, it:
- Applies to the entire report you're generating
- Only fills in missing values in the exported DEX report
- Does not change your actual visit, roster, or invoice data
- Can be overridden at any time by entering the correct information
The subcontractor and volunteer answers are handled separately - those always come through (based on the Helper's engagement type or the source of the work), whether or not you tick the defaults box.
Where a default can't reasonably be worked out (for example, transport distance), the export will identify those records so you can complete them manually.
Here's how "Apply defaults" behaves in different situations:
| Scenario | Result |
|---|---|
| A service already has a value | The existing value is kept |
| A field is blank | A default may be filled in for the report |
| Transport distance is blank | May still need to be entered manually (a default can't always be worked out) |
| Subcontractor / Volunteer | Populated automatically, independently of the defaults checkbox |
Default values
To generate a report with defaults:
- From the main navigation menu, click CHSP DEX.
- Click + Generate new report.
- Next to the date picker, tick stage 3 defaults.
- You can click the question mark icon next to Stage 3 defaults to see what the default is.
Please note: During development, we found discrepancies between the Department of Health specifications for DEX reporting and the DEX portal. We are in contact with them and will provide further updates if this becomes an issue.
What Happens Next?
- Once the feature is switched on, the new fields become part of your normal rostering workflow, so future DEX exports will automatically include the required information, with no extra steps.
- Nothing breaks if a field is left blank during rostering. You can carry on as normal; the gap will simply show up at reporting time, where you'll need to backfill the missing information before submitting DEX.
Troubleshooting
We've listened and pulled together answers to the most common CHSP DEX Stage 3 questions in one place - see the CHSP DEX Stage 3 changes: FAQs.
This FAQ includes answers to a plethora of questions - covering fields, defaults, group visits, purchase orders, imports, and reporting. Use it alongside this main guide before seeking further help from Support.