Vision rostering
A how-to on setting up and maintaining worker pay, conditions and rostering insights.
Data preparation considerations
Creating a workforce agreement
Maintaining your workforce agreements with versions
Payroll and integration options
Data export external status and file history
Shift maintenance & automatic shift wrapping
What is vision rostering
Lookout Vision Rostering provides real-time insights to empower your business. It highlights a Helper’s pay rate and outlines any applicable warnings, allowances, or penalties for specific shift scenarios.
Vision rostering is not designed to replace your current award interpreter, instead, it is a pre-emptive guidance solution to optimise your roster ahead of time instead of waiting until it's too late.

By putting this information in your team’s hands, staff can identify inefficiencies in advance and address them proactively rather than waiting for issues to appear on a payroll report. Once the rules are configured within a Helper’s workforce agreement, rostering staff receive insights for shifts, ensuring you are optimising your roster as effectively as possible and providing a projected margin for each shift.
In the above example, a filter was applied to show any shifts that did not meet the minimum shift requirements. The affected shift is highlighted after the filter is applied.
If you are interested in understanding how this add-on can be turned on for your instance, please reach out to your account manager or email success@thelookoutway.com
Note: The set-up and maintenance of vision rostering is usually restricted to Finance Admin users.
Data preparation considerations
For vision rostering to work as expected, the Helper needs to be assigned an employee type (full-time, part-time, or casual), and a set of public holidays. Learn more about public holidays here.
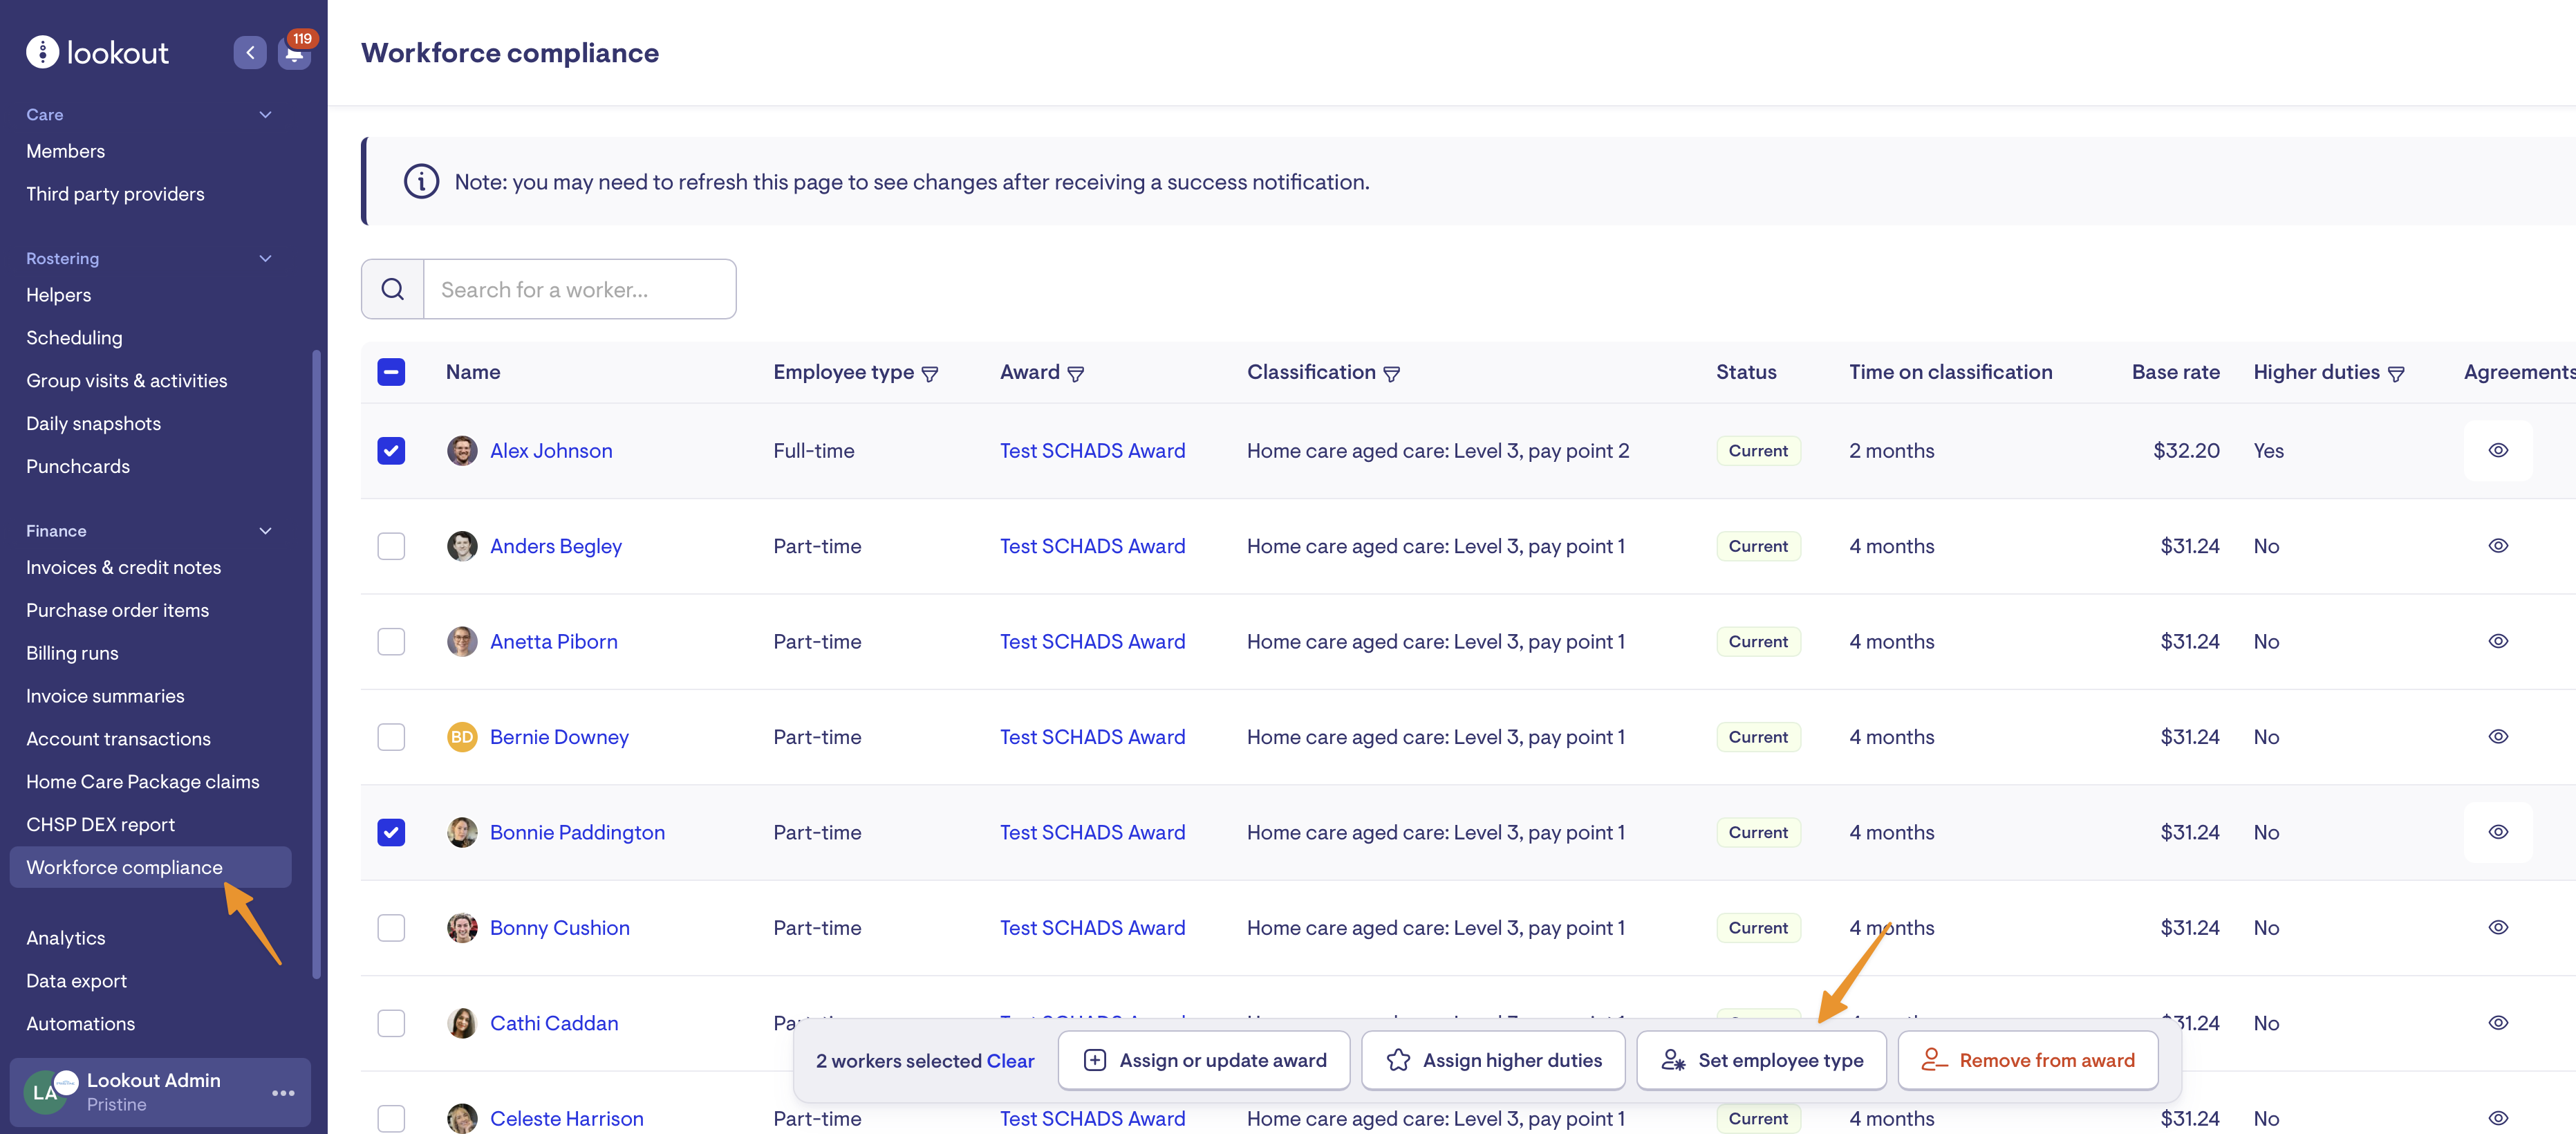
To find any Helpers without an employee type, navigate to the Workforce compliance page, found under the Finance heading in the navigation. Filter by Employee type "Not assigned" in order to find all workers without an employee type. You can select multiple workers by clicking the checkbox next to their names and then clicking "Change employee type" to assign an employee type to the selected workers. To update an individual worker, click the three dots at the end of their table row and select the option to change the employee type.
Creating a workforce agreement
Navigate to Settings by clicking the three dots next to your name in the navigation bar, and then select Vision rostering under the Finance heading.
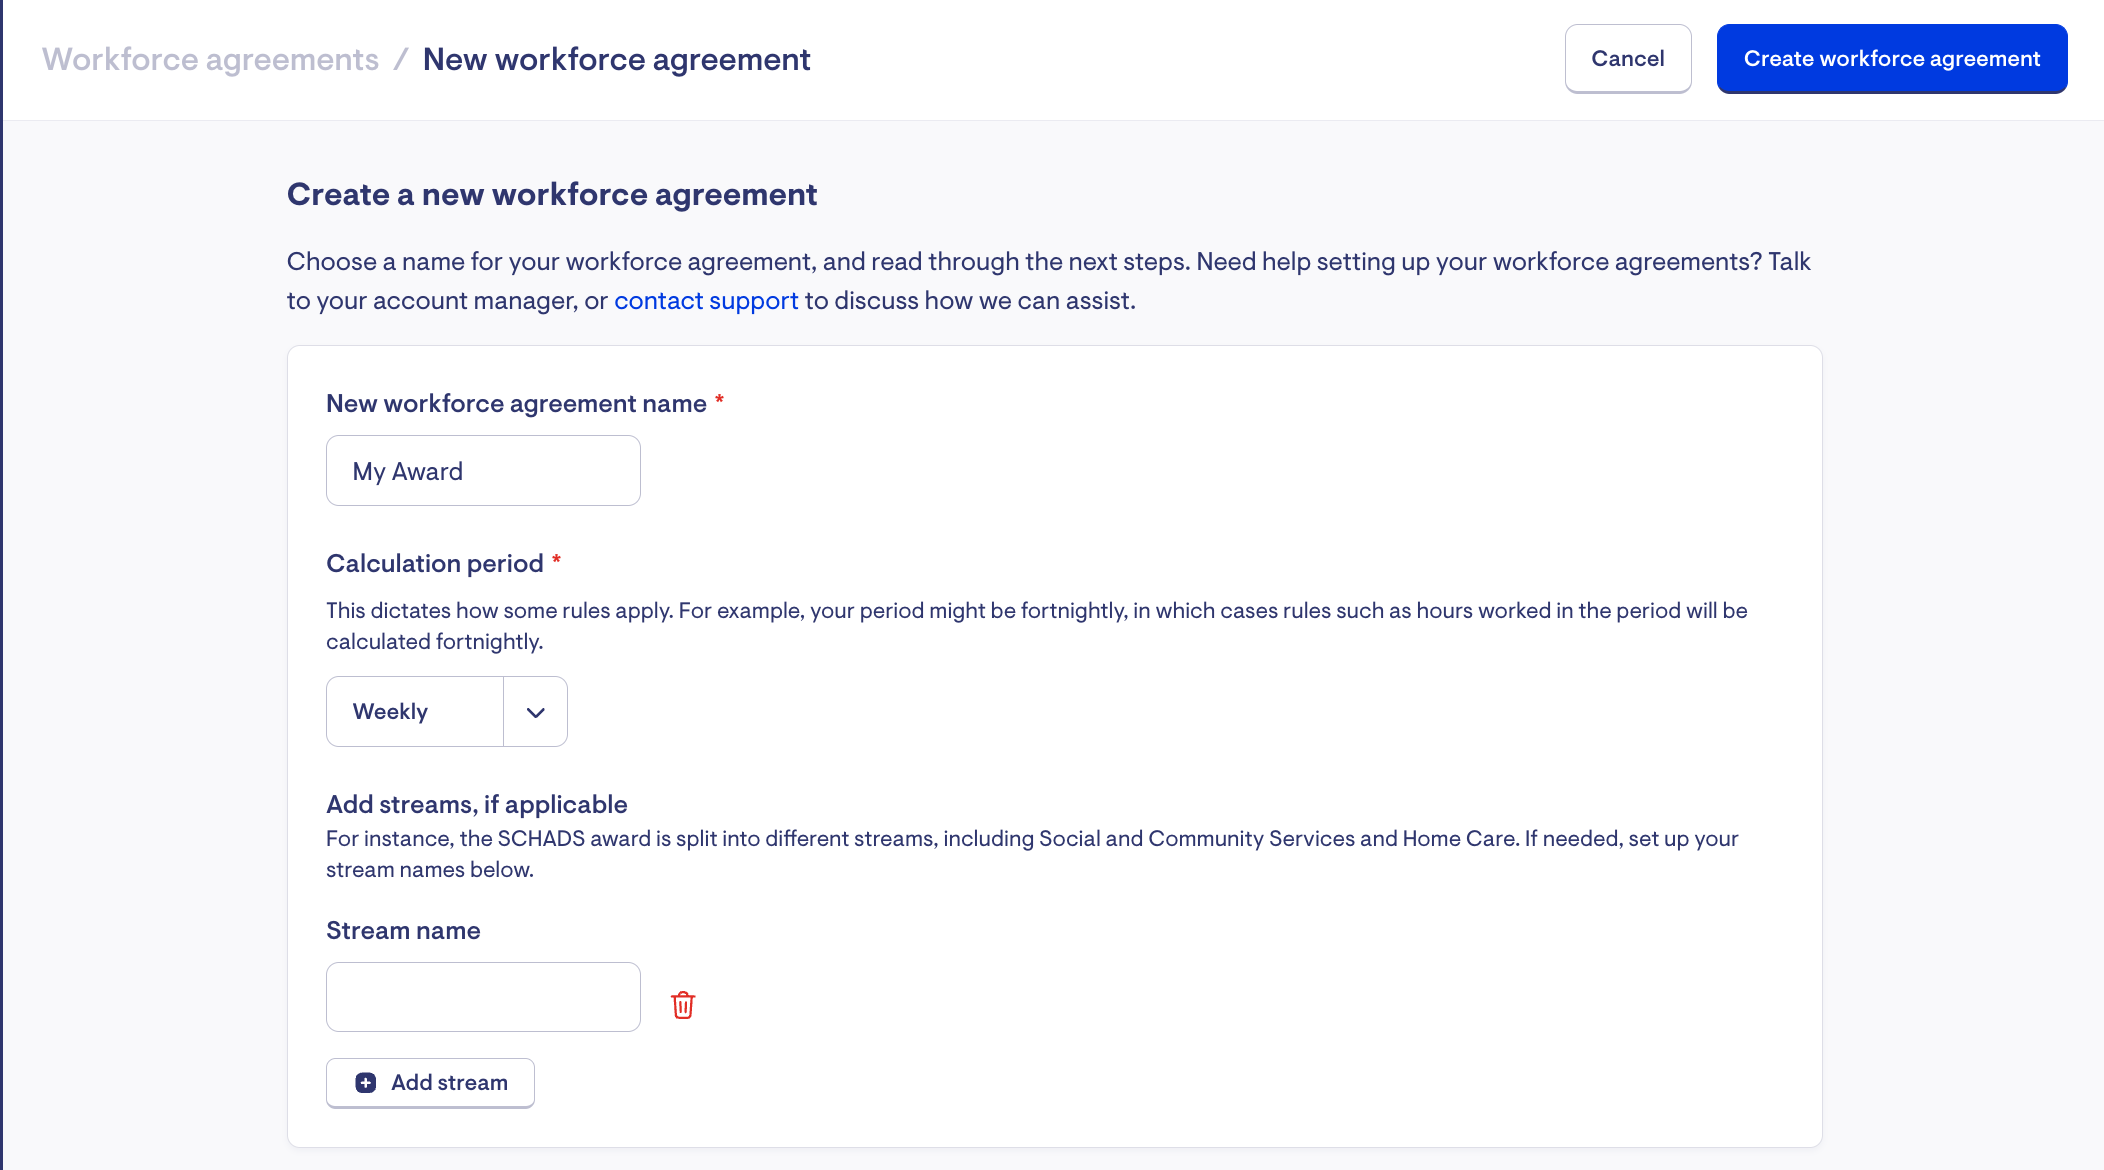
Click the "New workforce agreement" button at the top-right, and on the next screen, name your workforce agreement and choose the period - this usually coincides with your payroll period. The award period makes sure that calculations, such as a worker's hours per week, are recorded correctly.
Here you'll also find an option to add streams. This is most common in the SCHADS award, which has streams for Home Care, Social and Community Services, etc.
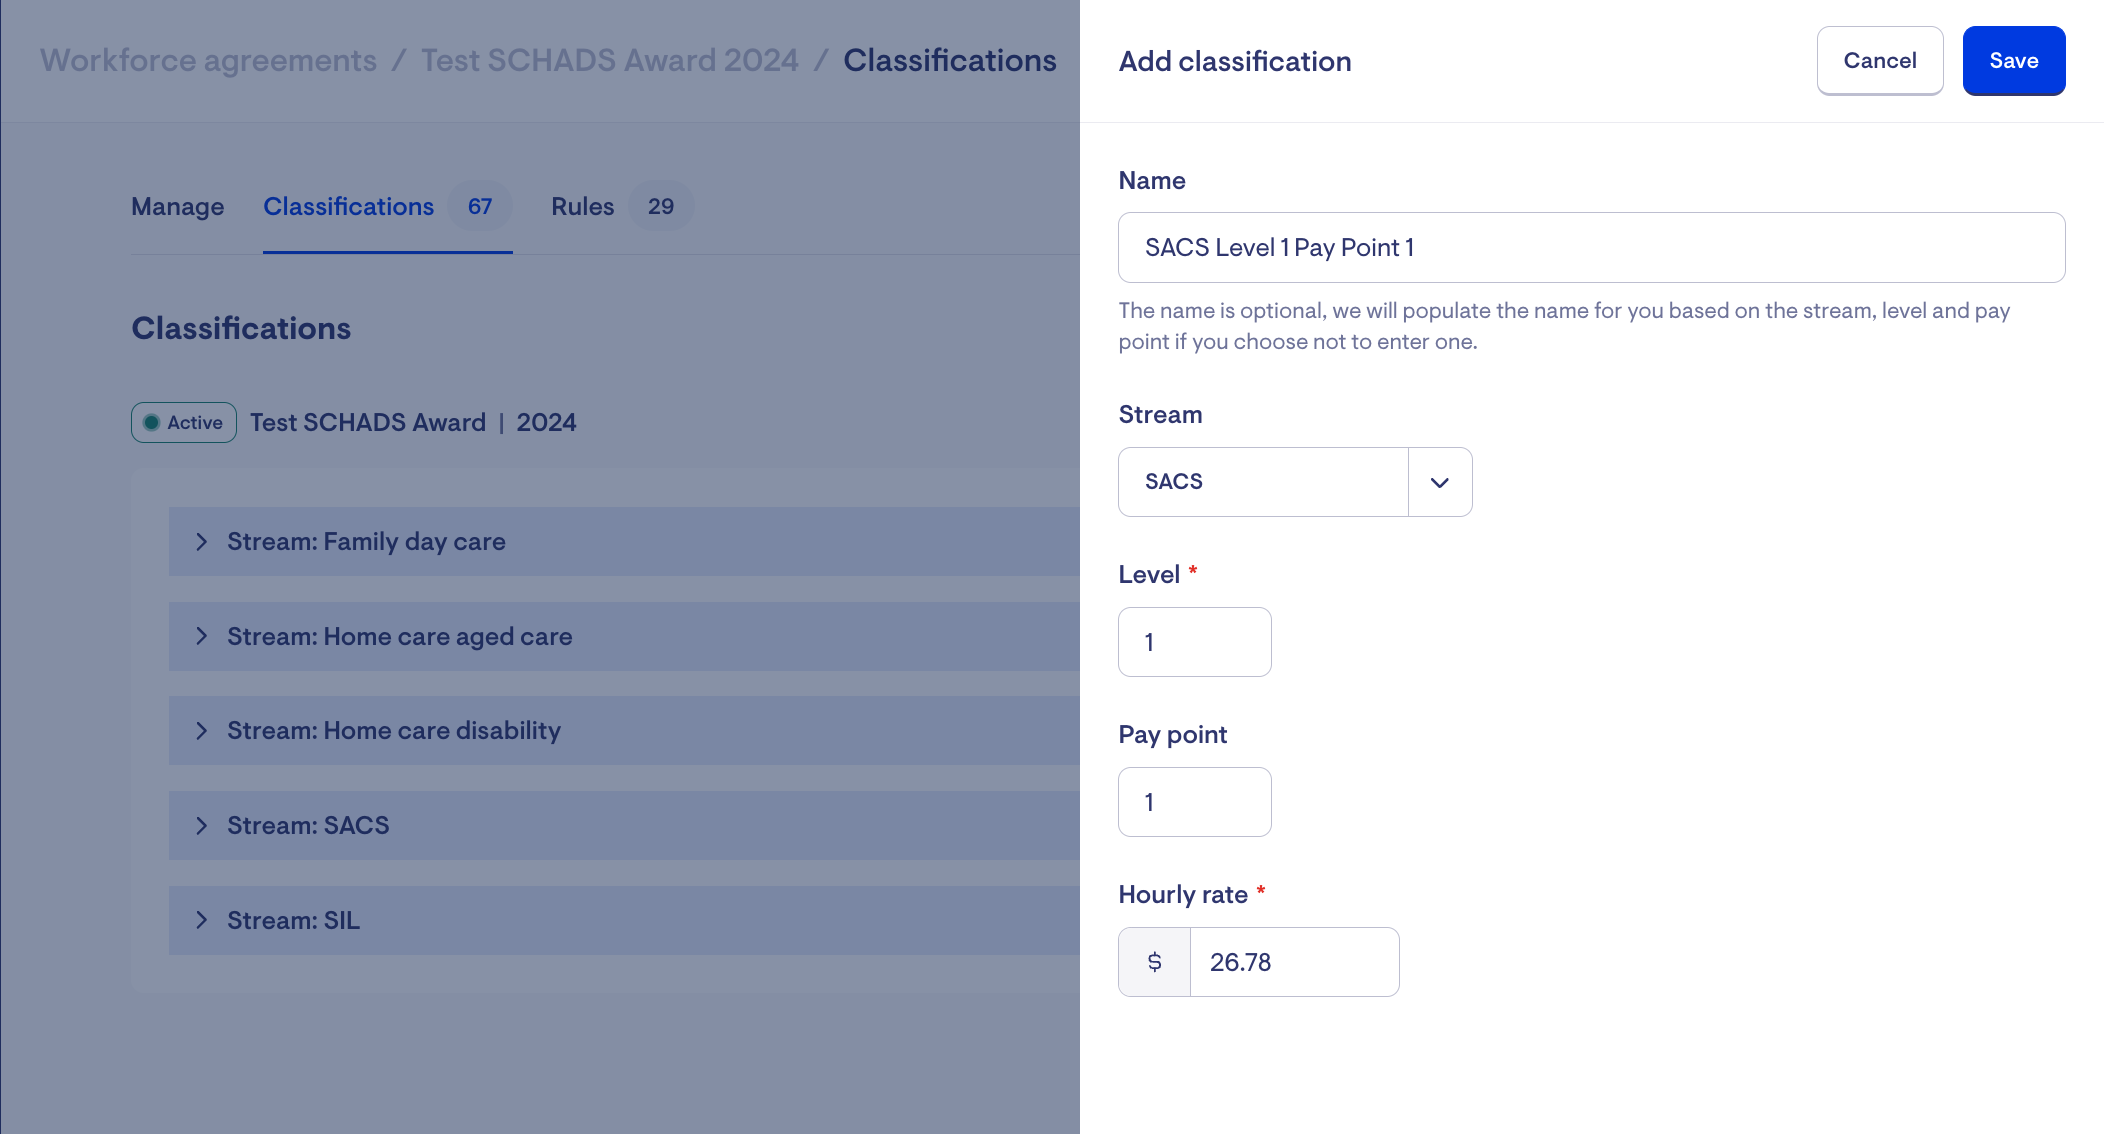
After creating your workforce agreement, you’ll be redirected to a page where you can start creating your classifications. Click the "Add classification" button to add a new classification. Here, you’ll be able to assign the classification to a stream (if applicable) and choose the level, the pay point and the hourly rate.
After your classifications have been created, you can set up your rules.
At the top, click on the "Rules" tab, and then click the "Add rule" button.
Name your rule and give a short description if you like. The description may help anyone looking at the rule understand what it means at a glance.
After naming, you can then use the rule builder to create the rule. Read the guide at the end of this article for guidance on how to build an award rule.
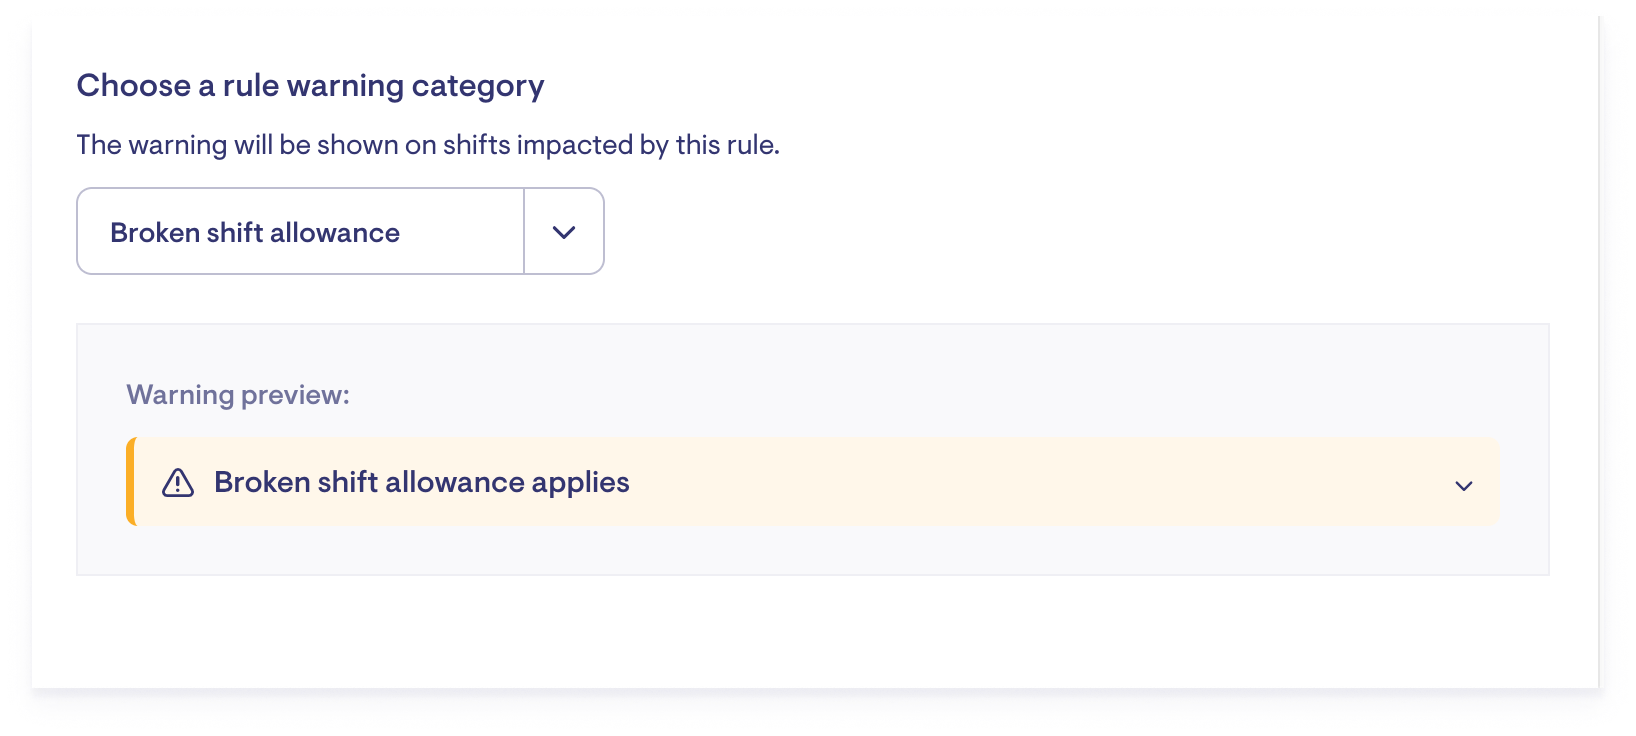
Finally, if you wish for the rule to be shown on relevant shifts when scheduling, select a rule warning filter category. After selecting, you will see a preview of what the warning will look like on a shift:
Important: classifications and rules can be edited or deleted until workers are assigned to the award. After that point, a version needs to be created to change them. This restriction is in place to avoid changing workers' pay conditions mid-shift.
Activating the workforce agreement
After setting up your classifications and rules, you’re ready to activate the award. Click on the ‘Manage’ tab.

You’ll see a panel on the left - this is your current workforce agreement version, and it’s currently labelled as "Inactive". Click on the "Add a start date to make active" link. In the window that appears, choose a version suffix for this version of the workforce agreement - Lookout will automatically add the current year, but you can change this to whatever you like.
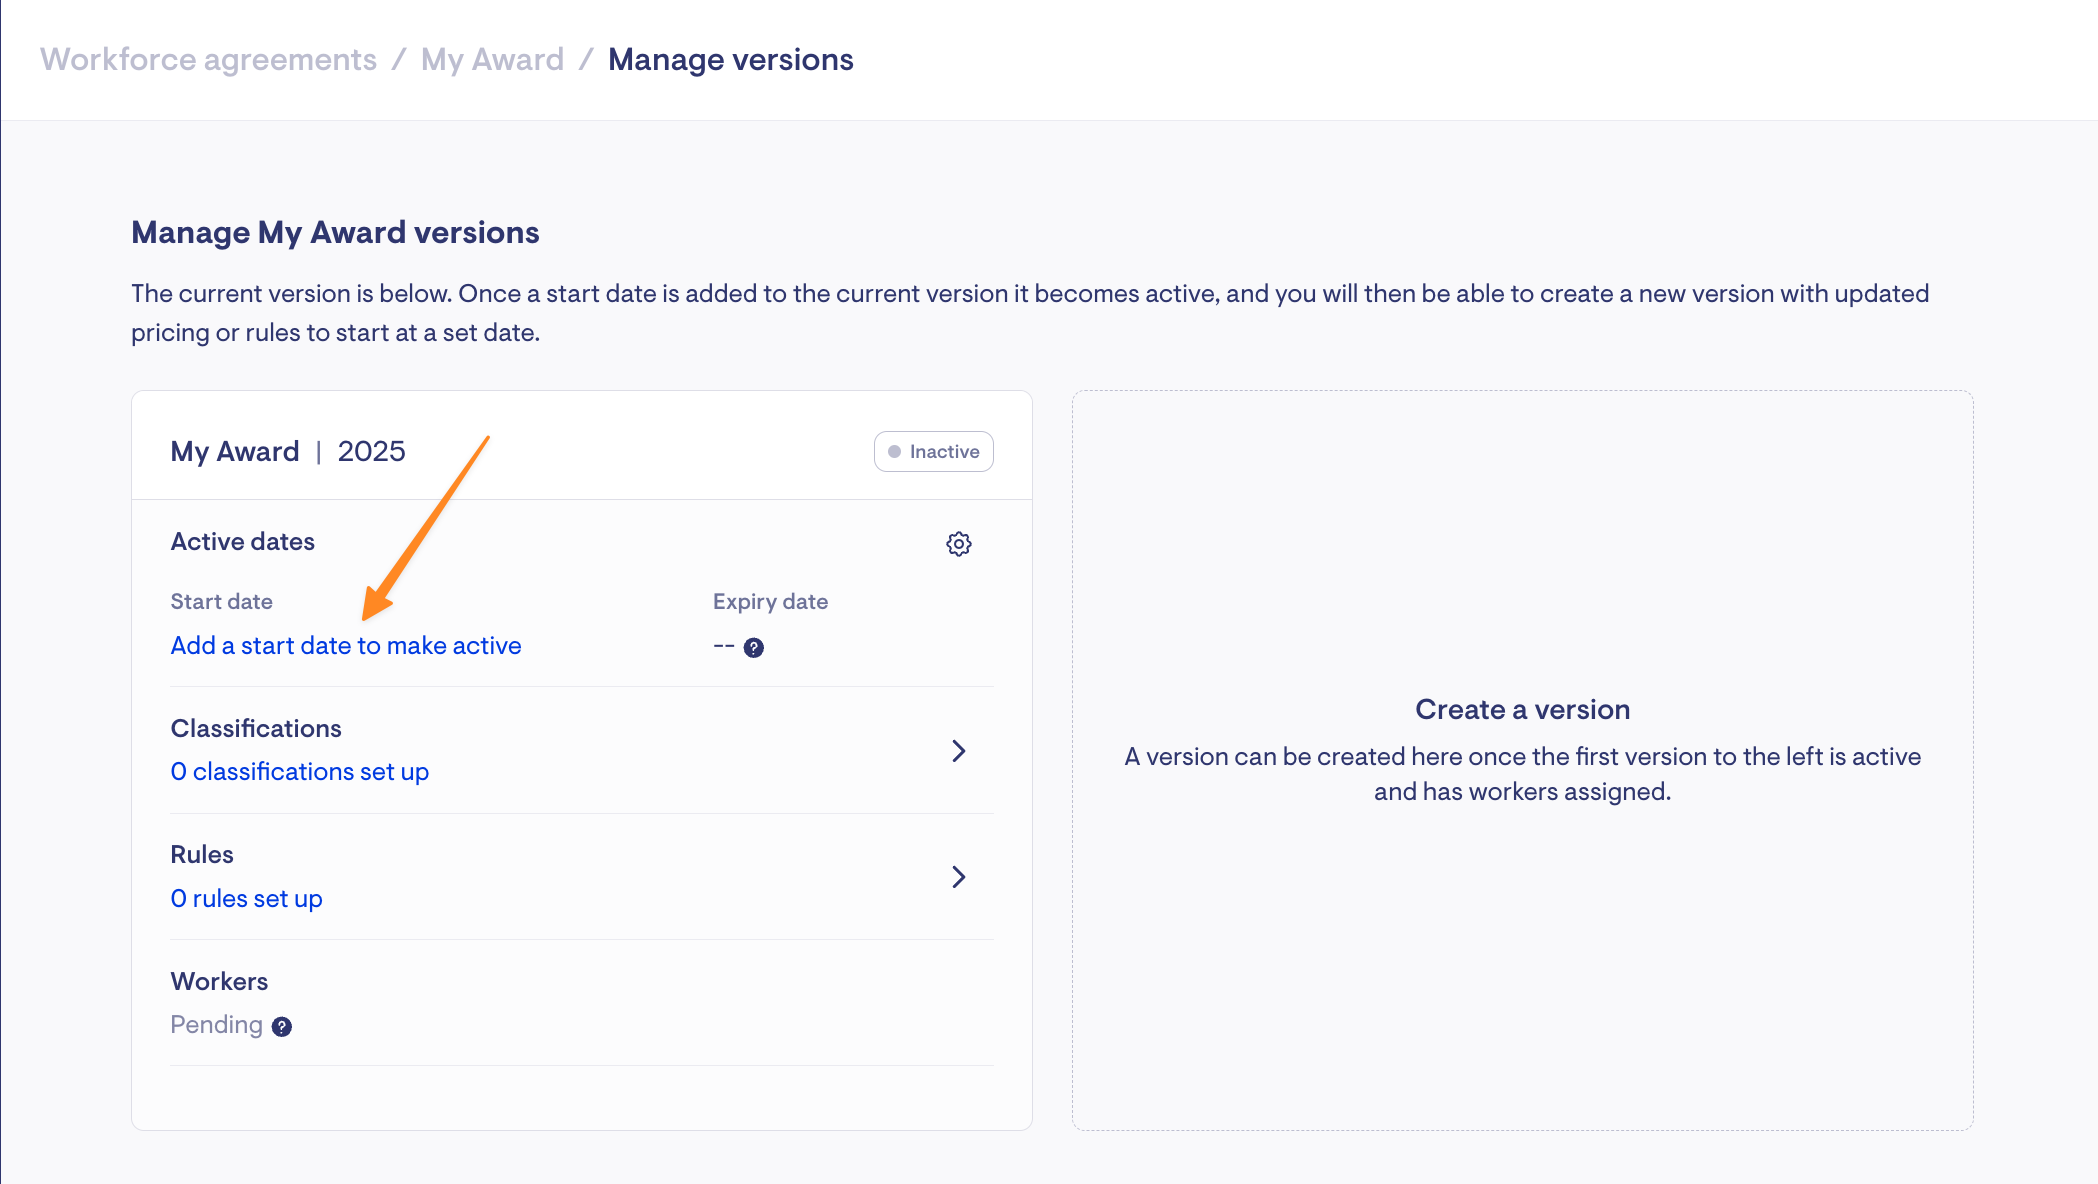
Choose a start date for your award. This should align with your workforce agreement period. Save the changes.
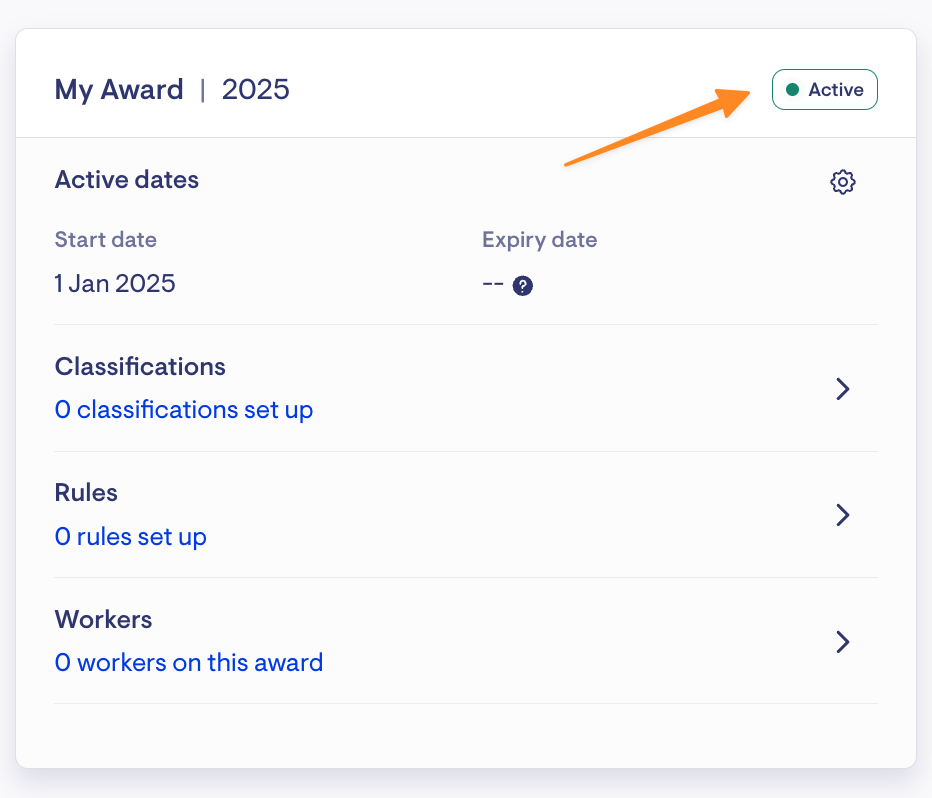
The workforce agreement will become active on your selected date. On the start date, the tag at the top of the version will change from "Inactive" to "Active."
Maintaining your workforce with versions
Lookout allows you to create versions of your workforce agreement. Versions let you schedule changes in advance.
When you want to create a new version, for example, when there is an award wage increase, click the "Create a version" button.
On creation, new versions will copy the classifications and rules from the previous version which can then be edited as needed, and the changes scheduled to become active at a future date.
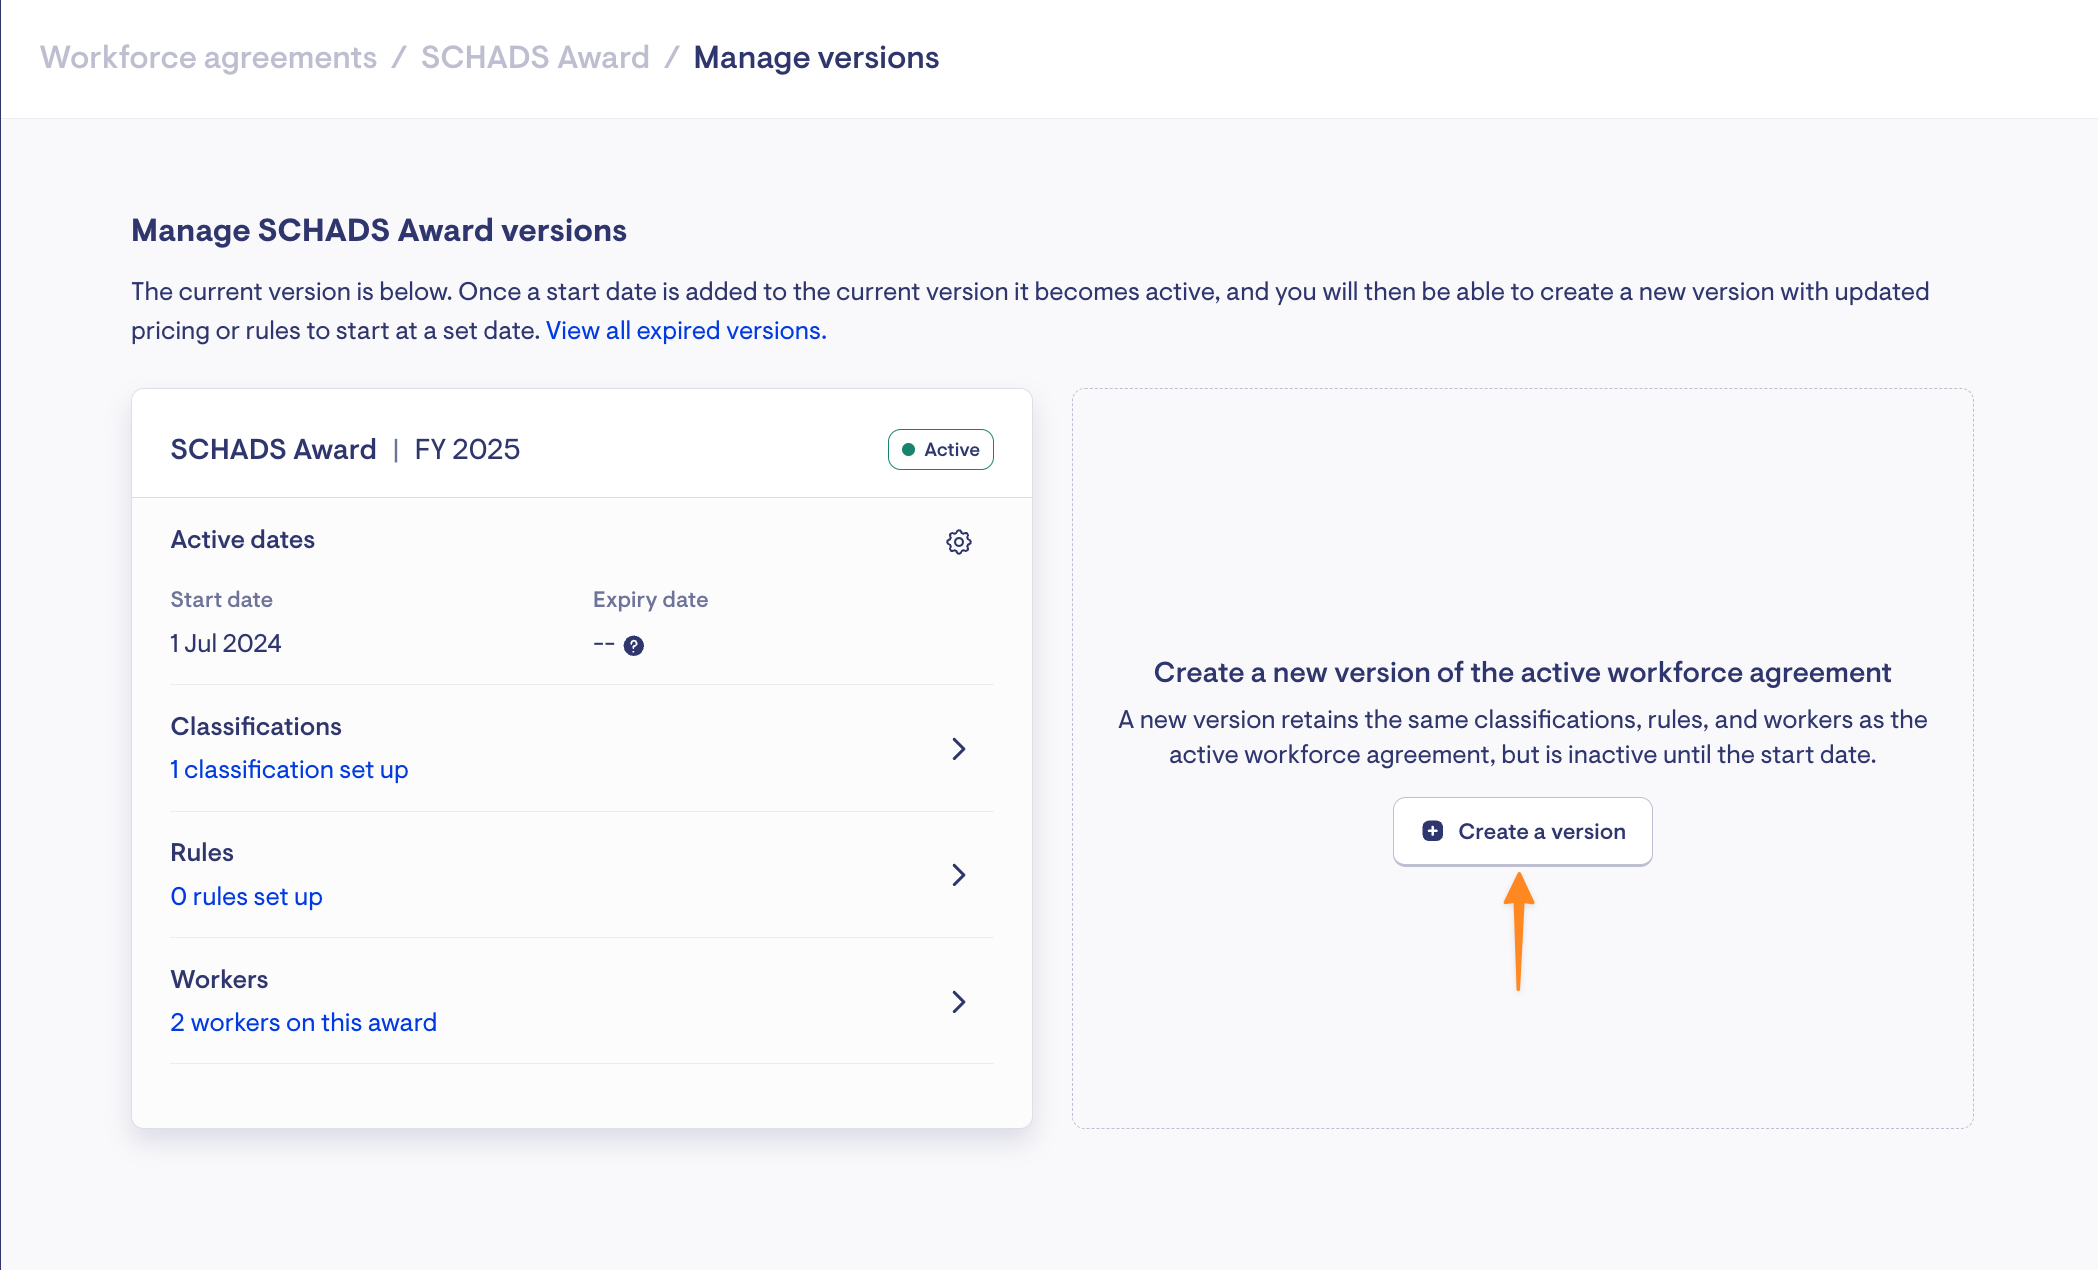
Choose a suffix for the new version and select a start date. You have the additional option to bulk update the award pay points. For example, if the award wage increase is 3%, you can enter this percentage, and Lookout will automatically change all the pay points.
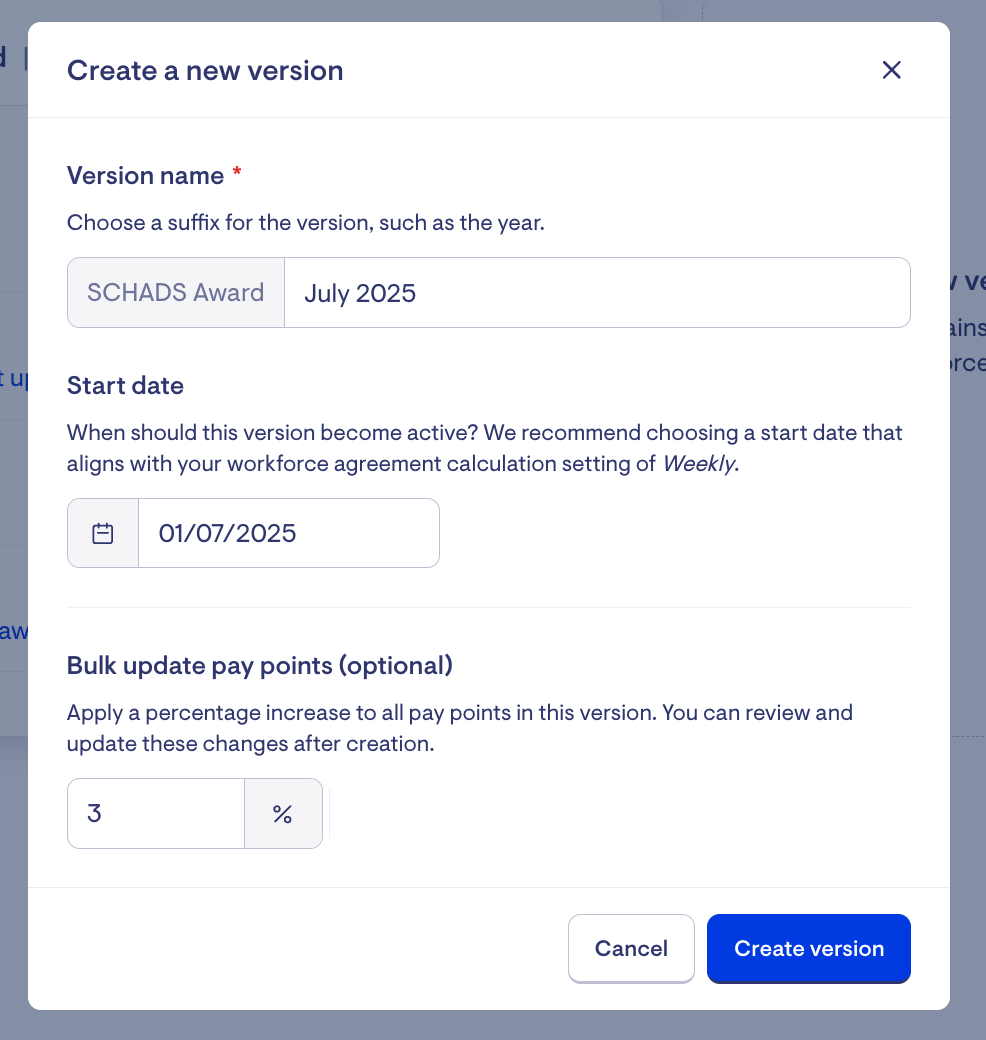
Once a new version is set-up, you can change the classifications and rules as needed - workers won’t be affected by these changes until the version’s start date.
Rule builder guide
Vision rostering provides a flexible framework to build optimisation rules as required for your business, and the rule builder is at the heart of the feature.
We support four primary rule types:
1. Warnings
Warnings let rostering staff know about issues like insufficient rest between shifts or alerting that the worker has exceeded the maximum number of hours that week. The rosterer can then decide on actions to take to clear the warning.

2. Penalties
Rules with penalties have a cost attached above the standard hourly rate and impact the margin calculation. As an example, penalties apply to rules like working overtime or on a public holiday. Showing this information on a shift lets rostering staff decide if the worker scheduled is the best choice or if there are other suitable workers who would not have a penalty pay for working the same shift.

It also important to flag which penalties represent overtime hours. This allows hours worked to be clearly divided into ordinary and overtime hours, which can then inform other rules, such as a rule to pay double overtime when more than 2 hours of overtime have been worked.
3. Allowances
These rules most commonly consist of travel and broken shift allowances. Allowances form part of the margin calculation for a shift. These can be combined with a warning rule, if needed, to alert rostering staff that an allowance applies. For example, if a broken shift allowance rule is set up as part of an award, you may wish to also set up a warning rule for broken shifts so that the warning shows up on a shift to alert the rosterer.
4. Adjustments & split shifts
An example of an adjustment rule is the minimum shift length required under the SCHADS Award. For instance, a rule can be configured to ensure a worker is paid a minimum of 2 hours per shift. Similar to allowances, a warning rule can also be set up to alert the rosterer if an adjustment will apply to a particular shift.
In some cases, the minimum shift length will influence whether a shift is split. For example, if splitting the shift would result in both a broken shift allowance and a minimum shift adjustment, Lookout will not split the shift. This decision is based on the award’s minimum shift length and the configured split shift tolerance.
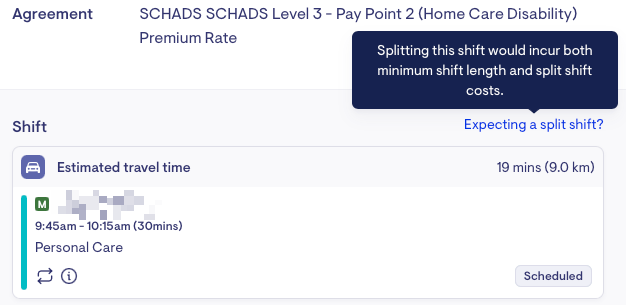
Using the above rule types as a guide, a wide range of rules can be created.
Rule creation example
In this example, we'll create a rule for overtime.
The award states that for full-time workers, the maximum standard hours for a shift is 8 hours. For the first two hours after the maximum, the worker is paid 150% of their base rate. For hours worked over 10 hours (8 hours standard, 2 hours overtime at 150%), the worker is paid 200% of their base rate.
In the award builder, we can set this up in two rules to cover the above overtime requirements:
After naming the rule and choosing 'Full-time' from the employee type checkbox list, scroll down to see the rule builder. We'll set up the first part of the overtime rule, which is paying the worker 150% for the first two hours of overtime. The first condition will be 'Hours worked', and then from the list that appears, we'll select 'Greater than 8'.

Once selected, the rule builder will ask what we want to do when these conditions are met. In this instance, we want to apply a penalty:

We'll specify that we want to apply a penalty of 150% and we want to apply this penalty for every hour over the limit. If we had selected 'per hour' the penalty would apply for the entire shift. The 'per hour over the limit' option will apply the penalty only to the hours over the 8 hours specified in the first condition.
We'll need a second rule to cover the overtime requirements specified in the award. For the second rule, we'll again choose 'Hours worked' as the first condition and select 'Greater than 10' for the second:

As with the first rule, select 'Penalty' for the action you wish to take when the conditions are met, specify 200% as the penalty rate, choose 'per hour over limit', and specify these hours as 'Overtime':
If there are rules that overlap, the award builder will always favour the rule that pays more to the worker. This is how the above two rules work in conjunction: the second rule, paying 200% of the worker's base hourly rate, takes over once 10 hours have been worked because this rule pays more.
Together, these two rules will ensure that the award-specified overtime for full-time employees is met.

Rules can also be stacked, so you can apply multiple conditions to one rule. To do this, set up your first condition and then click the plus button next to it. This will display another condition box.

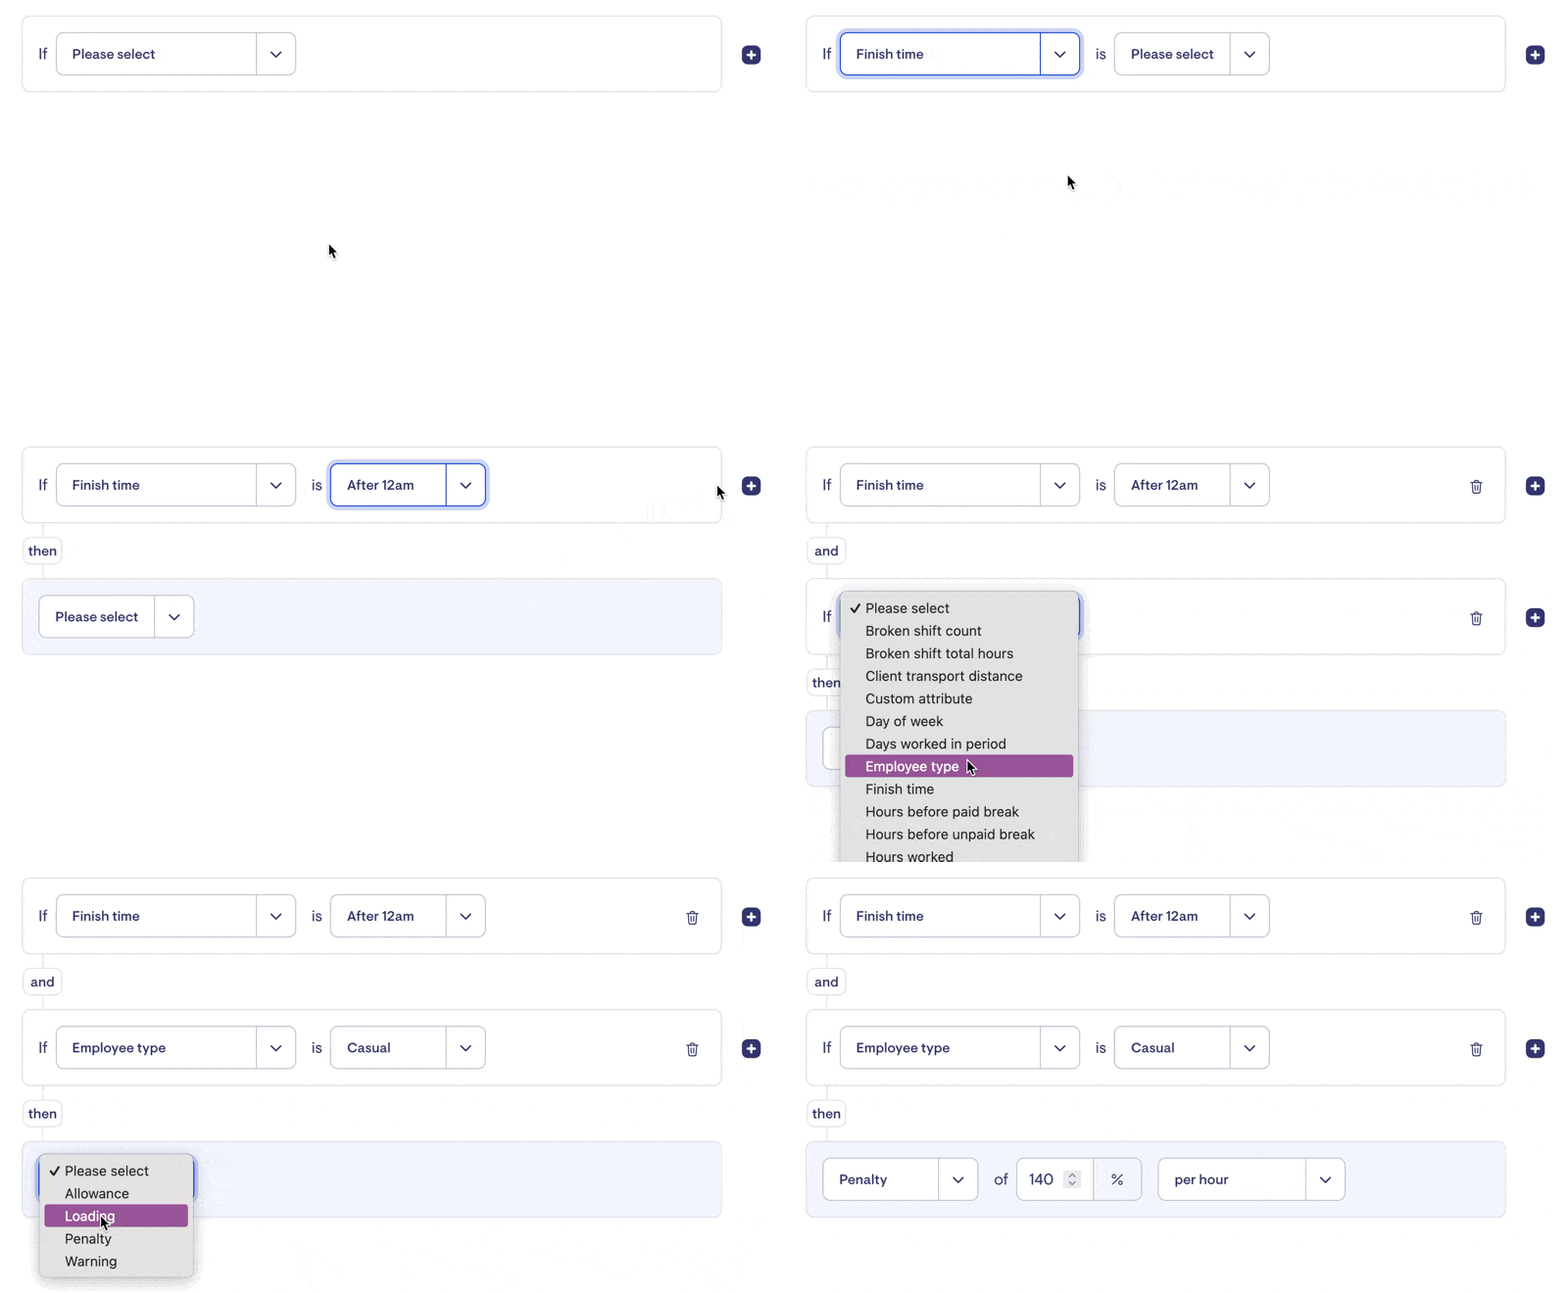
Assigning workers to workforce agreements and scheduling progression or other changes to worker agreements.
Once one or more workforce agreements have been set up and activated, workers can be assigned a workforce agreement and a classification, as well as any higher duties.
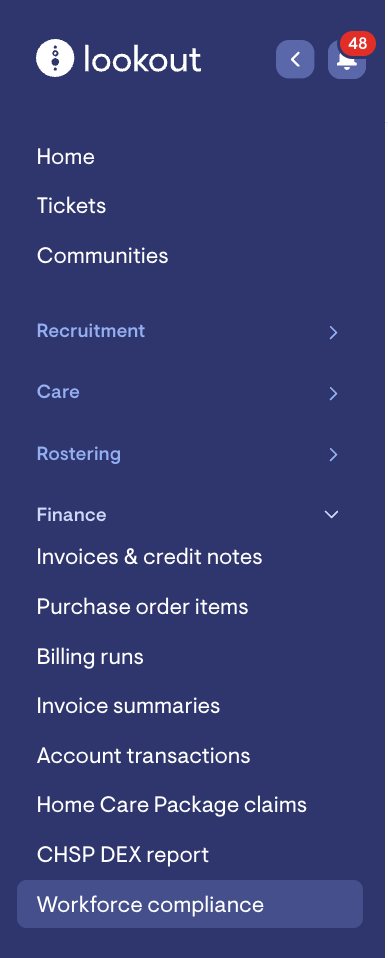
To manage worker agreements, navigate to 'Workforce compliance' under 'Finance' in the side navigation:
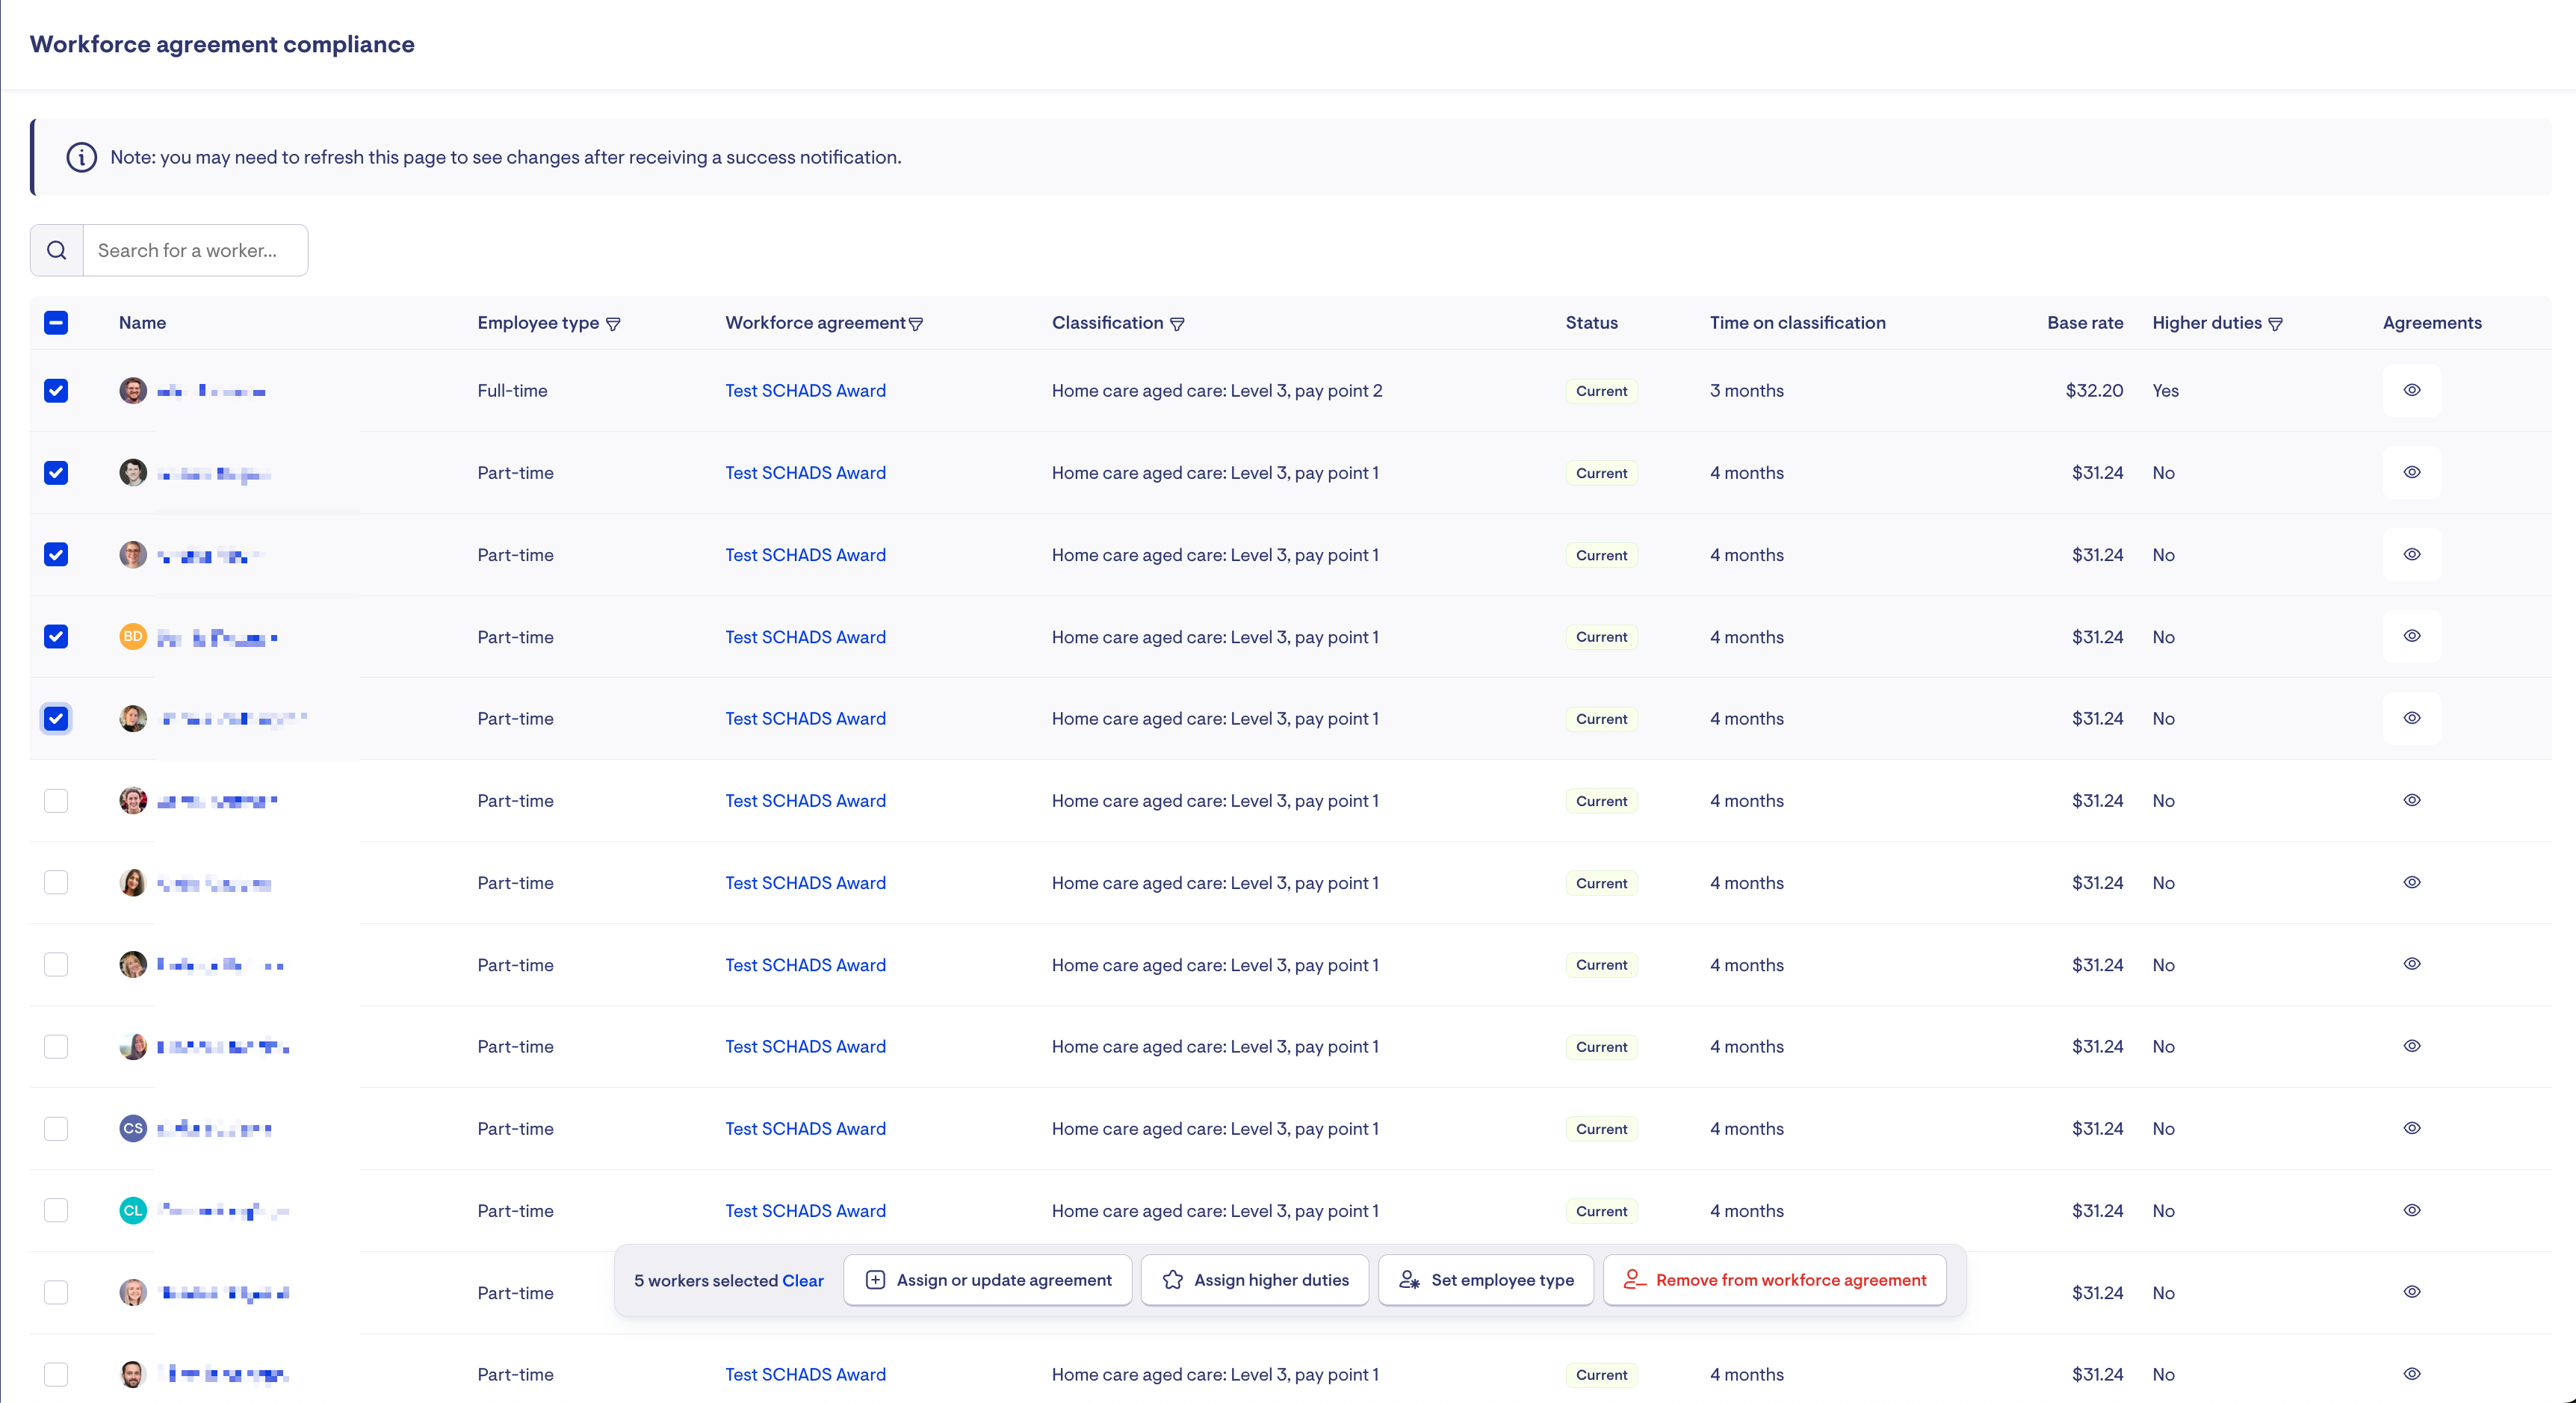
The 'Workforce compliance' page will show a list of all your workers. You can filter your workers by searching for a name or by clicking the filter icon next to a column name.

After clicking a checkbox next to a worker's name a number of options will appear - you can select one or more workers. In the action bar that appears, you can assign or change workforce agreements or classifications, change employee type, assign higher duties or remove the worker from their assigned workforce agreement.
Scheduling a progression or classification change
What are higher duties?
Higher duties can be applied if a worker is eligible to be paid extra for certain services. Lookout will allow you to select applicable funding schemes and services for a worker's higher duties and then select the higher pay rate for these services.
When set up, the worker will be paid this higher rate whenever these services are scheduled.
To change how your higher duties apply, go into "Edit workforce agreements" and either:
-
Untick the box to "Apply higher duty rate to the entire shift" in order to only apply the rates to the actual visits, or
-
Update the threshold to apply after a specific number of minutes (how long a worker perform a higher duty before the higher rate is applied to the entirety of the shift) For example, you could set to 120 minutes to apply the rate after performing the higher duty for 2 hours.

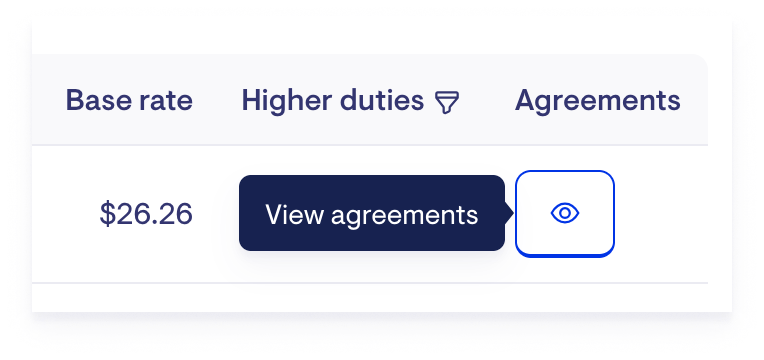
At the end of a worker's row, an icon will appear under the heading 'Agreements' if a worker has an award and classification assigned. Clicking on this icon button will show a list of the worker's agreements, past, current and upcoming.
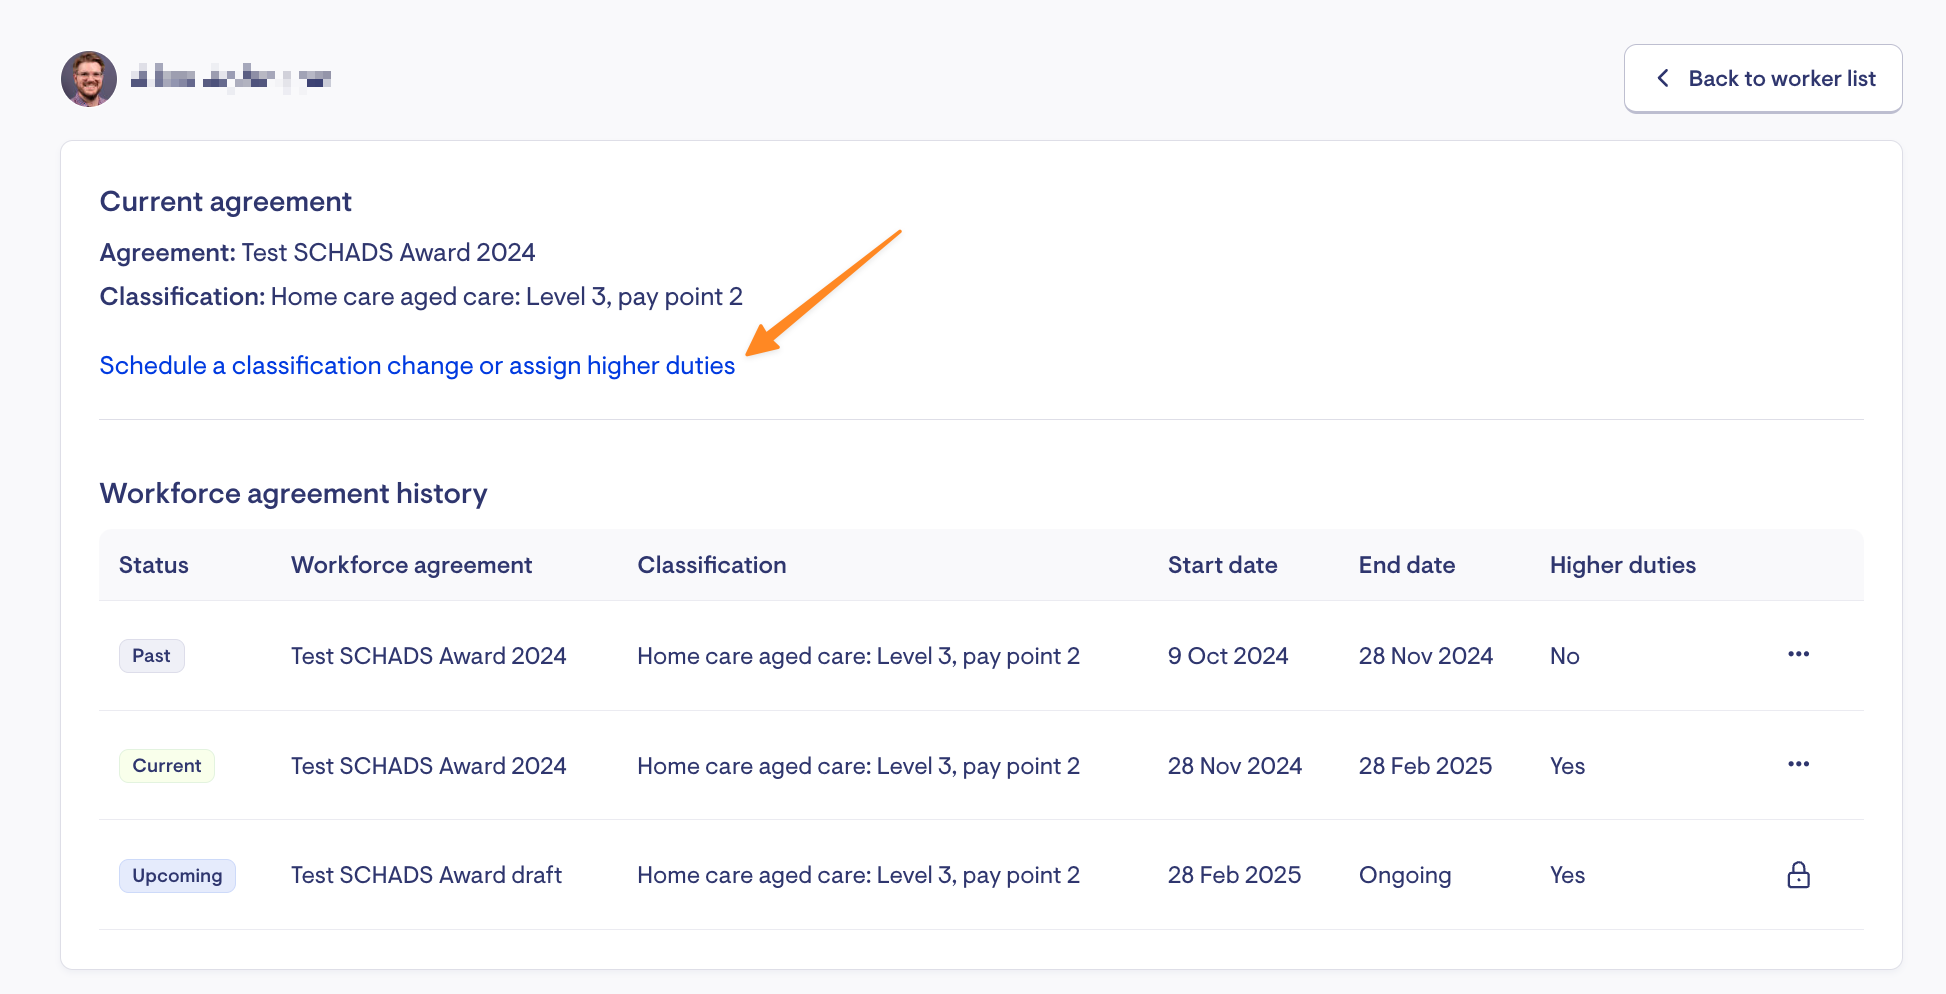
Click the 'Schedule a classification change or assign higher duties' link to schedule a date in the future for the worker's classification to change, or assign higher duties.
Changes to the current agreement will create a bulk action request, and you will be notified whether the update is successful.
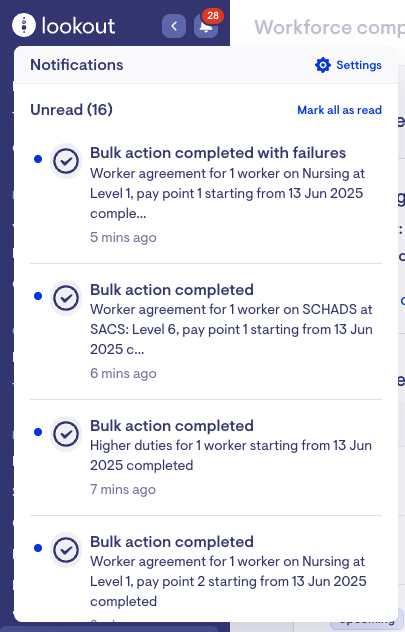
If a bulk action completes with failures, click on the notification to understand why the request was unsuccessful.
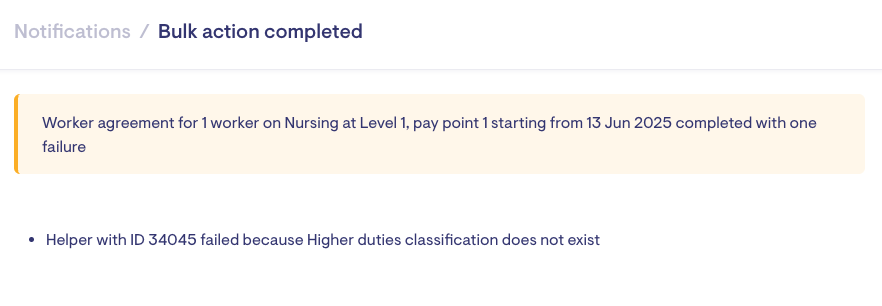
In this example, the request to change the helpers' classification failed because they are currently assigned higher duties incompatible with the new award.
To change a helper's award/classification:
-
View the helper's agreements and check for any higher duties assigned. If higher duties are incompatible with the new classification, remove them.

-
Return to the worker list. Select the helper's name and click Assign or update agreement from the bulk action menu.
-
Choose the required workforce agreement, update the classification, and set the start date.
-
Save the changes, and refresh the page.
Building payroll and shift costs reports
Because Lookout tracks the cost of each shift by breaking down all its components, you can easily produce detailed, itemised shift cost reports.
By using the Data Exporter’s “Shift Costs” dimension, Lookout can itemise each component—such as hourly rates, penalties, loadings, allowances, and travel.
This breakdown can then be used to import data into a payroll system to help inform payment.
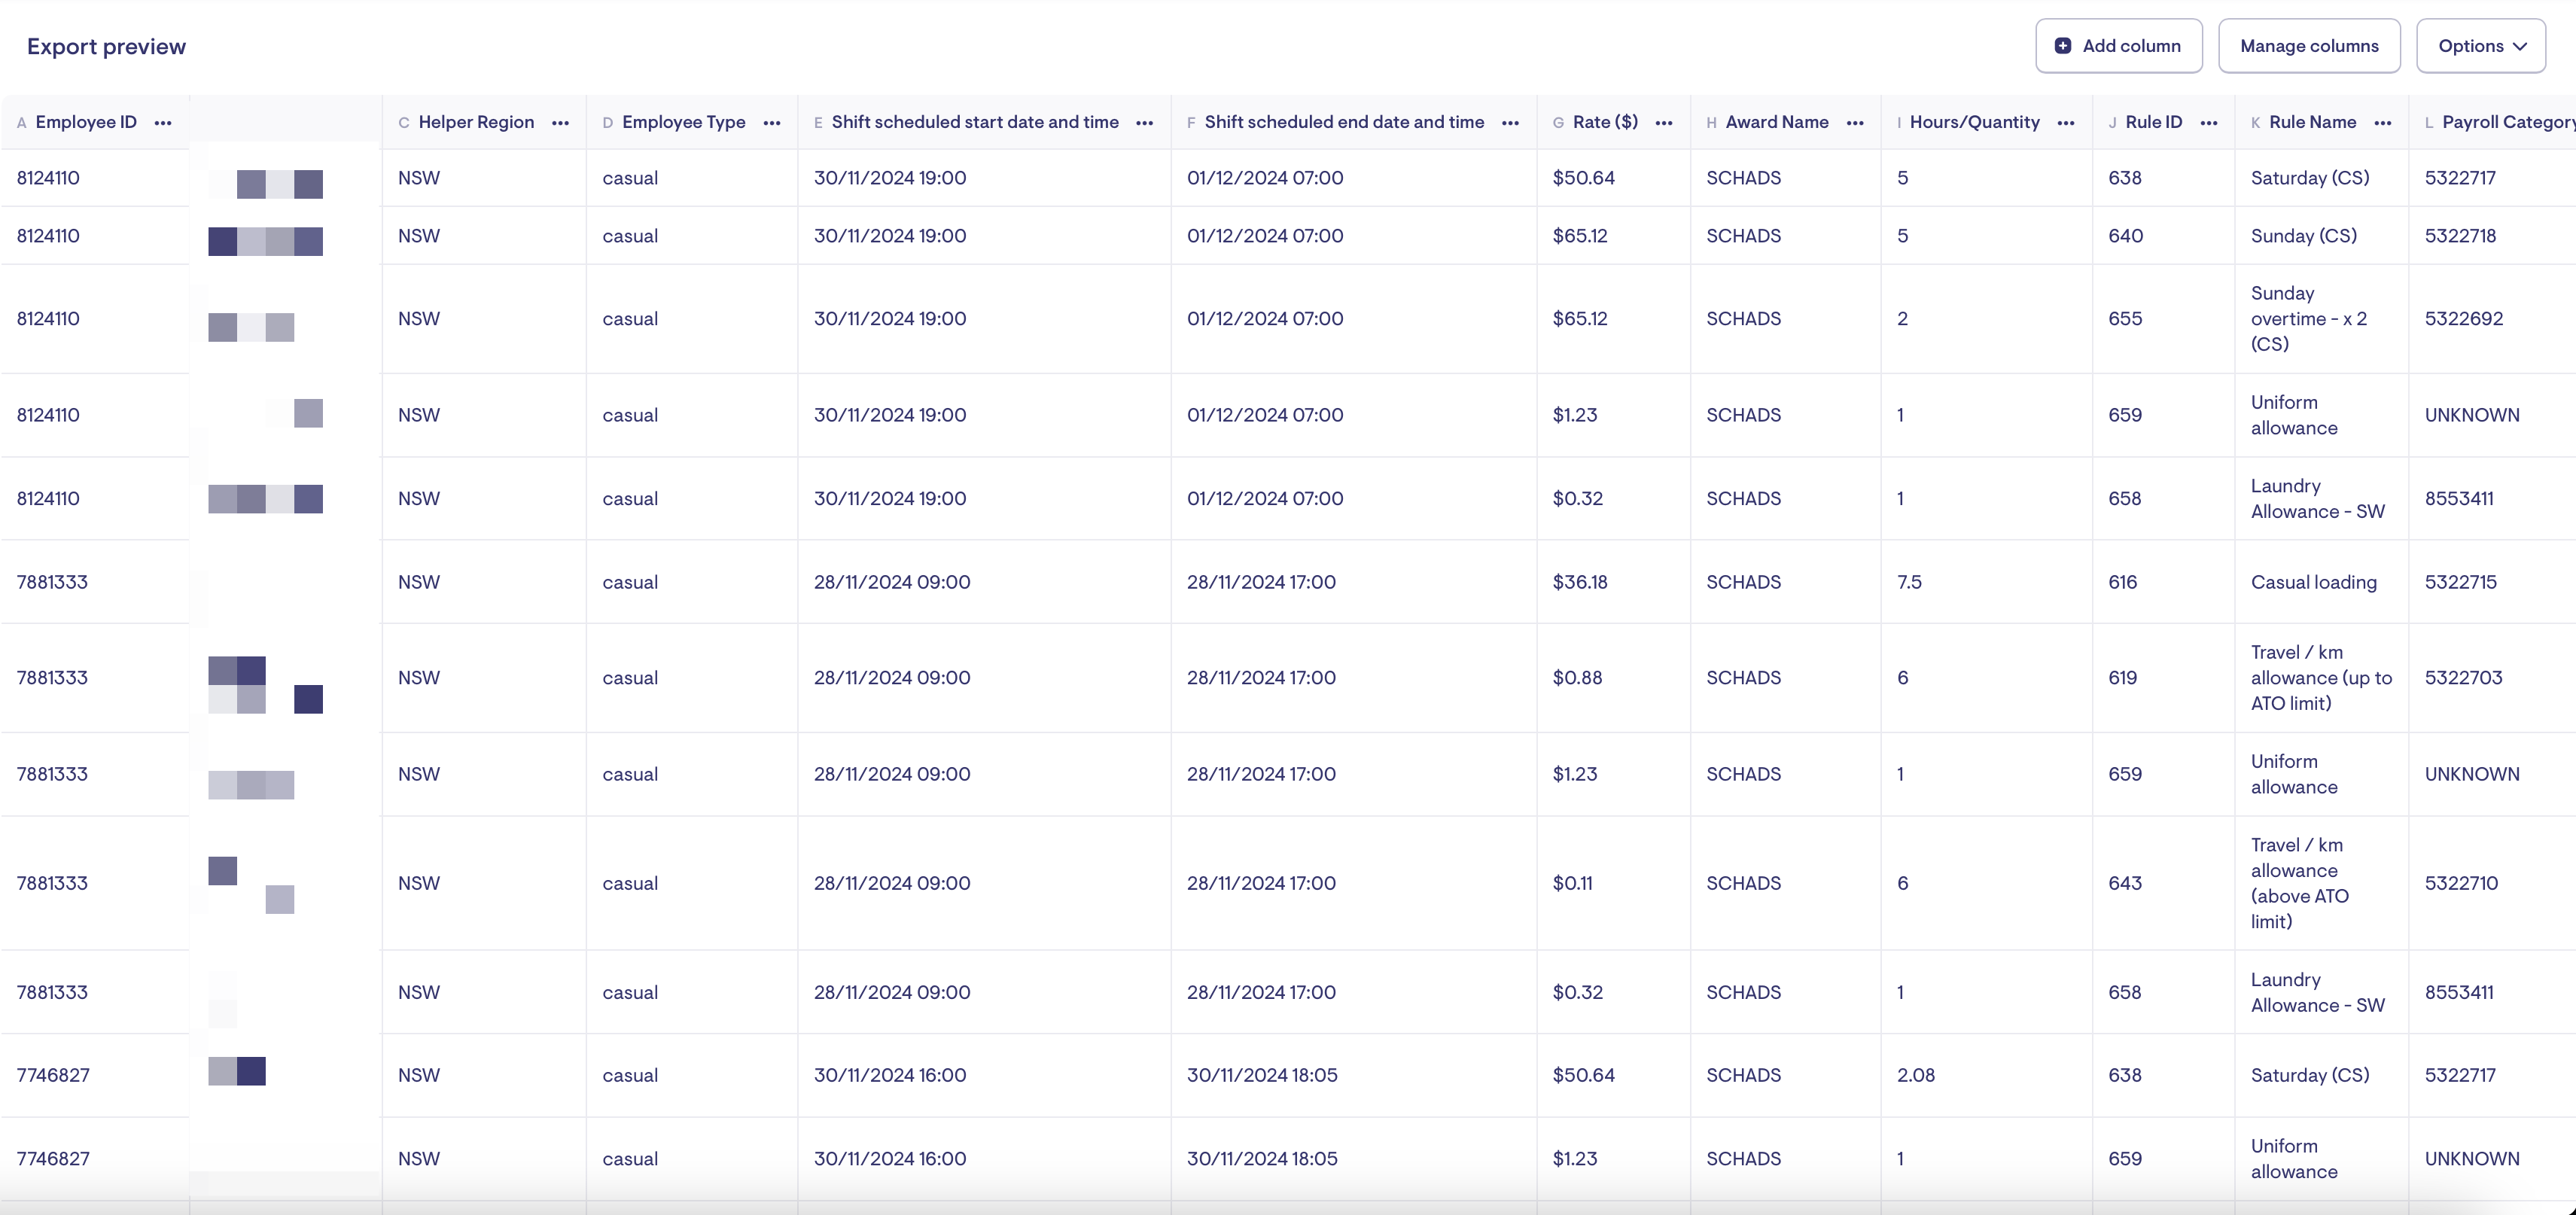
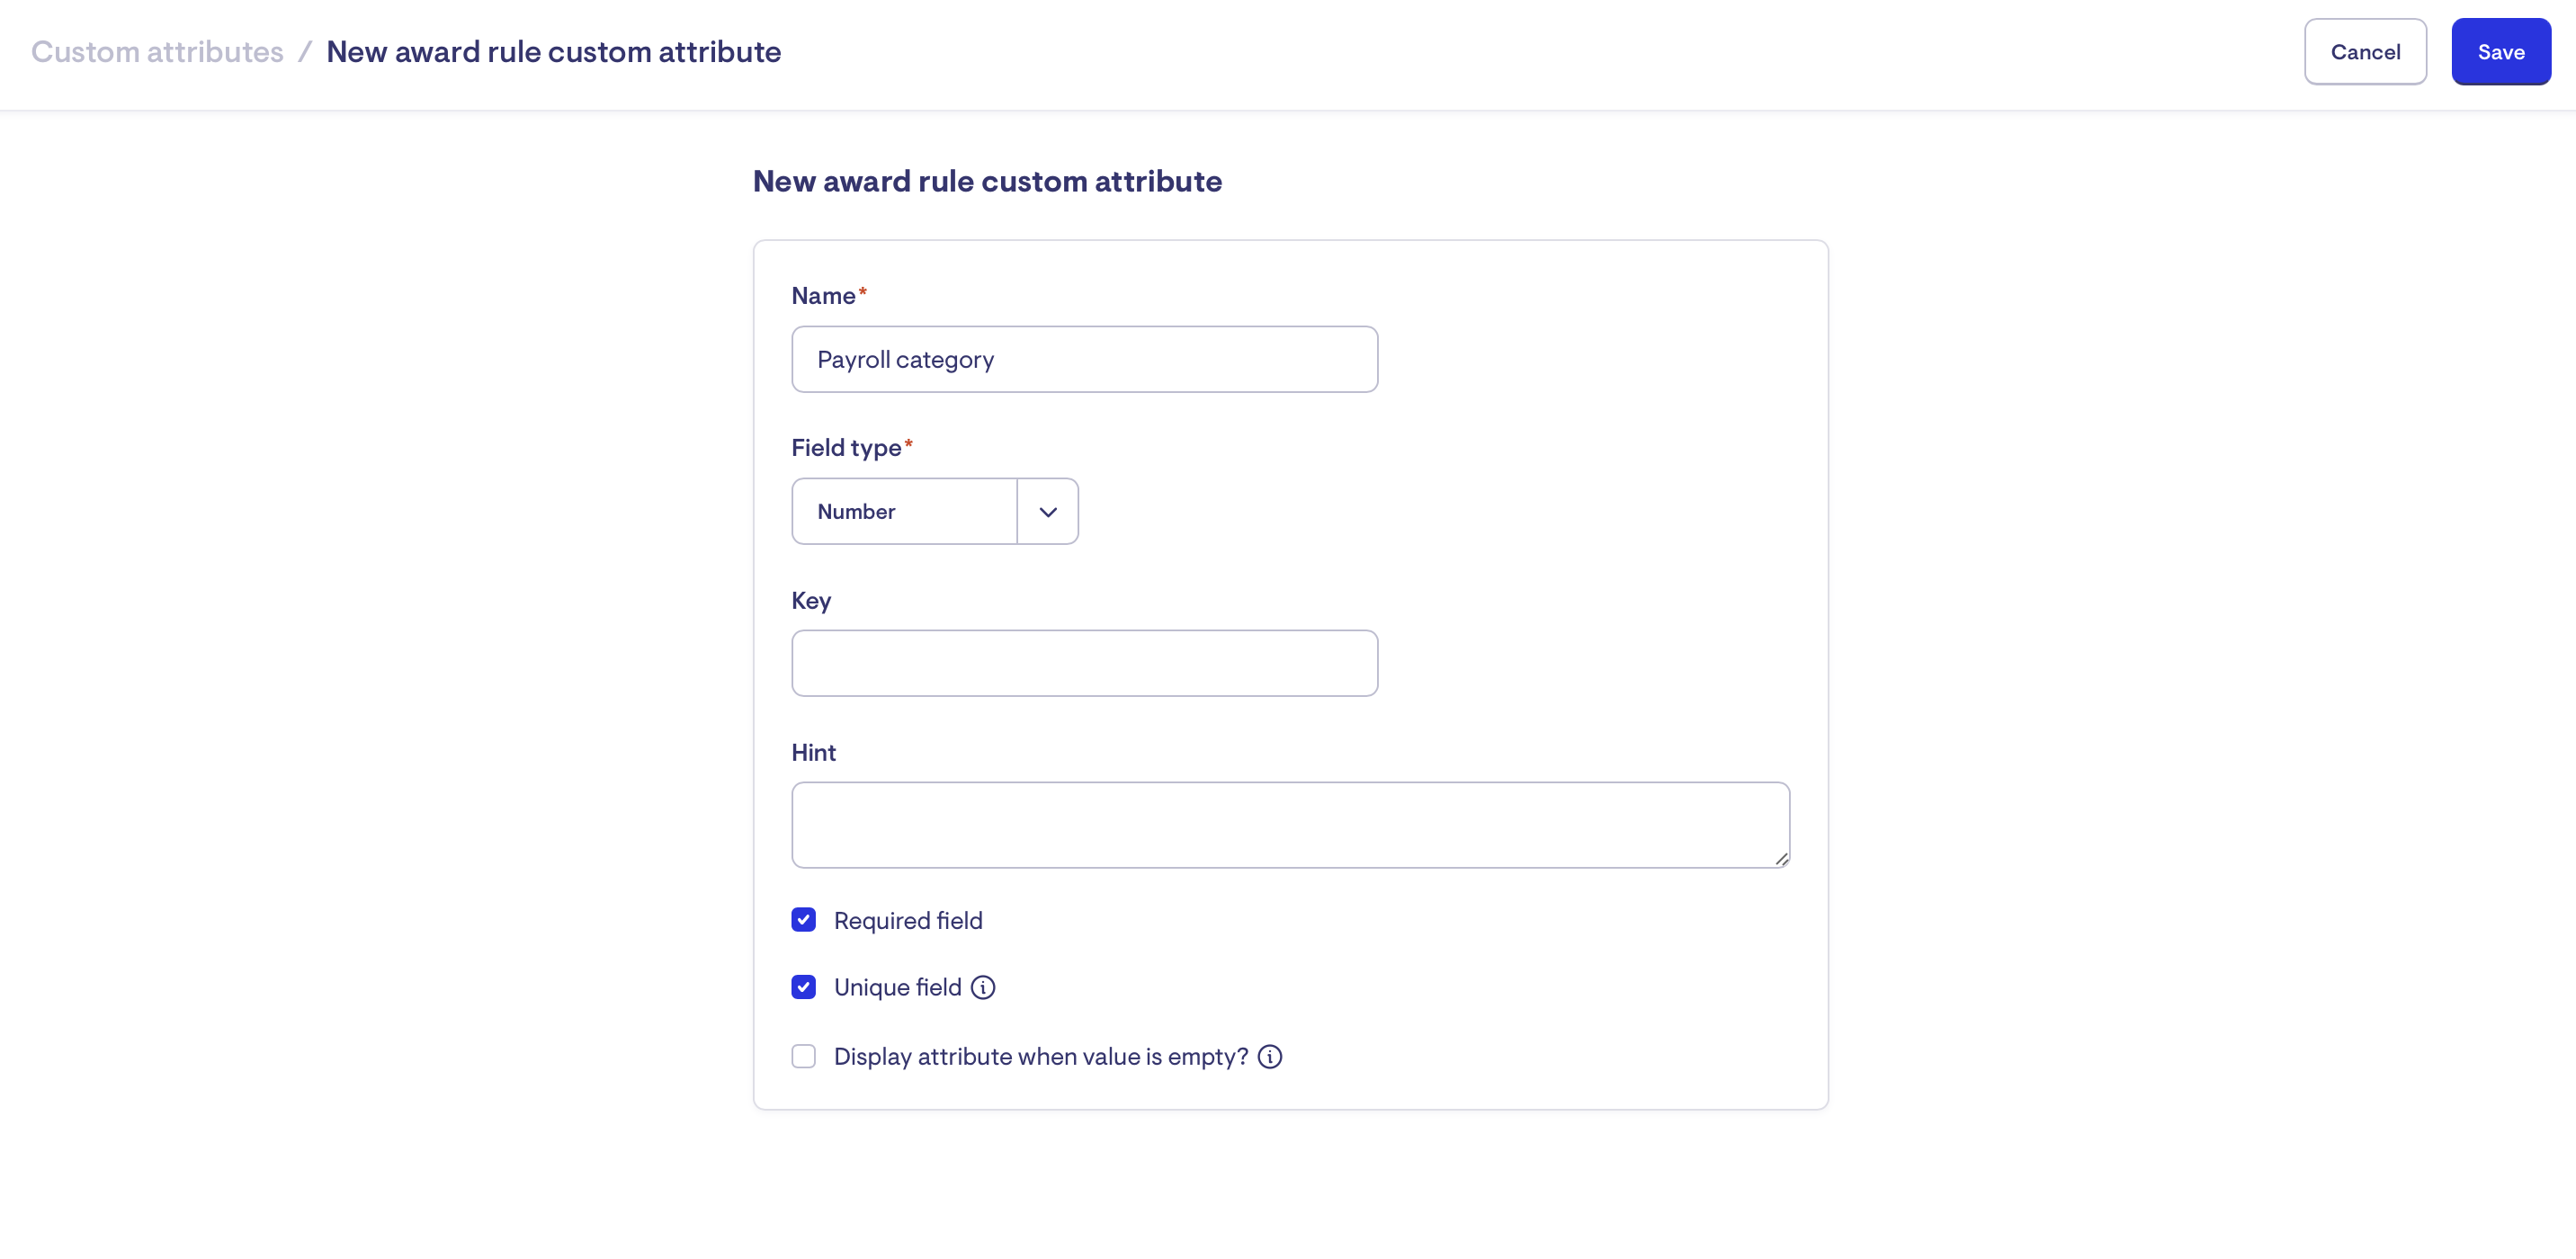
Custom attributes can be applied to Data Exporter reports to help with data imports into other systems.
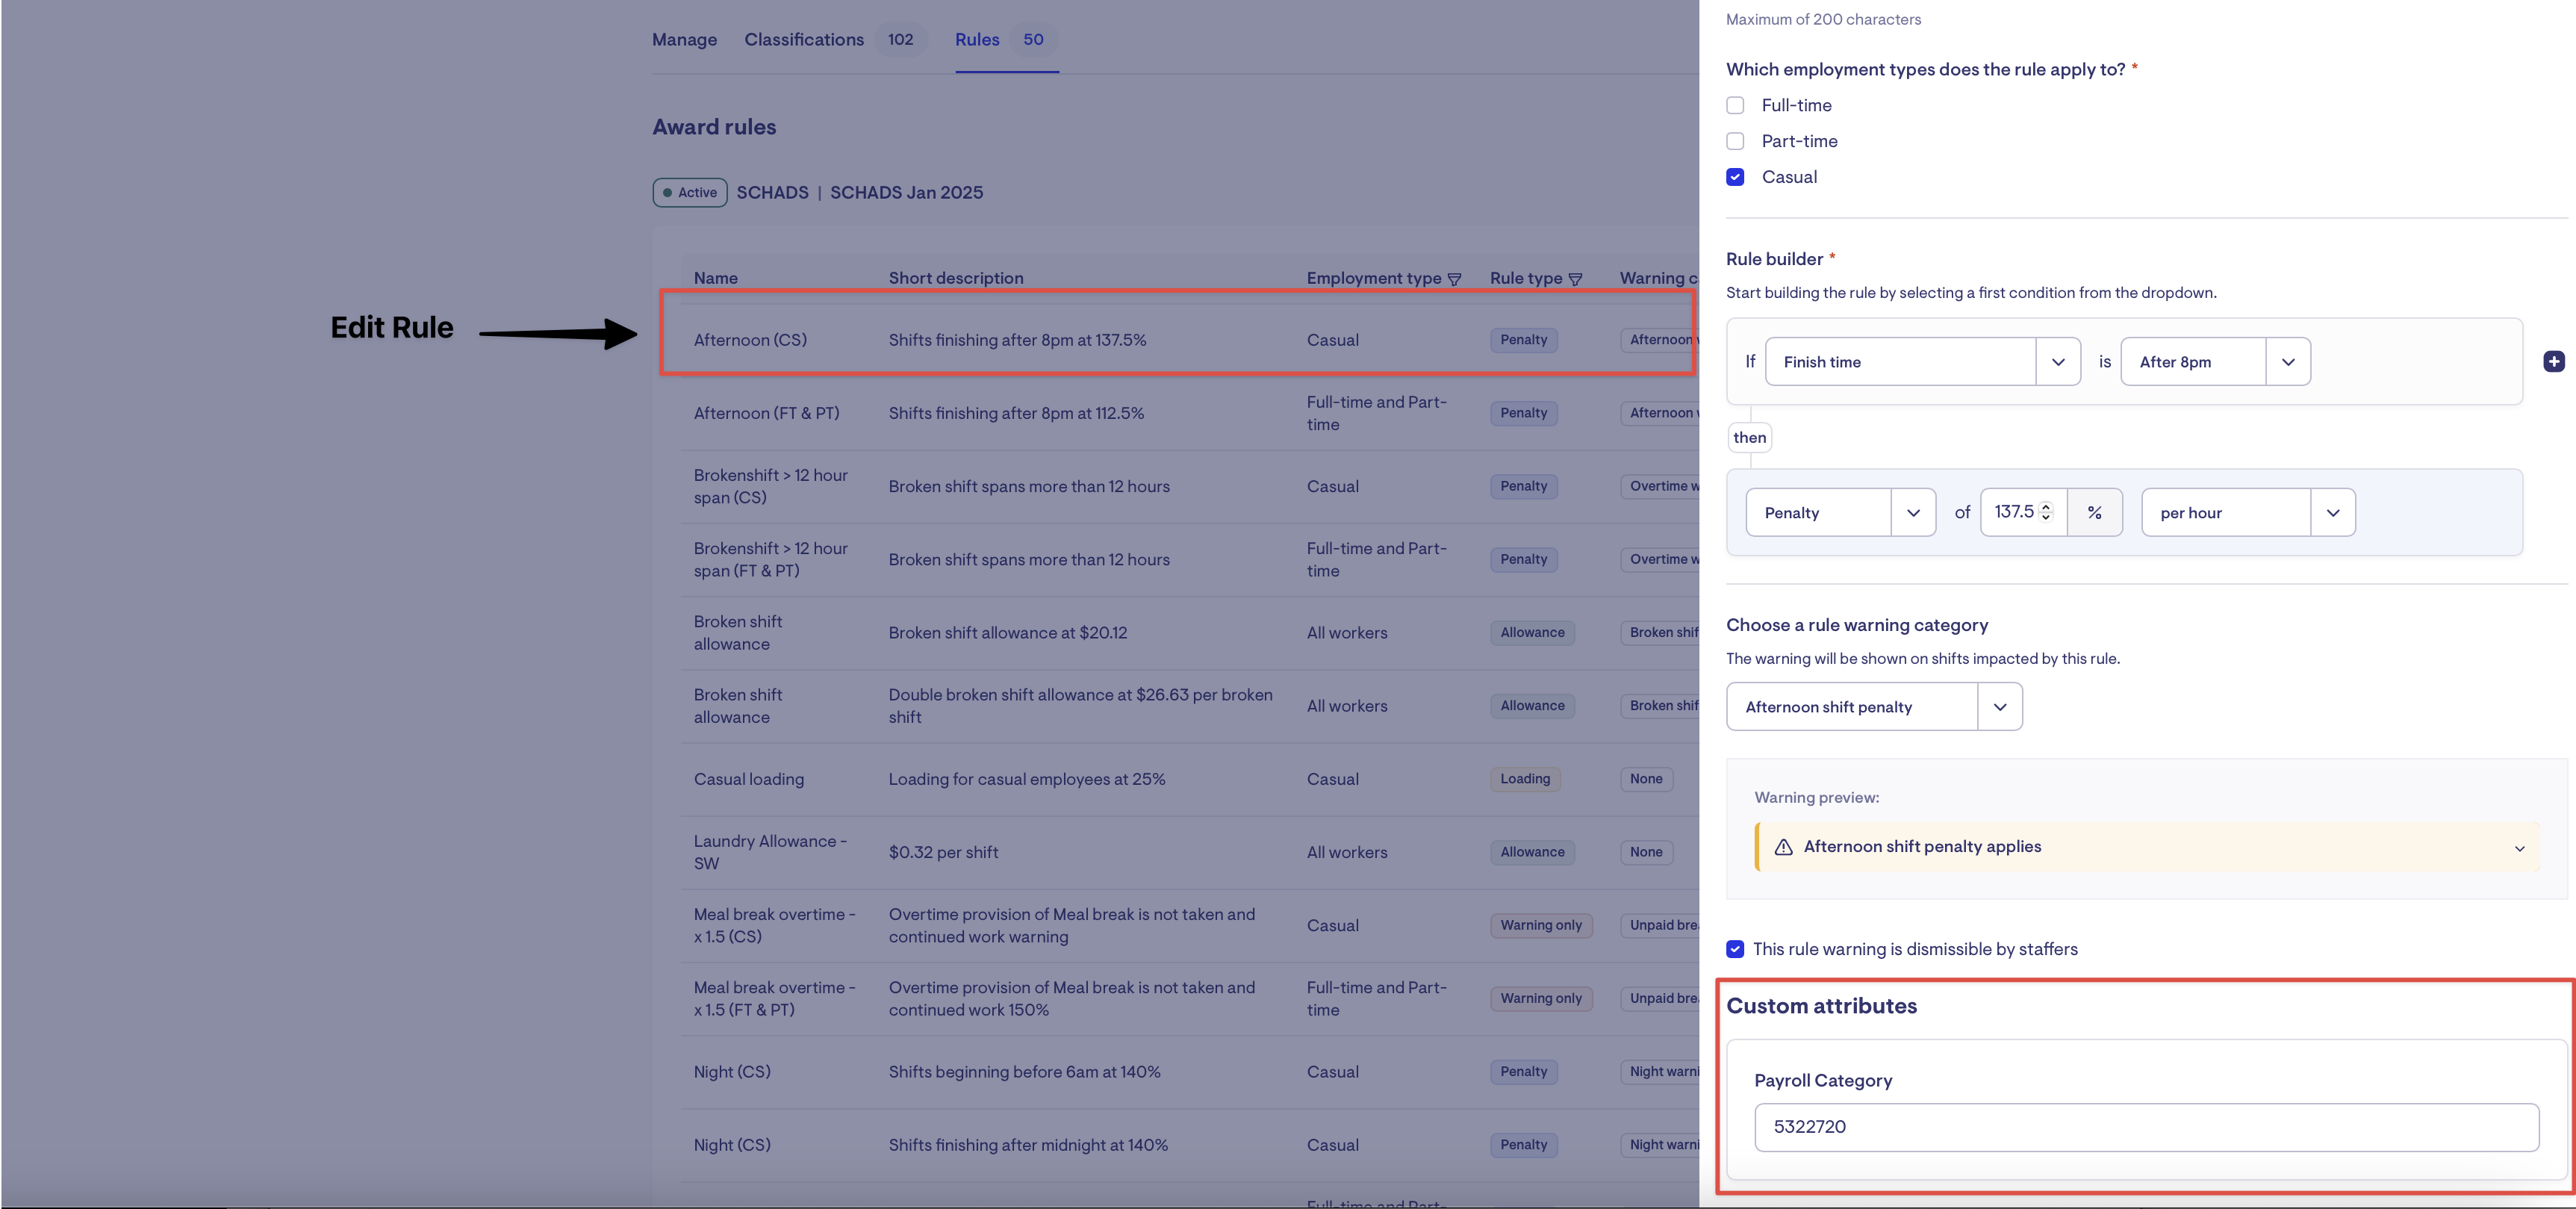
In the examples below, you can see how to set up a payroll category that an external payroll system expects. This can be done by applying custom attributes directly to a rule (to highlight its usage).
Data export external status and file history
The data exporter also allows you specify the external import status of a data export. What does that mean? As an example finance/payroll may download exports through the week, but they will only pull one final export that will be imported into an external system (e.g. Keypay, Xero, MYOB etc.) Users can mark that particular export as the one that was used by clicking into export history.
This does a couple of things:
-
Provides a visual indicator of which export was imported into external system
-
Imported file is not purged for 12 months, rather than the usual 30 days, allowing teams to come back and re-download the exact files used in a financial year
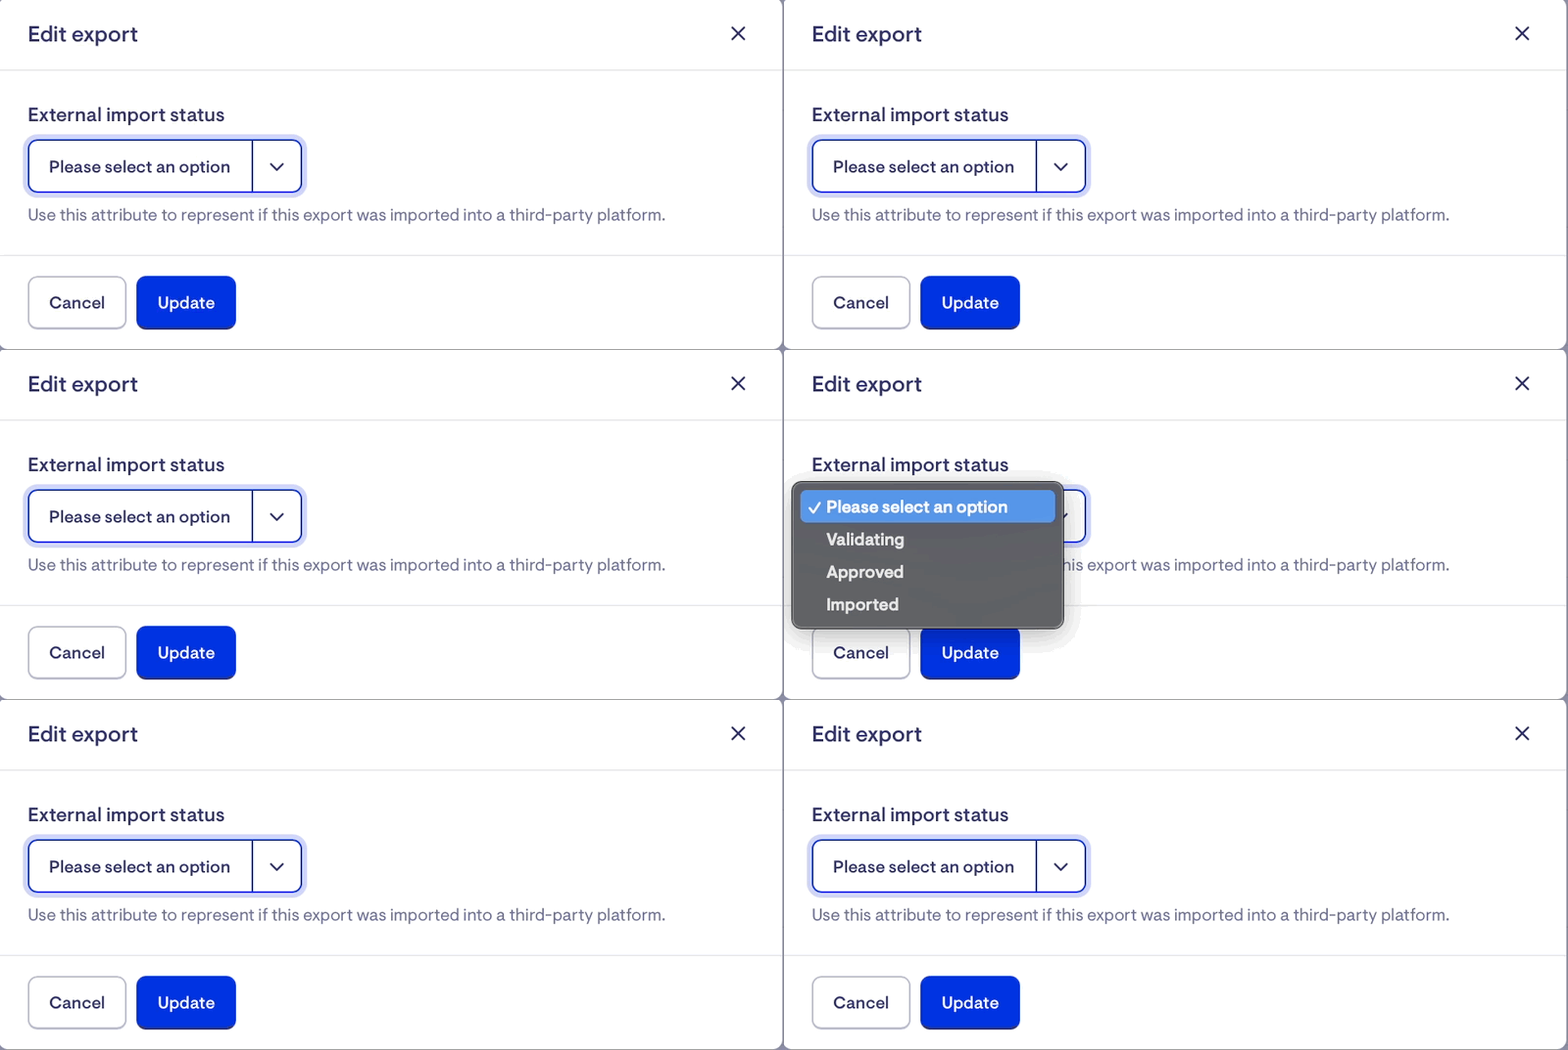
This status can also be set via the API, allowing it to to be hooked into a Workato workflow or other integration.
Automating shift wrapping
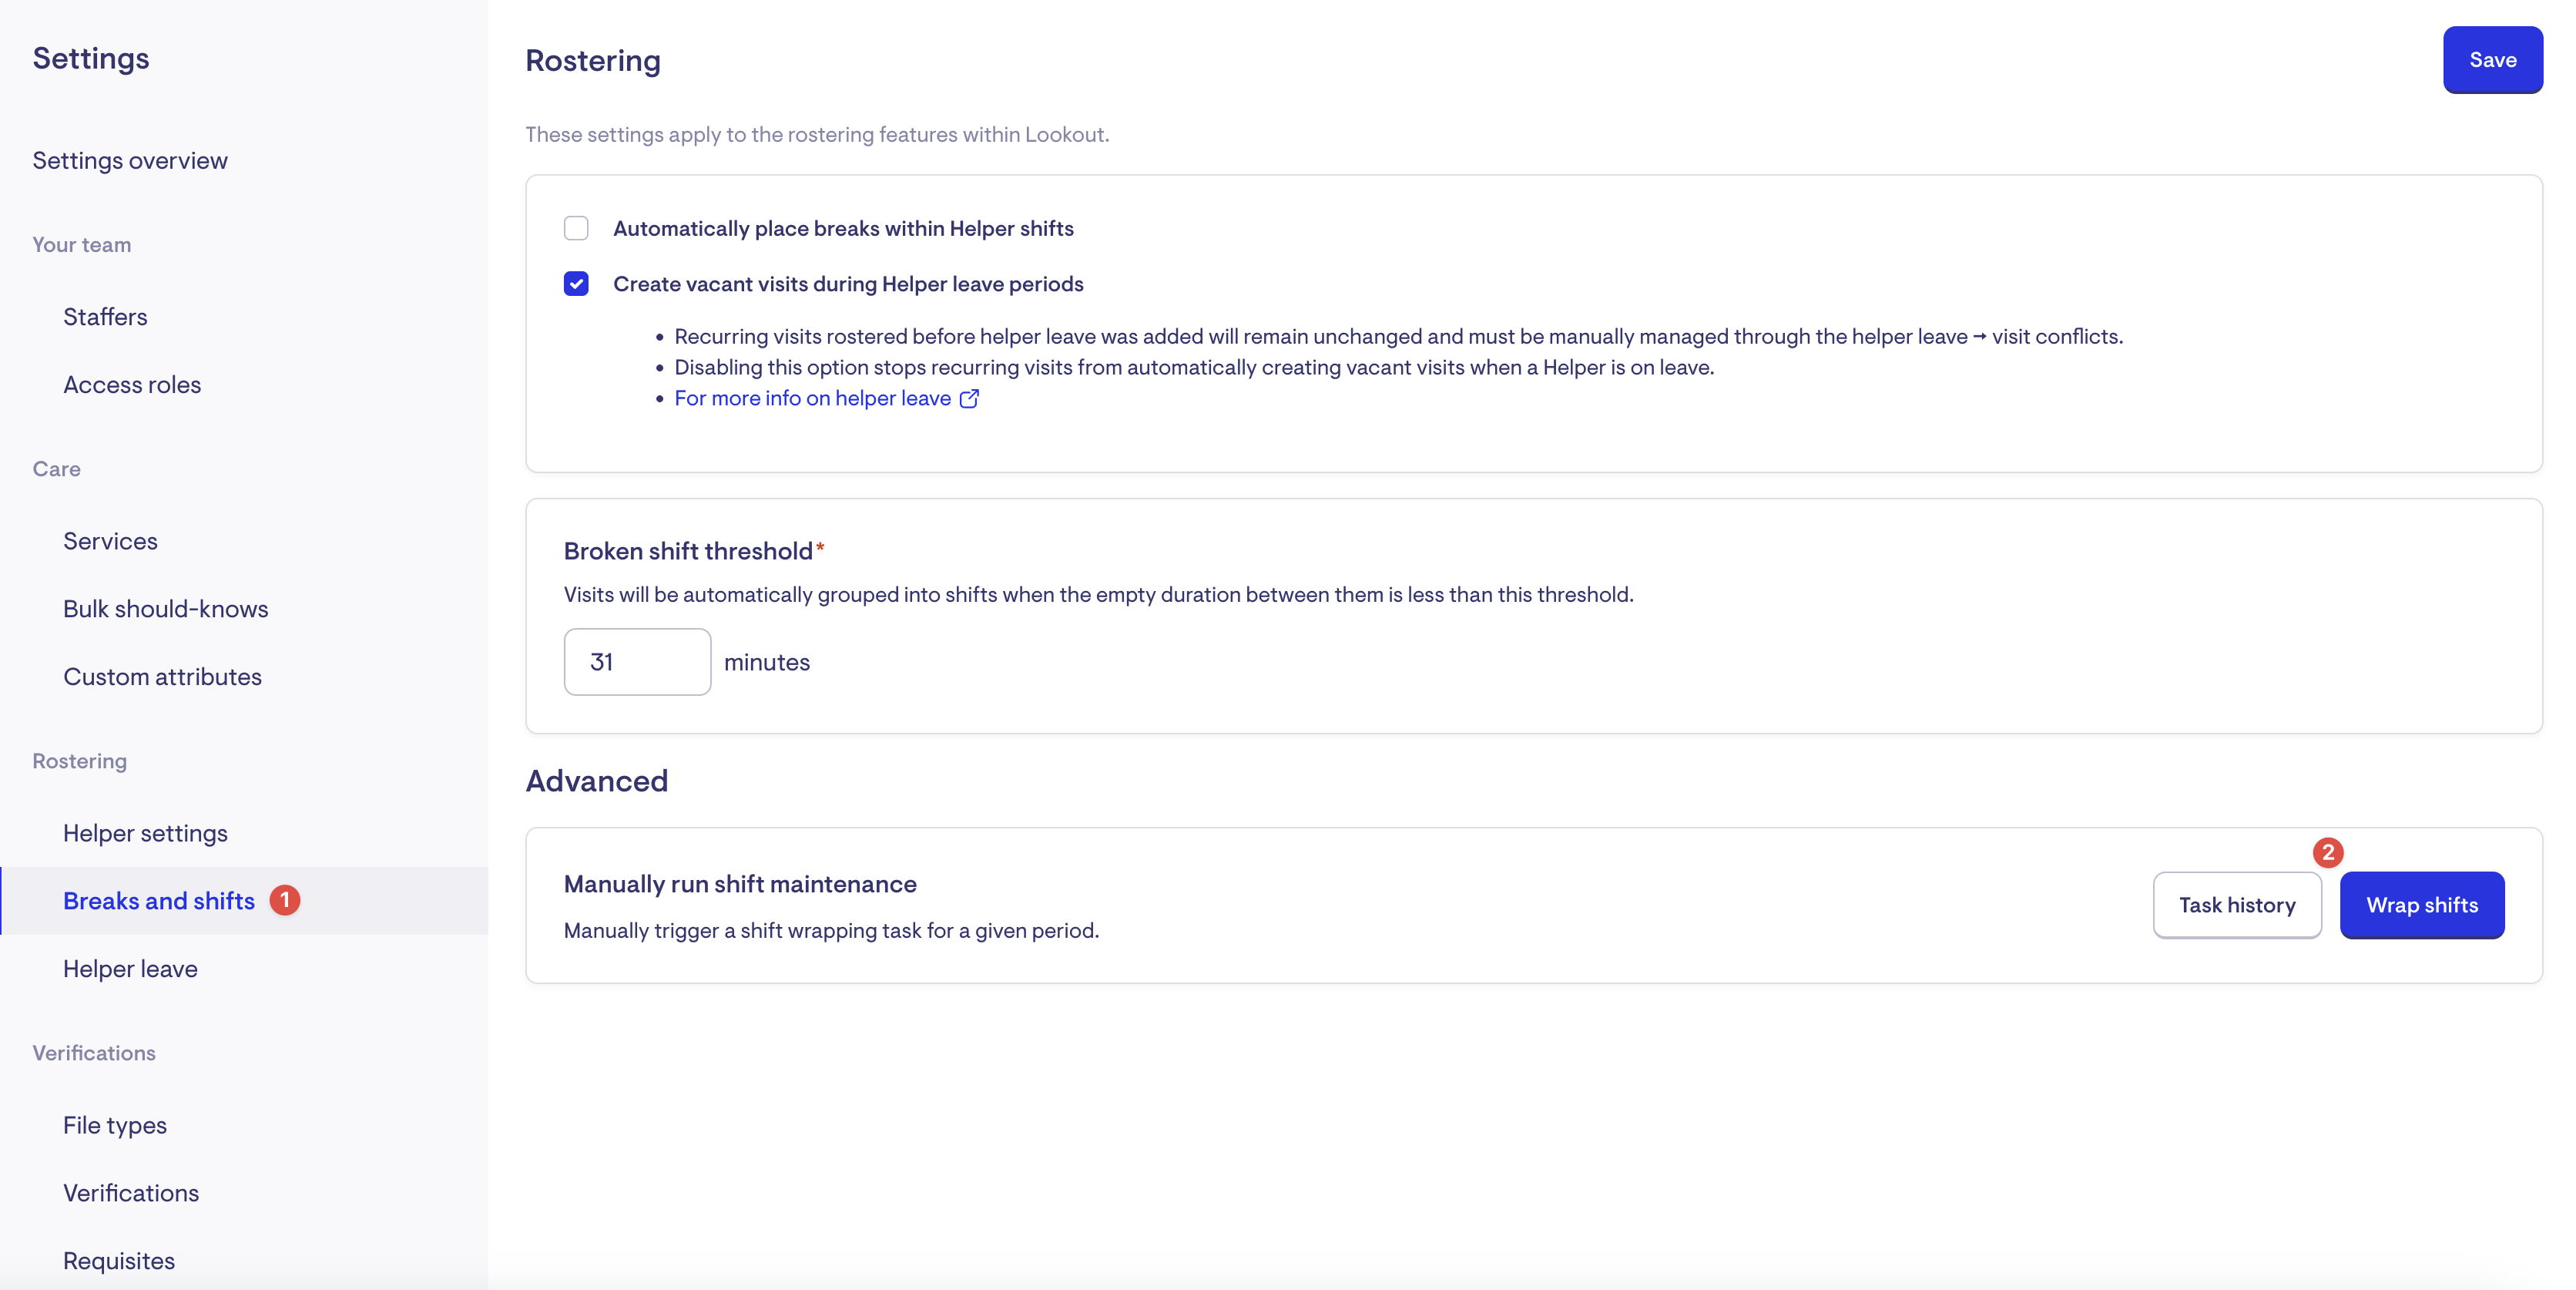
Managing shifts can be a manual task or automated to ensure your payroll exports are accurate and up to date.
Run wrapping across a time period
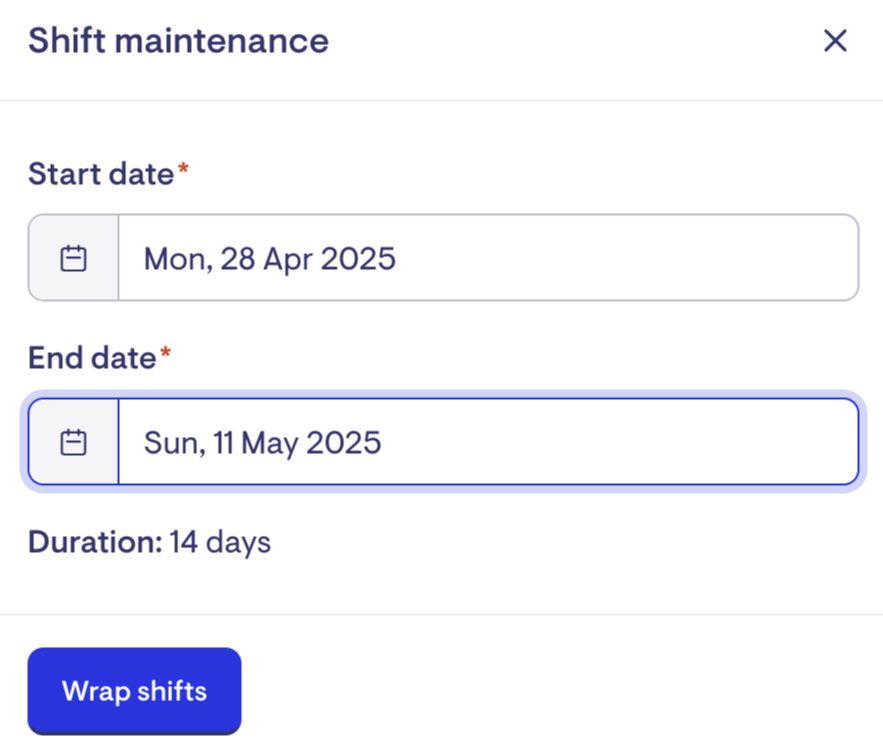
Shift wrapping can be run across your entire workforce for a chosen date range. This is especially useful before exporting payroll—for example, you might run it for the previous week to ensure all shifts and award calculations are complete. Any issues encountered will appear in the task listing so you can resolve them before proceeding.
Nightly automatic shift wrapping
You can configure a rolling window (e.g. +/- 1 week), and Lookout will automatically run the shift wrapping task each night. This ensures any outstanding shifts and associated award calculations are processed in time for payroll. Like the manual version, you can check the status of these tasks via the task listing.
If you haven’t already, we recommend enabling nightly shift wrapping to keep your data fresh and ready for payroll each week.
