An access role with Finance permissions is required to access and manage
billing runs.
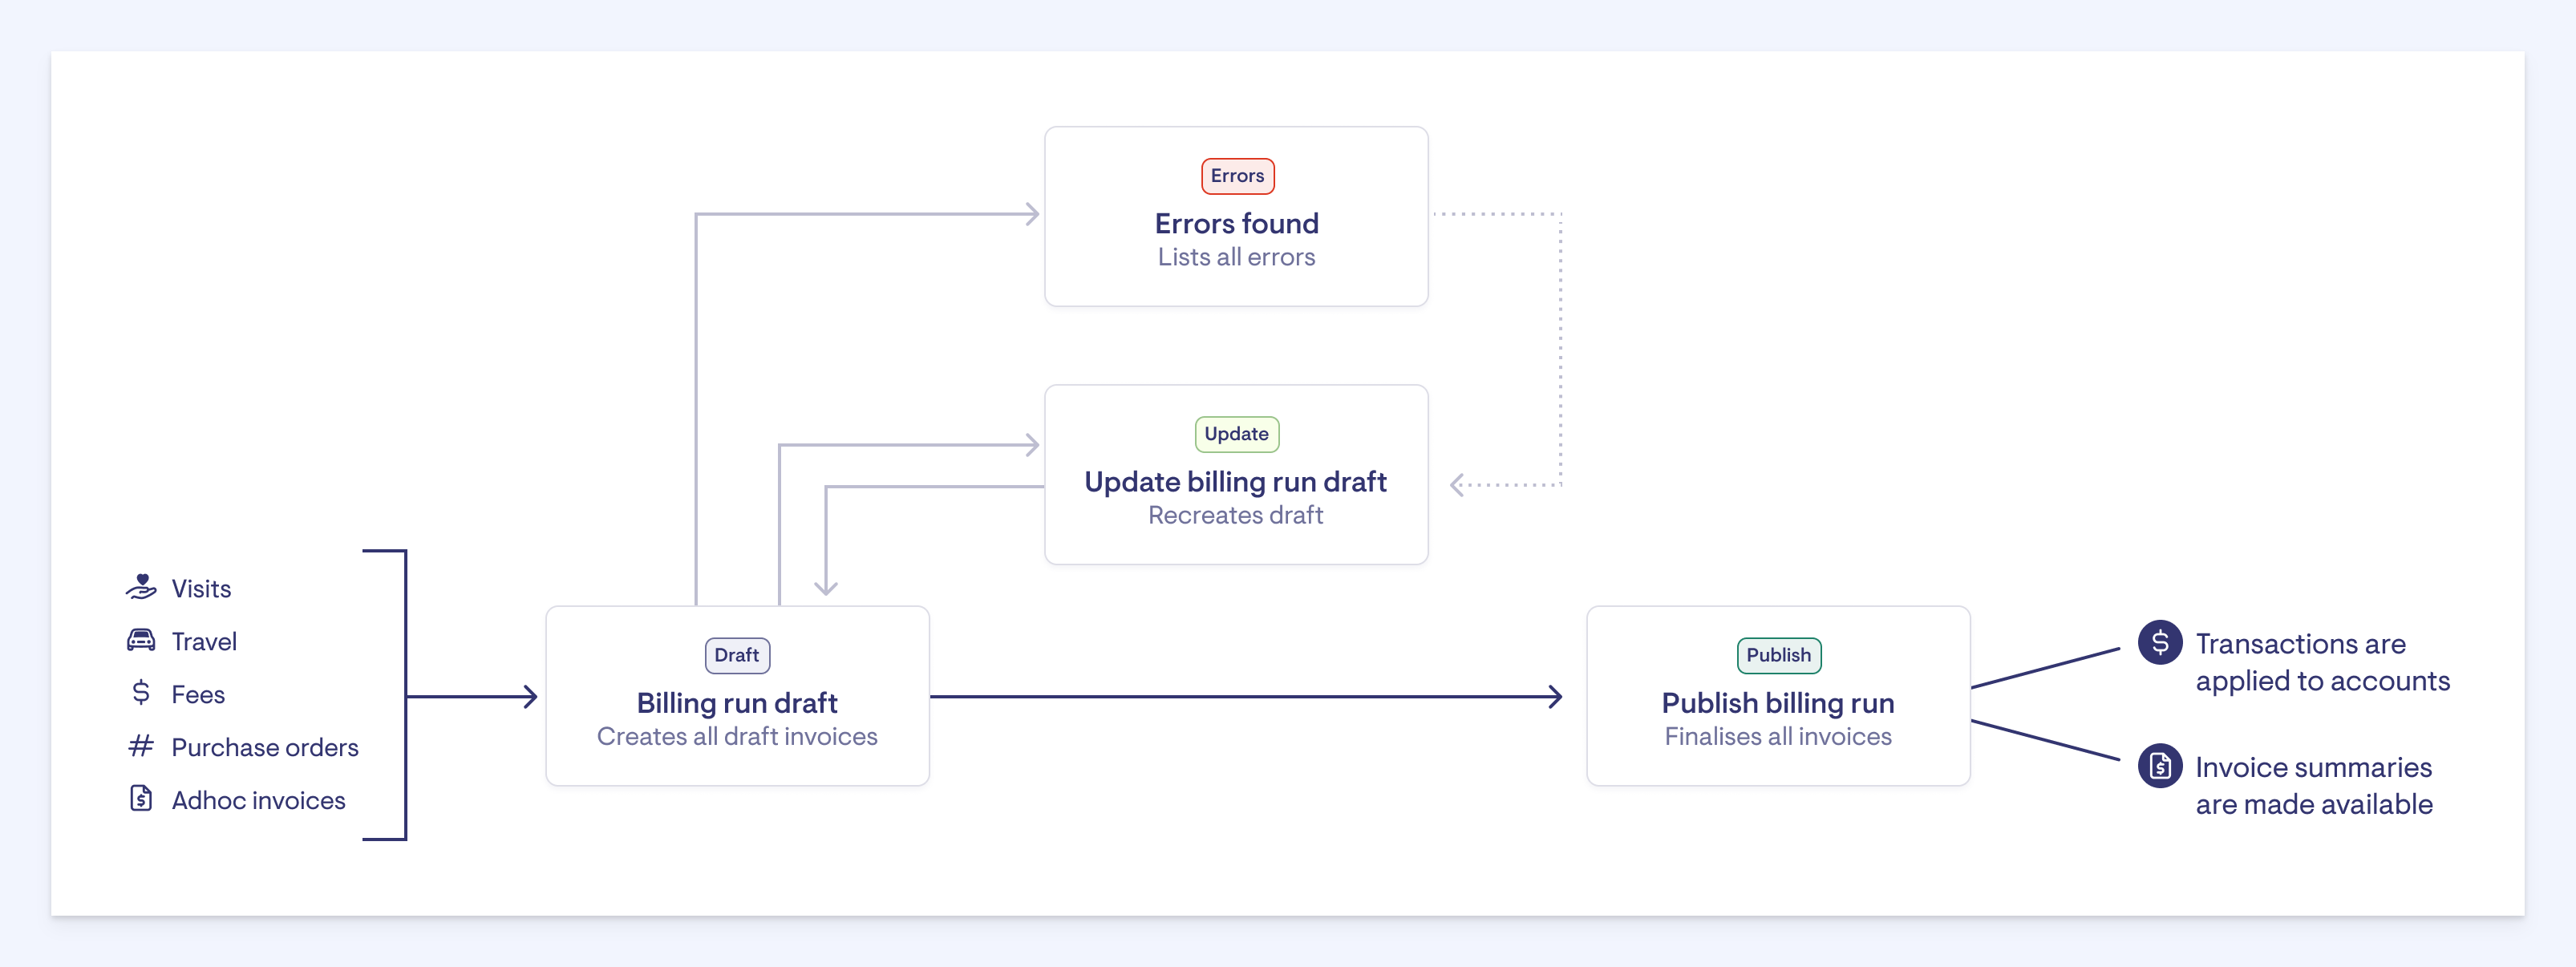
How billing runs work
Billing runs are the important first step required to finalise invoices in order to make Home Care Package and CHSP claims. Billing runs also ensure up-to-date invoices for Home Care Package, CHSP, private and brokerage clients.
Creating a billing run pulls together financial elements that fall between your chosen billing run period and creates draft invoices for each.
The billing run process

This image shows actions that might be taken after billing run completion
The elements pulled together by a billing run include:
-
Visit fees
-
Travel fees
-
Package management fees
-
Purchase orders
-
Adhoc invoices
-
Credit notes
If errors are found when the draft billing run is created, you’ll be able to see a list to fix them. For example, a visit may have occurred during the specified period but is not recorded as being completed. You’ll see this visit in the error list and will be able to click through and edit to complete and finalise the visit for invoicing. More detail about errors and how to manage them is explained further in this article.
Tip: A billing run is always in draft form until published. You can update the billing run as many times as needed to recreate all the draft invoices.
Once everything looks correct, the draft billing run can be published. Publishing finalises the invoices, applies transactions to client accounts and makes invoice summaries available.
Once billing runs are complete, client transactions are updated for Home Care Package claims. Learn more about making Home Care Package claims with Lookout.
How package management fees work in billing runs
Package management fees are calculated at a daily rate multiplied by the billing run days and dated on the last day of the billing run. This is important if a billing run period crosses over a month for Home Care Package claims.
Choose the billing run cycle for your business
Navigate to the settings menu by clicking the three dots next to your name in Lookout, at the bottom-left corner. Find the 'Finance settings' under 'Finance' and click the 'Edit' button at the top-right. Here you'll find the billing run options:
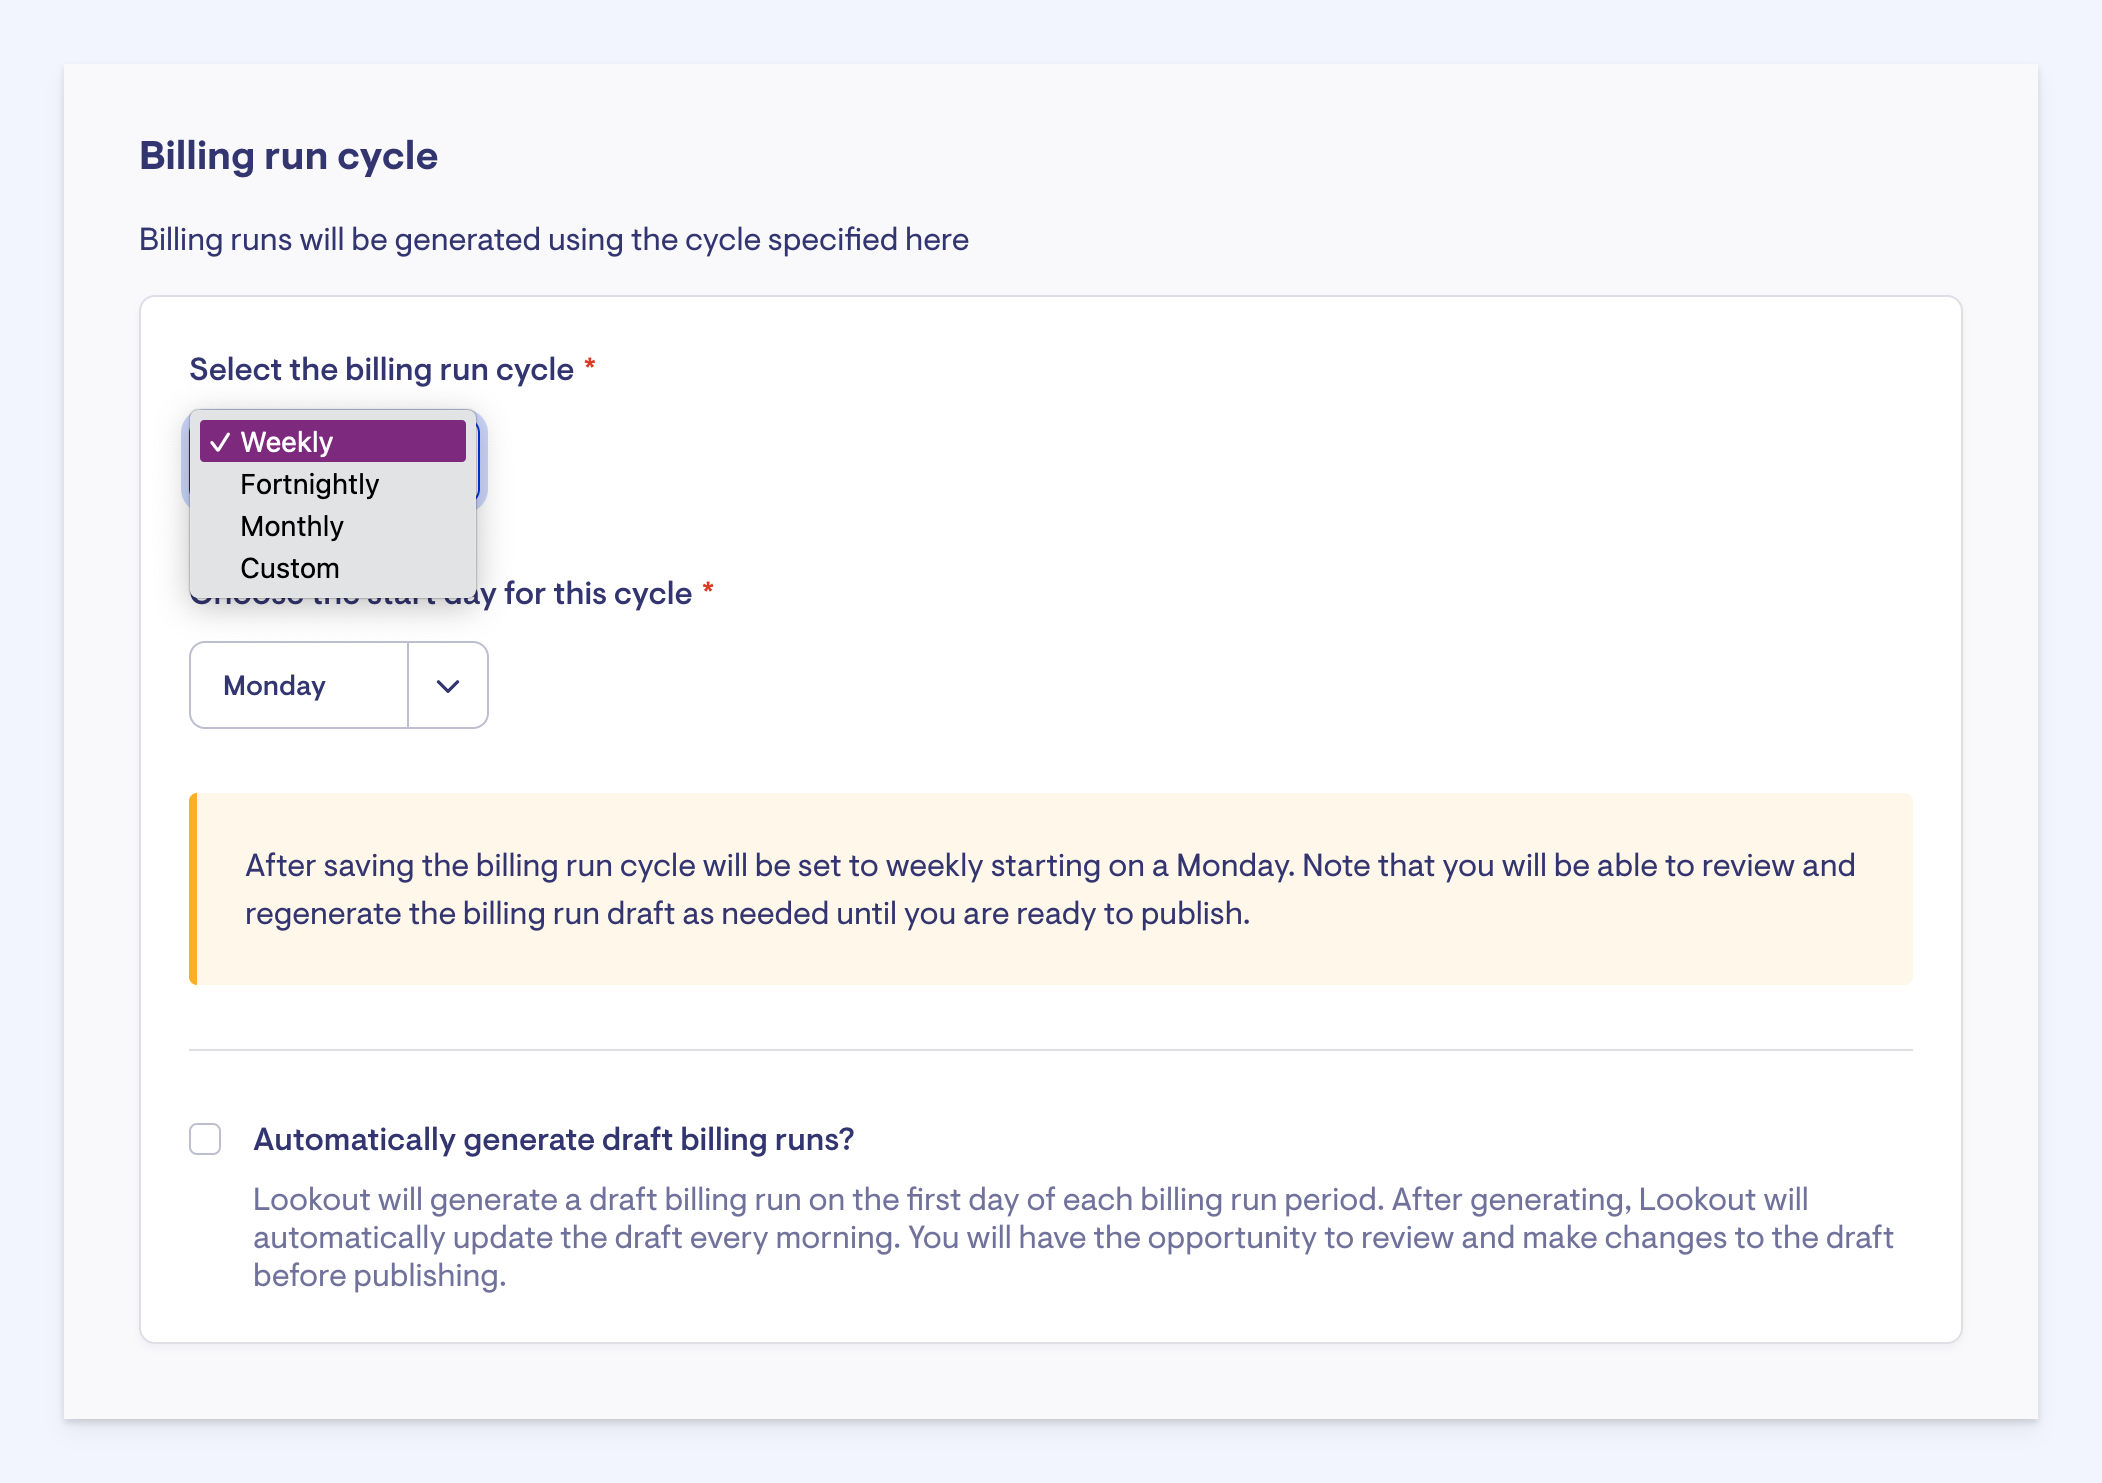
Select the cycle that suits your business. You also have the option of automatically generating draft billing runs, if you wish. This means that draft billing runs will be automatically updated every morning, saving you time.
Click the 'Save' button to confirm your changes.
Step-by-step: create, update and publish a billing run
Before creating a billing run draft it's important to ensure all the visits for the billing time period have been reviewed and are correct in Punchcards. Read more about Punchcards here.
Creating a draft
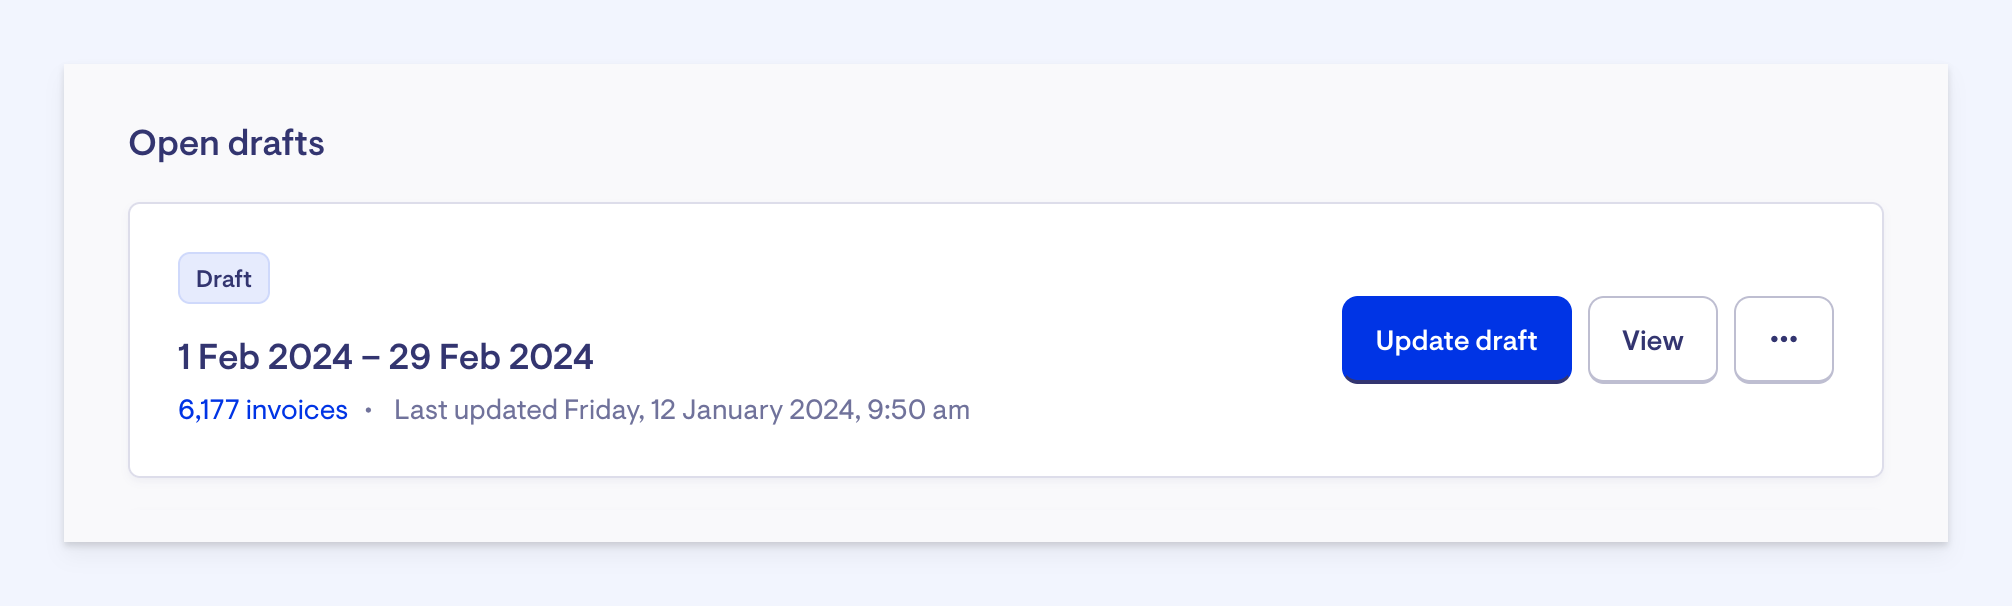
Once your billing run cycle has been chosen, Lookout will automatically show a list of drafts you can create in the panel on the right-hand side.
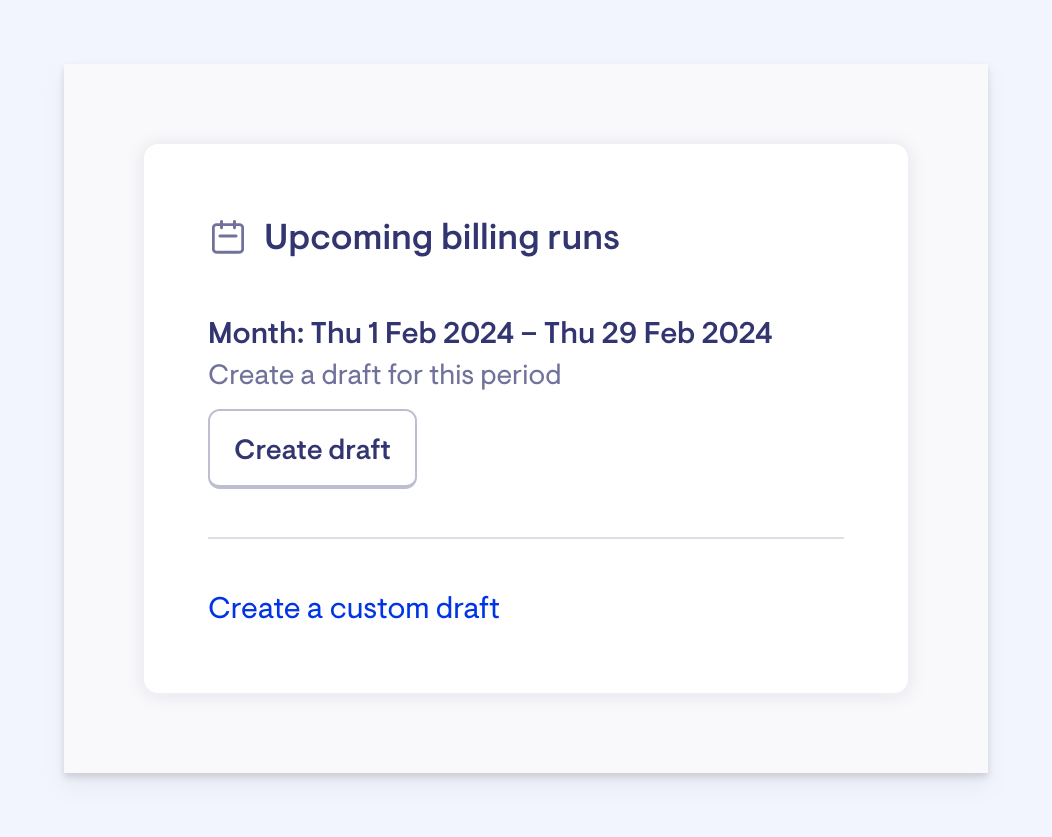
In the above example the billing run cycle is set up to be monthly, and Lookout shows the next billing run month in the panel, ready to create a draft. Click the 'Create draft' button. As Lookout needs to find all of the transactions for this period it may take a little time to finish. You'll receive a notification when the draft billing run has been created.
Tip: Creating a draft billing run does not change anything in the system, you are free to update as many times as needed, or even delete the billing run if you wish.
You can create a custom draft outside of your specified billing run cycle as needed. Click the 'Create a custom draft' link at the bottom of the 'Upcoming billing runs' panel to select a date range for the custom draft.
Viewing and working with errors
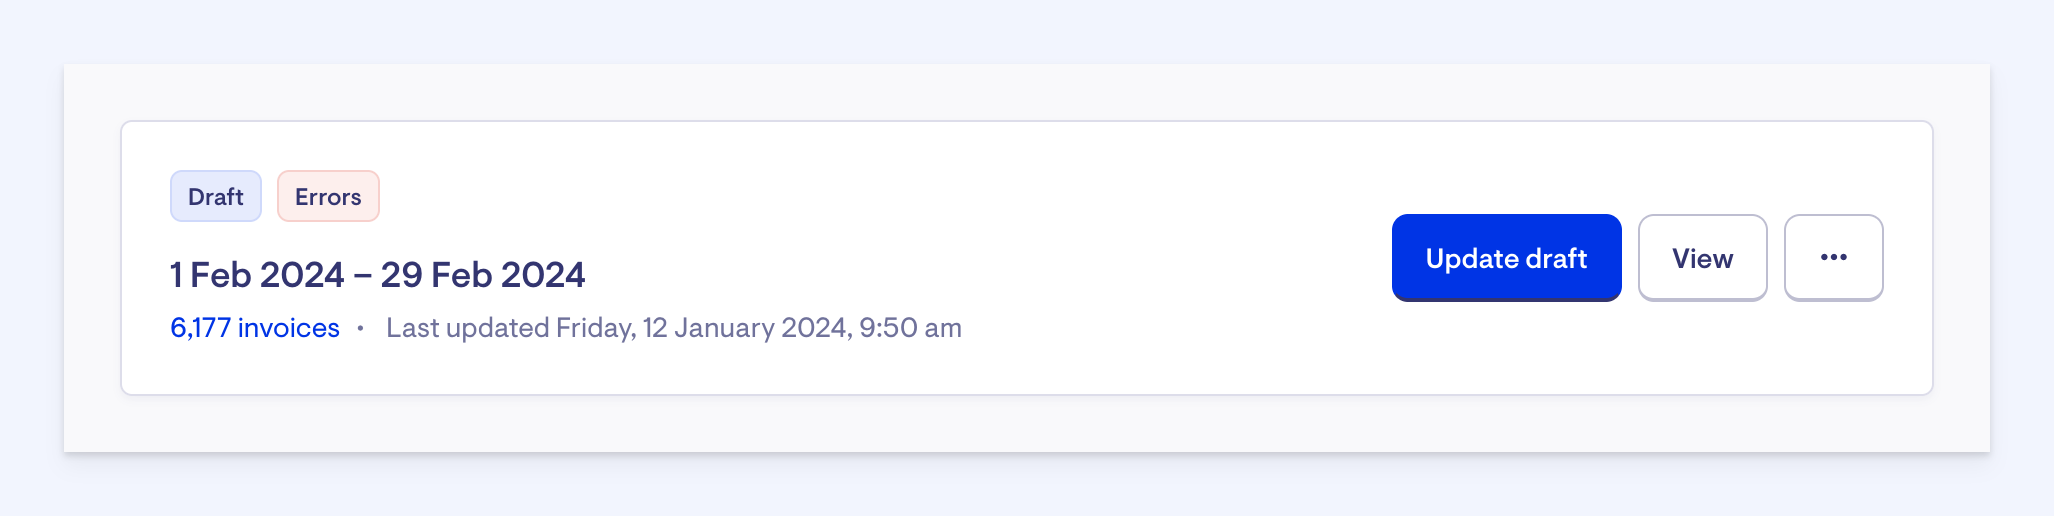
Lookout will find any transaction that looks incorrect and will display in a list for review.
You can see if your billing run has errors in two spots.
On the home panel, an error badge will show:
And when viewing the billing run a banner will appear at the top to show that there are errors to be investigated:

Click the 'View errors' button to see the error list and resolve. Take a look at the following section 'Errors: what they mean and how to resolve' to go into more depth.
You can perform bulk actions in the error list, allowing you to select several errors at a time and make changes to all with a click. For example, you may have several errors relating to visits that were scheduled during the billing run period, but were not marked as complete. Selecting the affected errors and clicking 'Visit actions' and then 'Checkout visits' will bulk checkout all at once, instead of individually checking out each one.
.gif)
You can also mark any errors as 'Resolved' by click the box next to the error and selecting 'Change status' and then 'Mark as resolved', either individually or in bulk, so you can keep track of what's been fixed.
Make sure to update the draft after fixing any errors, to bring the billing run up-to-date with any error fixes.
Tip: when looking at errors you will see a list of errors for the entire billing run period specified. For example, let's say you have a monthly billing run and you create a draft for the month of January on the 15th of January - the errors will show for the entire month of January. If you wish to hide the errors that occur after 15th of January to make the error list more relevant for the time you are viewing, you can select the below checkbox in the filter panel on the left-hand side.

Updating the billing run draft
Updating can be done at any time and will simply recreate another draft of all of the invoices that can be found for the billing run cycle.
Updating is important to do after fixing errors and right before you publish a billing run, to make sure everything's up-to-date.
There are two places you can update a billing run draft.
On the home page panel:
Or in the billing run itself:

As with creating a billing run, it will likely take some time to generate and a notification will be sent to you when it's done.
Publishing
Pushing the 'Confirm and publish' button might feel a bit daunting, but you will have the opportunity to review and make sure everything looks right before finalising.
Firstly, make sure you've resolved any errors and have updated the draft. Click the 'Confirm and publish' button. You'll see the first of two screens that step you through the publishing process.
The first screen will ask if you've made sure to update the draft. If you have done so, click 'Yes, continue'. If not, just click 'Cancel', make your changes and try again when you're ready.
Once you've hit 'Yes, continue' a second screen will show with a summary of the billing run. This gives you a last opportunity to ensure everything looks right.
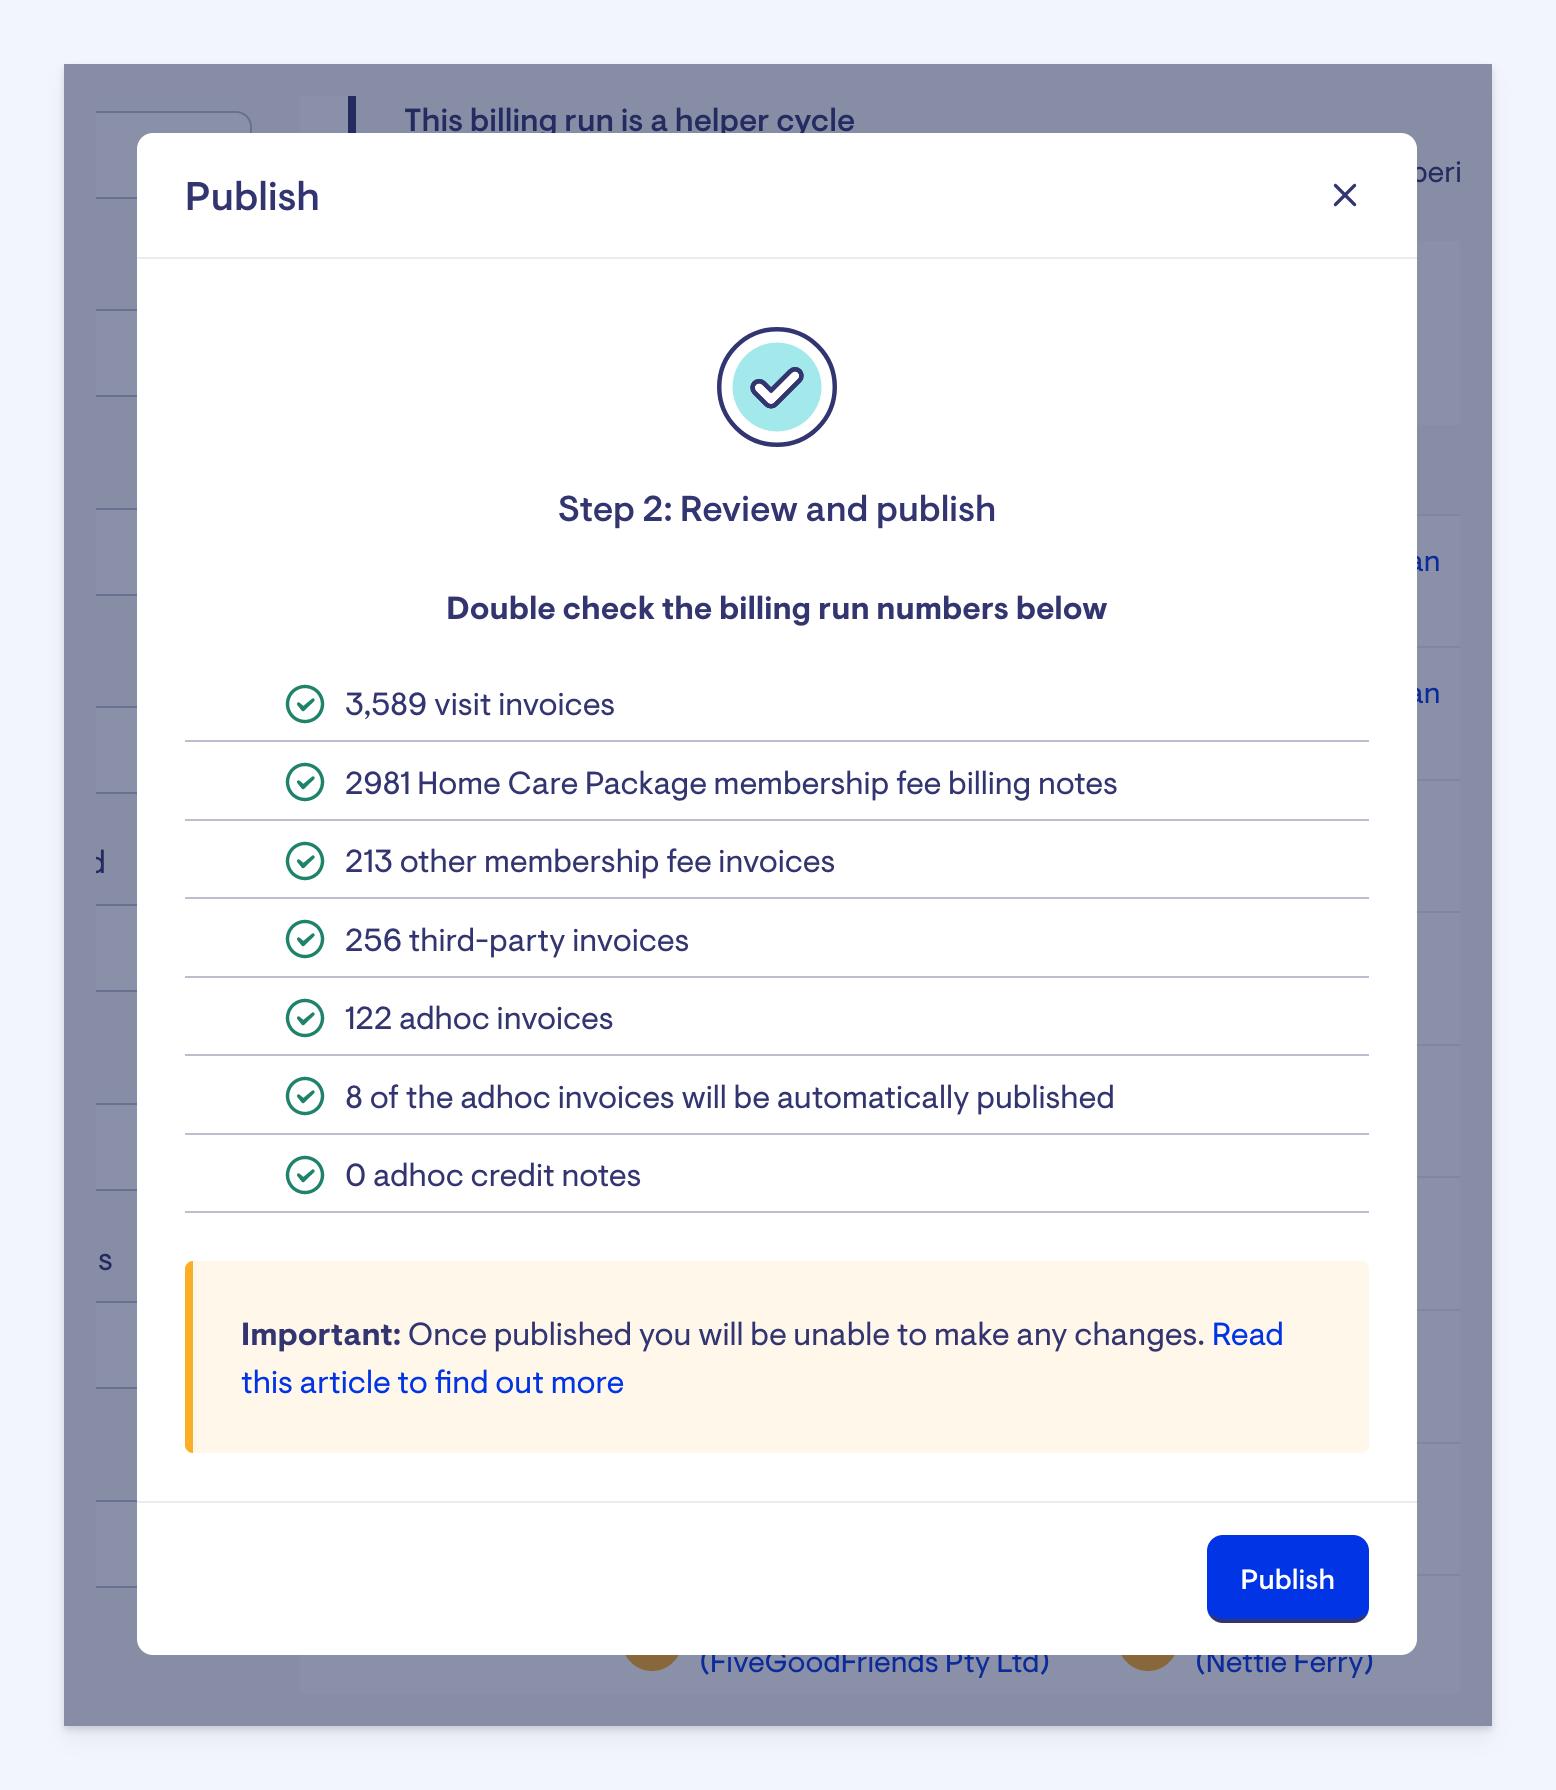
Click the 'Publish' button when you're ready to finalise the billing run.
Important: once a billing run has been published no further changes can be made.
Any errors not resolved will need to be manually invoiced.
Publishing may take some time: a notification will be sent to you when the process is complete.
Once published you will have the ability to send out invoice summaries, and all transactions will have been updated, ready to make a Home Care Package claim if required.
Errors: what they mean and how to resolve
Lookout will find any transaction that looks incorrect in a billing run and will display in a list for review:
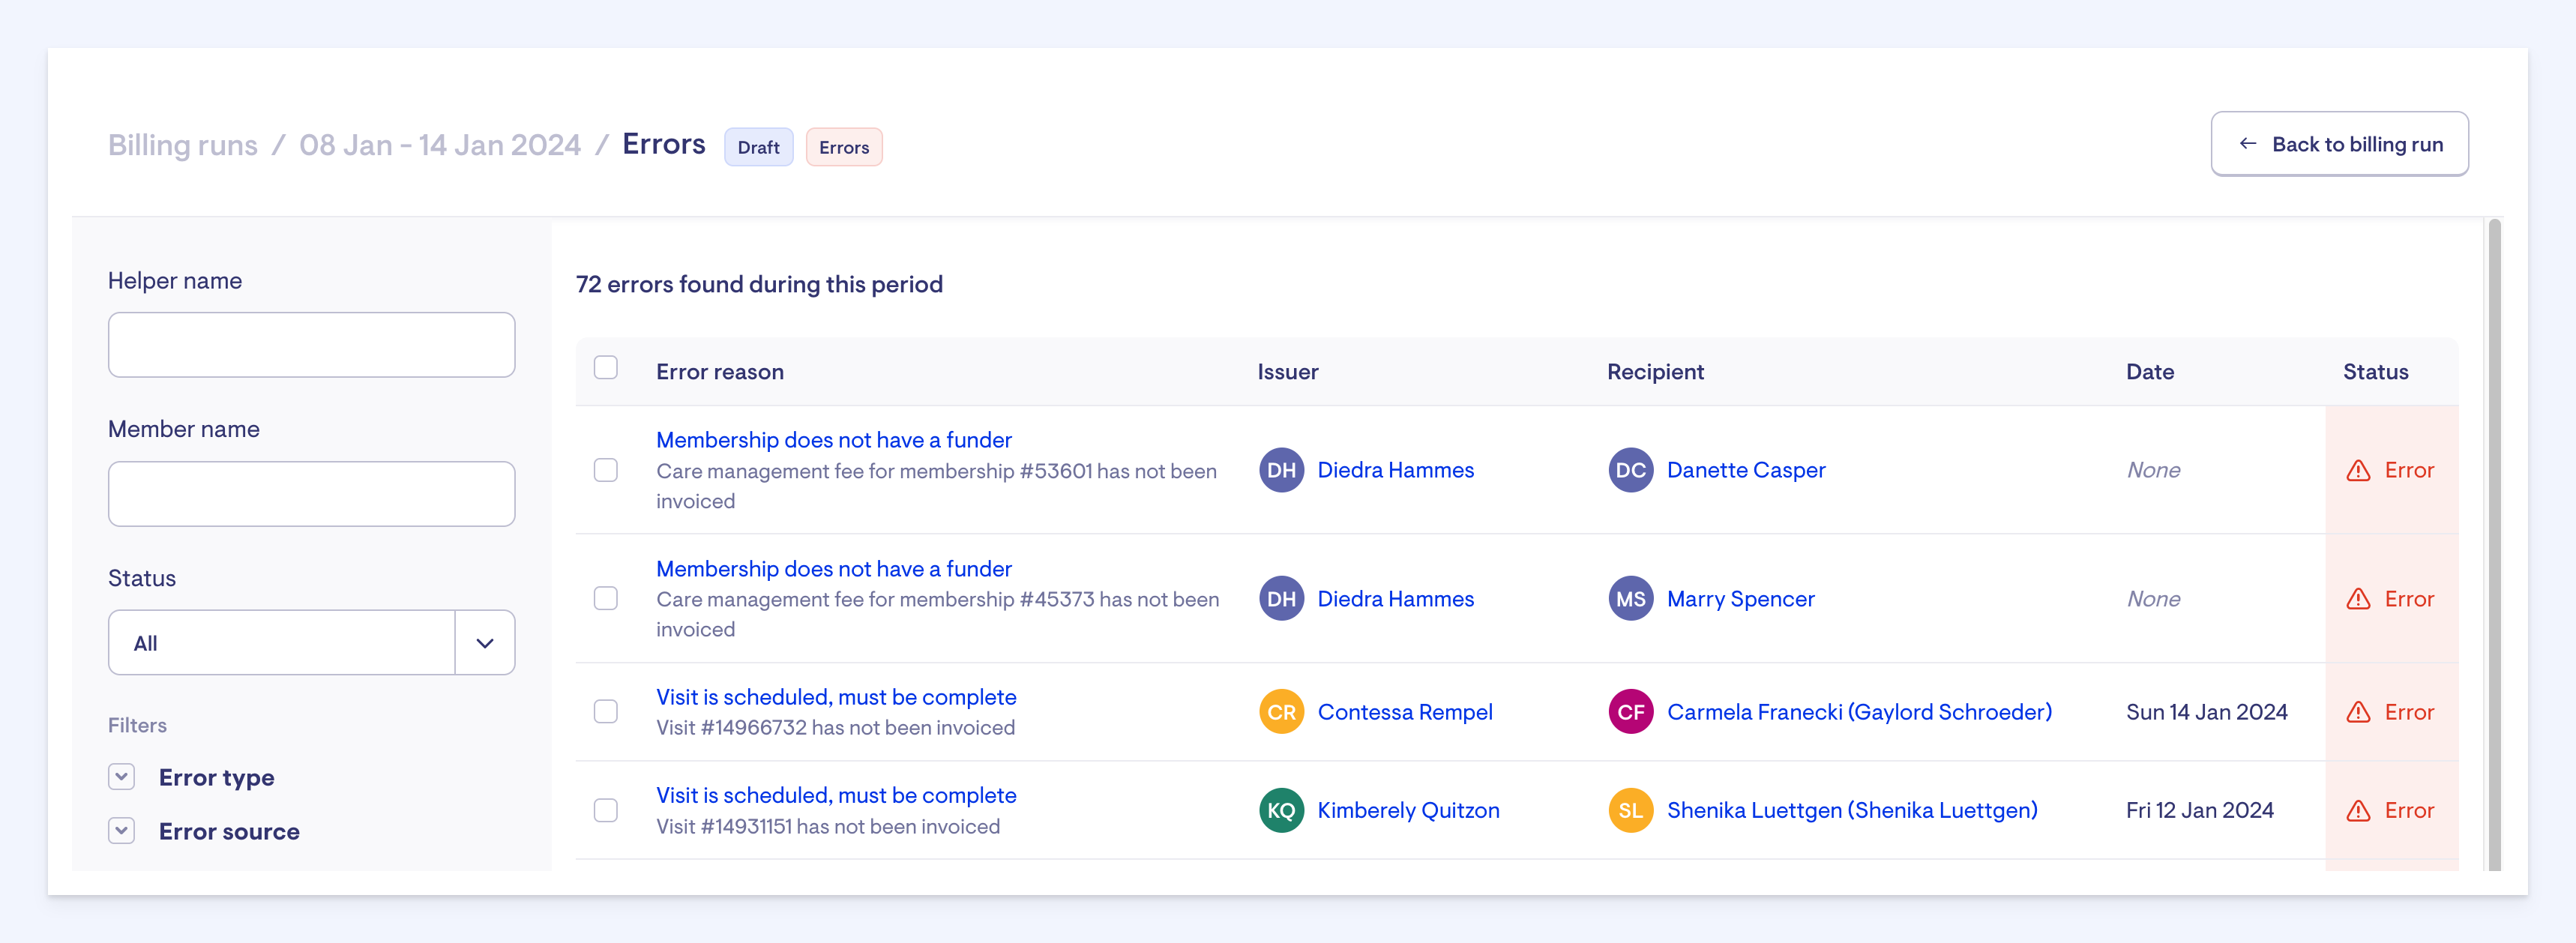
The error screen allows you to make bulk changes, if needed. For example, you may want to select a set of visits and check them out. You can do so by clicking the box next to each visit, clicking the ‘Checkout’ button in the bar that appears at the bottom and clicking confirm. You can also select visits and mark them as ‘Resolved’, to keep track of errors that have been addressed.
Bulk changes can take a few minutes to update - you’ll receive a notification when the changes have been completed.
Important: make sure to update the billing run after fixing errors - this will ensure all the changes are incorporated into the billing run.
Below is a list of the errors that can show (click the arrow next to each to show more info):
Visit is in progress, must be complete
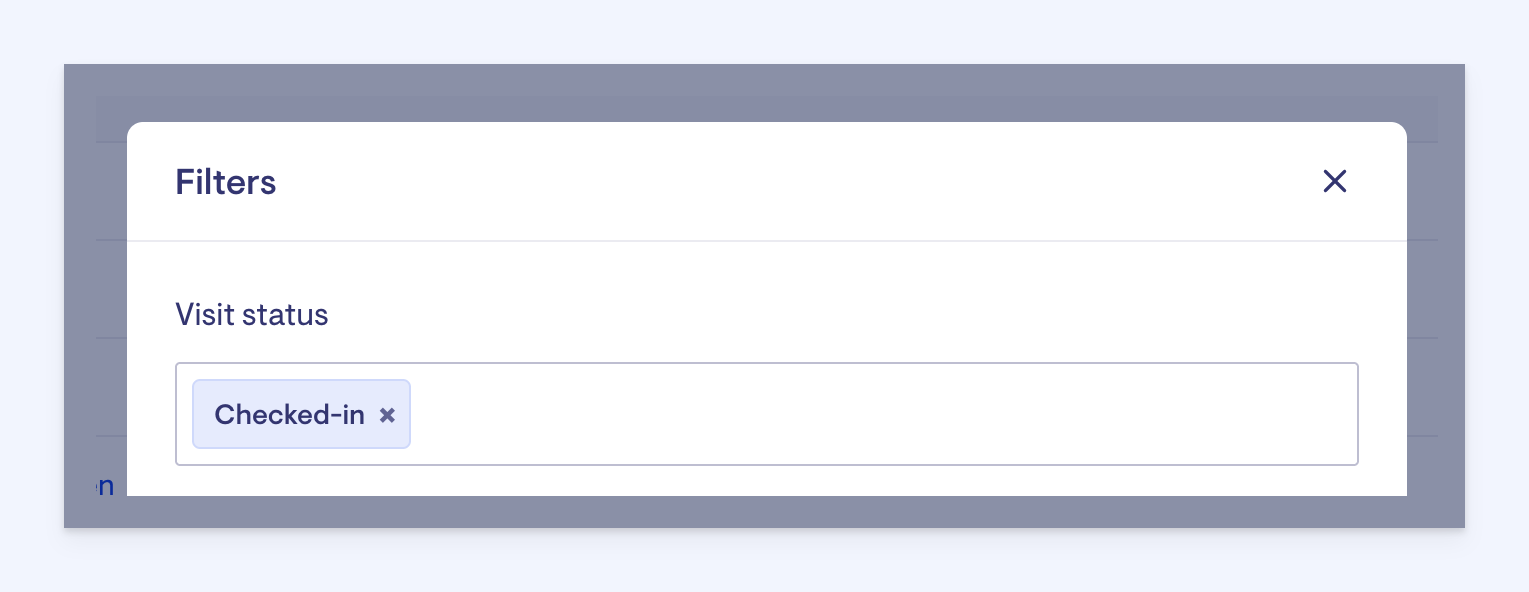
This error will show when there are visits that have been checked in by the worker, but have not been completed by checking out during the specified billing run period. This can also be seen on the 'Punchcards' screen by choosing a date range at the top and then using the 'Filter' button to filter by 'Visit status' > 'Checked-in'.
You can fix these errors by checking out of the visit either one-by-one, or you can use the bulk tool, as described here.
Visit is scheduled, must be complete
This error will show when there are visits that have been scheduled, but have not been checked in during the specified billing run period. This can also be seen on the 'Punchcards' screen by choosing a date range at the top and then using the 'Filter' button to filter by 'Visit status' > 'Scheduled'.
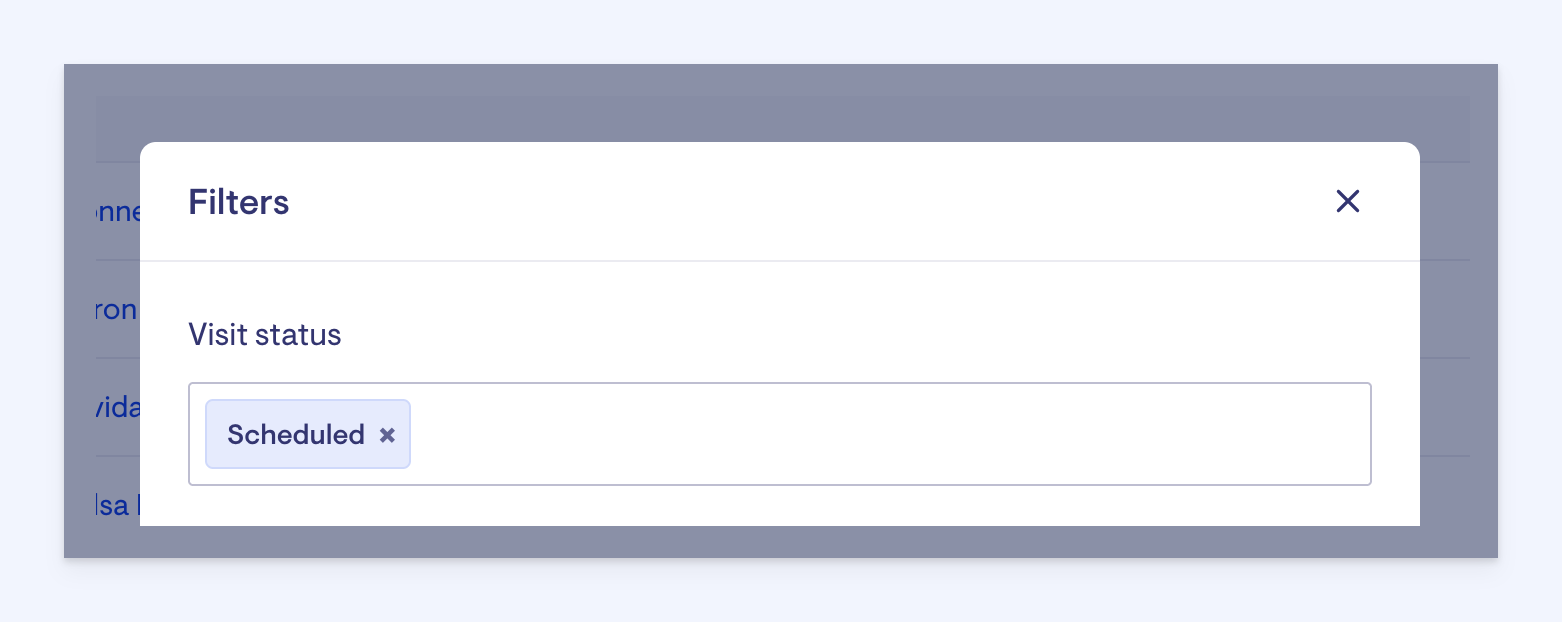
You can fix these errors by checking out of the visit either one-by-one, or you can use the bulk tool, as described here.
Helper is vacant
This error indicates a visit was set up for a client, but a worker was not assigned. You may wish to cancel these visits.
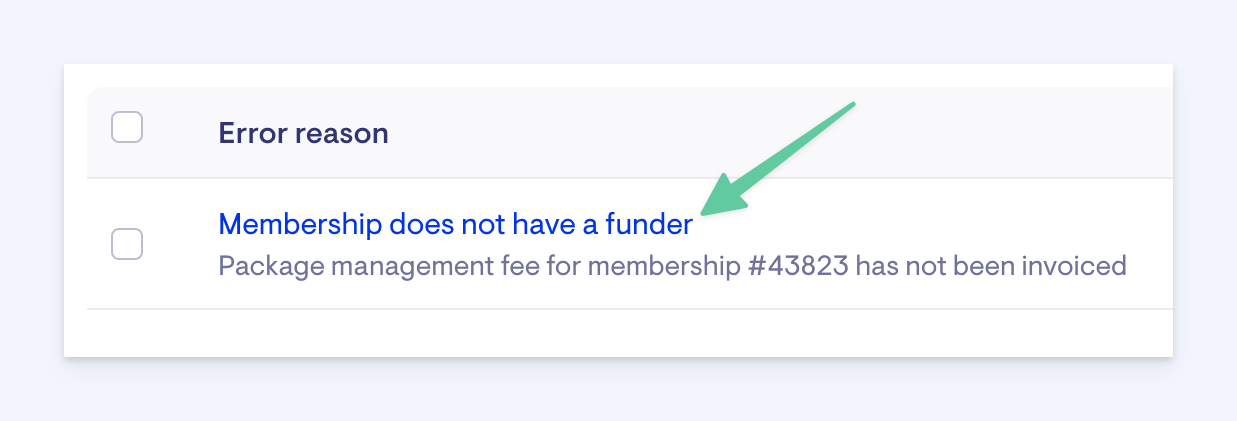
Membership does not have a funder
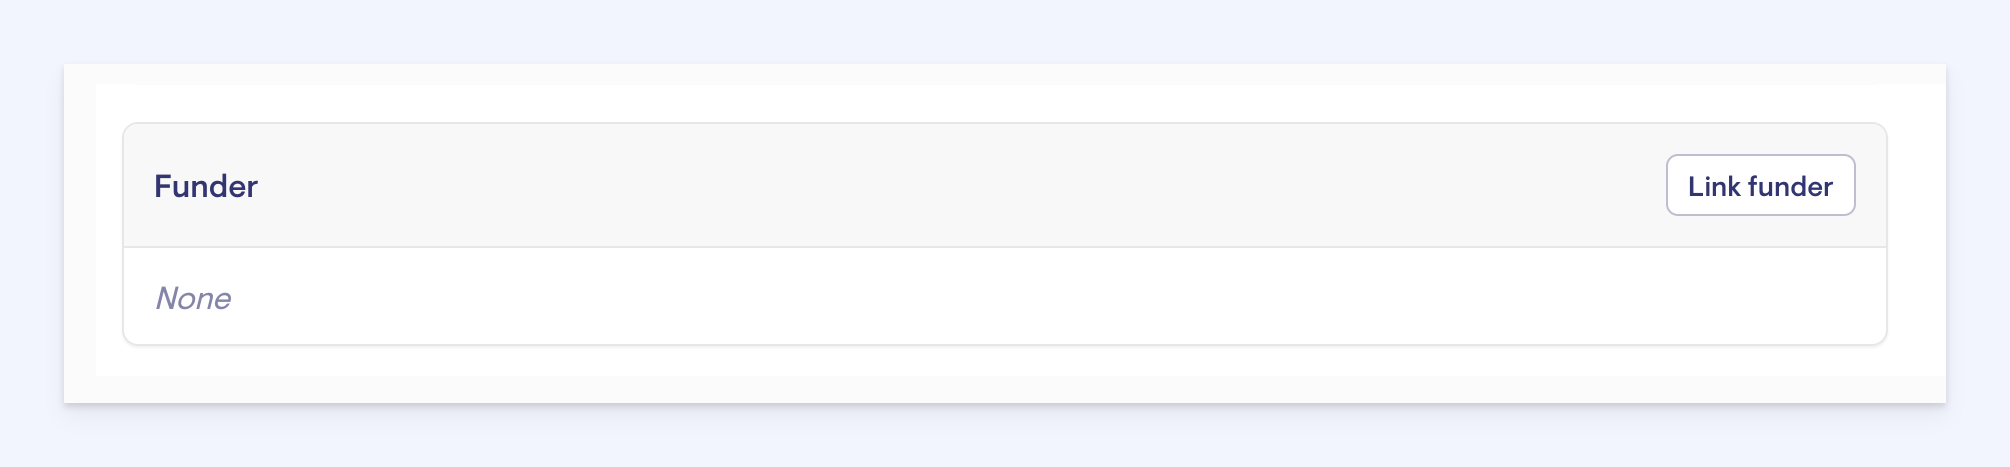
This error will need to be fixed by navigating to the Membership dashboard for the client. You can do this by clicking the link in the error list:
After navigating to the Membership dashboard, scroll down until you see the title 'Funder' on the left-hand side. Click 'Link funder' and proceed.
Has a provider travel distance rate but no provider travel distance has been recorded
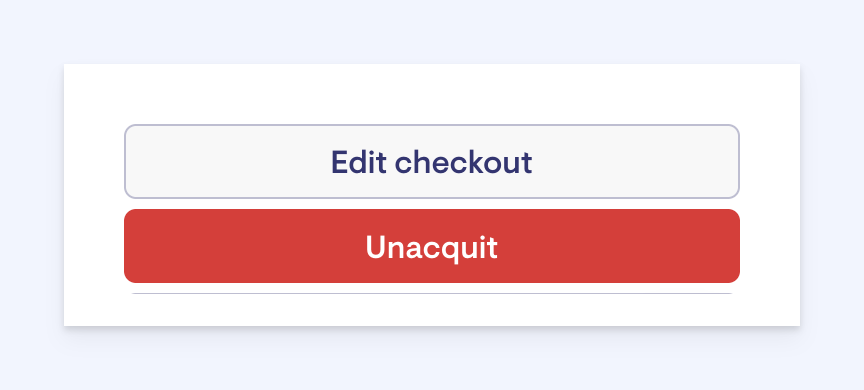
The system has identified that a rate has been set up for provider travel, but the worker hasn't recorded this information on the visit. You can click on the link in the error list, which will take you to the visit in the client roster.
Click the 'Edit checkout' button on the bottom right and amend the visit provider travel distance as needed.

Has a provider travel distance of number which is greater than your-maximum-distance
The system has identified that the worker has added a provider travel distance that's more than what has been specified. You can click on the link in the error list, which will take you to the visit in the client roster. Click the 'Edit checkout' button on the bottom right and amend the visit provider travel distance as needed.
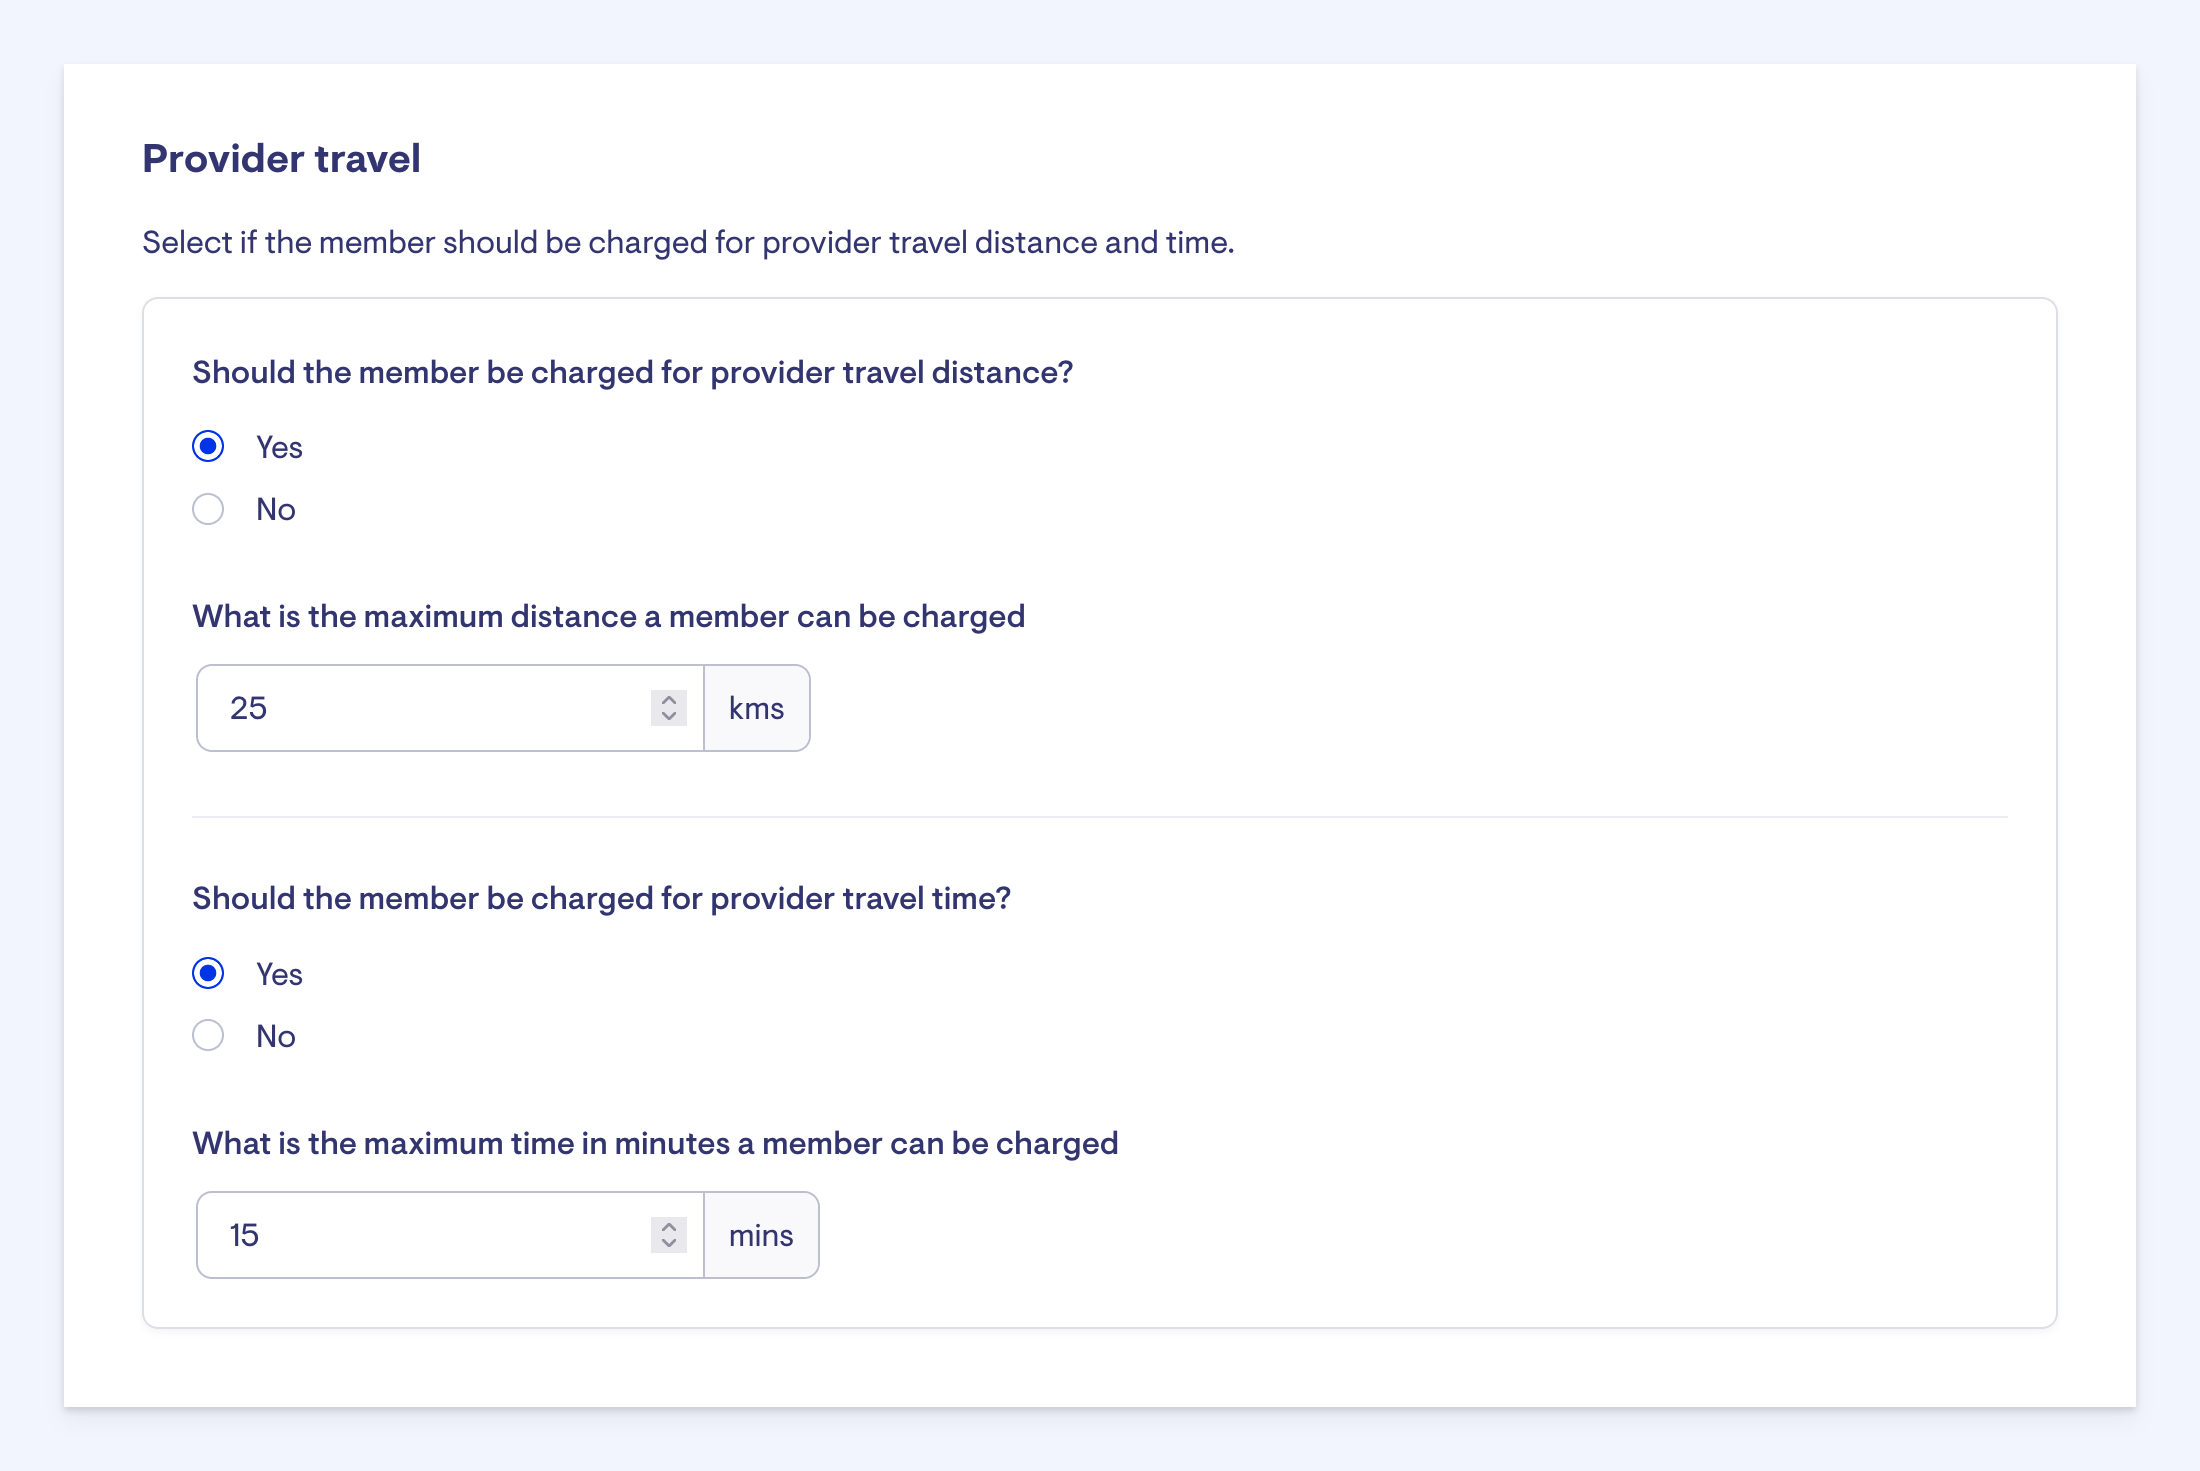
To check the maximum distance set up for provider travel, find the 'Membership plans' section of 'Settings', click on the relevant Membership plan in the list and scroll down to 'Provider travel':

Has a client transport rate but no client transport has been recorded
The system has identified that a rate has been set up for client transport, but the worker hasn't recorded this information on the visit. You can click on the link in the error list, which will take you to the visit in the client roster:
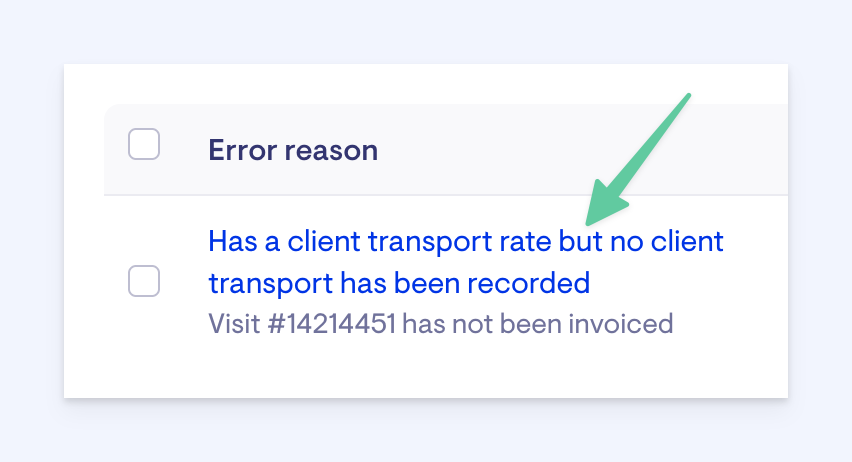
Once in the client roster you will be able to click 'Edit checkout' on the bottom right and edit the client transport for the visit:

Has a client transport distance of number which is greater than your-maximum-distance
The system has identified that the worker has added a provider travel distance that's more than what has been specified. You can click on the link in the error list, which will take you to the visit in the client roster. Click the 'Edit checkout' button on the bottom right and amend the visit provider travel distance as needed.

Alternatively, you can edit the travel information through Punchcards.
To check the maximum distance set up for client transport, find the 'Membership plans' section of 'Settings', click on the relevant Membership plan in the list and scroll down to 'Provider travel':
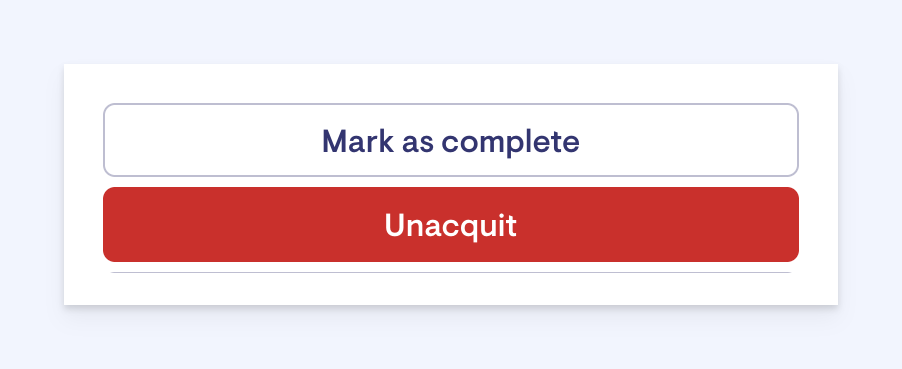
event-name group event has not been checked out
The system has found that a group event has been checked in, but not completed by checking out.
Click on the link in the error list to navigate to the visit and checkout by clicking the 'Mark as complete' button at the bottom right:
Contract price for visit_fee is missing
The system could not find an active or existing contract between the helper and member for the rostered visit. This may happen if they’ve been marked as incompatible or if the contract has been expired.
Editing the scheduled visit (if completed) may also trigger the below message:

To resolve the issue:
-
Remove any incompatibility between the member and helper (if applicable).
-
Add a new contract to the membership for the helper and the product (visit rate), ensuring the start date is before the scheduled visit.
-
Complete or edit the visit as needed.
-
If necessary, reinstate the incompatibility after the invoices have been published. This will automatically end the new contract, but the error may return if past visits need to be edited.
In addition to the above errors, the below can appear in your confirmation modal:
[number] adhoc invoices could not be published
This message can appear on the confirmation screen. The adhoc invoices may not be able to be published as Lookout needs invoices that are imported in bulk to be published from the import screen.

Some things to watch out for
-
The elements that make up a billing run have some dependencies that need to be set up correctly in order for billing runs to be accurate.
These dependencies include:
1. For visits: visit, services and travel rates are set up correctly
2. For package management fees: fees are defined accurately in Membership plans
3. For third-party purchases: purchase orders are matched
-
Not resolving billing run errors before publishing the billing run will result in those items having to be invoiced manually, or you can enable automatic invoicing.
-
It’s important to update your draft after fixing any errors and before publishing to ensure that everything in the billing run is up-to-date.
-
Billing runs can be affected by Home Care Package claim periods - read about Home Care Package claims below.
Need to make adjustments after a billing run has been published? Read this article.
Home Care Package claims and billing runs
The state of your Home Care Package claim can affect your billing run, and vice versa. Read more about Home Care Package claims here. When running a Home Care Package claim, ensure that the billing run/s for that period have been completed in order to include all the relevant invoices.
Once the first step of an Home Care Package claim has been completed, that is, once the file has been exported, the claim period is locked. For this reason you may have this error pop up in your billing run if the Home Care Package claim is in it's locked state:
"Your [claim period] claim is blocking this billing run. [Number] invoices have services delivered within your locked claim period."
"Services delivered in the locked claim period will not be able to be backdated and included in the [locked period] claim submission to Services Australia if you proceed."
You can unlock your Home Care Package claim period by clicking the 'Allow transactions' button on the panel per below, up until the second step of the claim is complete.
After the second step of the claim is finalised you are no longer able to include additional invoices, and they will need to be included in the next claim period.
FAQs
What does the 'invalid quantity rounding' error mean in the billing run?
Answer: Services Australia will not accept claims where services are not billed in increments of 0.25 hours for services charged on an hourly basis. We have updated the claiming process to identify non-0.25 values earlier during the billing run, allowing invoices to be corrected before publication. Any invoice containing values that are not in increments of 0.25 will now trigger a billing run error and cannot be published until corrected.
Editing values directly in the CSV is supported only for invoices that had already reached the claiming stage prior to 11 December, when this update was made. Moving forward, hourly services should be billed in 0.25-hour increments.