
This guide explains what the Data exporter is, why it's useful, and how to make the most of it. You'll learn how to create a template, choose your data, add and arrange columns, apply filters, and export your data - plus troubleshooting for common issues.
New to reporting terms? Before you dive in, you may find it helpful to review our Reporting: Glossary of terms, which explains key words like templates, columns, filters, and export formats in plain language.
What is the data exporter?
The data exporter is Lookout's flexible reporting tool. It lets you pull specific information out of Lookout - such as invoice lines, visits, Member details, or Helper details - into a file you can download and use elsewhere (for example, in your finance system, for payroll, or for your own reporting). Data can be exported from templates in CSV or JSON format and is also available through the API if your organisation integrates with other systems.
Lookout also has a set of ready-made reports in the All reports area. Those are great for common, general-purpose needs. But when you want more control over specific columns, custom filters, or data that the fixed reports don't offer - that's where the data exporter comes in. Think of all reports as off-the-shelf, and the data exporter as build-your-own.
Looking for a ready-made report instead? If you need a quick, standard report rather than a custom export, see our All reports article - Lookout's collection of ready-to-run reports.
Why it matters
The data exporter puts you in control of your data. It's valuable because it lets you:
- Get exactly the data you need: Choose the specific columns and records, rather than being limited to a fixed report.
- Support real business processes: Such as billing, payroll, finance reconciliation, and Member or Helper reporting.
- Reuse your work: Save templates so you can run the same export again whenever you need it.
- Tailor the output: Rename columns, transform values, and format the file to suit whatever system you'll use it in.
Top tip: It's best used by data management users, as it lets them create and modify templates and export data from them.
Before you start
Access to the data exporter depends on your permissions:
- To view existing templates, run exports, and download files, you need either the Finance Admin permission or the Data exporter permission.
- To create, edit, and manage templates (including choosing columns and filters), you need the Data exporter permission (labelled as the data management permission).
- If you have neither permission, you won't see the data exporter in the menu at all.
Top tip: If you can see templates but can't create or edit them, you likely have view-only access. Ask an administrator to review your permissions.
Navigate to Data exporter
From the main navigation menu, click Data export. If all sections are expanded, you may need to scroll to find it.
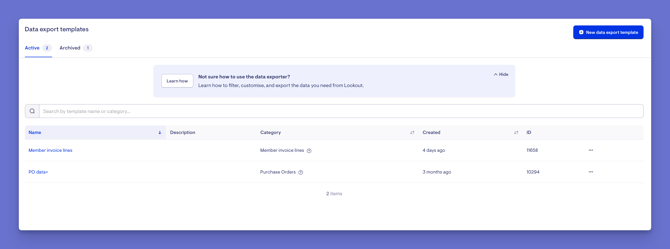
Here you'll see all active templates, if any, and a tab for archived templates. You can search by template name, description, or category, and each template shows useful details such as its data category, when it was created, and options to manage it.
Top tip: A data category (or "dimension") is essentially a view on your data - it determines which columns are available to add to your template.
You'll also see a highlighted message, where you can click the button to learn how to use data exporter. It’ll take you straight back to this article, where you’ll find everything you need to get started.
Creating a template
Step 1: Start a new template
-
From the main navigation menu, click Data export. If all sections are expanded, you may need to scroll to find it.
-
In the top-right corner, click the blue + New data export template button.
-
You can either create your own template or pick a template Lookout provides as a starting point.
Step 2: Choose your data type
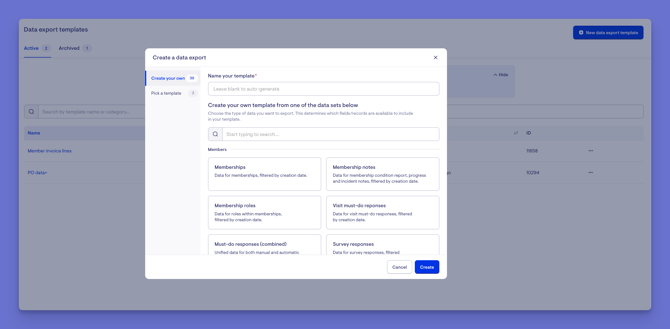
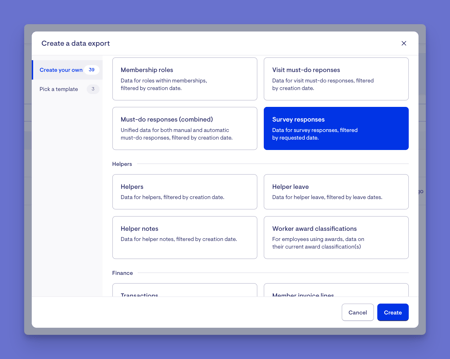
Choosing "create your own" lets you pick the type of data to export. This determines which columns will be available.
- Give your template a name (if you leave it blank, it takes the data category name).
- Search, or scroll through the categories - you'll see groups such as Members, Helpers, Finance, Rostering, Rates, and more.
- Select the data type you want (for example, Member invoice lines).
- Click the blue button.
You'll see a green confirmation banner and a blank export preview, ready for you to add columns.
Step 3: Add columns
Columns are the pieces of information that appear in your export.
-
Click the + Add column button, then choose:
-
Data column - information pulled from Lookout (such as a Member's name or an amount).
-
Custom column - a fixed value you set yourself, or a calculated value (see the tip below).
-
-
Use the search bar to find the columns you need - you can search by keyword, description, or type.
-
Tick each column you want (you can select several at once), then click the blue Add columns button.
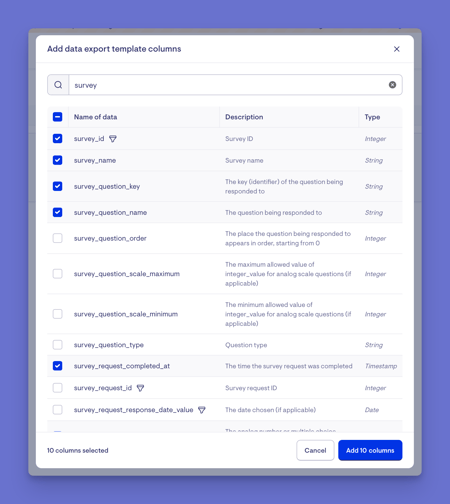
Top tip: All of your organisation's custom attributes are available as columns too - you'll find them at the bottom of the list.
Step 4: Arrange and manage columns
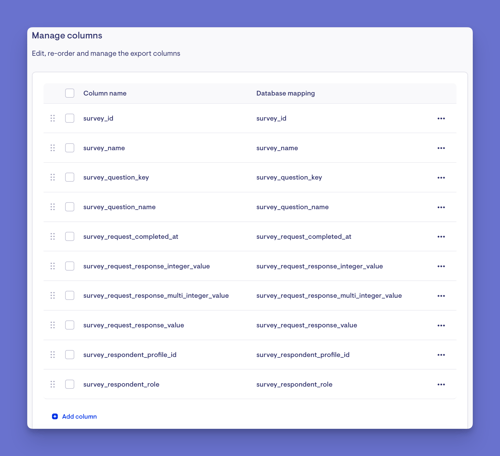
Once added, columns appear in alphabetical order. To tidy them up:
-
Click the Manage columns button.
-
Use the six-dot handle on the left of each column to drag it into the order you want (for example, putting IDs and names first).
-
Select a column's ellipsis (...) icon to bring up a short options menu:
-
Rename it: If the default name isn't clear enough for your needs.
-
Apply a transformation: Replace certain values with others (you can add multiple rules).
-
Hide it from the export: Keep it available for filtering on screen, but leave it out of the downloaded file. Useful for filtering by a name or account without including it in the output.
-
Duplicate or remove it.
-
Click the blue Save button to apply your changes.
Step 5: Apply filters
Some columns can be filtered (shown by a funnel icon when you hover). Filtering lets you narrow your export to exactly what you want.
-
Select a filterable column's ellipsis (...) icon and choose Filters.
-
Set a rule - for example, is equal to, contains, or is empty.
-
Click the blue Save filters button. You can see all applied filters in the top-left, and remove them individually or clear them all.
Please note: Not every column is filterable - this is set up by Lookout depending on the column.
Step 6: Set your date range and export
-
In the top-right, choose your date range. You can pick a custom range or a preset (last 24 hours, week, month, quarter, or year to date).
-
Click the blue Export button and choose CSV or JSON.
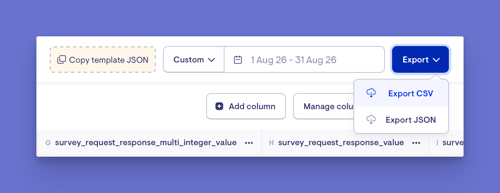
The person who clicks Export receives an email when the file is ready to download.
A couple of things to know about exports:
- You can only export up to one year of data in a single export.
- The on-screen preview only shows the first 25 entries - but the downloaded file contains all the matching data.
Managing your templates
You can manage an existing template at any time - whether to update its details, adjust its columns, duplicate it, or archive it when it's no longer needed. There are two ways to reach these options: from the template list, or from within the template itself.
Editing a template's details
-
In the Data export list, find the template you want to change.
-
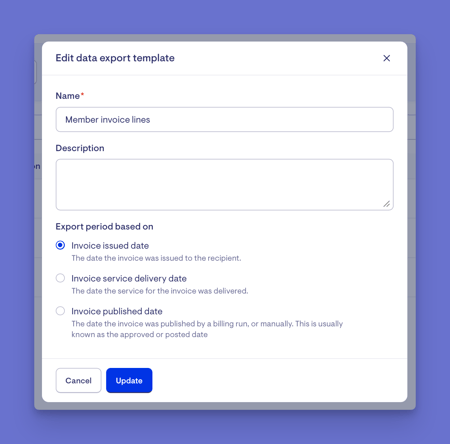
Select its ellipsis (...) button and choose Edit details.
-
Update the name, add or change the description, and adjust how the export is categorised (for example, whether the export period is based on the invoice issue date, service delivery date, or publish date - the available options depend on the data type).
-
Select the blue Update button to save, or Cancel to discard your changes.
Please note: You can also open a template to edit its columns and filters directly - see the "Add columns" and "Apply filters" steps earlier in this guide.
Duplicating a template
If you want a variation of a template but would like to keep the original, duplicate it rather than editing it.
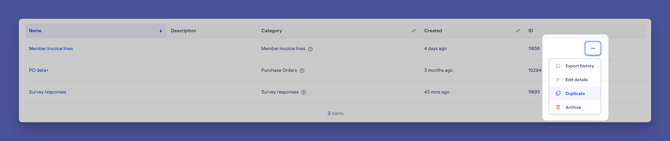
- Select the template's ellipsis (...) button.
- Choose Duplicate.
- Edit the copy as needed - for example, applying different columns or filters.
Top tip: Duplicating is ideal when you need a similar report with a small change, so you don't lose the original.
Viewing a template's export history
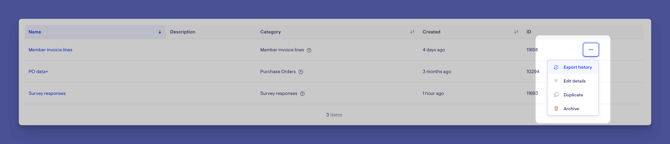
- Select the template's ellipsis (...) button and choose Export history.
- Here you'll see an audit log of when exports were run and by whom, and you can re-download past export files.
Archiving a template
When a template is no longer needed, you can archive it. Templates cannot be deleted - archiving is how you retire them, and they can be restored later if needed.
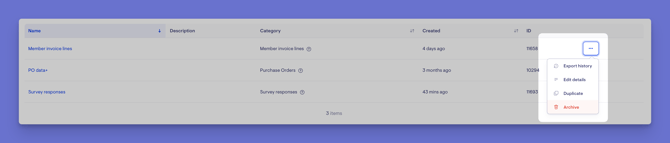
- Select the template's ellipsis (...) button - or open the template and use its Options menu.
- Choose Archive.
- Confirm your actions.
- A green banner will appear confirming your changes have been applied.
The template is removed from your active list but kept safely, so you can bring it back at any time.
Restoring an archived template
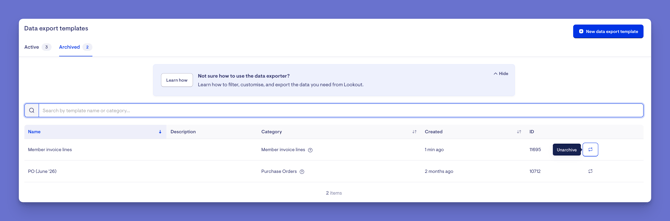
- In the Data export list, switch to the Archived view.
- Find the template you want to bring back, and click its unarchive button
- A green banner will appear confirming your template has been re-activated. It will now appear in the Active tab with other active templates.
Making the most of data exporter
Save and reuse templates. Build a template once for a recurring task (like monthly billing) and run it whenever you need it.
Duplicate before you tweak. If you want a variation of an existing template, duplicate it rather than editing the original, so you keep both.
Rename columns to match your other systems. If you'll import the file elsewhere, rename columns to match what that system expects, so it loads cleanly.
Use hidden columns for filtering. Filter by something (like a Member name) without cluttering your final file.
Check the export history. Each template keeps an audit log of who ran what and when, and lets you re-download past exports.
Troubleshooting
I can't see the Data Exporter in the menu
You need either the Finance Admin or Data Exporter (data management) permission. Without one of these, it won't appear. Ask an administrator to review your access.
I can see templates but can't create or edit them
Creating and editing templates requires the Data Exporter (data management) permission. View-only access lets you run and download existing templates but not change them.
The Export button is greyed out
You need to select a date range before you can export. Choose a custom range or a preset.
My export only shows 25 rows
The on-screen preview is limited to the first 25 entries. The downloaded CSV or JSON file will contain all the matching data.
I can't export the range I need
Exports are limited to one year of data at a time. Break a larger period into separate exports.
A column I want to filter on has no filter option
Only certain columns are filterable (shown by a funnel icon). If a column isn't filterable, consider filtering on a related column instead.
I can't delete a template
Templates can't be deleted - only archived. Select the template's ellipsis (...) button to bring up a small options menu. Click Archive. Archived templates can be restored later.
I get a "Fields is invalid" error when duplicating a template
This happens when the template still uses a deprecated column that's no longer supported in new (or duplicated) templates. To fix it, remove the deprecated column and replace it with the suggested one — the column's description will tell you what to use instead. Note that once removed, a deprecated column can't be added back.
Still Need Help?
If you're still experiencing issues, please contact our Support Team and include:
- Screenshots (if possible)
- The user's name/email
- The type of notification affected
- The channel you expected it on (in-app, email, or push)
- The exact steps taken