Being able to manage all costs and expenses associated with client care is paramount for many care organisations. These costs include travel expenses incurred by support workers travelling to visits (provider travel) and providing transport during visits (client transport).
How to enable provider travel and client transport?
Provider travel information can be collected without invoicing clients, but client transport services will always generate an invoice when collected.
To begin collecting provider travel information and invoicing clients for associated costs, as well as client transport services:
-
Enable provider travel collection and add provider travel and client transport rates to your Rates Settings.
-
Enable provider travel and client transport charges within Membership plans.
-
Add client transport to a service within Membership plans.
-
Enable helper-specific travel settings.
-
Select a provider travel/client transport rate when rostering a visit.
Step 1: Add provider travel and client transport rates
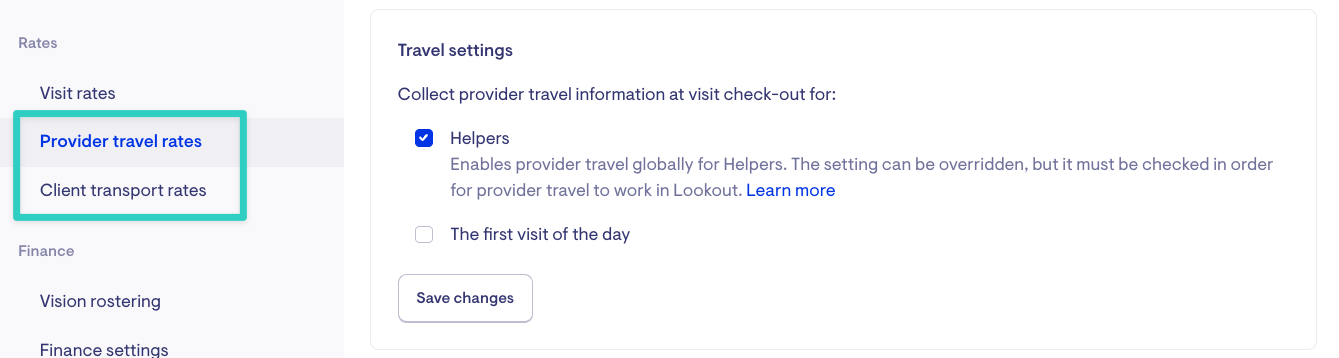
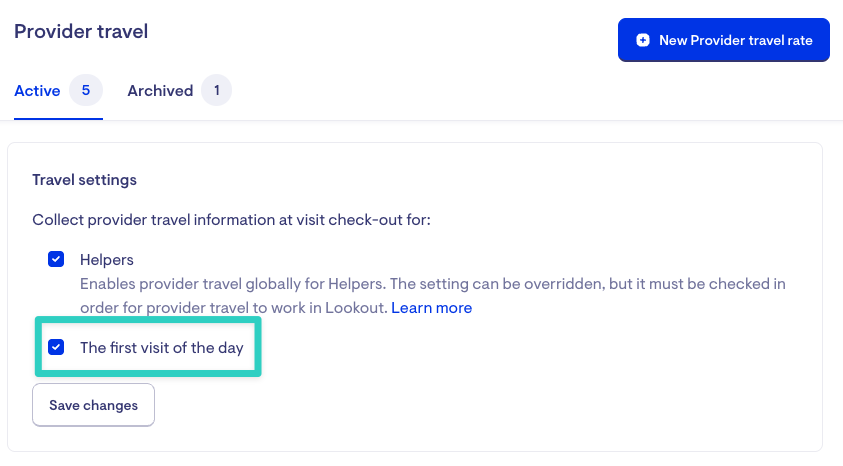
The first step is to ensure that you have provider travel and client transport rates set up. For provider travel, information collection from helpers at check-out (general) should also be enabled, as well as whether or not you collect provider travel for the first visit of the day.
Click the link below to learn how to set up travel rates:
Managing Travel and Transport rates in Lookout

Step 2: Enable charges within Membership plans
After configuring the rates, you must set up membership plans to manage travel and transport charges. This setup determines whether members on a specific plan will be invoiced for the helper's travel to their address and any transportation services provided during the visit.
If you do not invoice members for provider travel expenses, skip this step.
An access role with Workflow permissions is required to update Membership plans.
To enable charges:
-
Click the three dots next to your name on the navigation bar, and choose Settings.

-
In the settings, navigate to Membership Plans, locate an active plan you want to edit, and click the three dots in the right-most column of the selected plan.

-
Within the Plan details tab, scroll down to Provider travel and set provider travel distance and provider travel time charges to Yes, as needed.

-
Do the same thing for Client transport, as needed.

-
Finalise the changes by clicking the Save button.
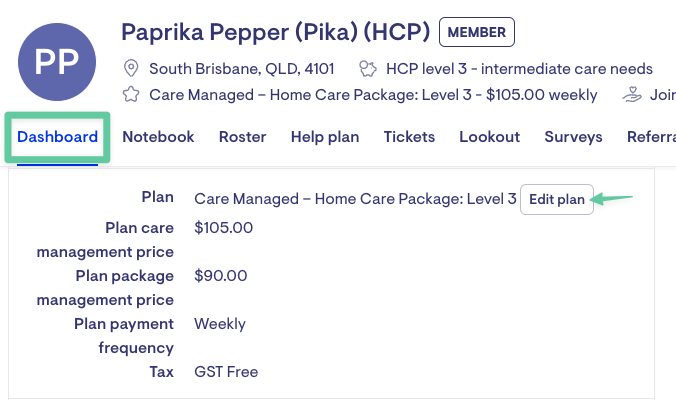
You can customise a membership plan for an individual member, allowing their travel and transport settings to differ from those of other members on the same plan. For example, if you want to exempt a specific member from travel charges.
To customise, go to the member's dashboard, navigate to the Membership Plan section, and click Edit Plan.
For more information on how to set up brand-new membership plans, please refer to the guide here:
Setting u p membership plans in Lookout
Step 3: Add client transport to a service within Membership plans
Collecting client transport information requires assigning a client transport rate to a specific service.
For example, if you offer a service such as Shopping Assistance, you need to specify which client transport rates apply to this service to allow the collection of client transport kilometres at check-out.
To attach client transport rates:
-
Click the three dots next to your name on the navigation bar, and choose Settings.
-
In the settings, navigate to Membership Plans, locate an active plan you want to edit, and click the three dots in the right-most column of the selected plan.
-
Open the Client Transport tab and click 'Add client transport to a service'

-
Tick the boxes for the services that should allow client transport to be provided, then click Save.

-
Click 'Add client transport rates to this service'

-
Select the rates that can be applied to the service by ticking the corresponding boxes, then click Save.

-
Click on the red rubbish bin icon to remove any services and/or rates and confirm the changes.

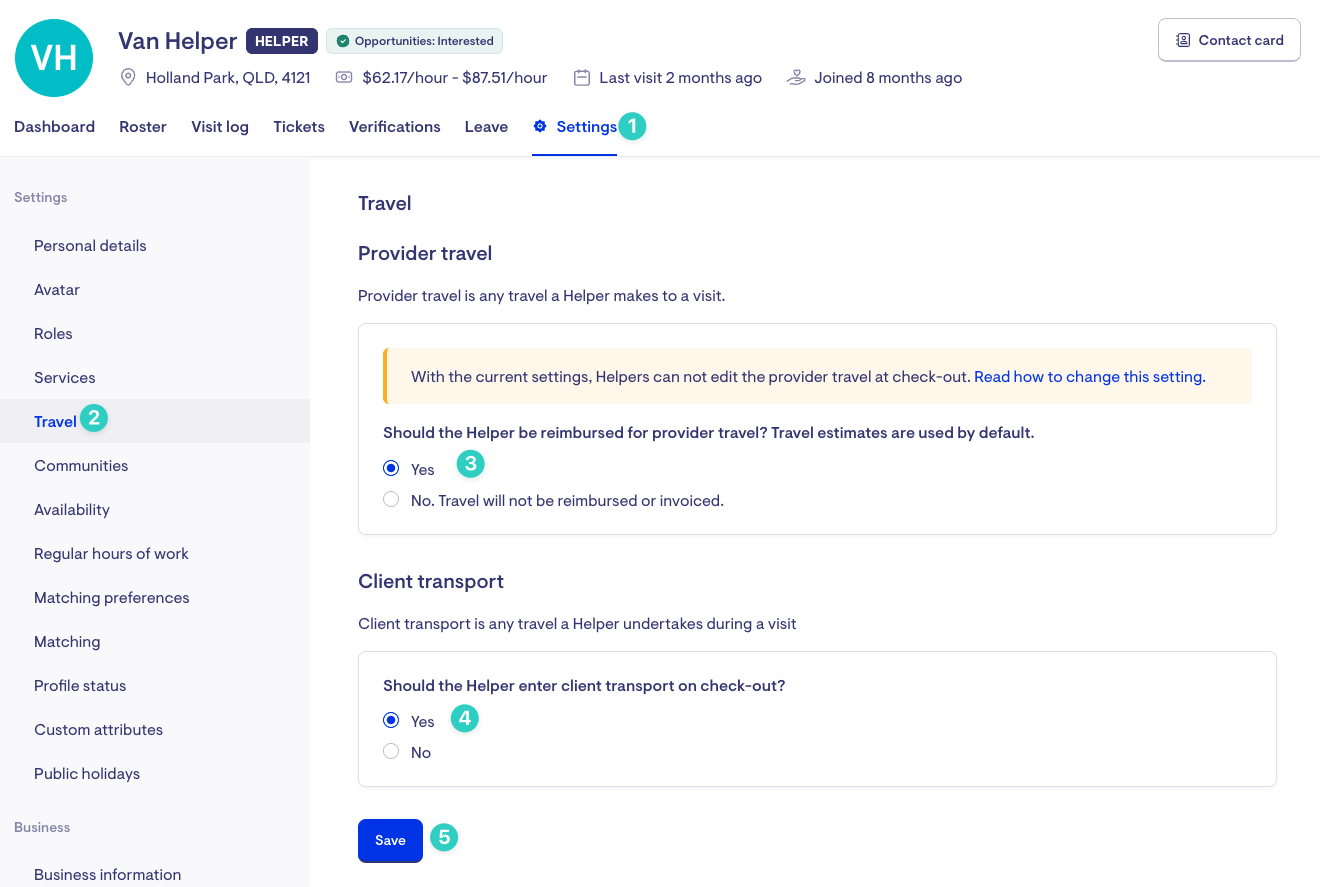
Step 4: Enable helper-specific travel settings
You can decide which helpers can collect and claim provider travel and client transport expenses.
If a helper's travel settings are disabled, no provider travel or client transport invoices will be generated for their visits, even if travel information is recorded, the membership plan is chargeable, and the service allows client transport collection.
To enable travel settings for a specific helper:
-
Open the helper's profile and navigate to the Settings tab
-
Click Travel from the Settings menu
-
Set the applicable provider travel setting for the helper
-
Set the applicable client transport setting for the helper
-
Finalise the changes by clicking Save
Step 5: Roster visits with provider travel and client transport rates
Once you have completed Steps 1 to 4, you will automatically get a second 'Visit travel information' page whenever you create an exceptional or recurring visit for a member.
To select the applicable travel and transport rates for a visit:
-
Create a new visit. You can do this through the member or helper's roster or the scheduling page.
-
Complete the visit details and click Save to proceed to the visit travel information page.

-
Select the applicable Provider travel distance, provider travel time, and client transport rate from the dropdown menu as required. Save to finalise the changes.

-
Review the visit details to confirm that the rates are correct.

-
To change the travel or transport rates, click 'Edit visit' from the visit details window. Click Save to open the visit travel information page.

-
Select the correct rates and click Save again to finalise the changes.

Note: If you select a client transport rate, workers will be asked to enter client transport information at check-out. If you choose not to charge for client transport for the visit, workers will not be asked for client transport information at check-out.
How are provider travel and client transport information collected?
Provider travel
Lookout uses two types of provider travel: estimated and rostered. The type used at check-out is based on the visit's 'Roster provider travel' setting and will determine how provider travel is calculated, displayed, and collected.
-
Estimated provider travel
-
Provider travel information does not get added to the roster. If you hover over a visit tile, no provider travel data is available.

-
If the visit is wrapped in a shift, estimated provider travel information will be available in Shift details. However, the estimates are excluded from shift utilisation (not factored in the shift travel information)

-
-
Rostered provider travel
-
Provider travel information gets added to the roster. A predicted helper travel widget will appear in the Visit travel information page for capturing and refreshing travel estimates.

-
If you hover over a visit tile, provider travel time will be available. A grey car icon will also appear on the roster as an indicator that the visit uses rostered provider travel.

-
If the visit is wrapped in a shift, the rostered provider travel time will be included in shift utilisation.
.png?width=501&height=804&name=provider+travel+7+(1).png)
-
Roster provider travel settings
As mentioned previously, this setting determines the type of provider travel used for the visit.
-
If workers are allowed to edit provider travel in the care app, Lookout will recalculate the travel value at check-out using real-time Google Maps data. This calculation is based on the helper’s last recorded location (stored address from the previous visit, or helper's address if first visit of the day), and the current visit address—factoring in live traffic conditions.

-
If workers are not allowed to edit provider travel, Lookout will only recalculate the value at check-out if the visit uses estimated travel that are NOT rostered values.

The roster provider travel options appearing on the visit form can differ based on your global Helper Settings for allowing workers to edit provider travel at check-out.
To update preference:
-
Click the three dots next to your name on the navigation bar, and choose Settings.
-
Select Helper settings under the Rostering submenu.
-
Update the "Allow workers to edit provider travel values on check out?" option as needed, and save the changes.

When a helper checks out of a visit, provider travel details are automatically filled in using either previously rostered values or updated Google estimates, depending on your configuration settings.
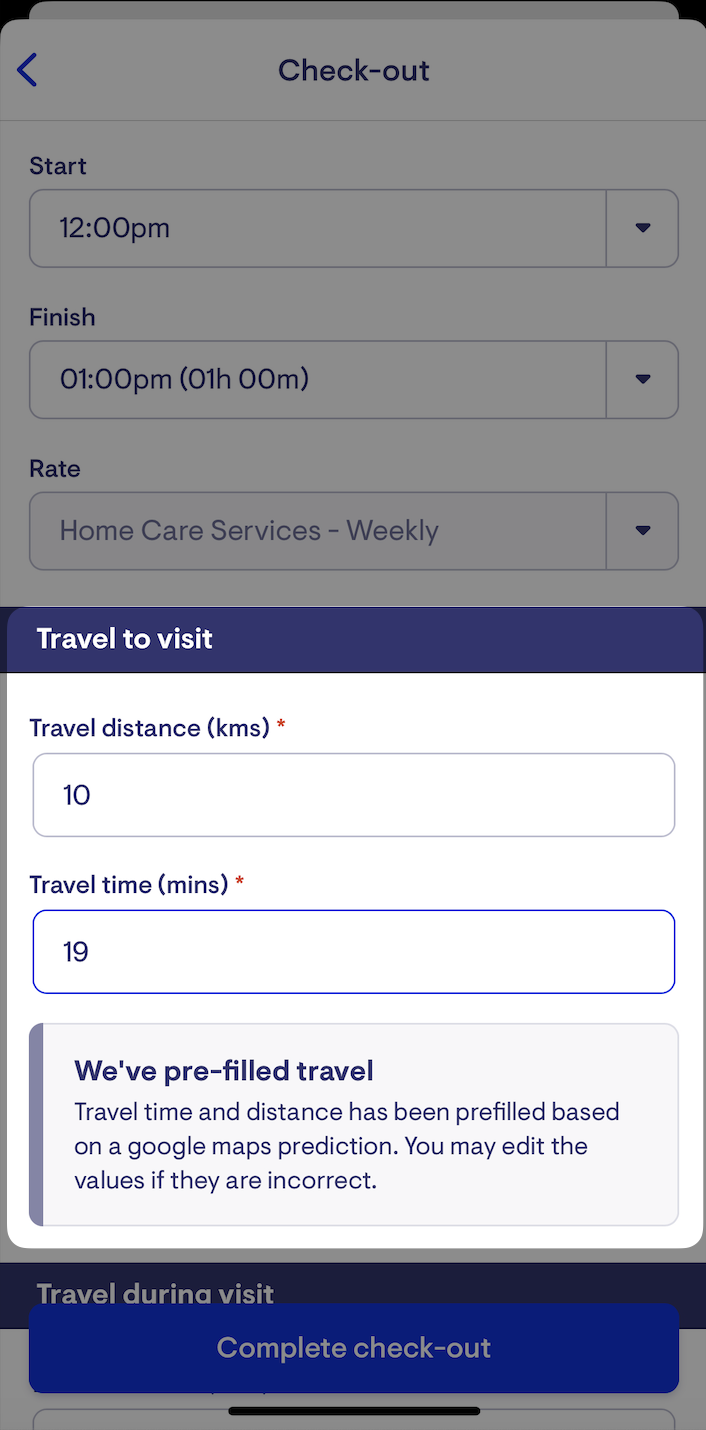
Helpers can also be given permission to edit provider travel values during check-out.
Client transport
In contrast, client transport information requires the helper to enter the total kilometres travelled during the visit.
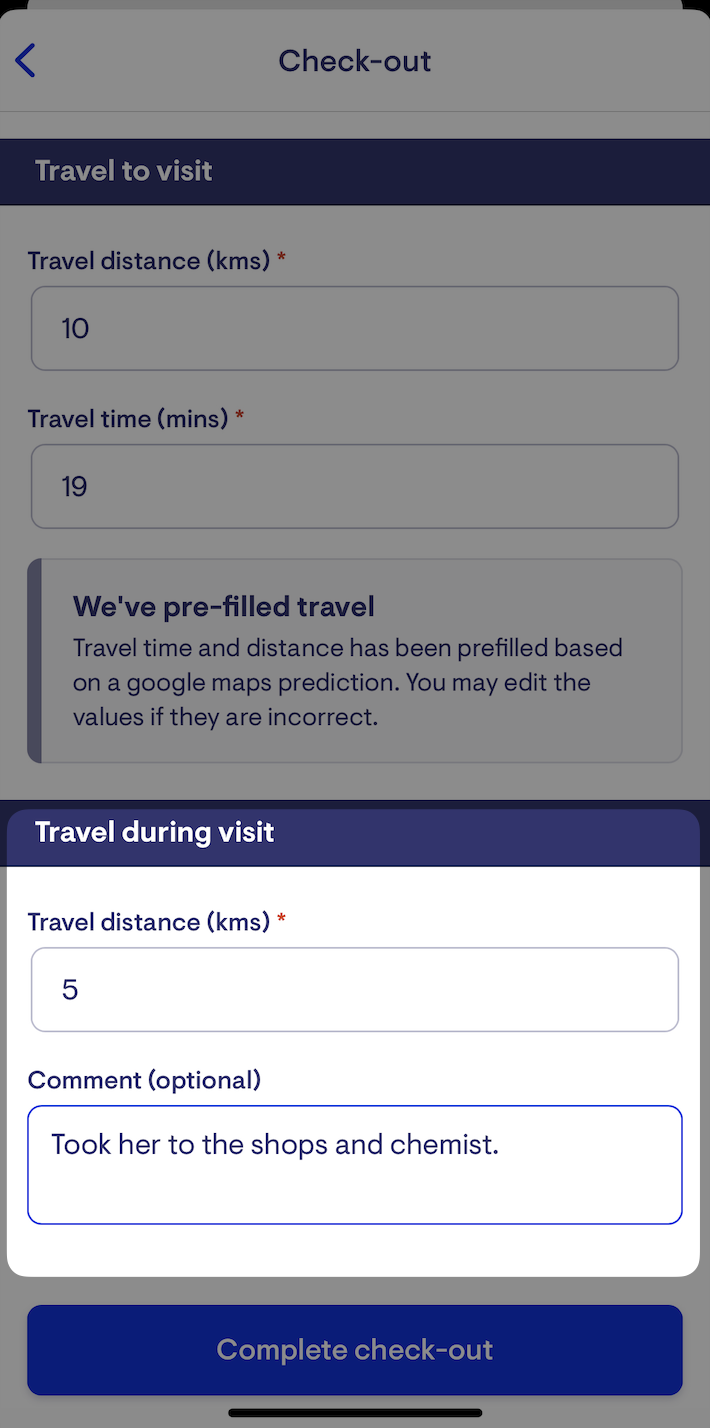
Client transport notes can also be added
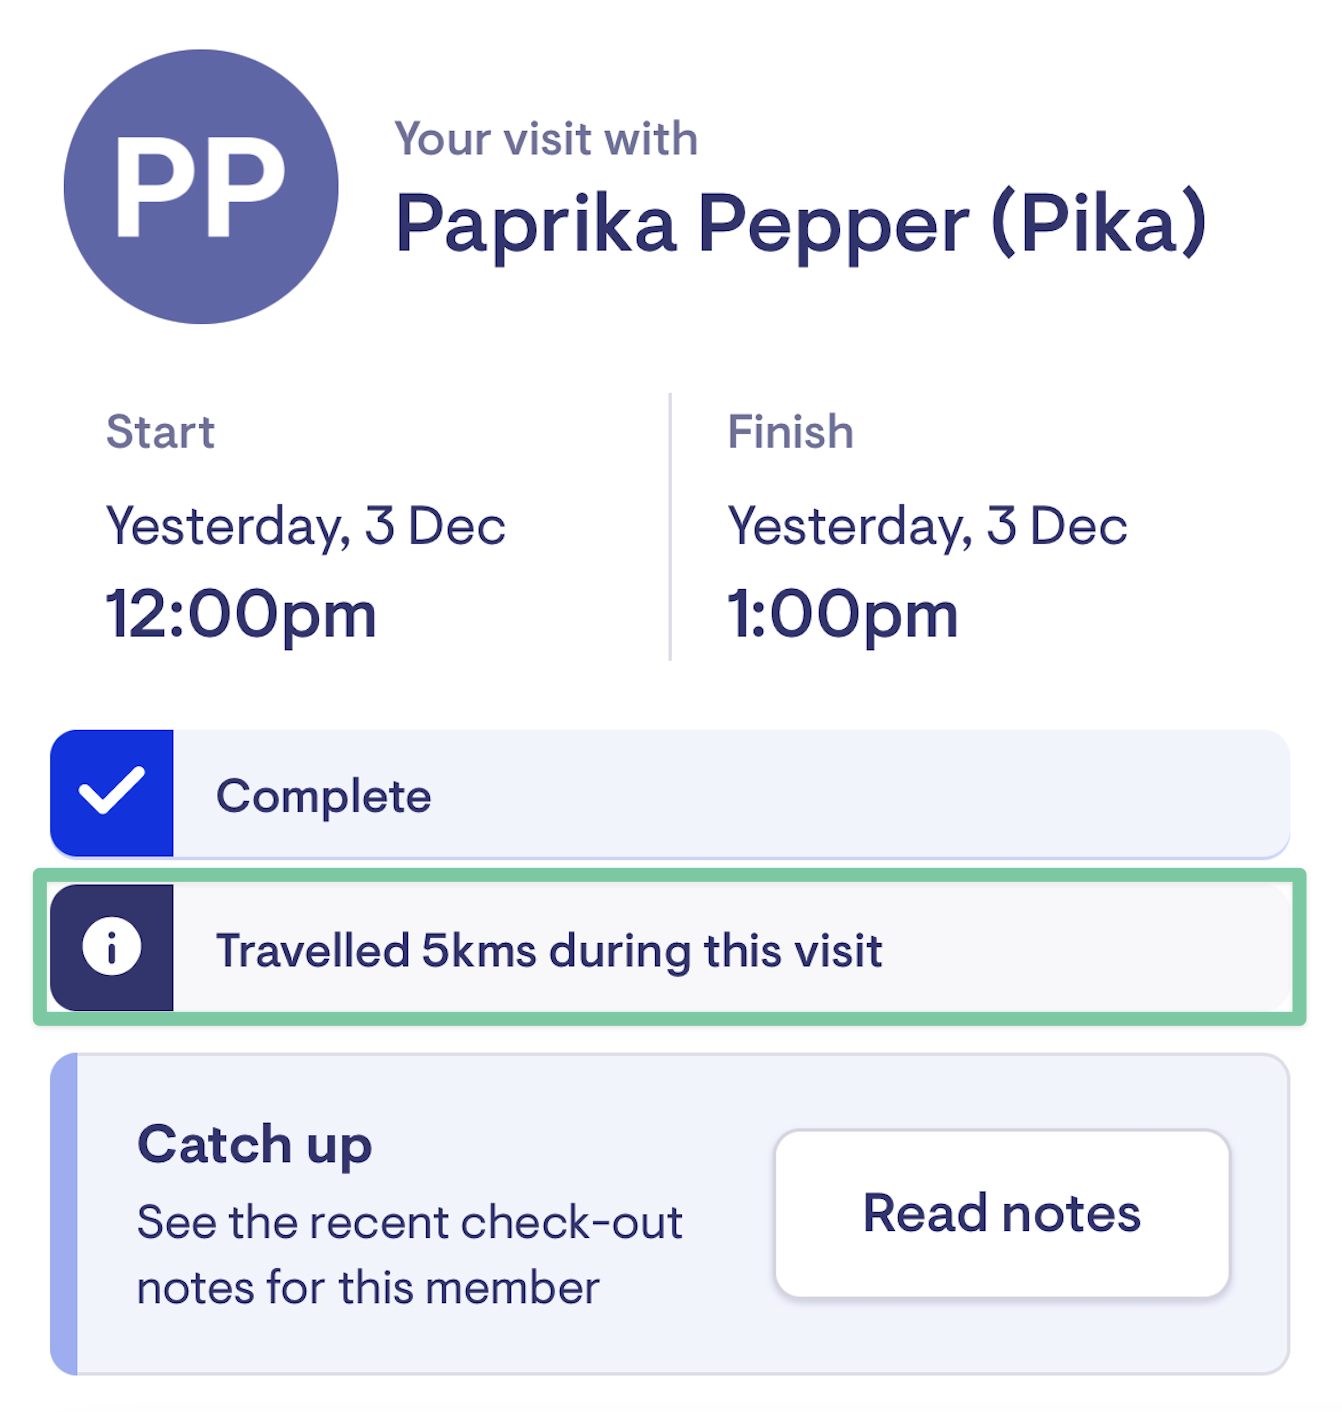
Once check-out is complete, the client transport distance will be displayed on the visit details page of the care app.
Editing worker checkout information
Staffers can edit travel information provided by workers at checkout via Punchcards. This can be done through the helper or member's roster by clicking on a visit and then selecting Edit Checkout.
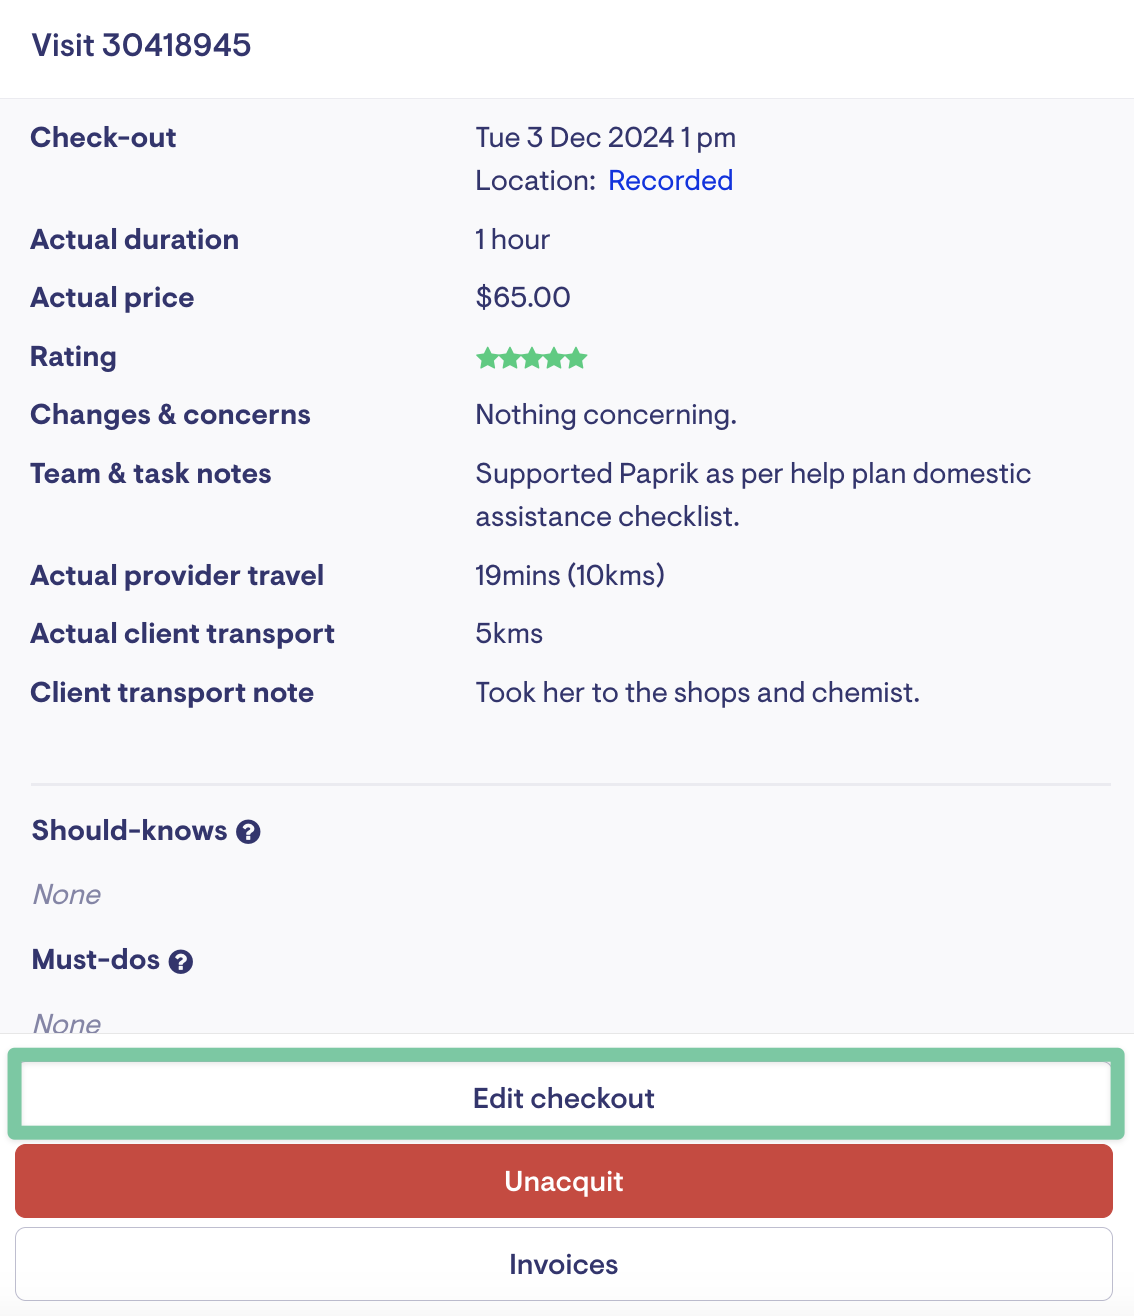
You can also edit check-outs from the Punchcards. Find the completed visit, and click the three dots on the right-most column.
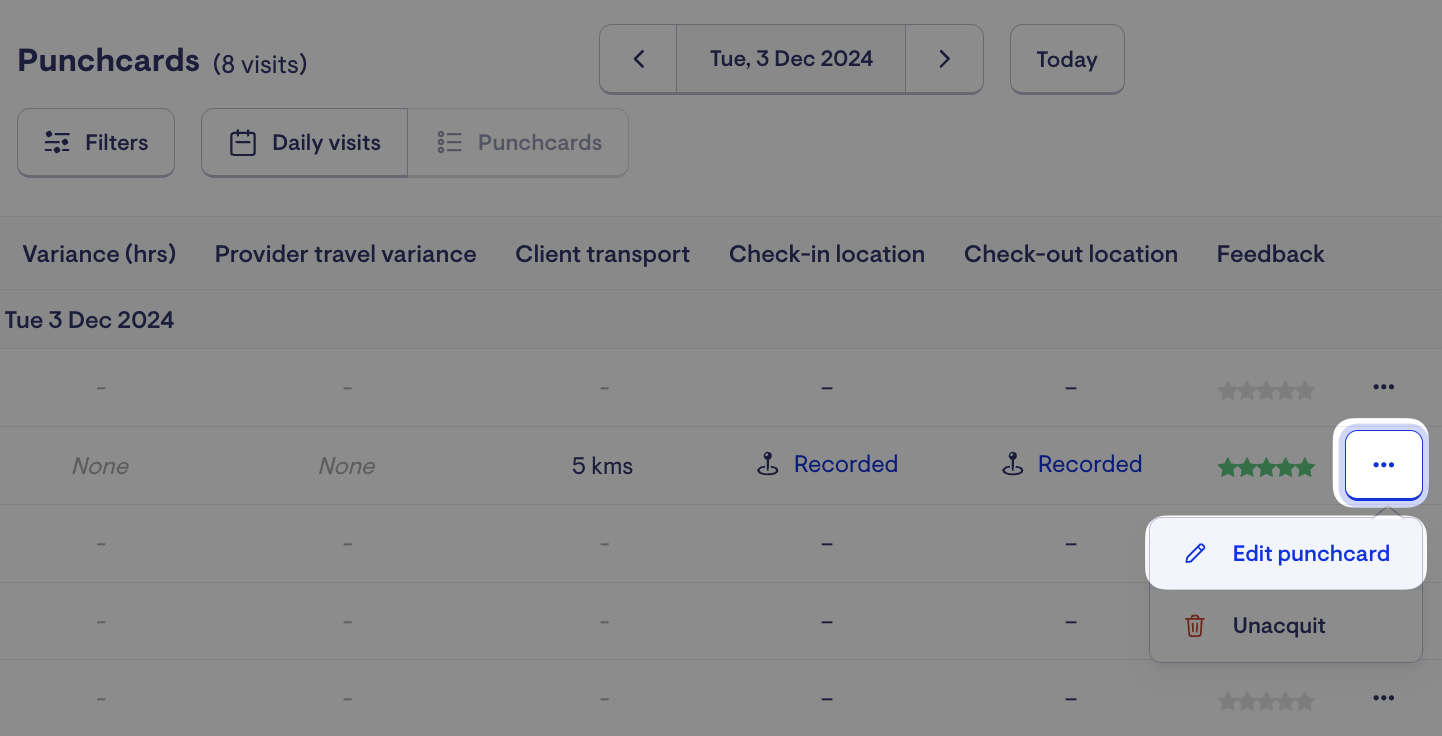
Once the Edit Punchcard page is open for the visit, scroll down to the Expenses section. Enter the relevant details and then select Save.
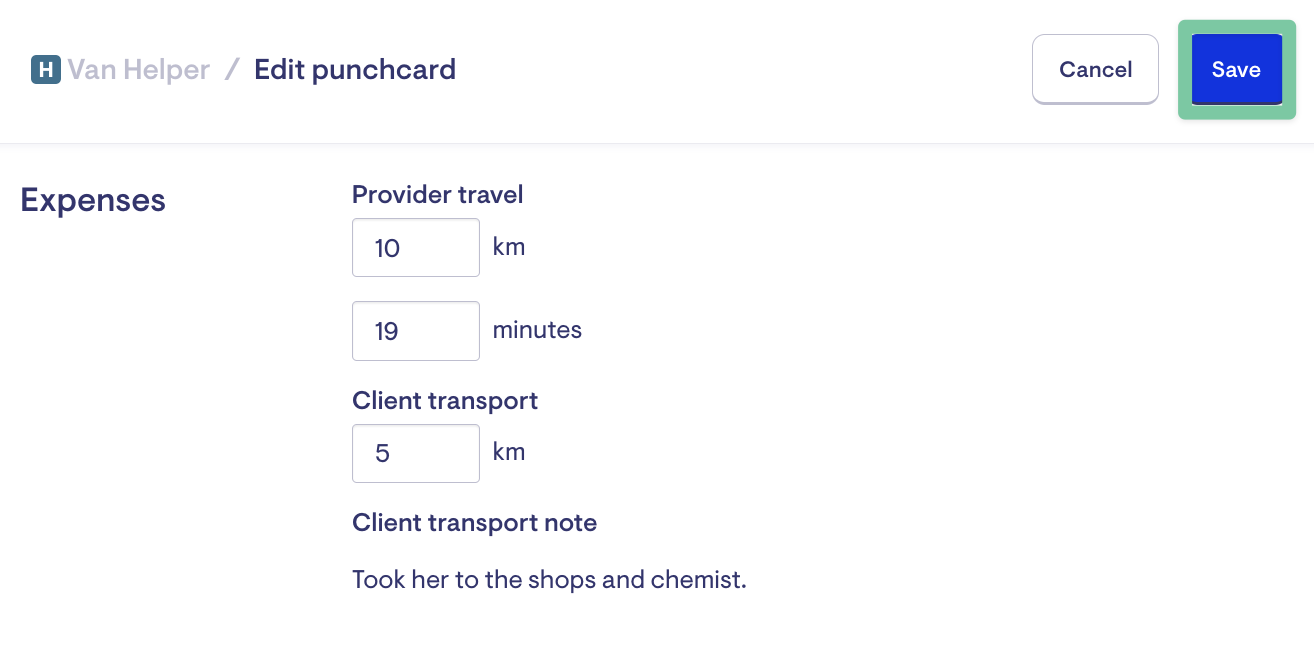
If you're updating travel information for a visit that has already been invoiced (published invoices), you must ensure that new invoices or credit notes are issued so that adjustments can be properly reflected in your records.

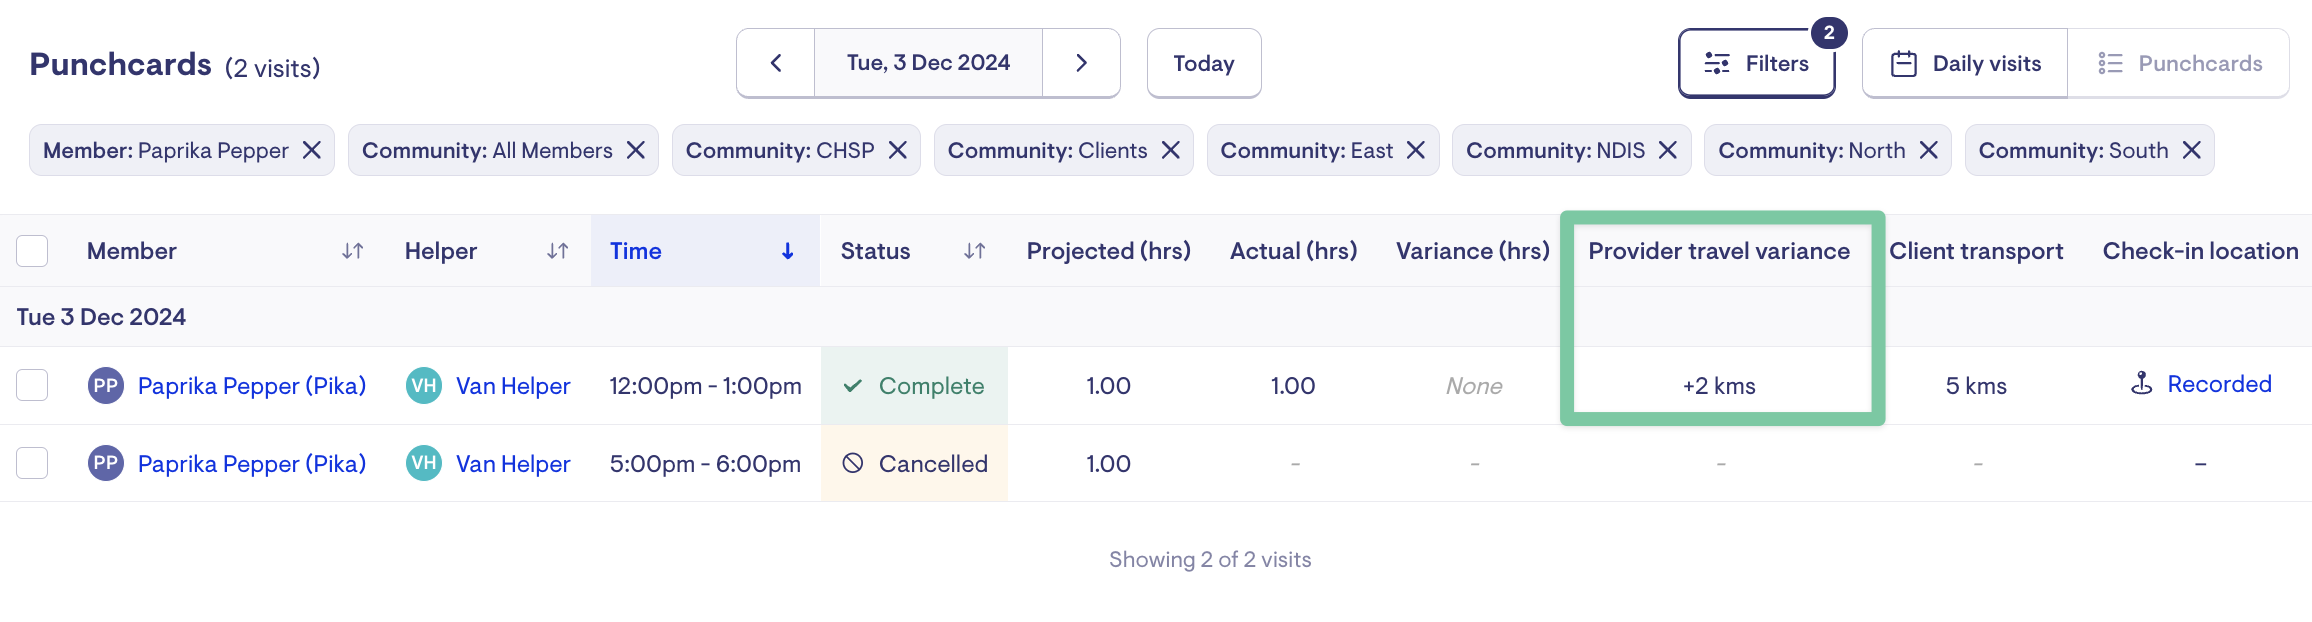
Comparing provider travel against expected values
If the helper edits the provider travel estimates at check-out, the variance will be recorded in Punchcards. Staffers can also update provider travel variance by visit punchcard .
Payroll reporting
Travel information will now appear on the Payroll report. To learn more about how to generate a payroll report, please refer to
Billing Runs, Invoicing, Reports & Adjustments
Invoicing for travel
If you have opted to bill clients for travel, checked-out visits with travel information from workers will be automatically invoiced when a billing run is started. To learn more about how billing runs work in Lookout, please refer to
Billing Runs, Invoicing, Reports & Adjustments
FAQs
What will appear on the payroll report if I have capped provider travel time and distance on a membership plan?
The caps set on the membership plan only impact what will be invoiced to clients. The full amount that the worker entered on check-out will be reflected on the payroll report.
Example:
A member is on a membership plan that caps provider travel time at 30 minutes per visit.
-
This means the member will only be invoiced for travel up to 30 minutes.
-
They will not be charged for any travel over 30 minutes.
-
On check-out, if a worker enters 50 minutes of provider travel time, the member will be invoiced for 30 minutes of provider travel time.
-
However, the payroll report will show the worker has 50 minutes of provider travel time.
My organisation doesn’t collect or charge provider travel. What do I do?
Lookout fully supports this use case. To ensure that your workers will not be asked for provider travel, under Provider travel rates in settings, deselect the toggles.
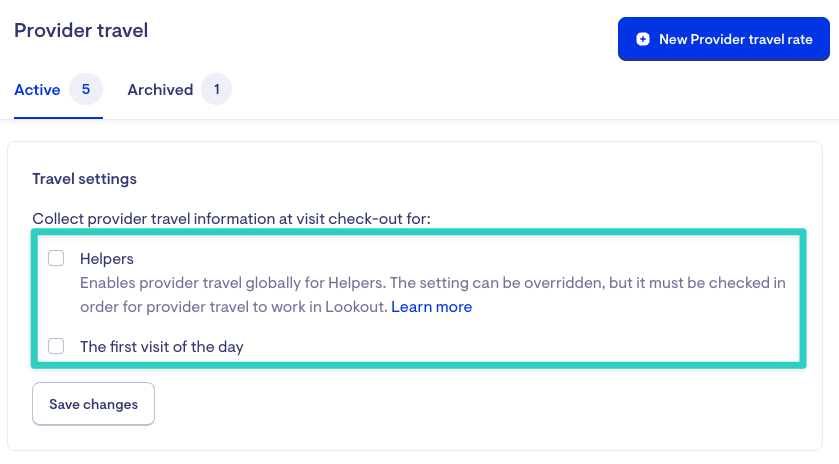
My organisation charges for provider travel on the first visit of the day. How do I make sure that we collect this information from workers?
Under Provider travel rates in settings, select both toggles.
How can I manage/oversee client transport?
To learn more about how to make adjustments before publishing invoices, please refer to:
Billing Runs, Invoicing, Reports & Adjustments
Once I add a new visit, will the estimated travel time and distance for subsequent visits on the worker’s roster automatically update?
No, the estimated and rostered travel time and distance showing up on the helper's roster will need to be manually updated if there are any changes in their travel that you wish to be reflected on the admin app.
However, you can enable our Update Travel early access feature if you have drag and drop enabled.

If you allow provider travel recalculation at check-out, the updated values will not appear on the roster until after the visit is completed unless you manually edit/refresh the estimates.
Does the travel estimate Lookout consider include the usual traffic conditions during the visit?
Lookout estimates do not include traffic conditions when rostering a new visit as it is too far in the future. However, traffic information is applied when the estimate is recalculated at checkout and when filling out vacant visits scheduled for the day.
Can I add Travel and Transport rates for vacant visits?
No, these rates can only be selected when the visit is assigned to a helper.
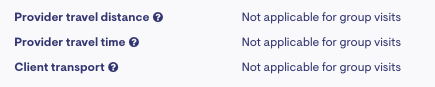
Can I collect provider travel information for group visits?
Yes, if provider travel collection is enabled in your platform, it will also apply to helpers when they check out of group visits. Provider travel information will be pre-filled based on Google estimates at check-out and collected solely for payroll purposes. Provider travel charges cannot be applied to members attending the group visit.
You can also enable provider travel for helpers on the roster, just as you would for standard visits.
Can I collect client transport information for group visits?
No. Group visits do not support client transport services.
What happens to provider travel and client transport values when a visit is unacquitted?
When a completed visit is unacquitted, the previously recorded provider travel and client transport values are reset.
-
Once the visit is acquitted or marked complete again, provider travel is recalculated, and client transport kilometres default to 0. Any helper checkout and client transport notes will be restored.
-
This behaviour applies regardless of whether the provider travel preference is set to rostered or estimated (which determines if recalculation is allowed or not during helper checkout).
To minimise inconsistencies, we recommend noting the original values before unacquitting a visit and manually re-entering them in the punchcard when completing the visit through the admin app.

What happens to provider travel and client transport if a visit is completed by staffer?
When a scheduled visit is marked complete or acquitted by a staff member:
-
Provider travel is always recalculated based on the helper’s last recorded location.
-
Client transport kilometres must be manually entered by the staff member under the Punchcard > Expenses section, if applicable.
-
Checkout notes and client transport notes cannot be entered by staff members and will default to "None."
I cannot collect provider travel or client transport for a visit. How do I fix this?
If you cannot collect provider travel or client transport information for a specific visit, you can use the visit detail window to help you troubleshoot.
For more details, refer to this guide:
Troubleshoot provider travel and client transport settings