This guide is for customers currently onboarding to Lookout.
Lookout uses a combination of templated spreadsheets and a service called Flatfile to help validate client, worker and staffer data is in the correct format.
* Please read through this guide in full before begining to prepare data. If at any stage you have additional questions or require further support, please don't hesitate to contact your Onboarding Specialist.
Jump to
Please reference the below tables for information on the user and admin roles applicable to your clients, workers and staffers when completing the templates.
User Roles:
|
Role |
Description |
|
Client |
The care recipient. |
|
Authorised Representative |
The person you wish to provide the same level of authority as the client. This includes access to the app. |
|
Emergency Contact |
The person you wish to identify as the emergency contact for the care recipient |
|
Billing Contact |
The person/s you wish to have email invoice summaries and monthly statements sent to. |
|
Funder |
The person/s or entity you will seek to provide the payment of the provided services. |
|
Sharer |
Additional users who you wish to grant access to the app for. Their view is limited to the schedule only. |
Admin Roles:
These roles enable this staff member to configure/administer components of the system related to these business functions.
|
Role |
Description |
|
Finance |
Allows user to create billing runs, set taxes, products and run financial reporting. |
|
Human Resources |
Allows the user to add a Staffer and Staffer roles. |
|
Legal |
Allows the user to create new agreement templates for memberships, services and care workers. |
|
Marketplace |
Allows the user to onboard new suppliers. |
|
Workflow Management |
Allows user to manage ticketing workflows, surveys, and cohorts. |
|
Workforce |
Allows the user to onboard new care workers, adjust pricing for care workers and manage verifications and requisites. |
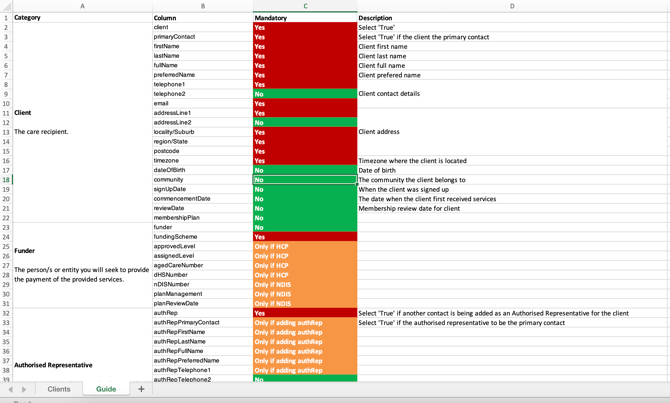
We have created templates for each type of data that can be migrated across to Lookout.
Download a copy of each template.
Open each template file and begin to populate with your existing data.
Each template has colour coded coloumn headers that represent if the field is mandatory or optional.
-
Red = Mandatory
-
Green = Optional
The 'Guide' sheet of each template will provide additional details on the fields and how to populate.
Fields with predefined responses show a dropdown:
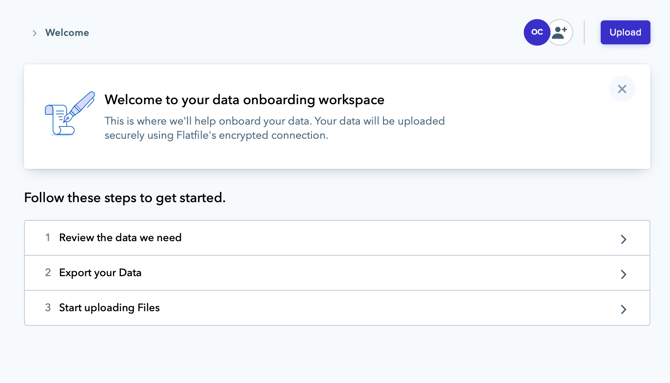
When you are ready to upload the completed templates, click the 'Upload files' button below and sign into your Flatfile account.
* Please contact your Onboarding Specialist if you have not recevied an invitiation to Flatfile.
Flatfile will show a 'Welcome Dashboard' with instructions on uploading and reviewing the templates.
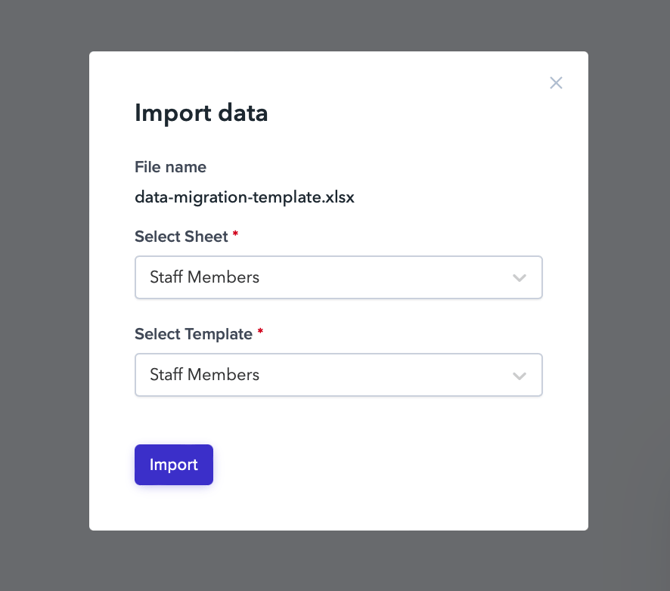
Click Upload in the top left and select the completed template file to be loaded.
Once the file has uploaded completely, click the folder icon that appears in the bottom right.

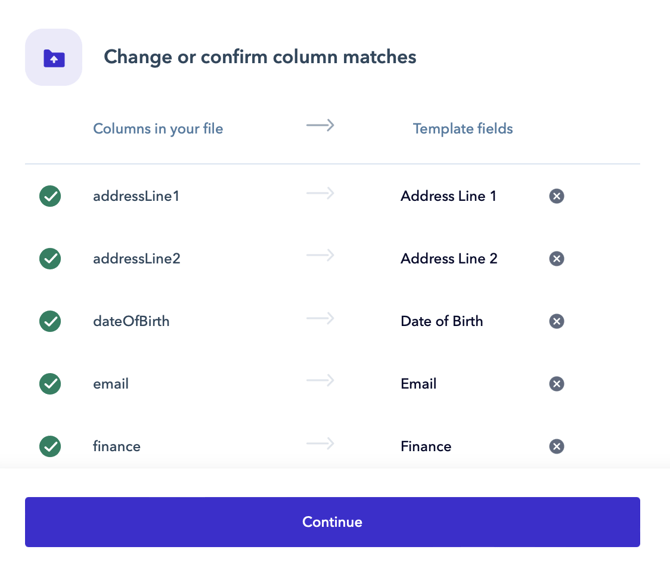
A pop up will appear to complete the import process. Select the sheet you want to import and the corrosponding template. The Sheet and Template names should match.
Select Yes to confirm that the first row contains column headers.
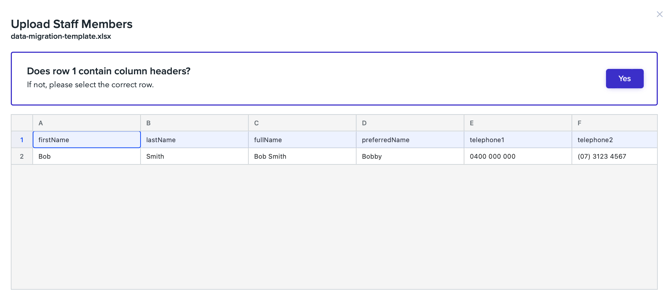
Confirm all column names have a green tick and then click Continue.
Your data will be checked against the required fields and formating required by Lookout. Any errors will be highlighted with an explanation.
Errors will typically be caused by:
-
Missing data in mandatory fields
-
Invalid formating
Errors can be corrected by double clicking into the field and amending the data manually or by uploading a new file with updated values.
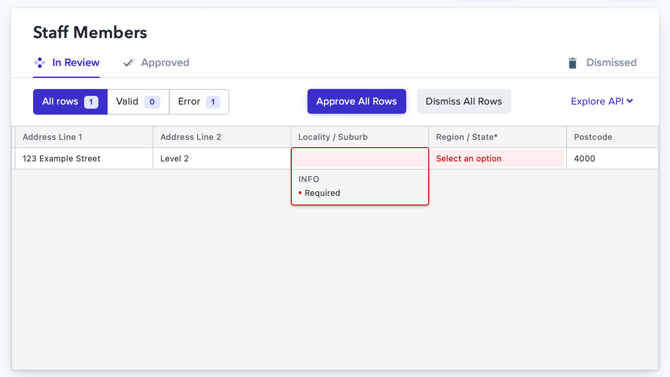
Once all errors have been corrected, click Approve All Rows. This will complete the data upload process for the file and notify Lookout.
Repeat the process for the remaining templates.
A member of the Lookout team will review the uploaded files and begin the process of importing the data into Lookout.