Welcome to Lookout!
Please dip into the range of articles provided to support you in using Lookout. The below guide is designed as a quick-reference overview of the Rostering functionality of Lookout in Administration view.
Roster Views
There are four pathways to view a roster:
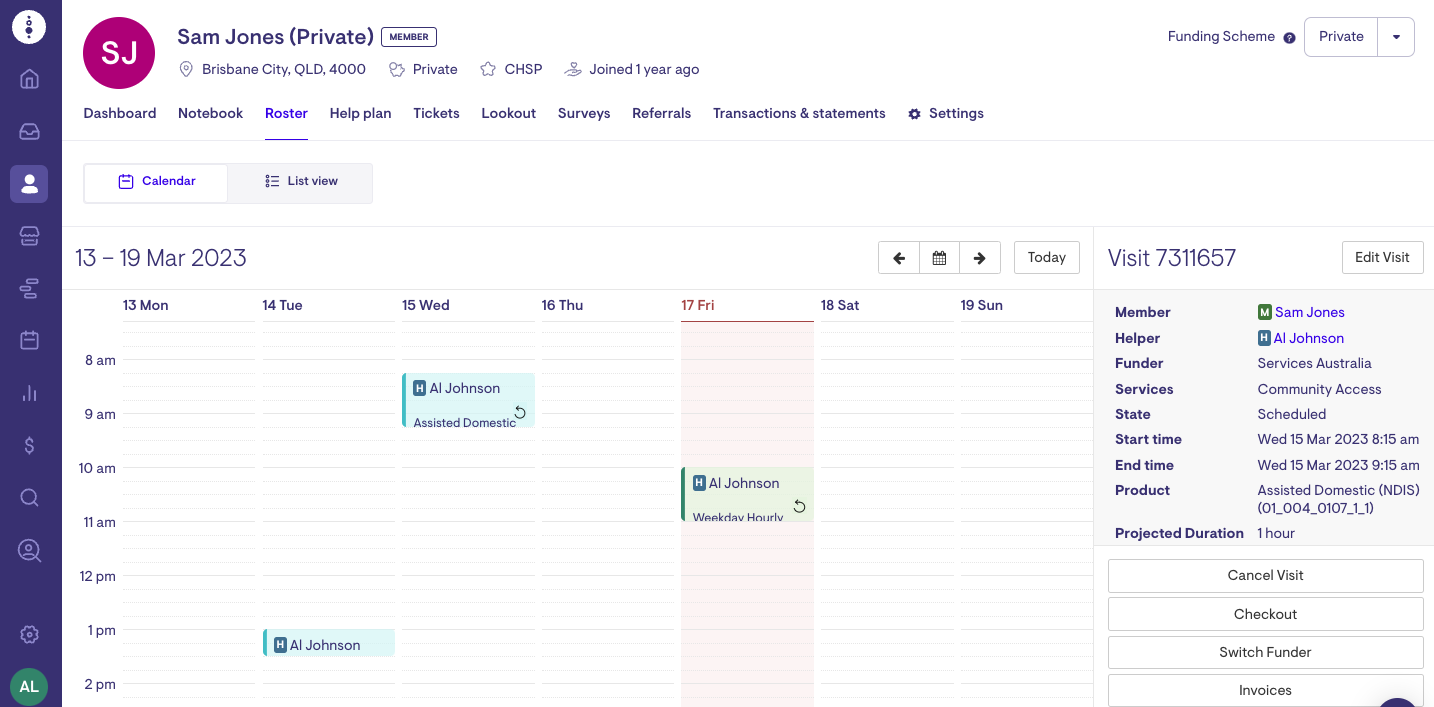
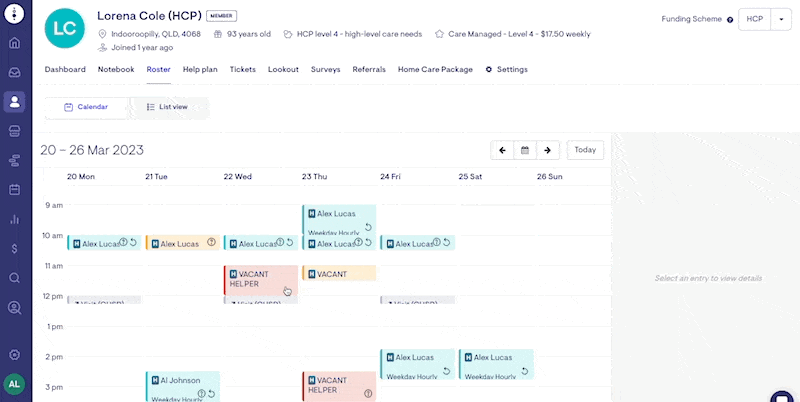
Client Roster
Will enable you to view all visits in a week scheduled for a particular client.
-
If the client has more than one Membership to support multiple funding schemes, the visit from the alternate Membership will also appear in the roster. See Managing multiple funding schemes to learn more.
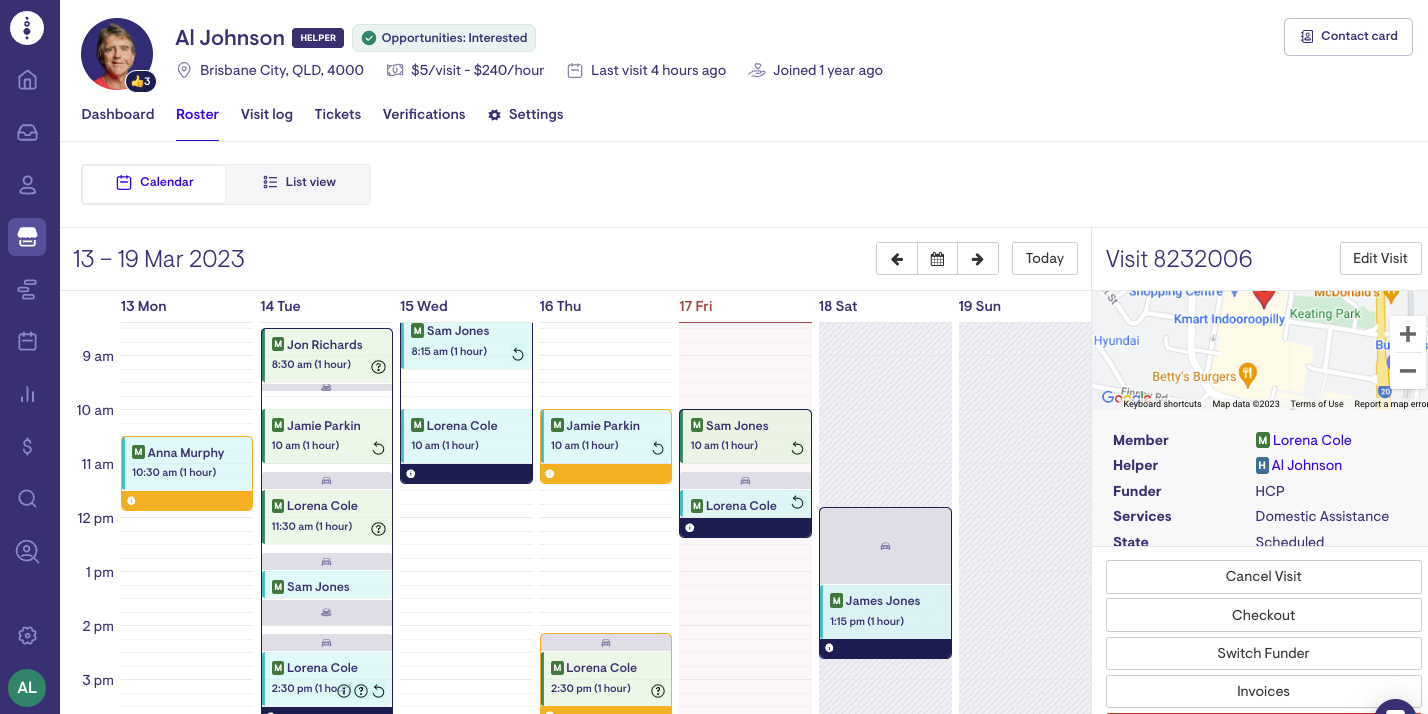
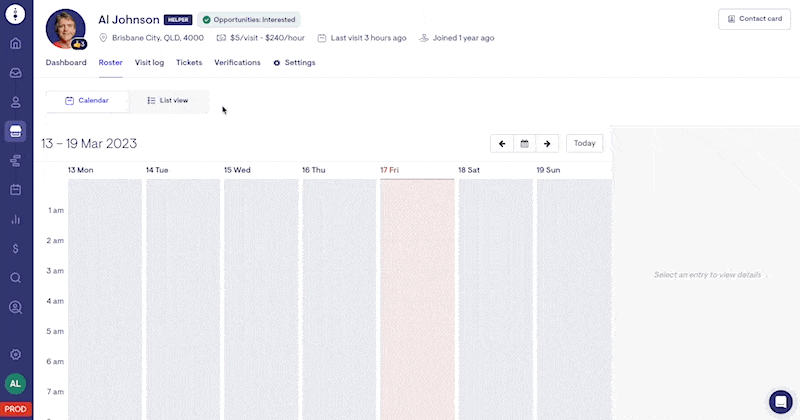
Care Worker Roster
Will enable you to view all visits in a week scheduled for a particular carer.
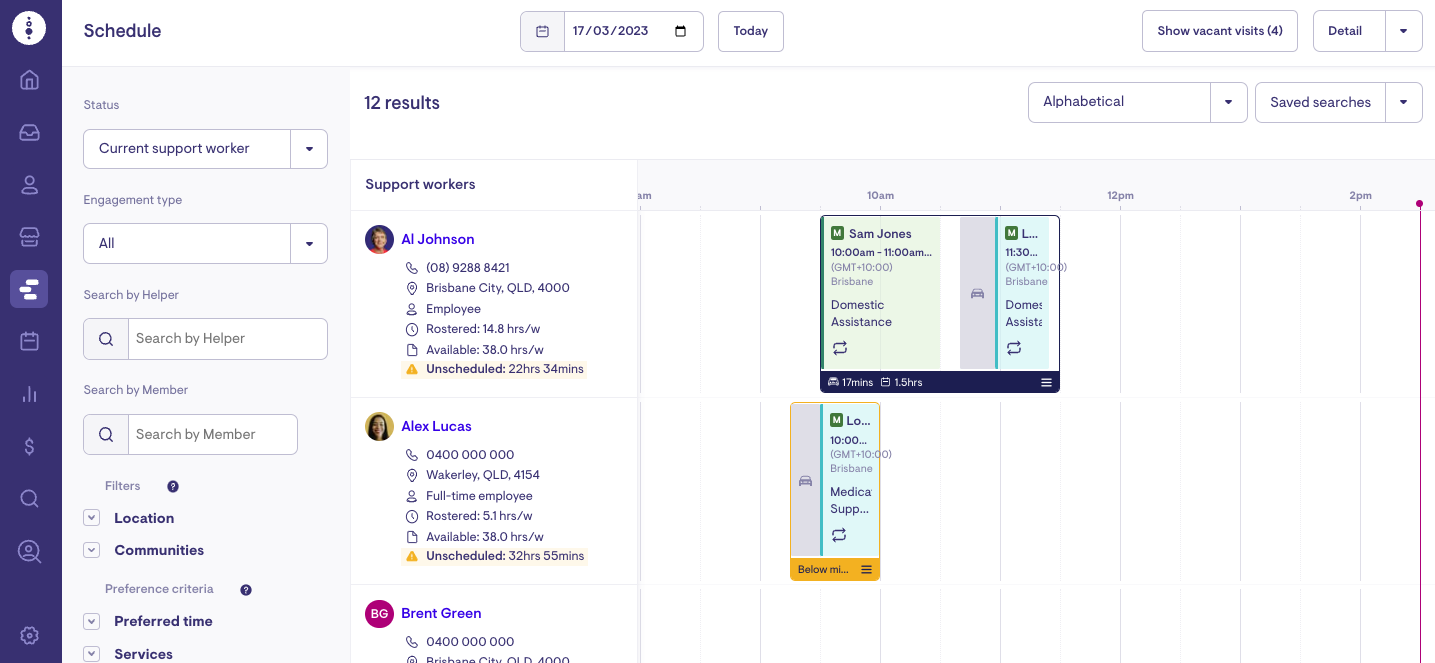
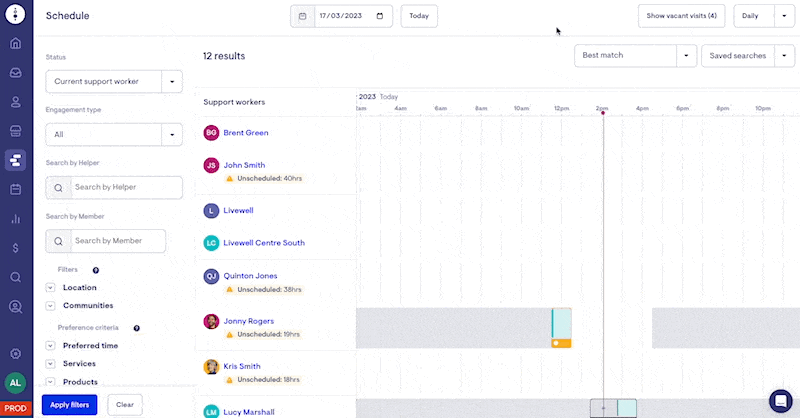
Schedule View
Provides a Daily, Detailed (daily) or Weekly view of Care Worker availability and visits. This view can be sorted by alphabetically, shift availability, distance (nearest first), best match as well as filtered by location, communities, services and more.
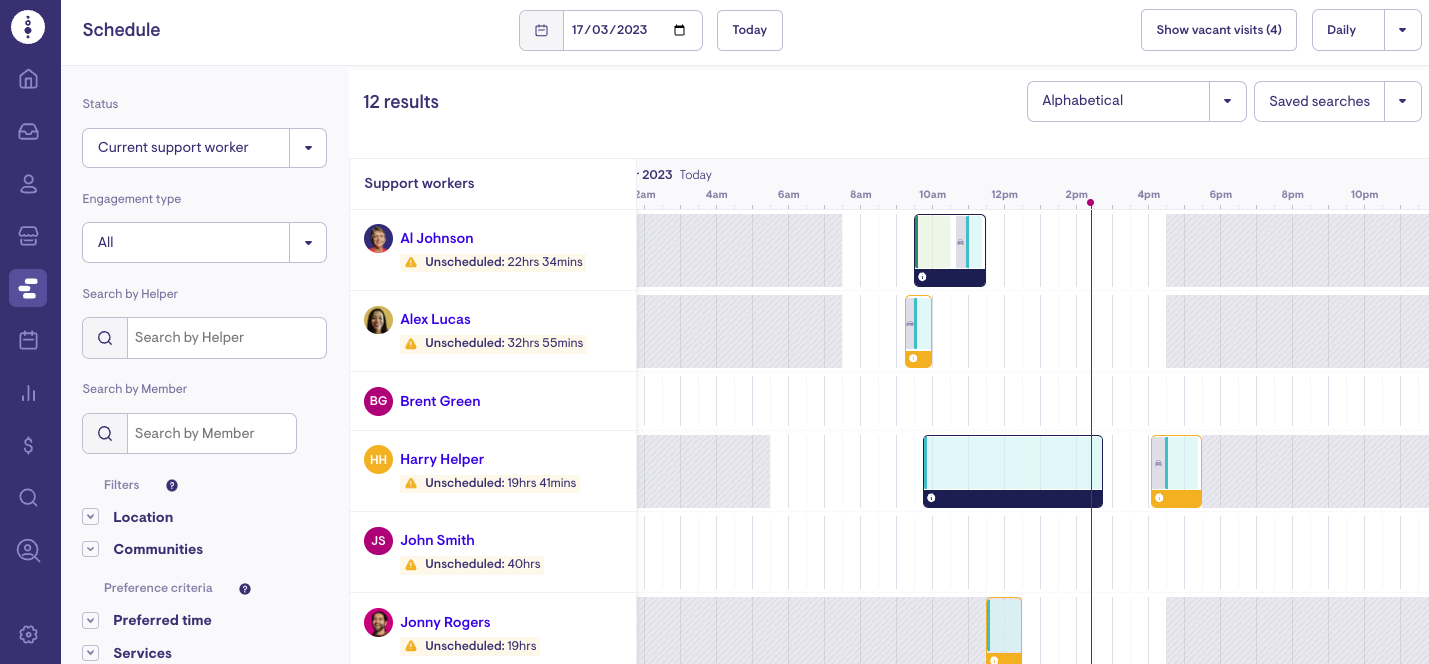
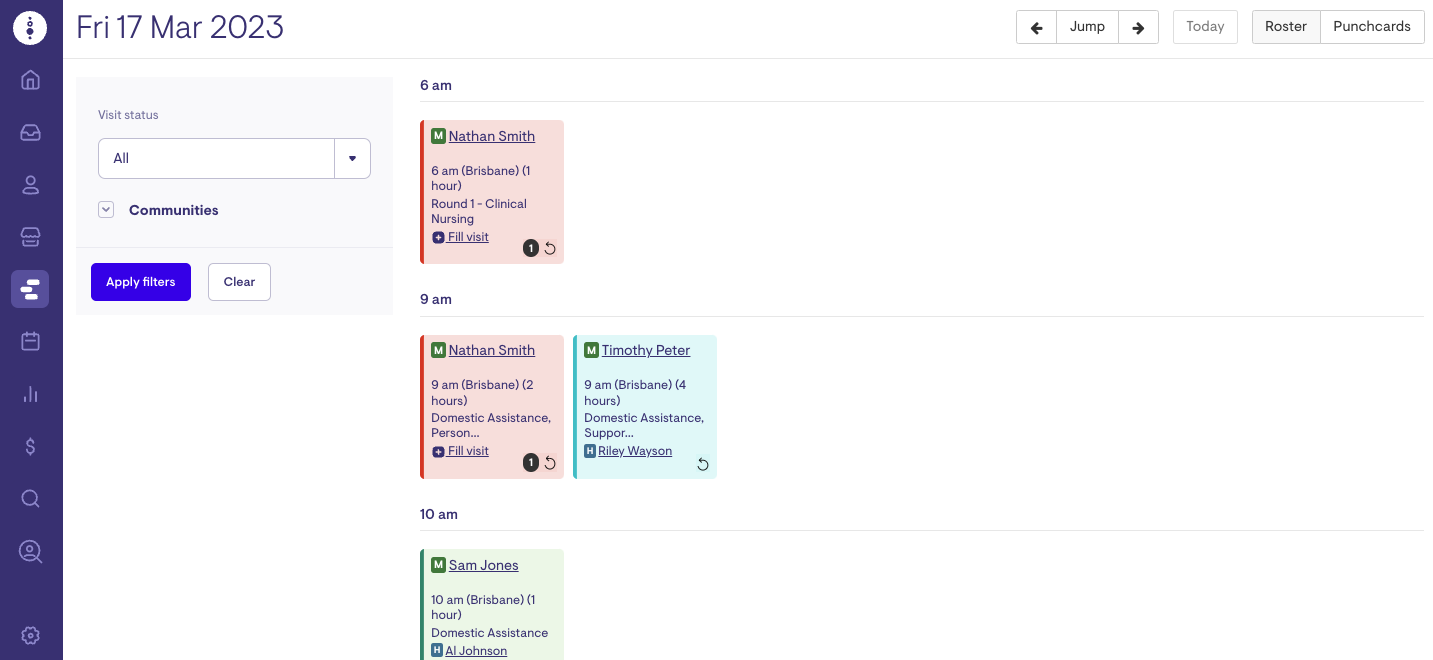
Daily View
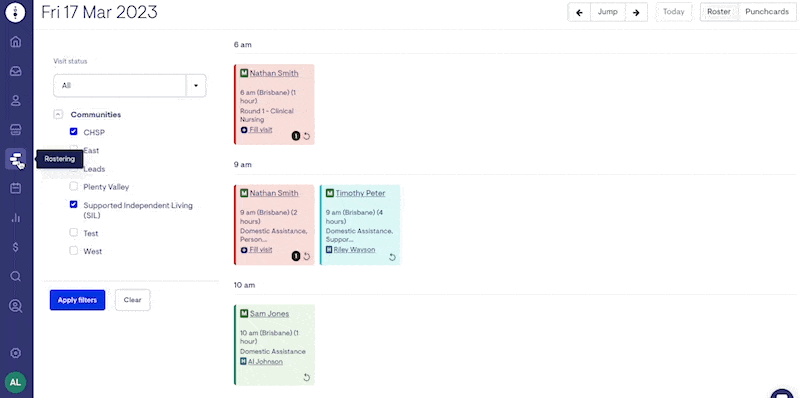
Provides a day-by-day overview of all scheduled visits. This view may also be filtered by communities.
Understanding the Roster View
When viewing a roster, either in a Client Profile or Care Worker Profile, there are a number of considerations including:
Visit Colour Codes:
 |
Scheduled |
 |
In Progress (visit has been checked in) |
 |
Visit on a second Membership (see Managing multiple funding schemes) |
 |
Completed (Visit has been checked out of) |
 |
Vacant |
 |
Cancelled |
Roster View Options:
-
Calendar View – Enables you to view all scheduled visits in a week.
-
List View – Enables you to view all visits scheduled for Client or Care Worker, allows you to filter on a number of variables (day, date, time, visit type and care worker), allows you to bulk edit visits and view the schedule rule (recurring or exceptional visits).
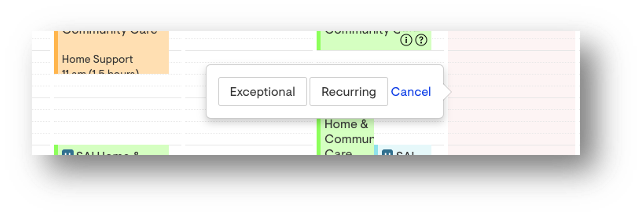
Visit Schedule Options:
-
Exceptional = One-off visit
-
Recurring = Recurring visits determined by rule set (e.g. Every Tuesday at 10am)
Scheduling a New Visit
-
Navigate to the Client Profile
-
Click to create new Recurring Visit or Exceptional Visit from right-hand column
OR
-
Navigate to Client Profile Roster, Helper Profile Roster or Scheduling view
-
Double Click on time of week you would like to create new visit
-
Choose if visit is Exceptional or Recurring

Exceptional Visit:
-
Choose Client (Member)
-
Choose Care Worker (Helper):
-
Clicking on the empty search bar will bring up the list of care workers that have had previous visits with the member
-
Typing in the search bar will bring up all care workers in your organisation that match the search query
-
Create vacancy will mark the visit as vacant
-
Selecting check the schedule view, will take you to a view of the schedule for all care workers
-
Selecting try a filtered search with take you to Marketplace
-
-
Select which services are to be delivered for visit
-
Select relevant product for visit to be charged correctly
-
Select Start Date and Time
-
Select End Date and Time
-
Click Save
If Visit was scheduled as VACANT, please refer to steps below to fill Vacant Visit
Recurring Visit:
-
Choose Client (Member)
-
Choose Care Worker (Helper):
-
Clicking on the empty search bar will bring up the list of care workers that have had previous visits with the member
-
Typing in the search bar will bring up all care workers in your organisation that match the search query
-
Create vacancy will mark the visit as vacant
-
Selecting check the schedule view, will take you to a view of the schedule for all care workers
-
Selecting try a filtered search with take you to Marketplace
-
-
Select which services are to be delivered for visit
-
Select relevant product for visit to be charged correctly
-
Select Start Time
-
Select End Time
-
Select Days of Week visit is to be scheduled
-
Select how often to repeat (Every week, 2 weeks, 3 weeks, 4 weeks)
-
Select when to commence the schedule
-
Select when to end the schedule
-
Click Save
If Visit was scheduled as VACANT, please refer to steps below to fill Vacant Visit
Additional Visit Configuration Items:
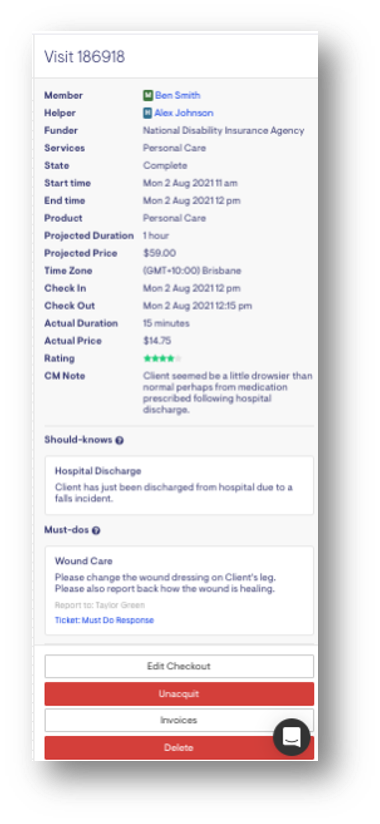
Upon completion of scheduling a visit, you have the opportunity to now review what you’ve configured for that visit as well as add some additional configuration items to the visit including:
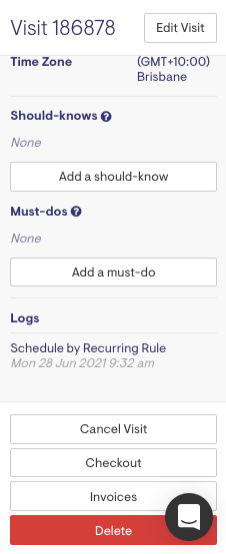
Should Know
A Should Know is a way to communicate important information to a care worker regarding that specific visit. An example might be “Mary was discharged from hospital on the weekend” or “It’s Mary’s Birthday today, wish her happy birthday!”. When scheduling a Should Know, the care worker is not required to acknowledge the message and therefore you shouldn’t use this option to request tasks to be completed.
To schedule a Should Know:
-
Click into newly scheduled visit from Roster View.
-
Refer to visit details panel on right-hand side of screen
-
Click ‘Add a Should Know’
-
Enter Title and Description
-
Click Save
Must Do
A Must Do is a way to request that a care worker completes a specific task as part of that specific visit. An example might be “Please change wound dressing and report how the wound is healing”.
When scheduling a Must Do, the care worker is required to acknowledge the message and provide a report back via the check-out process to notify the Care Team of the progress made pertaining to that task.
To schedule a Must Do:
-
Click into newly scheduled visit from Roster View.
-
Refer to visit details panel on right-hand side of screen
-
Click ‘Add a Must Do’
-
Enter Title and Description
-
Select who should be notified of the Must Do Response
-
Click Save
Please remember:
-
Must-Dos at the Visit Level: When a must-do is included as part of a specific visit, a ticket will automatically be created to log the free-text note entered during the helper’s check-out process.
-
Must-Dos at the Service Level: Must-dos added at the service level are treated as automatic must-dos. They do not generate must-do tickets; instead, they appear as part of the helper’s check-out note, where the helper is prompted to confirm whether each task was completed. If the helper selects “Not done,” an uninvestigated Observation is created.
If the helper selects “Done,” an Observation may be generated automatically based on the response content and the remote care monitoring algorithm (otherwise, no further action is taken).
Cancelling or Rescheduling a Visit
To cancel or reschedule a visit:
-
Click into scheduled visit from Roster View.
-
Refer to visit details panel on right-hand side of screen
-
Click ‘Edit Visit’ at top right to edit or scroll to bottom and click ‘Cancel Visit’ to cancel visit.
-
If Cancelling, you will be prompted for a reason.
-
If Editing, you will be shown options to reschedule the visit for another date, time or care worker.
-
Click Save
To cancel or edit visits in bulk:
If a care worker is sick or on leave, you can quickly update their visits to vacant by using the bulk edit option. You can also cancel visits in bulk
-
Click the List view option on the care worker's roster
-
Tick the applicable visits
-
Click Bulk Edit or Bulk Cancel on the top right-hand side
-
Tick the Helper and search for the Vacant Helper option (or edit another field) OR if you're cancelling the visits, select the reason for the cancellations.
-
Click Save
Filling a Vacant Visit
When you have a vacant visit, there are a number of ways to fill the vacant visit. The most common way is to fill visits using the Schedule view.
Schedule view
-
Click on Show Vacant Visits.
-
Select a Vacant visit
-
Find for the applicable Care Worker and then select Fill
-
Save the visit
Client's Roster
-
Select the visit on the roster
-
Select Fill visit, which will take you to the Scheduling view
-
Use the search options to find the most suitable Care Worker and select Fill
-
Save the visit
Daily View
-
Navigate to the applicable day
-
Filter by Vacant Visit (if required)
-
Select Fill visit, which will take you to the Scheduling view
-
Use the search options to find the most suitable Care Worker and select Fill
-
Save the visit
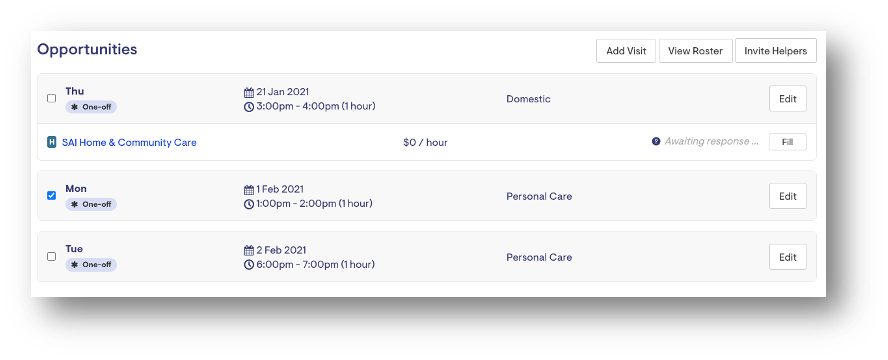
The alternative option to fill a vacant visit is to utilise the ‘Broadcast Opportunity’ feature. This feature is best used when you don’t know the exact availability of possible care workers (e.g. the visit is over the weekend or you need to utilise casual workers). This feature is only available when a ticket has been created. To fill a vacant visit via this option, follow the steps below:
Create Ticket for Vacant Visit
-
Click into Tickets menu item from left-hand side of screen
-
Click on ‘New Ticket’
-
Choose Ticket Template = Extra Visit Roster Request for example
-
Choose Client (Member)
-
Click Save
-
Next choose who to assign the ticket to. If you’re a Rostering staff member and you will be the one completing the task, assign yourself.
-
Select if a high priority
-
Enter Due Date
-
Click Save
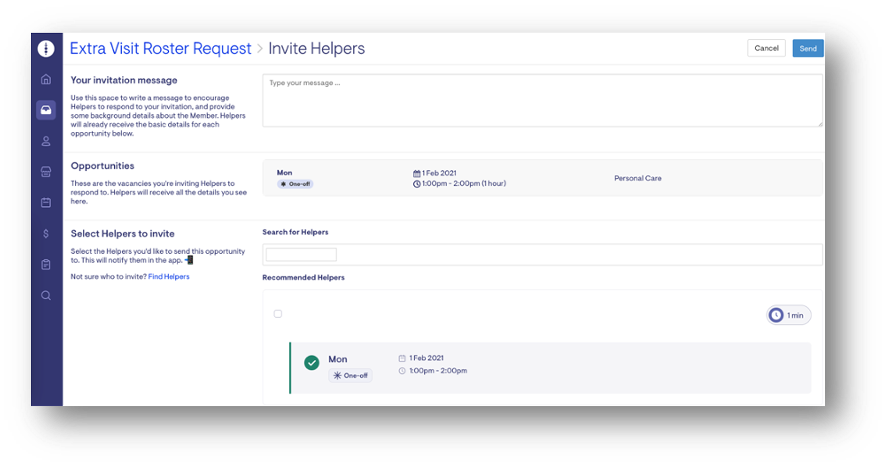
Now you have created the ticket, you have the ability to select the vacant visits you wish to broadcast out to care workers. To do so,
-
Click the checkbox/s for the visits you wish to broadcast
-
Click ‘Invite Helpers’
-
Enter the message you would like to send with the broadcast
-
Search for who you wish to invite or refer to ‘Recommended Helpers’ which are those the system has identified as possible options.
-
Click Send
Once you’ve sent the broadcast out, the Care Workers you’ve invited will be notified via their app. They will then have the opportunity to respond Yes or No and leave a message with their response.
You may review any incoming responses by visiting the ticket again where it will display their response. Once you’ve decided who you wish to fill the visit, simply click ‘Fill’ and the system will schedule the visit with this particular care worker.
Editing a Visit Post Check-In / Out
If you ever need to edit or cancel a visit after it has been checked-in or out of, you will firstly need to ‘un-acquit’ the visit first and then edit accordingly.
Glossary of Terms
Helpers (Care Workers)
Helpers are the term used by the Lookout platform to describe Care Workers.
Members
Members is the term used by the Lookout platform to describe your clients.