Purchase Orders and Third Party Invoices
How to create and manage purchase orders for your members
Purchase orders help manage and track purchases of goods and services for care recipients, such as one-off equipment orders or recurring weekly meals and allied health appointments from third-party providers.
In Lookout, Purchase Orders are created as tickets and the billing run looks at the issued date on them. This means for example, if you match purchase orders at the start of July, giving them an issued date within June, they would be included in the June run.
This does not affect the service delivery dates for invoices published within an open claim.
Create a Purchase Order
A purchase order can be created for suppliers and clinicians to order goods or services. To create a purchase order first you need to create a Third Party Order ticket:
-
Navigating to Tickets > New
-
Select the relevant Purchase Order ticket template
-
Select the Member that the Order is for
-
Click Save.
-
On the next screen, adjust the title of the ticket, who it's assigned to, and add the details of the order in the description.
-
Click Save.
Once you have created your ticket you can scroll to the Purchase Order section of the ticket and create your purchase order:
-
Click on New Purchase Order.
-
Select the Third Party and add in the delivery address and any delivery instructions.
-
Click Save.
-
Scroll to the purchase order section and add in any line items.
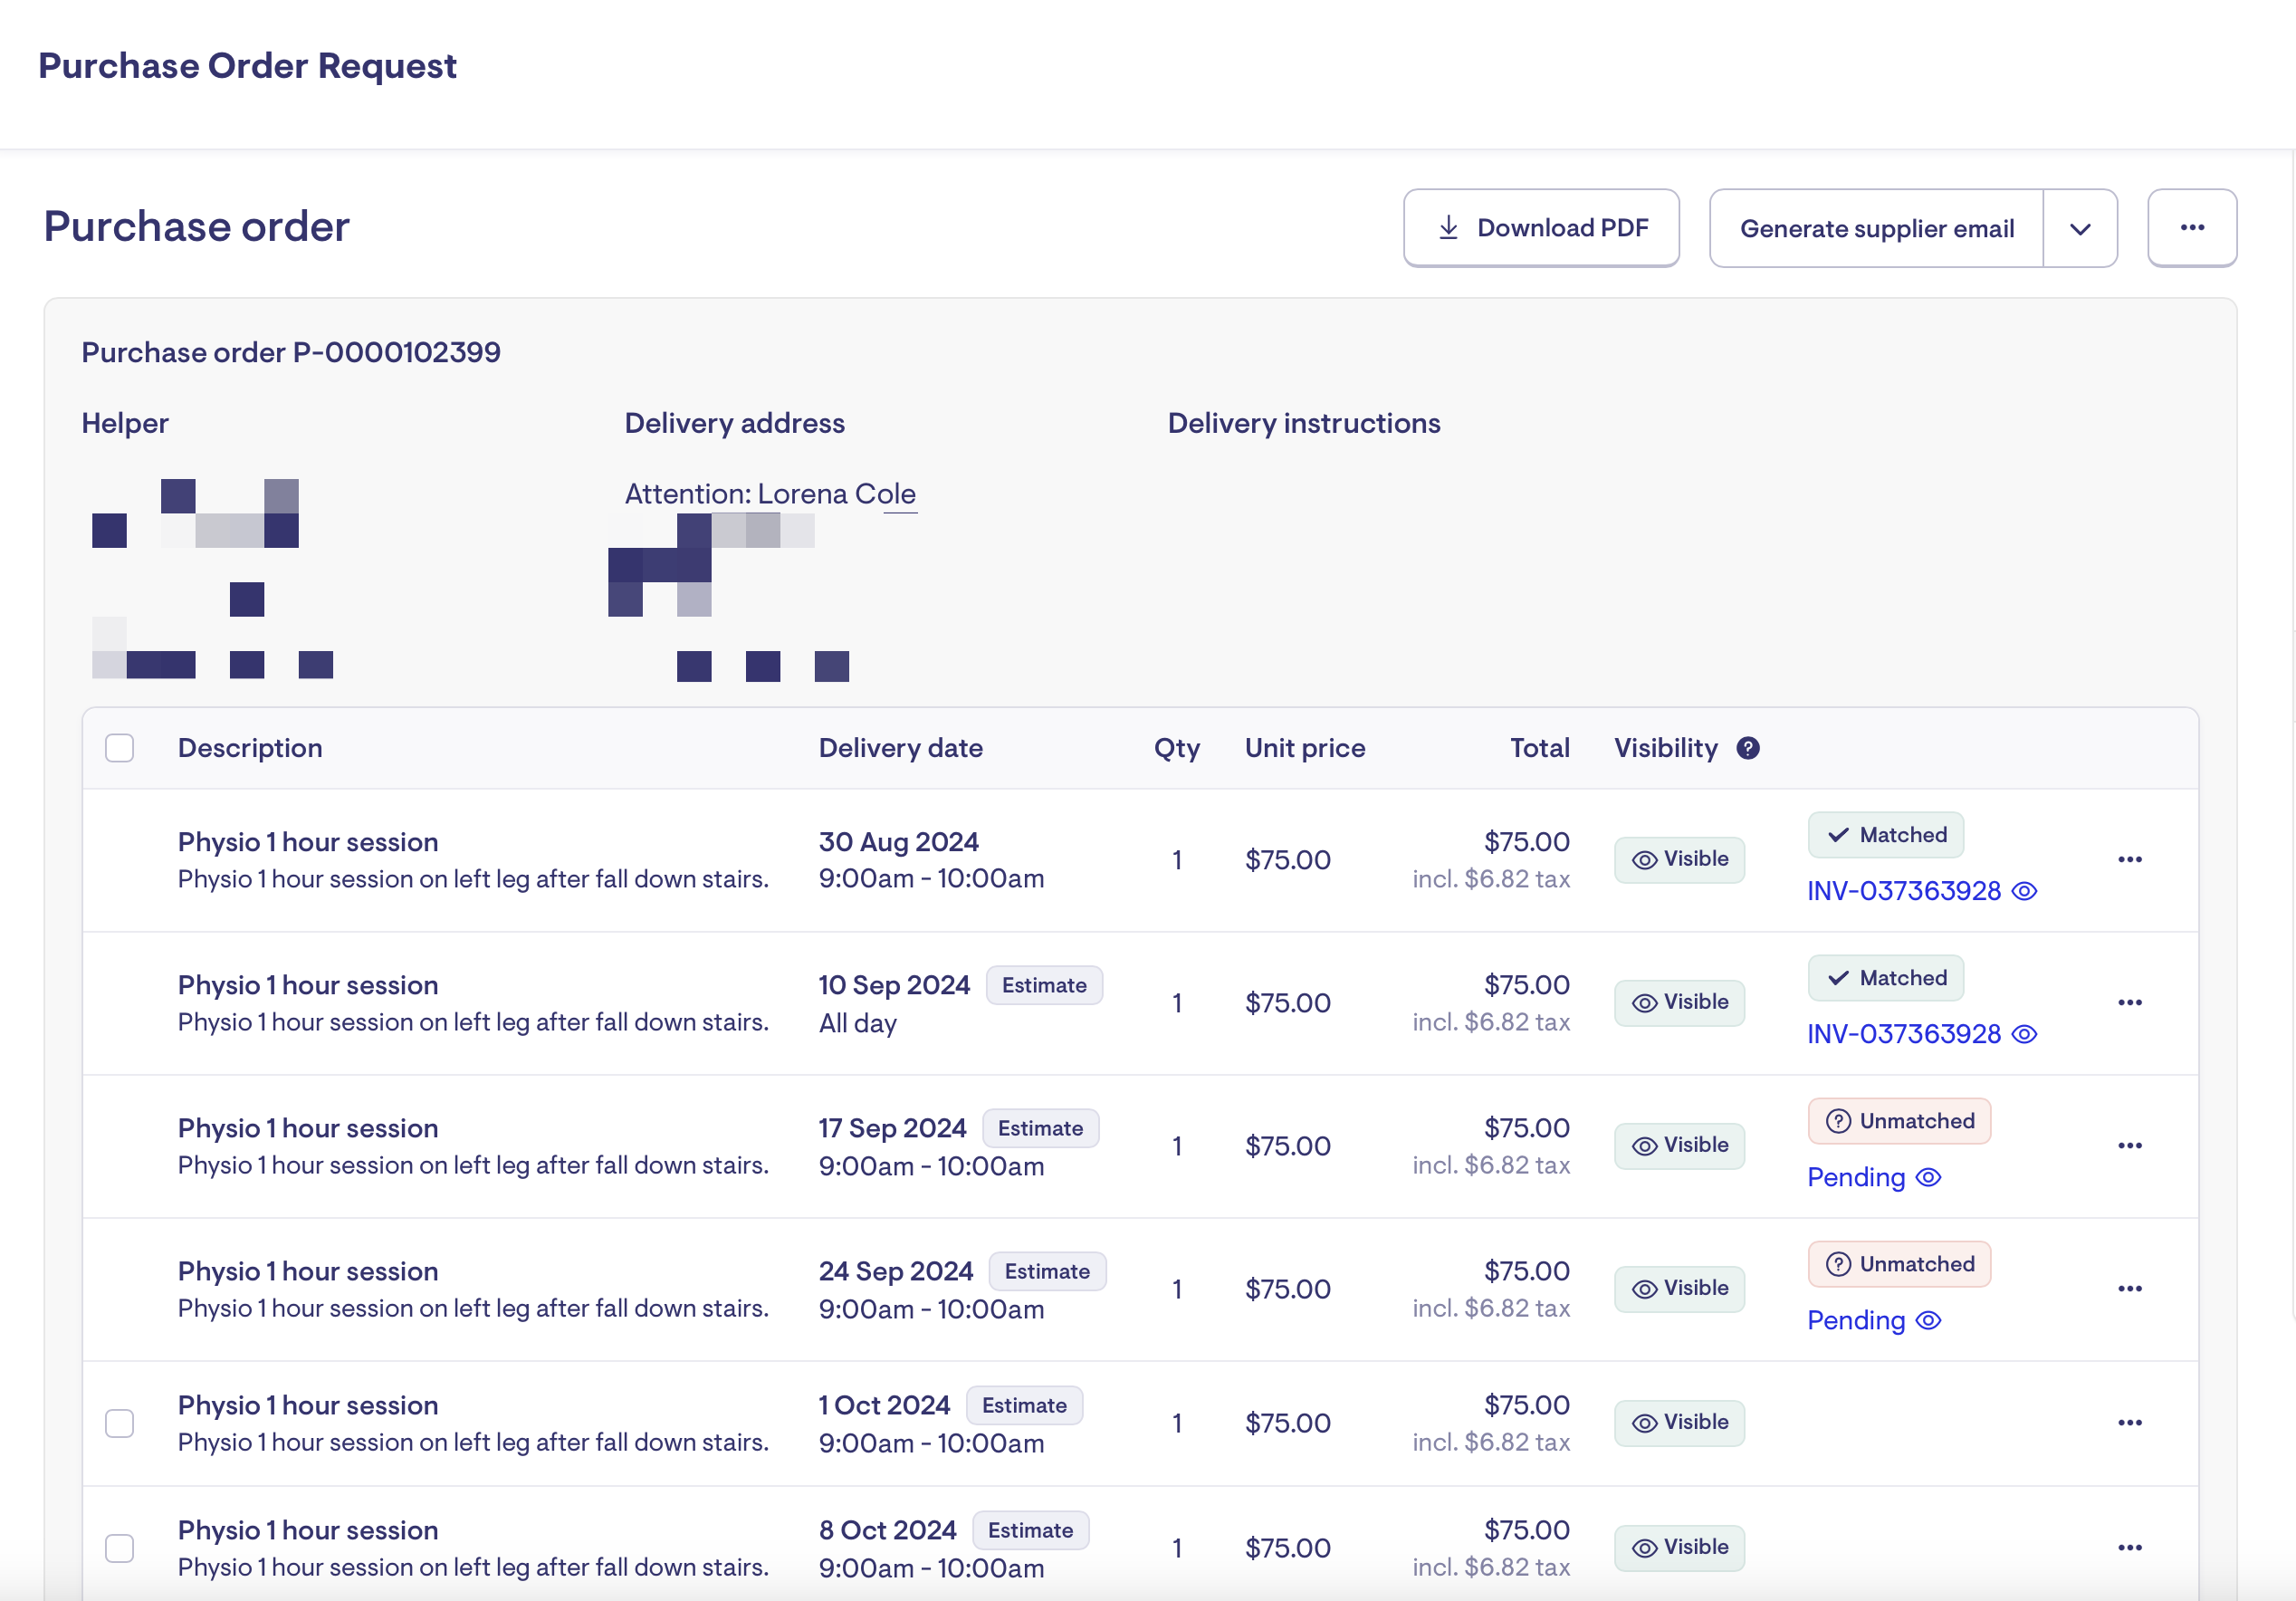
Generating a Purchase Order PDF to Send to Third Parties
Once you are happy with your purchase order, you can generate a PDF to send to the third-party and place the order.
-
Navigate to the ticket with the purchase order
-
Scroll to the Purchase Order section and click Generate PDF. The pdf will download to your computer.
Making a Purchase Order Visible on the Roster
Purchase order line items can be made visible in a member's roster and displayed within the Member's care app for improved visibility.
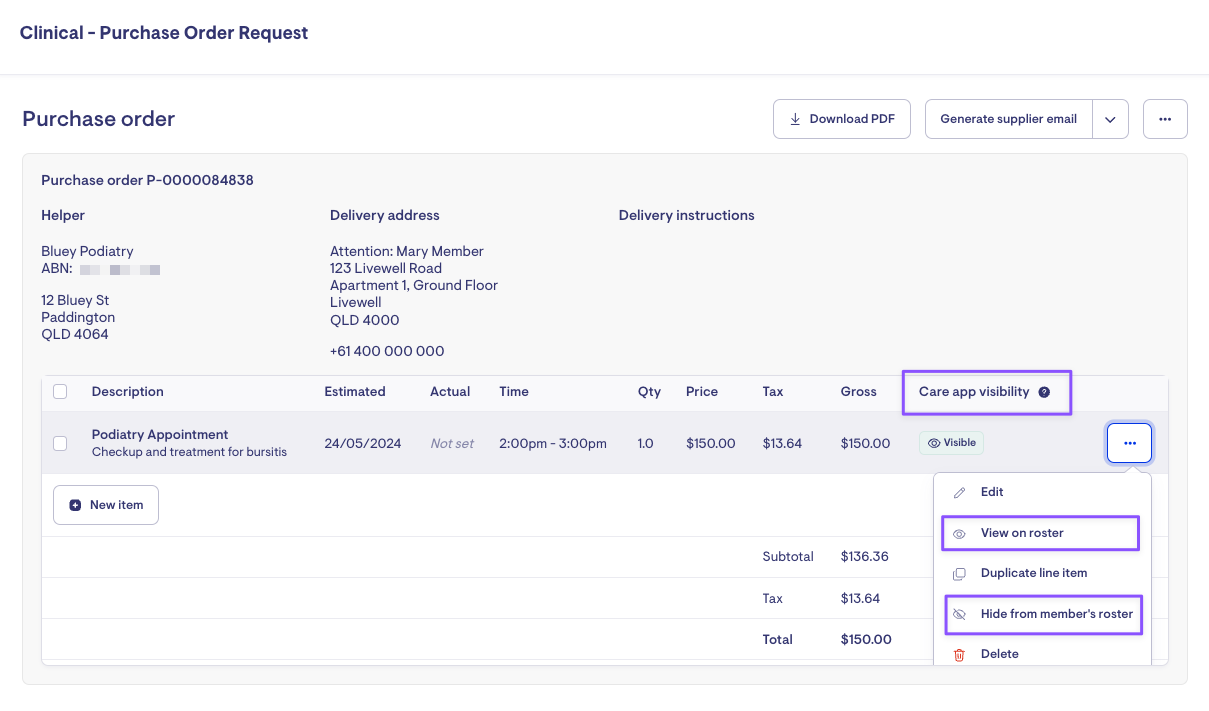
-
Visibility options allow you to control whether the item appears in the Lookout App. Admin's roster will always show the purchase orders.
To add purchase order (PO) items to the roster:
-
Add a delivery date - the estimated delivery date will trigger a banner warning the member about potential changes to the visit date and time. Adding the actual delivery date will remove this warning message.
-
Add a time - without an indication of time, the PO visit will not appear on the roster. Select 'All day' or set a start and end time.
-
Once the date and time are added, the Care app visibility status will change from No time set to Visible automatically.
-
To hide it from the member's roster, click the three dots and select 'Hide from member's roster', or you can remove the visit time by selecting 'Edit.'
Where will it be visible?
-
Admin App: appointments will remain visible to administrative staff regardless of the Care app visibility setting. However, they can only see it when they go to a member's Roster tab under Calendar view.

Purchase order appointments on the Calendar View of a Member's Roster
-
Member Care App: similar to standard visits, appointments will be visible on the member app Schedule page. Clicking on the appointment will display details and third-party contact details.

Purchase order appointments can be found under the Schedule page of the Care app
Options to claim a Third Party invoice
There are two ways to process a third-party invoice with the configuration options found in settings - finance settings - edit - Third-party invoicing. These settings can only be accessed with the Finance Admin permission.

Process on estimated delivery date
-
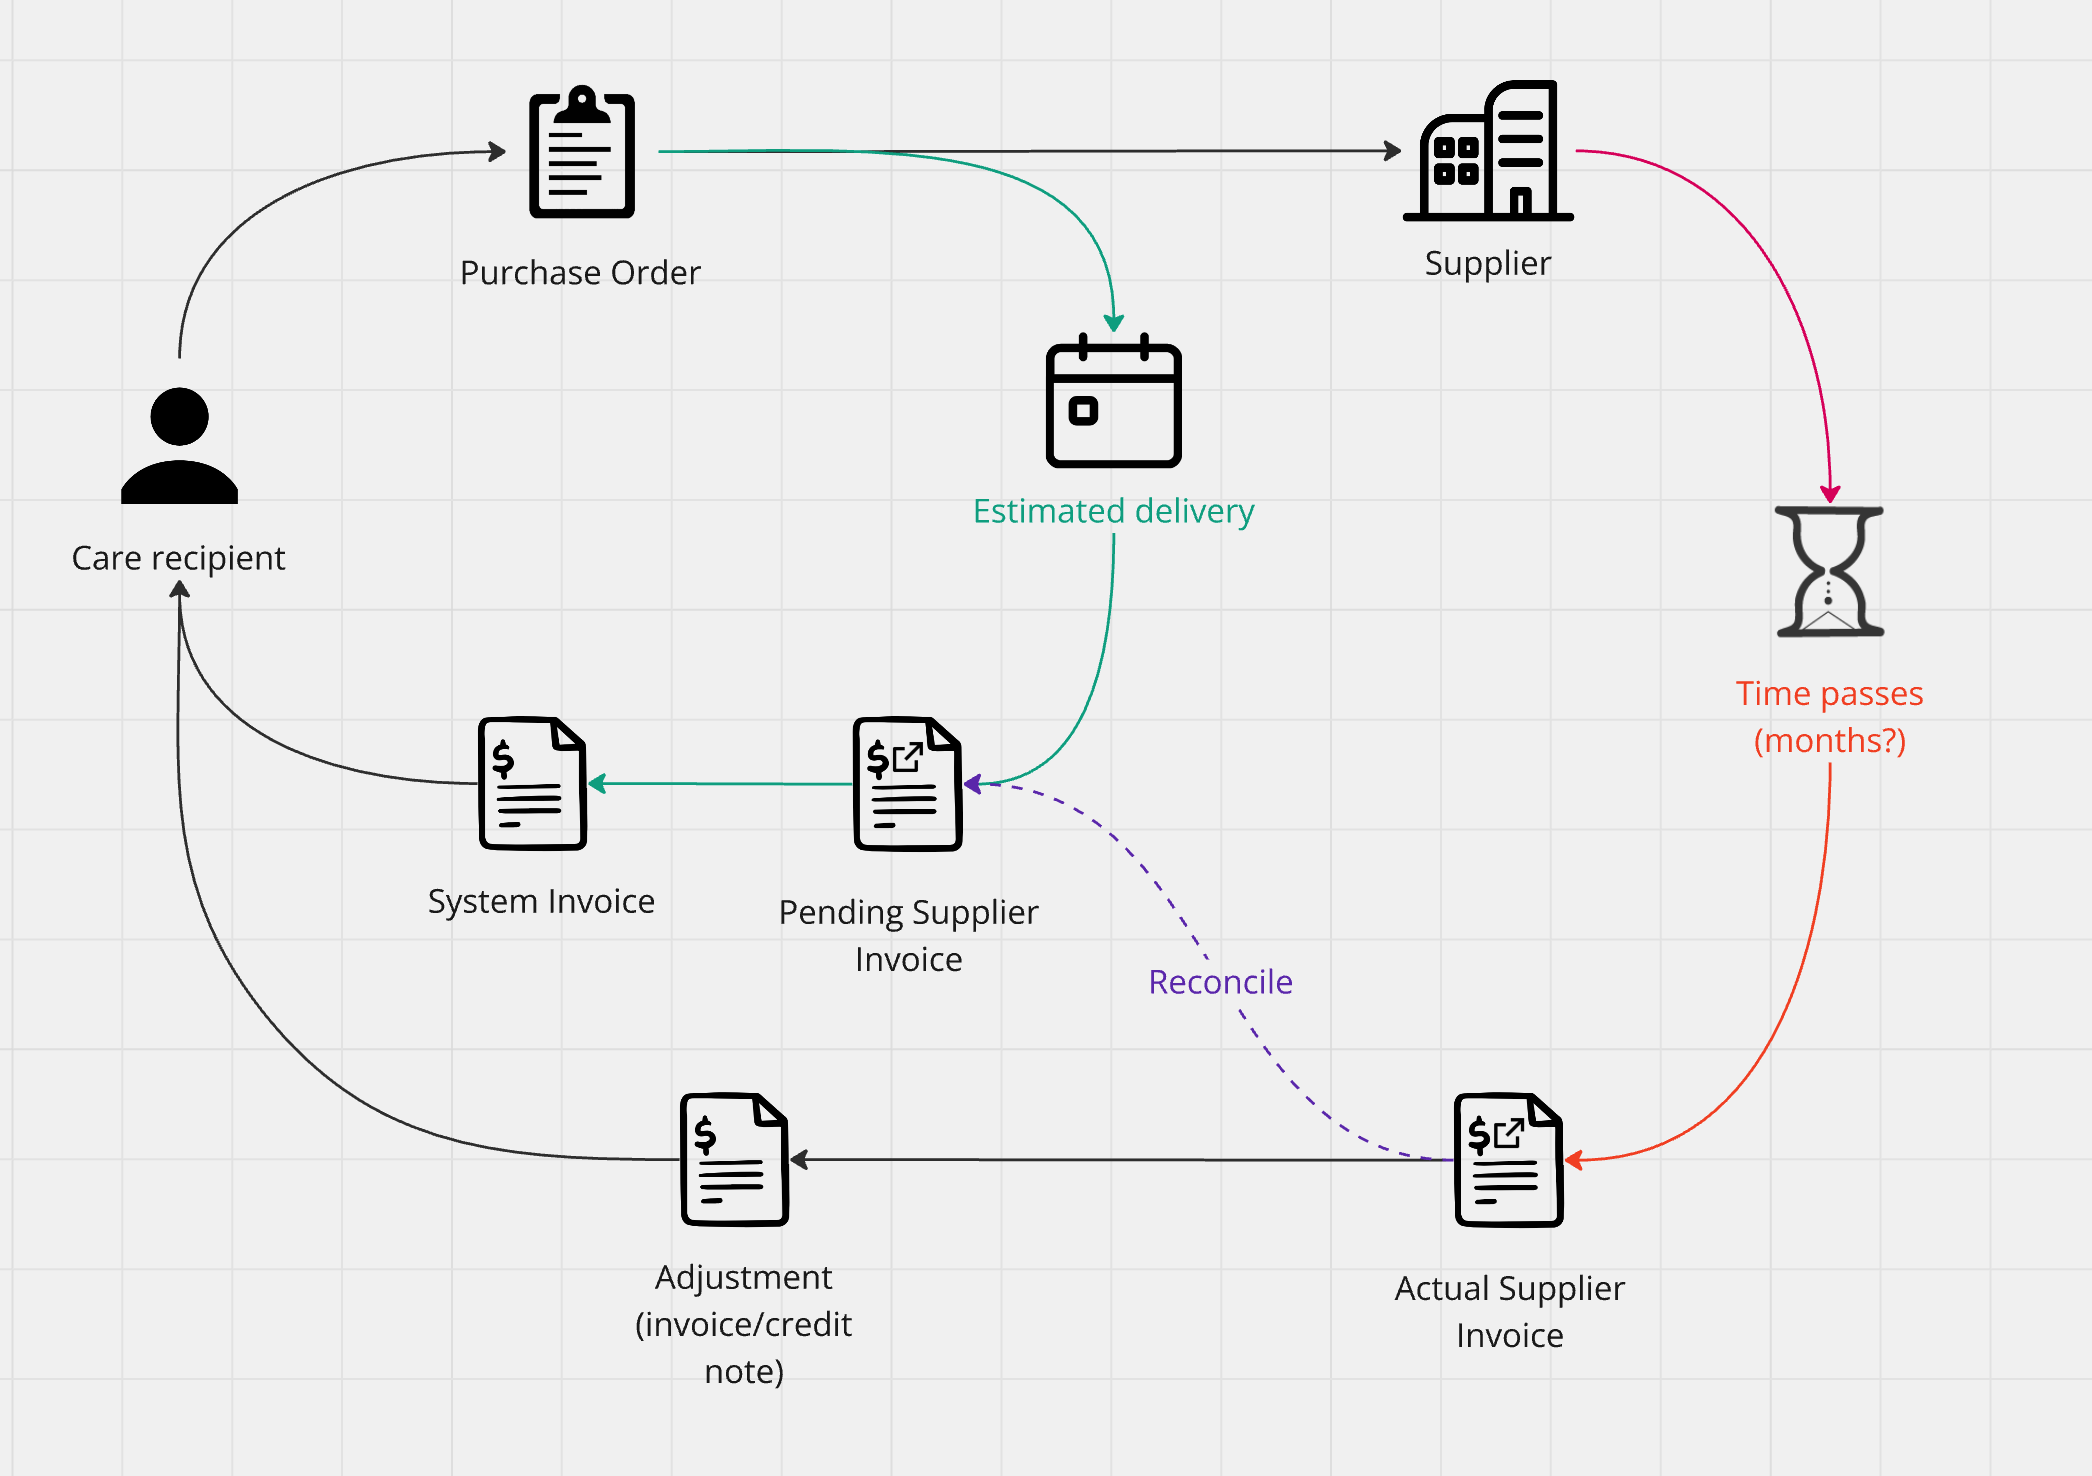
Any purchase order item with an estimated delivery date within the billing run window will have a pending supplier invoice created for it automatically. This means care is claimed for by default without additional workload
-
These automatic pending supplier invoices group items by estimated delivery date (ie. if several items within a purchase order are estimated for delivery on the same date, they'll all be placed in a single estimated supplier invoice)
-
When the actual supplier invoice arrives, rather than creating a new one you instead reconcile the existing pending supplier invoice.

When scrolling down to the supplier-generated invoices, you will see invoices awaiting reconciliation. These items will have invoices created for them, to affect care and services balances, and ultimately be claimable.
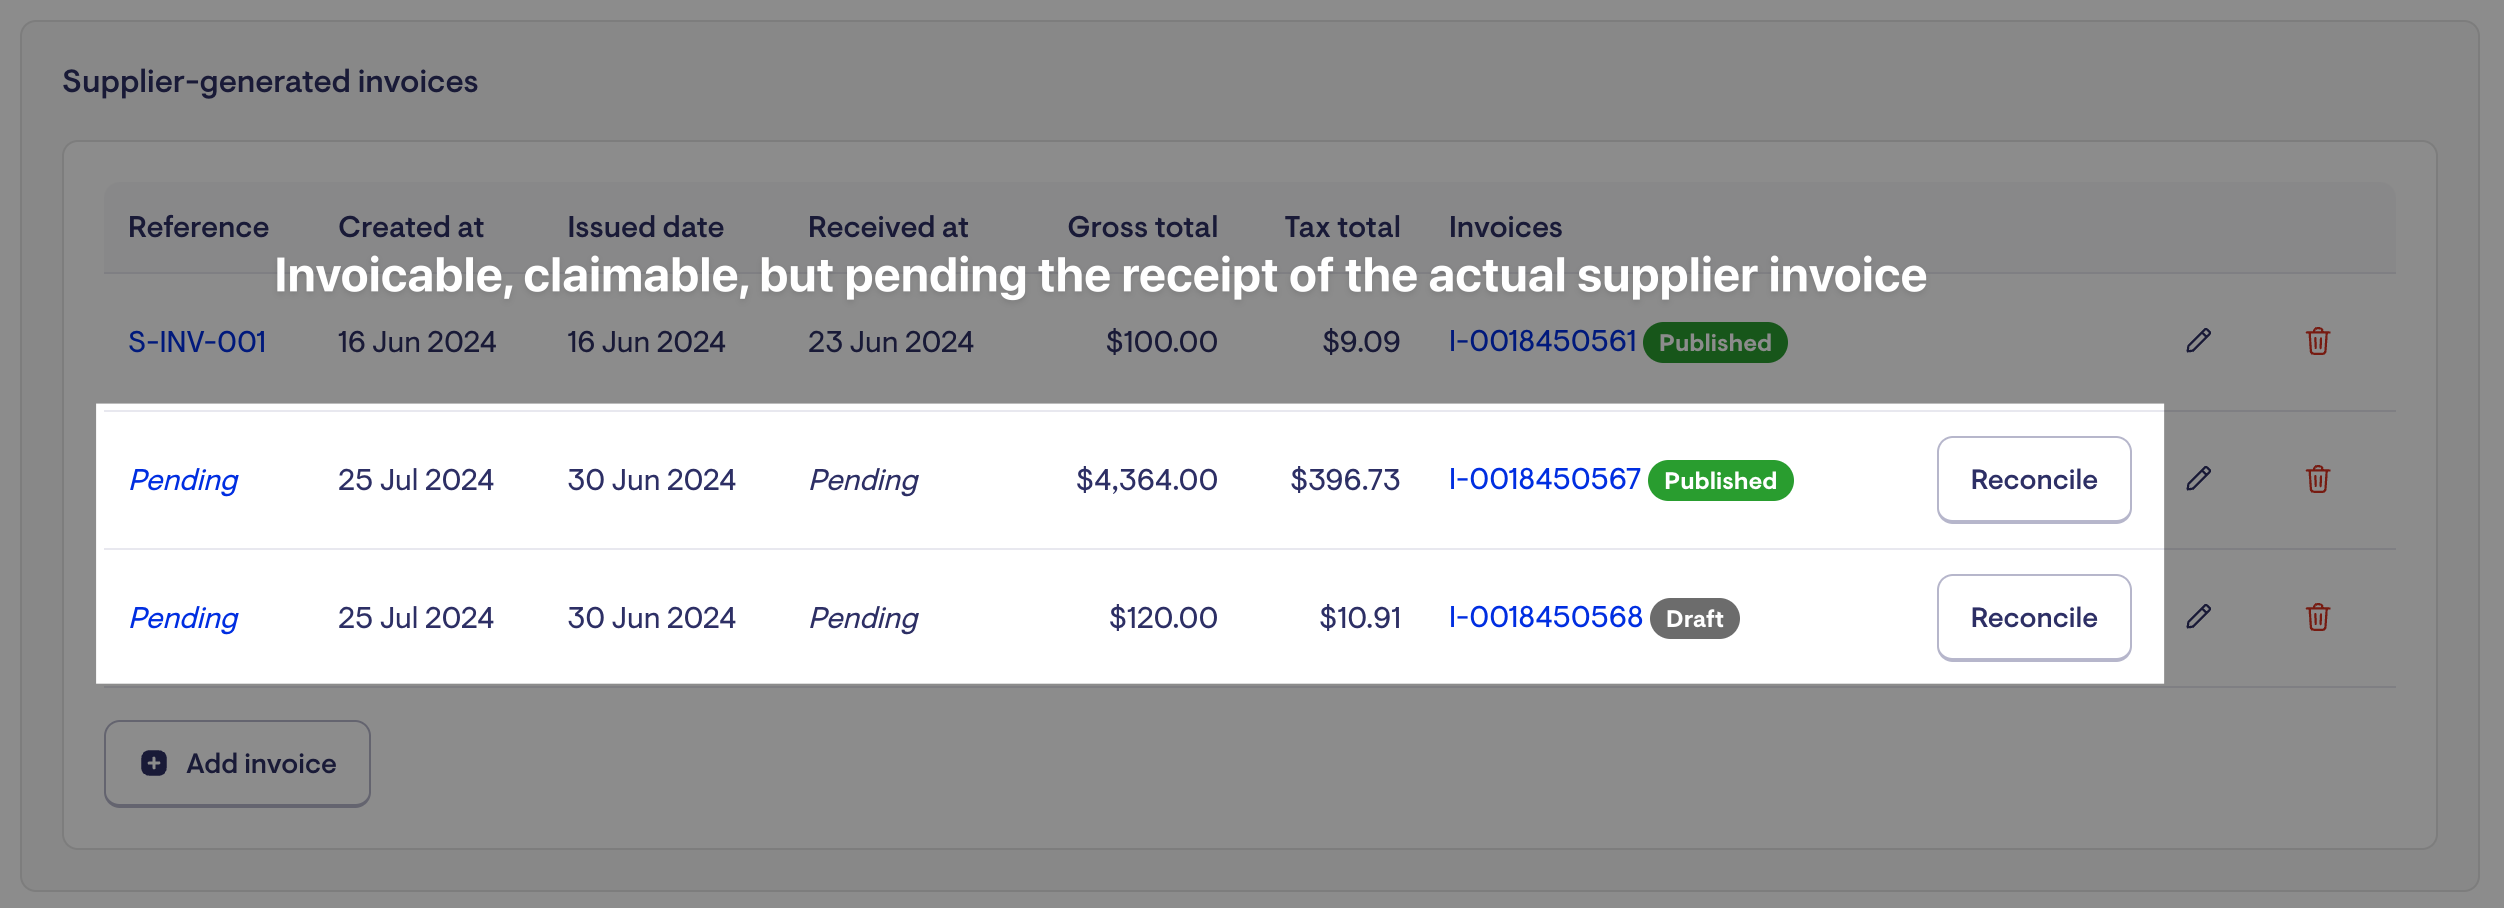
Reconciling or receiving a supplier invoice
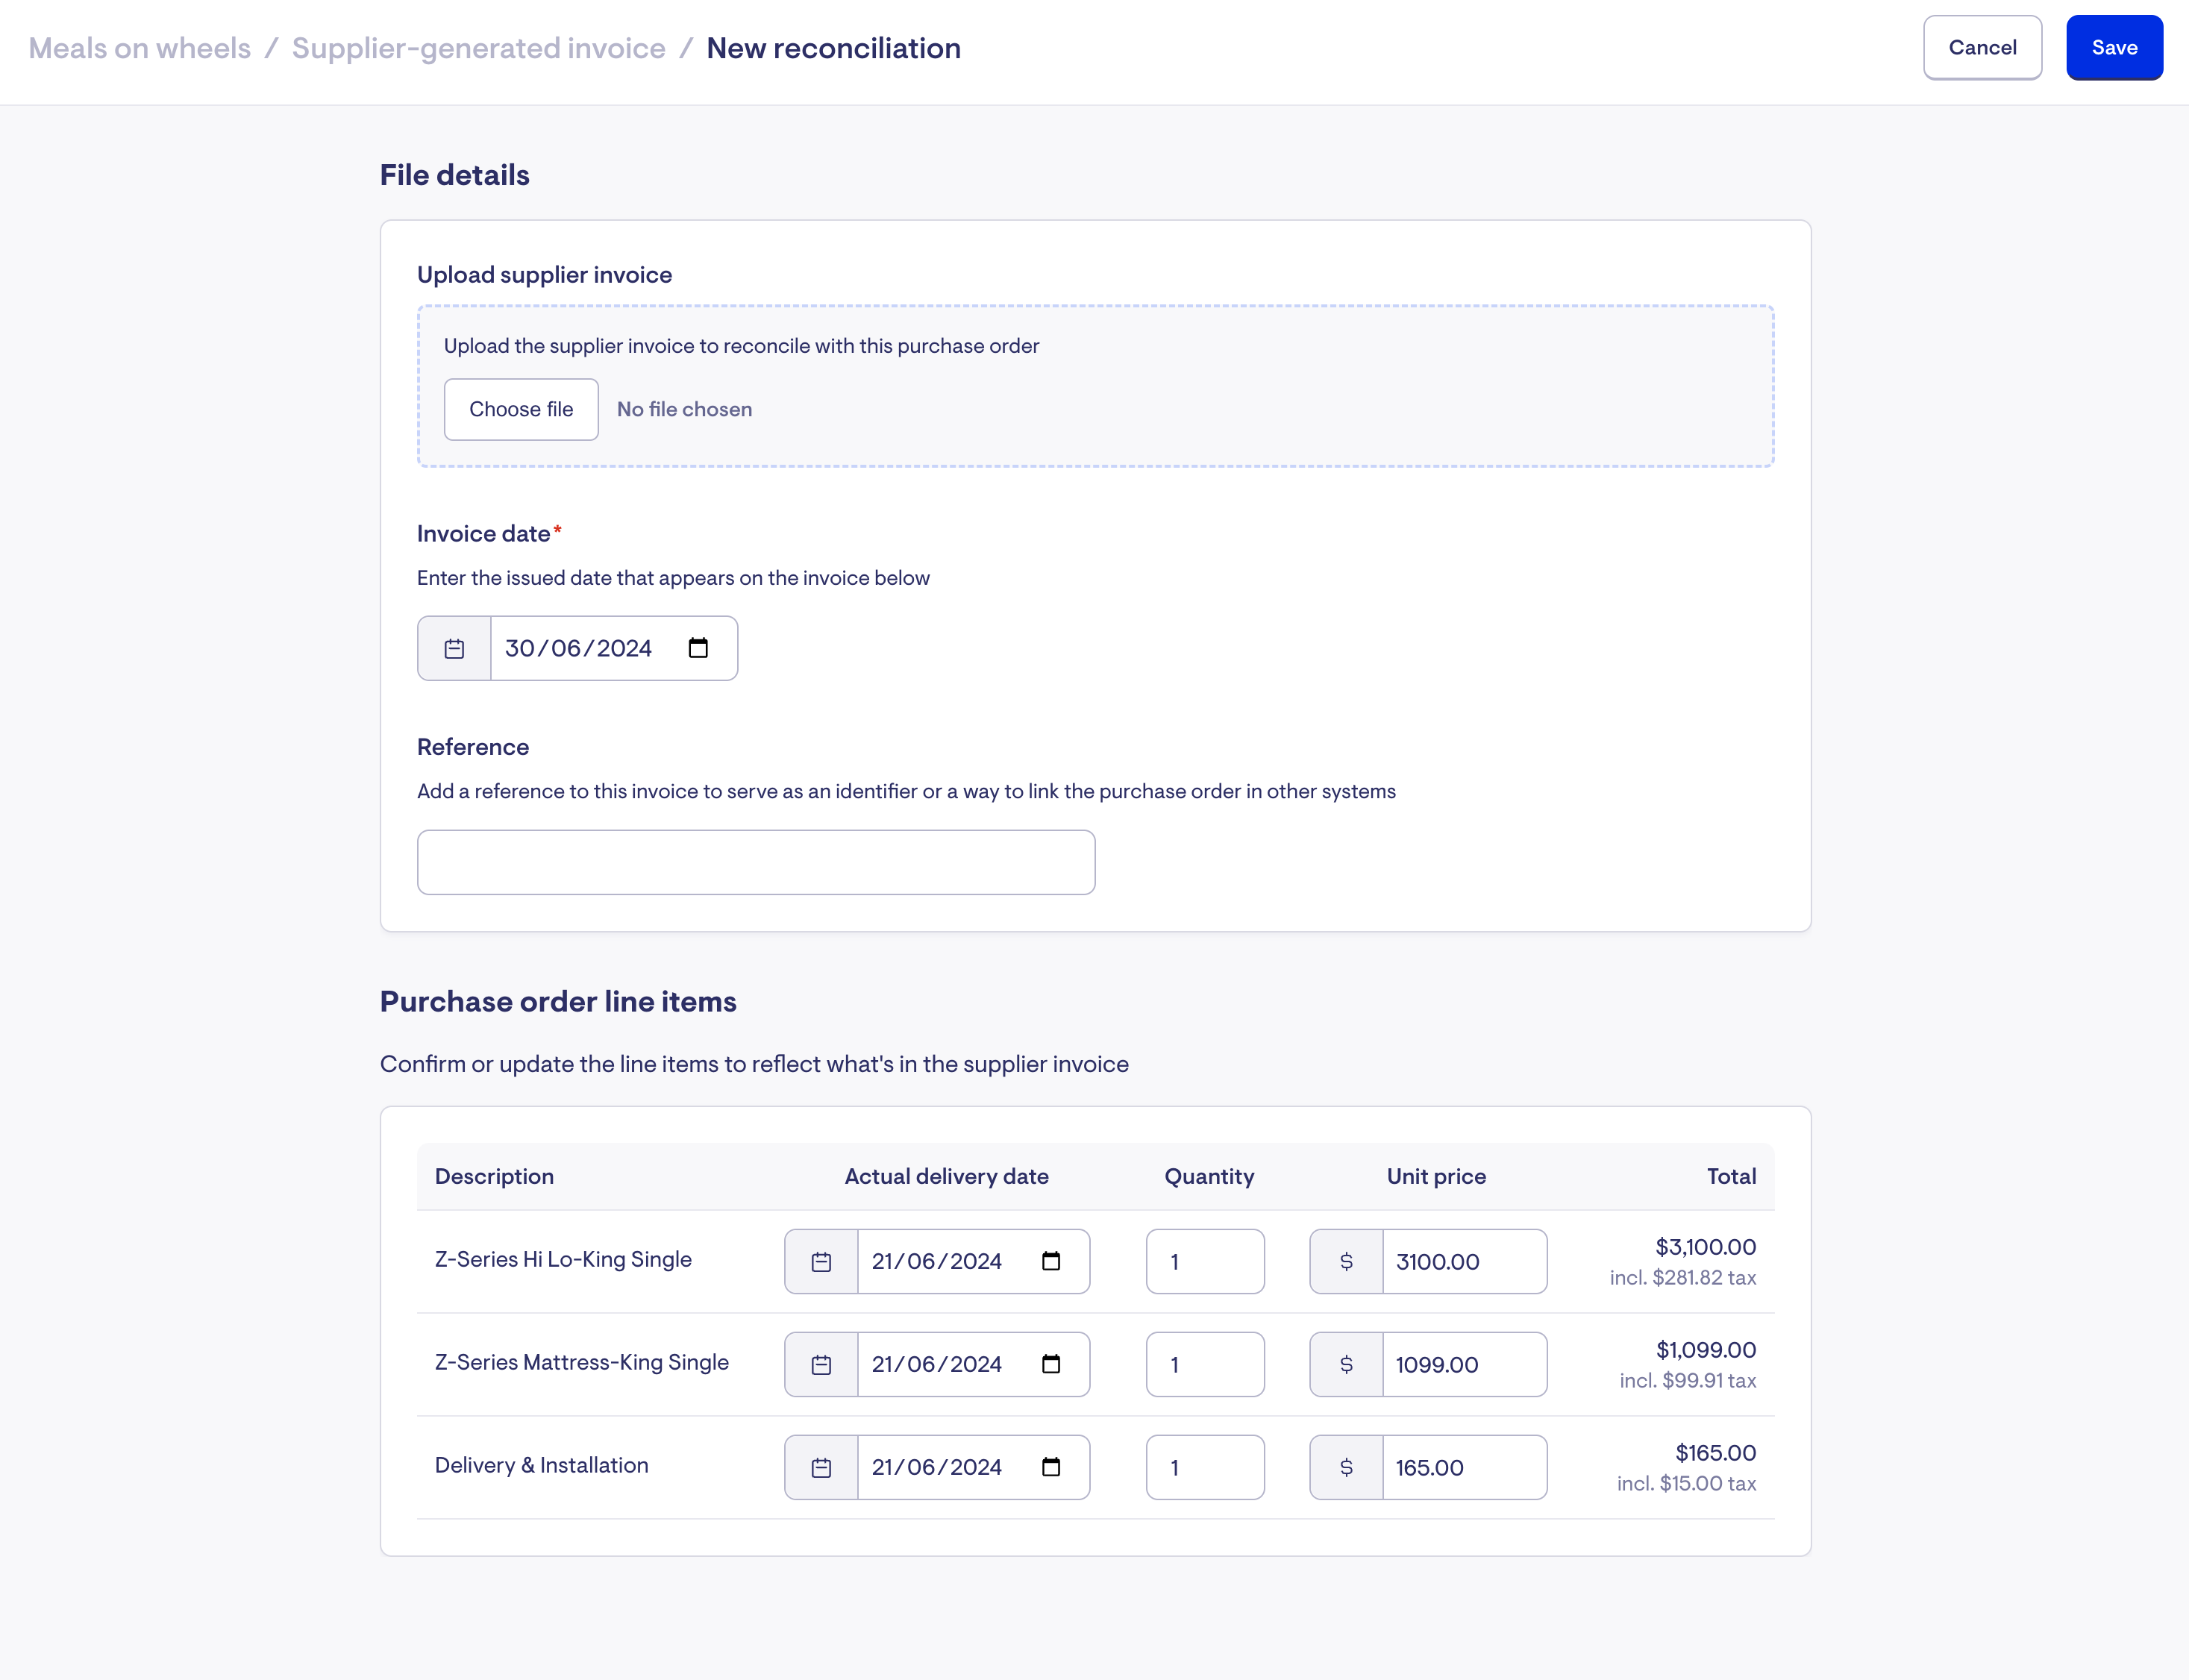
Clicking the "Reconcile" button opens a view to enter the details only known when the actual supplier invoice has been received...
-
The file itself (to be uploaded)
-
The invoice date (ie. when the supplier issued the invoice)
-
The supplier reference number (as per the supplier's invoice)
The items details can be left as they are (ie. if the estimates are correct). Otherwise, If the quantity or unit price require adjustment, a confirmation modal provides an opportunity to add a customer facing note.
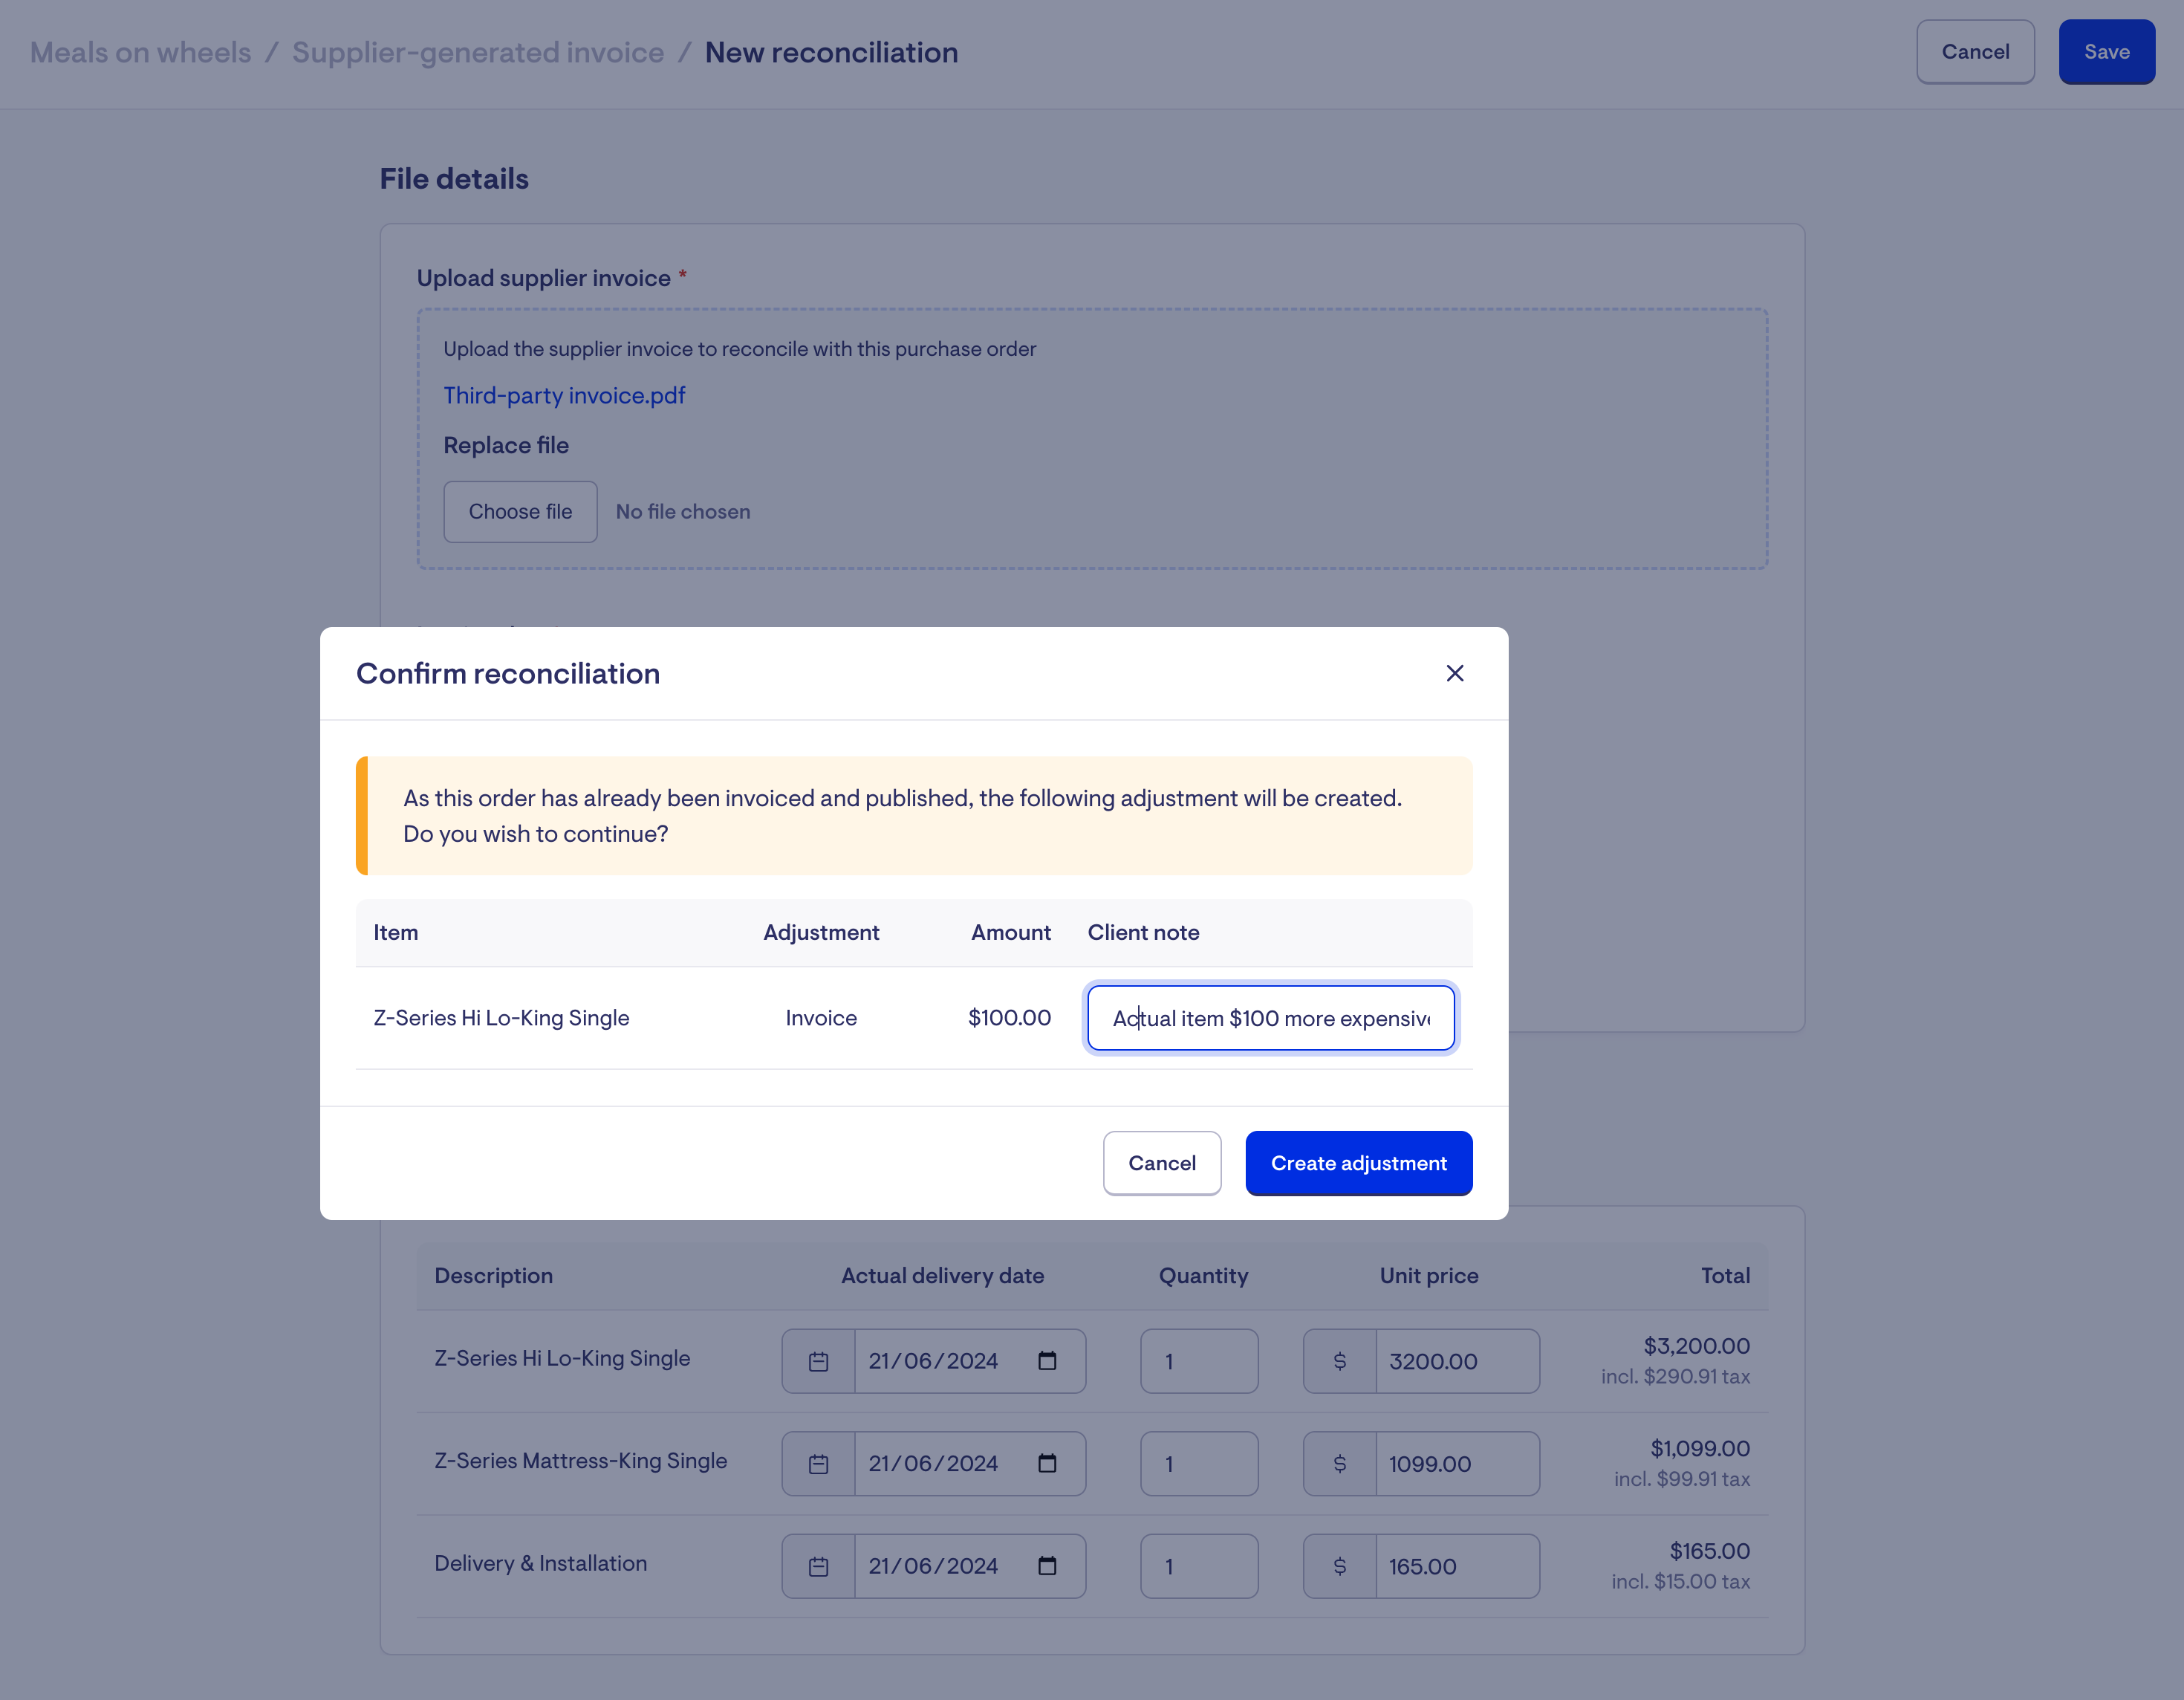
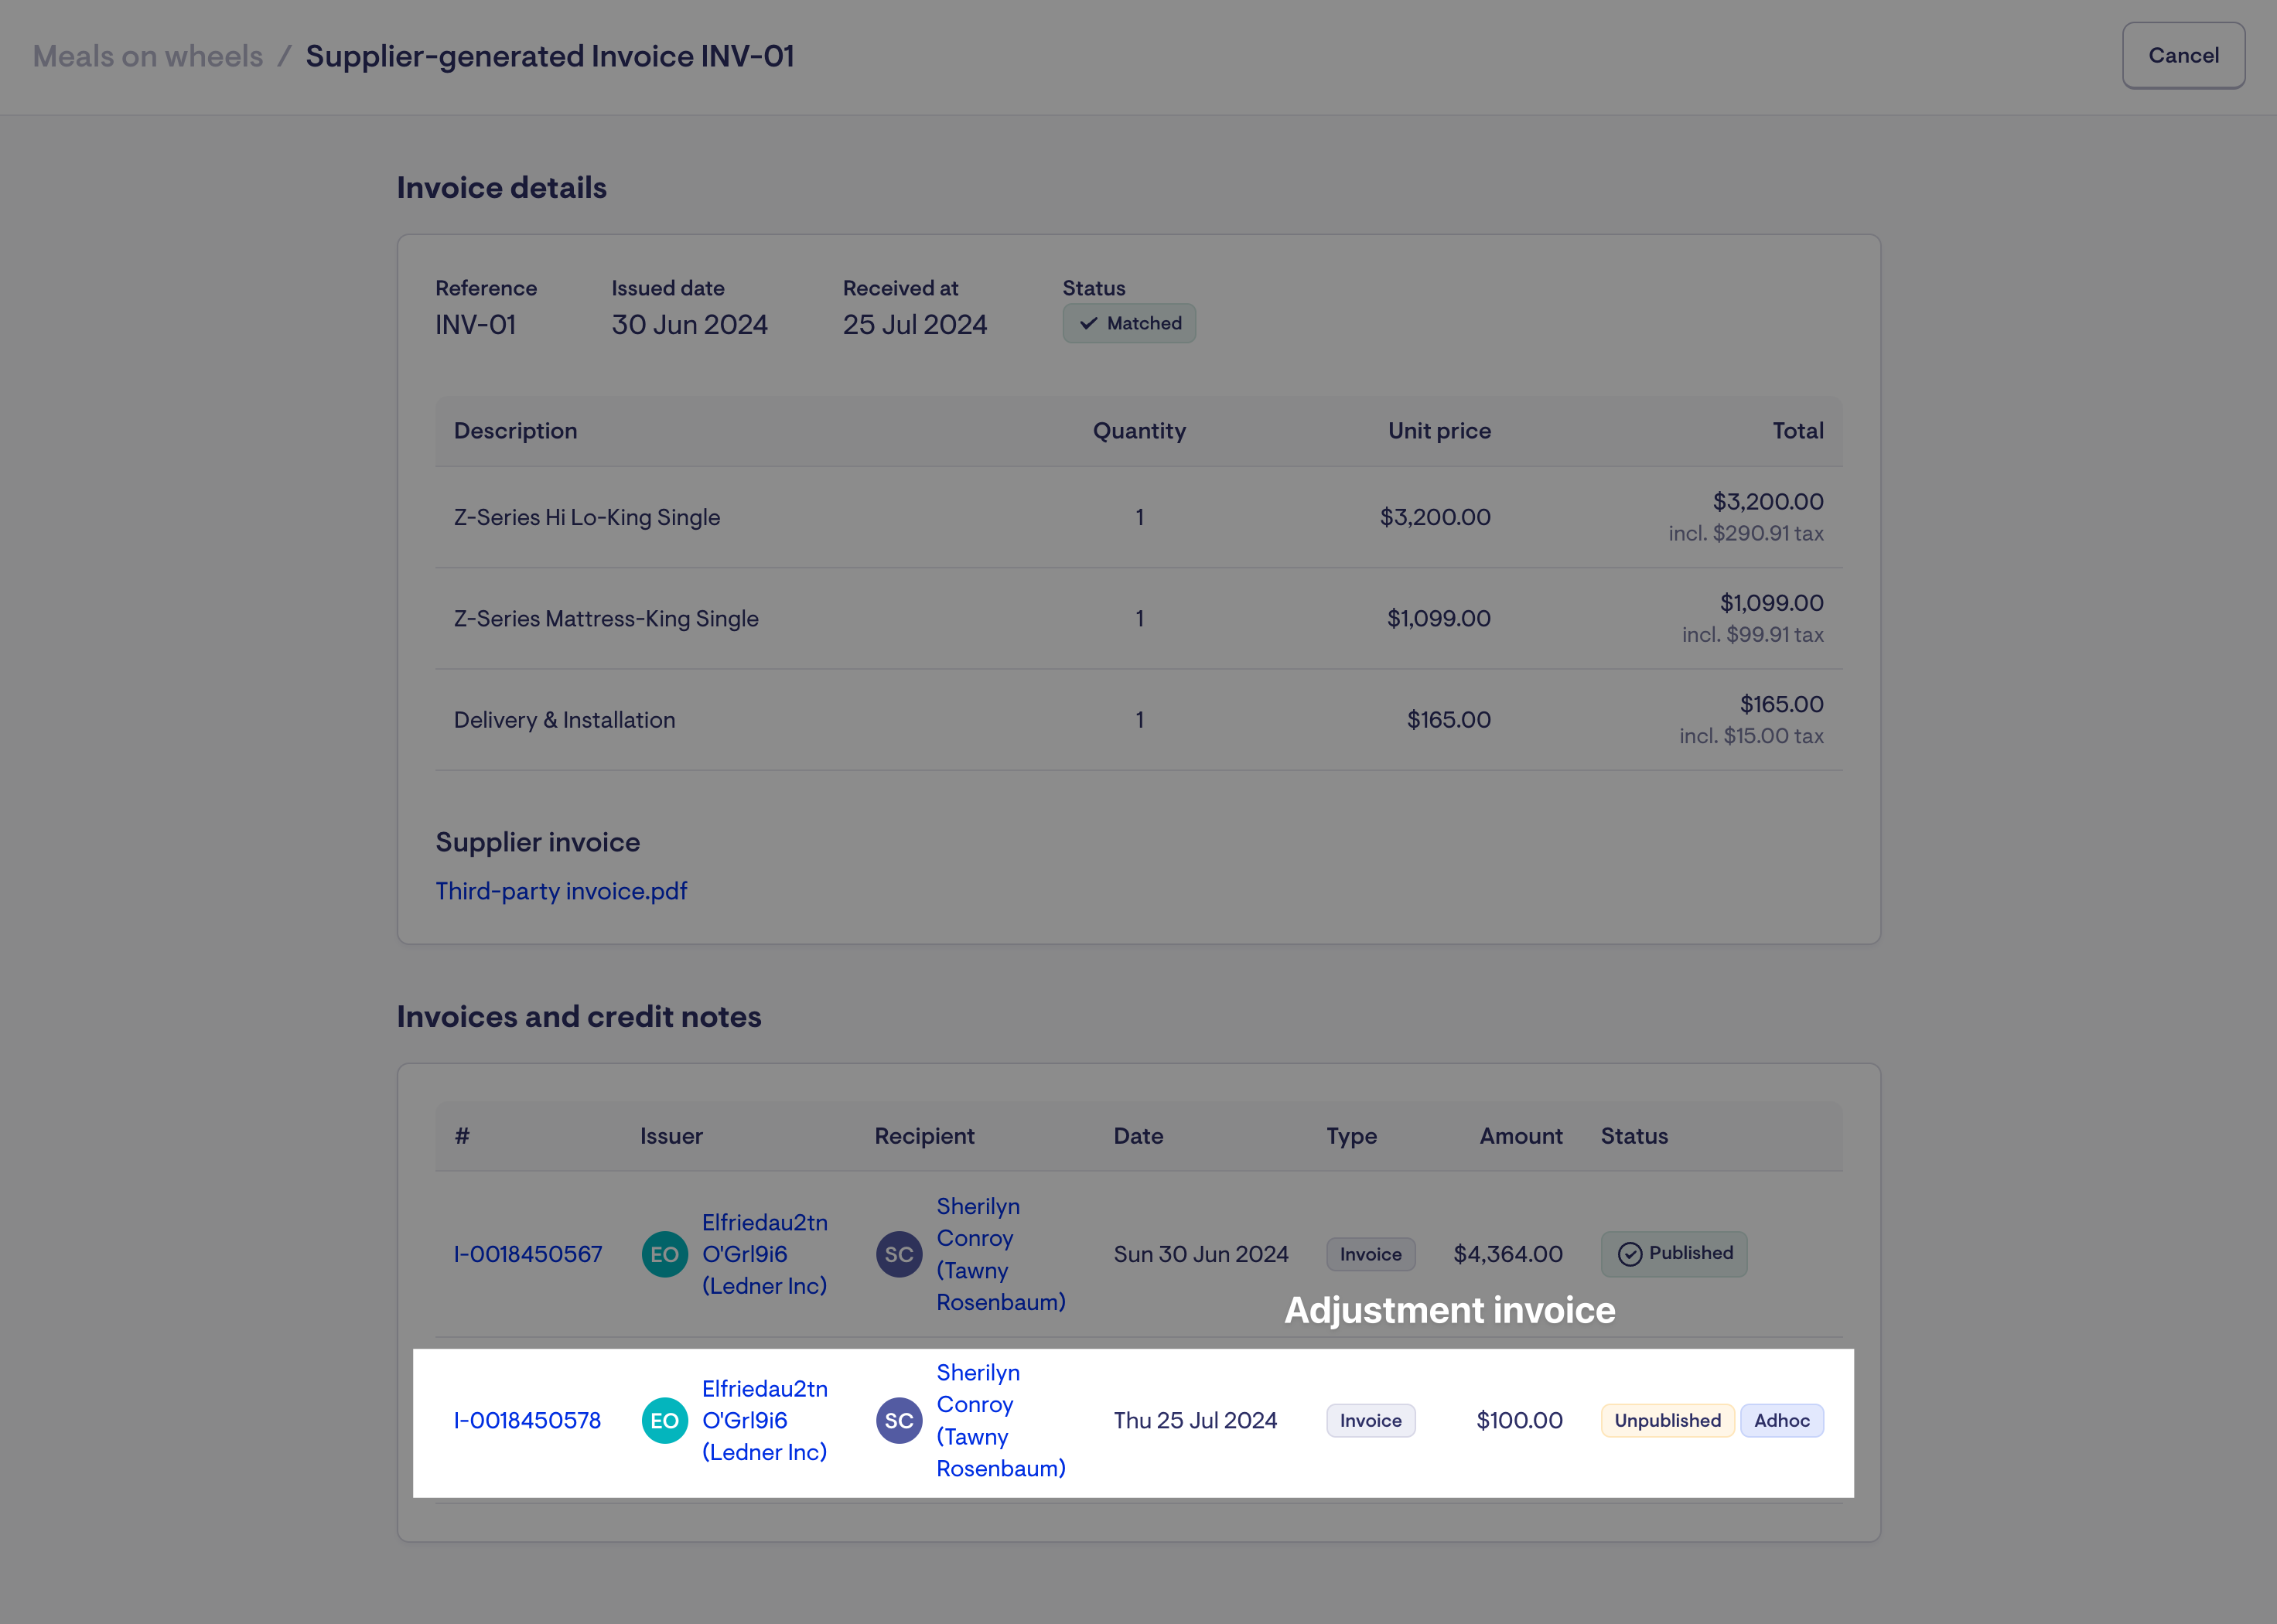
During confirmation any required adjustments become adhoc invoices or credit notes for the member, attached to the same originating supplier invoice - and published via the next billing run like any other. The can be freely edited, and manually published just like any other adhoc invoice or credit note.
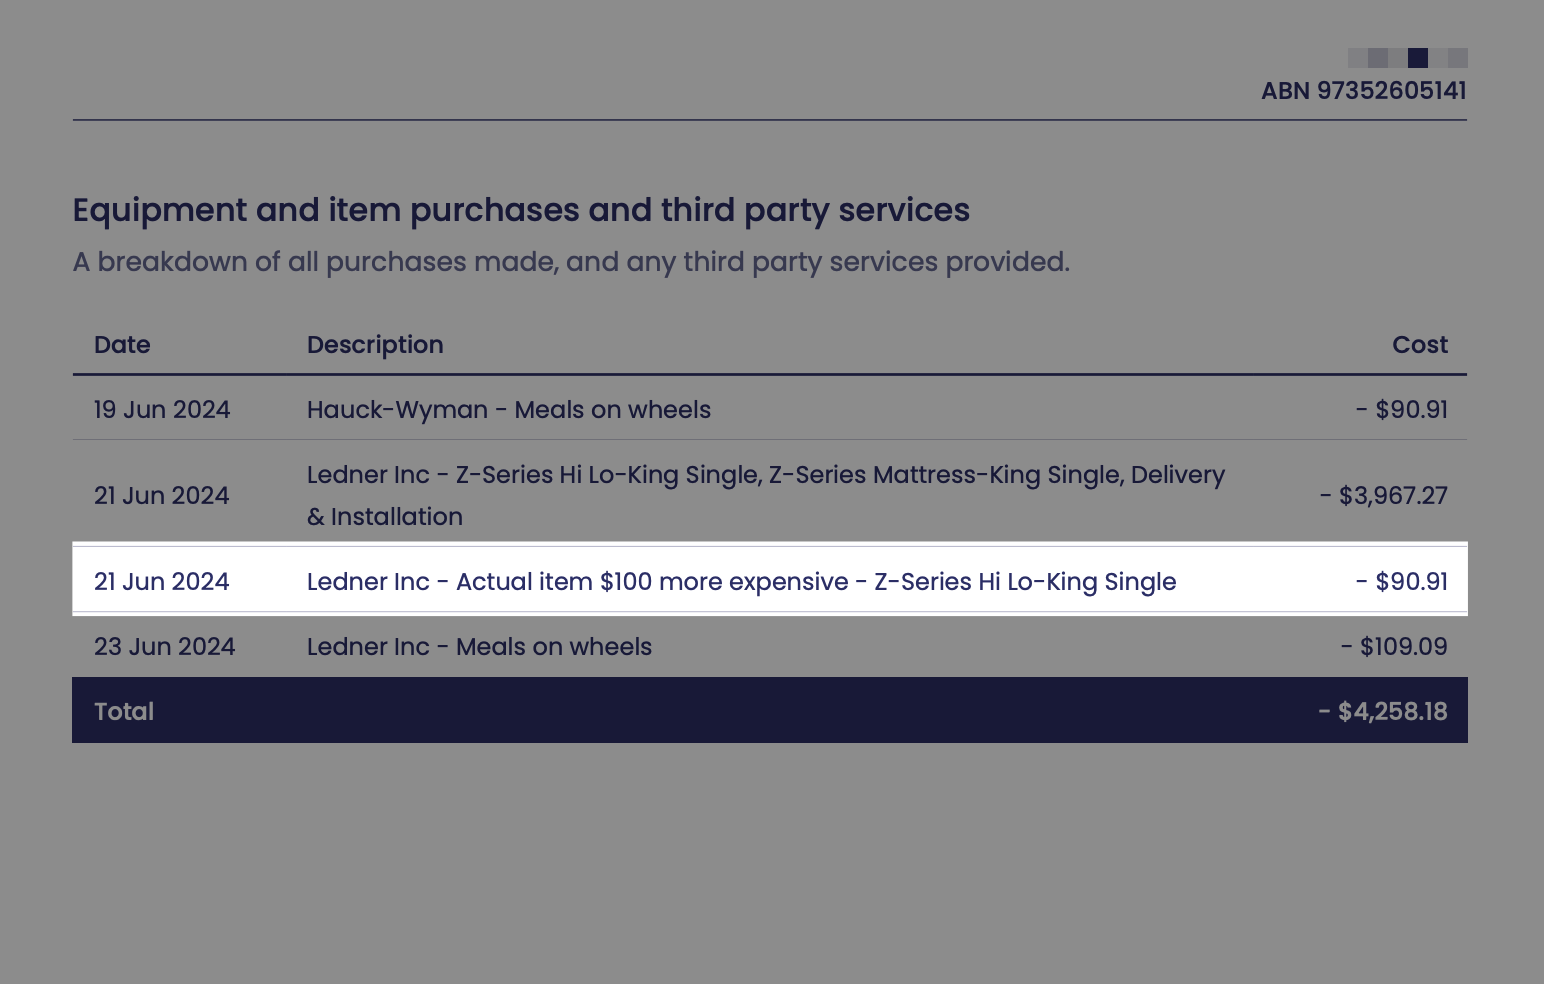
The adjustment, including the note entered during reconciliation, will show on the subsequent statement (for the period the adjustment was made in)
Process upon invoice received
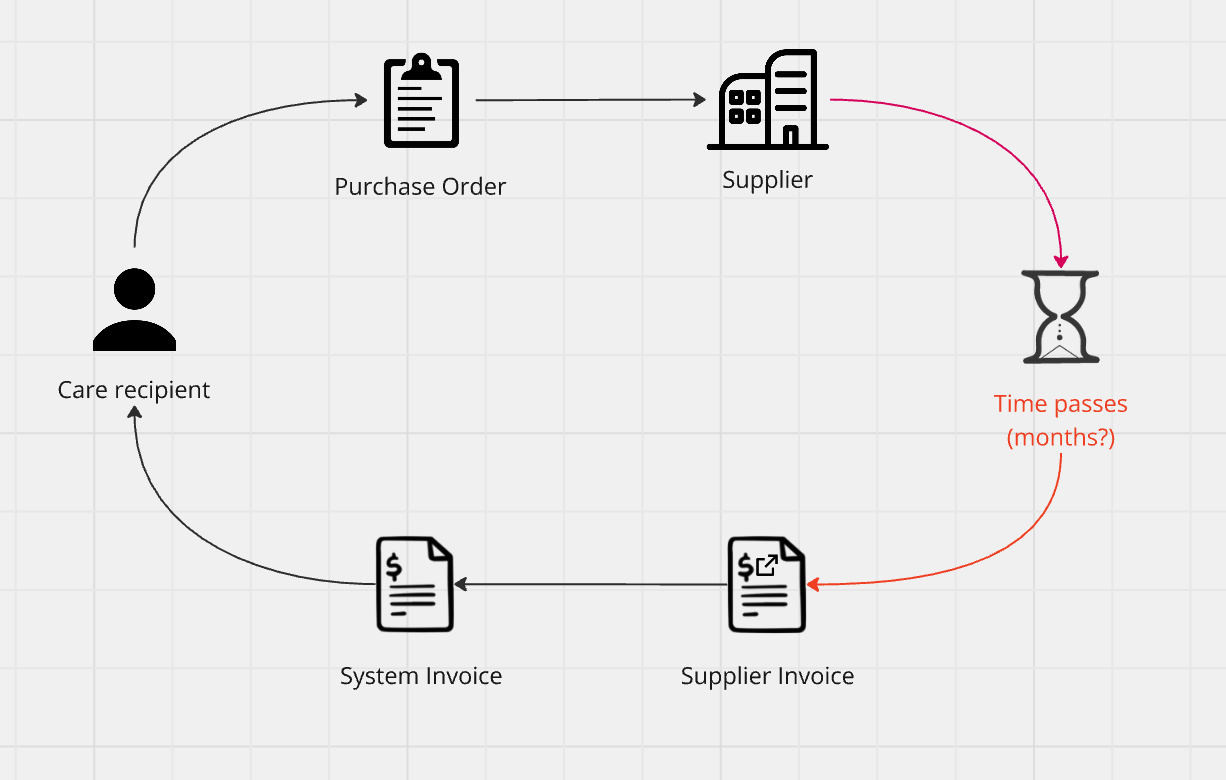
Once you receive an invoice from the third party, you can match it with the purchase order and upload it ready for the next billing and payment run.
Note: If the Purchase order line items do not match exactly to the invoice, you need to return to the Purchase order and adjust them.
-
Navigate to the ticket with the Purchase Order.
-
Scroll to the Supplier-generated Invoices section under the Purchase Order section.
-
Select Add Invoice.
-
Choose the invoice file to upload.
-
Add in the Third Party Invoice number reference.
-
Ad the Third Party Invoice Issue date.
-
Select the Purchase Order Lines that are associated with the invoice ensuring the amounts and description match exactly.

Finding a Purchase order
If you are looking for a purchase order you can find it by the purchase order number, Third Party (Helper) name, the Members Name, and the supplier generated invoice reference.
-
Navigate to Finance > Purchase order items
-
Filter by your preferred identifier
Editing a Purchase Order
A purchase order can be edited at any time up until a line item has an attached invoice and the billing run has processed the invoices. To edit a Purchase Order,
-
Navigate to the ticket with the Purchase Order.
-
Scroll to the Purchase Order section.
-
Edit the details or line items as you wish.
Adhoc Payment
If a third party invoice needs to be paid urgently.
-
Edit the supplier generated invoice
-
Navigate to the ticket with the Purchase Order.
-
Scroll to the Supplier-generated Invoices section under the Purchase Order section.
-
Click edit on the invoice that needs to be paid
-
Click on Generate Adhoc Invoice
You can then click on the invoice number to get to the invoice that was created on the supplier invoice to publish and export it for payment.
Finding a Third-Party Invoice
If you are looking for a Third-Party invoice you can find it by the Third Party Invoice number reference., Third-Party (Helper) name, the Members Name.
-
Navigate to Finance > Purchase order items
-
Filter by your preferred identifier
FAQs
Why are some of the supplier-generated invoices I've matched missing from the billing run they should be in or still marked as "awaiting next billing run"?
By default, billing runs generate supplier-generated or PO invoices based on the 'Issued' date entered by a staffer when matching the invoice—not the service delivery date of the PO line item. Any billing run on or after the Issued date can generate that invoice.
If multiple billing run drafts exist, some invoices may be assigned to the wrong draft based on the order of when they were updated or generated.
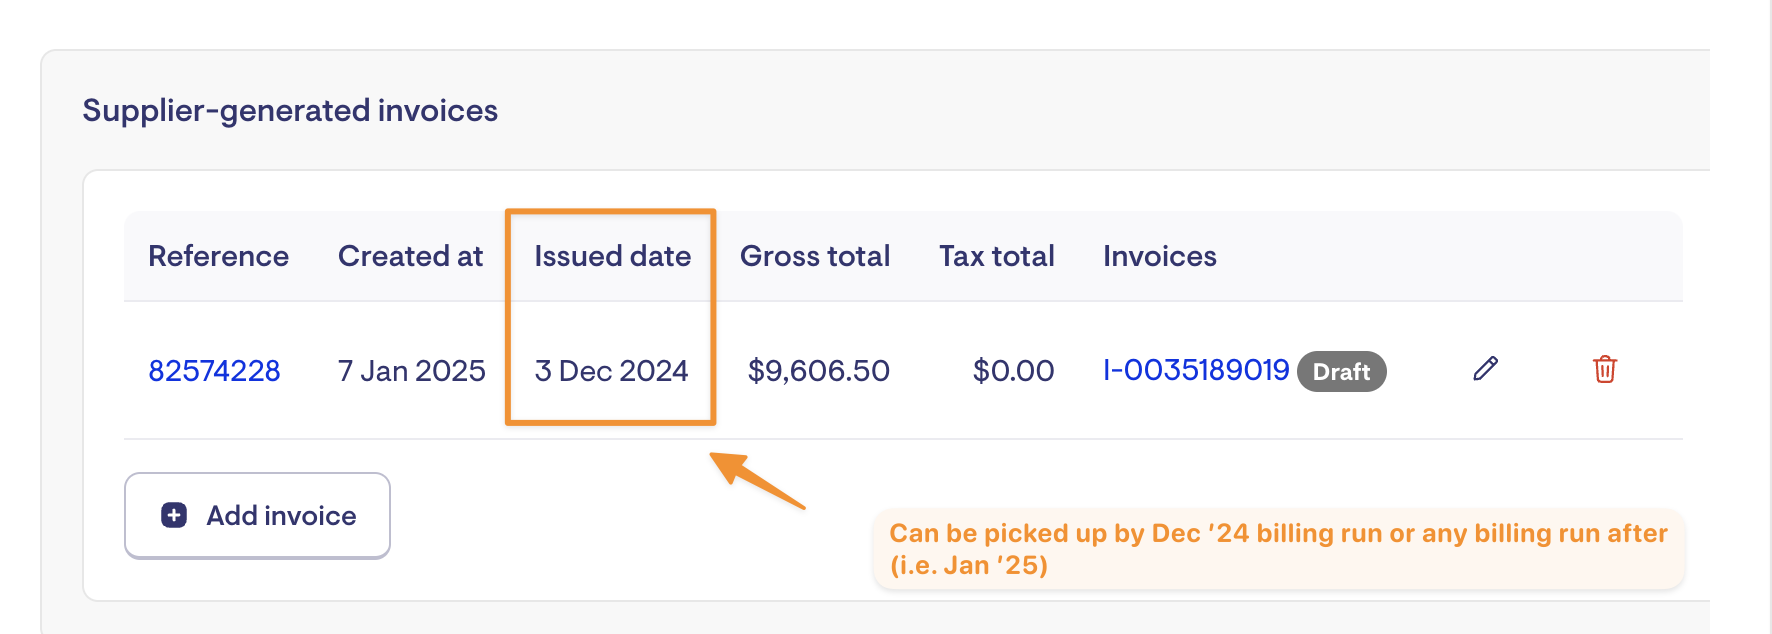
For example, if you follow a monthly billing cadence and notice missing invoices in the December billing run, check the January draft. If they appear there, delete the January draft and update December’s run. This allows the missing invoices to regenerate correctly in December.
To avoid this, finalise each billing run before opening the next or disable automatic billing run generation to keep invoices in the correct run and avoid having multiple drafts open simultaneously.
If the invoice status is still "awaiting next billing run," it means the billing run period that can generate the invoice (covers the issued date) has not yet been created.
The billing run is designed to provide flexibility in managing PO invoices while preventing duplicates. Once a billing run draft picks up an invoice, it will not regenerate in another draft unless the original draft is deleted.
