Finding the Members page
-
Sign in to your Admin Account
-
Select Members on the left-hand side menu bar
By default, every staffer will have access to the Members page.

Create a New Membership
-
Click on New Membership

This will present you with a form that guides you through creating a New Membership.
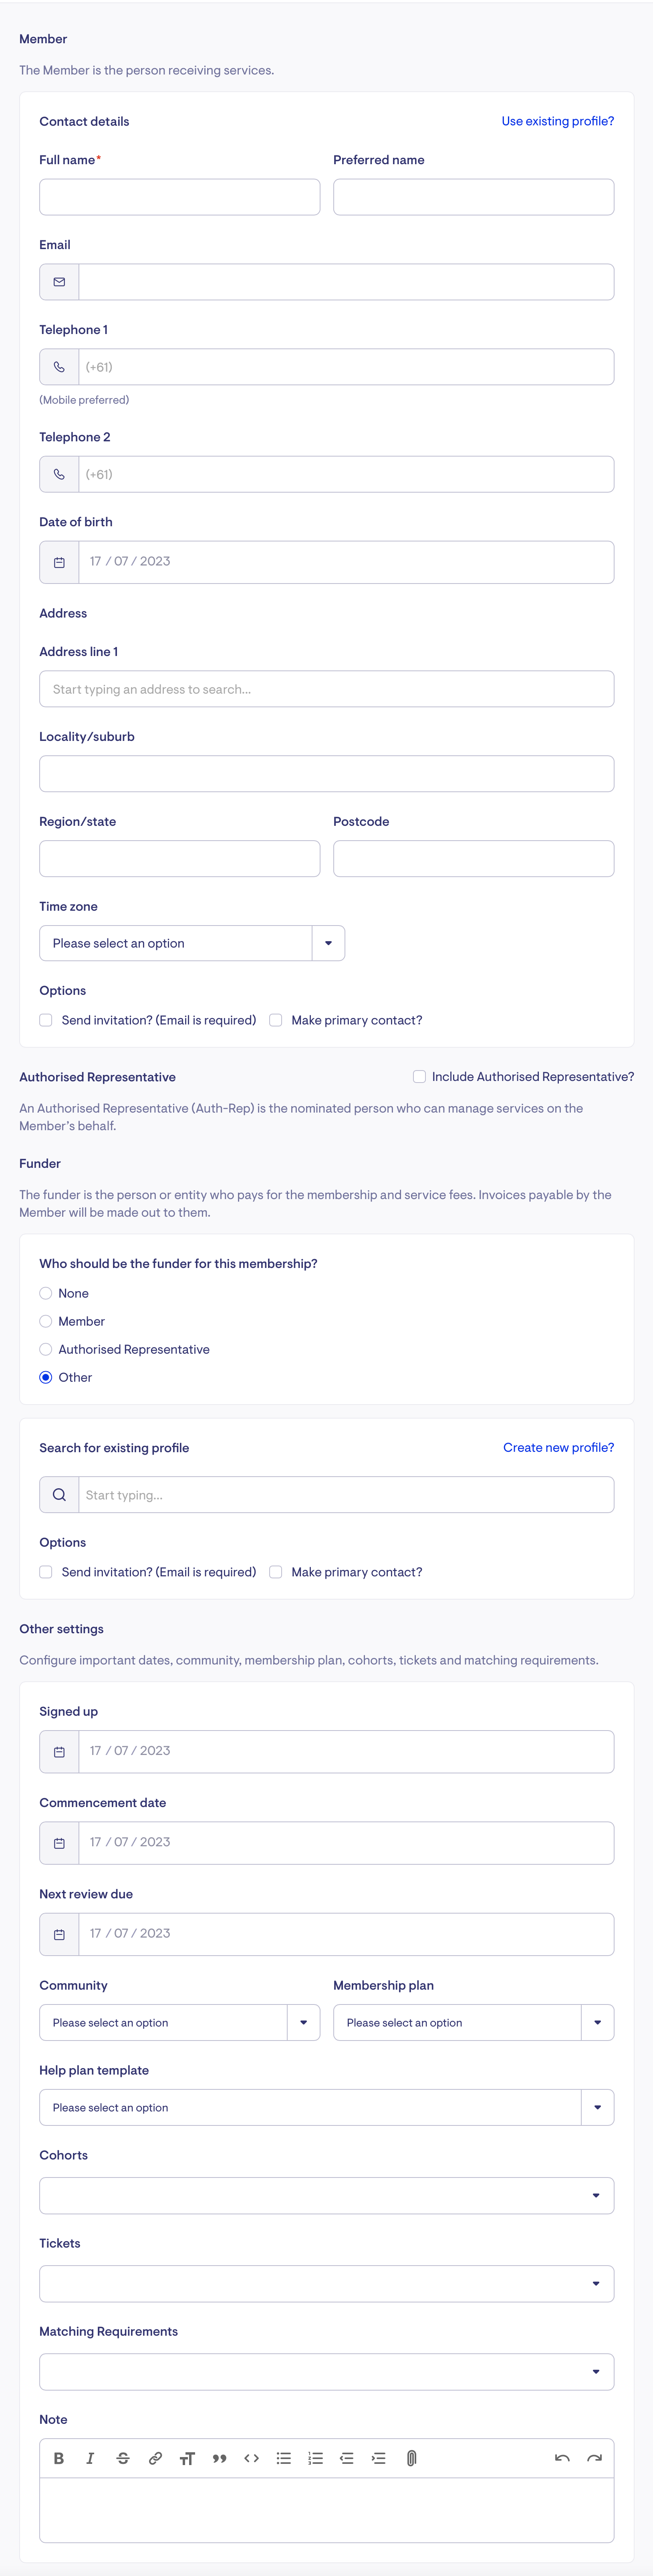
Add Member details
-
Name *
-
Contact details
-
Date of birth
-
Timezone *
-
Options to:
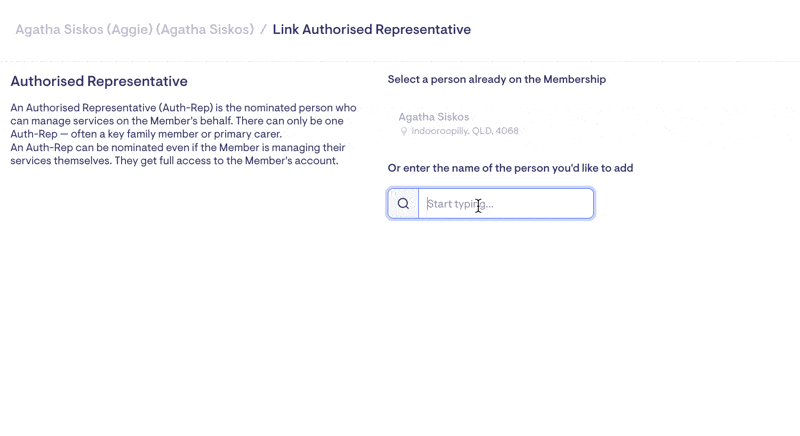
Create or link an Authorised Representative
-
The Authorised Representative is the person nominated to manage services on the Member's behalf. There can only be one Authorised Representative, and they are often a key family member or primary carer. They will get full access to a Member's account.
-
Not every Member has to have an Authorised Representative. An Authorised Representative can be nominated even if the Member manages their service.
-
In the search bar, start typing the Authorised Representative's name. You can link an existing profile or add a new profile with the Authorised Representative's contact information.
Link a primary contact
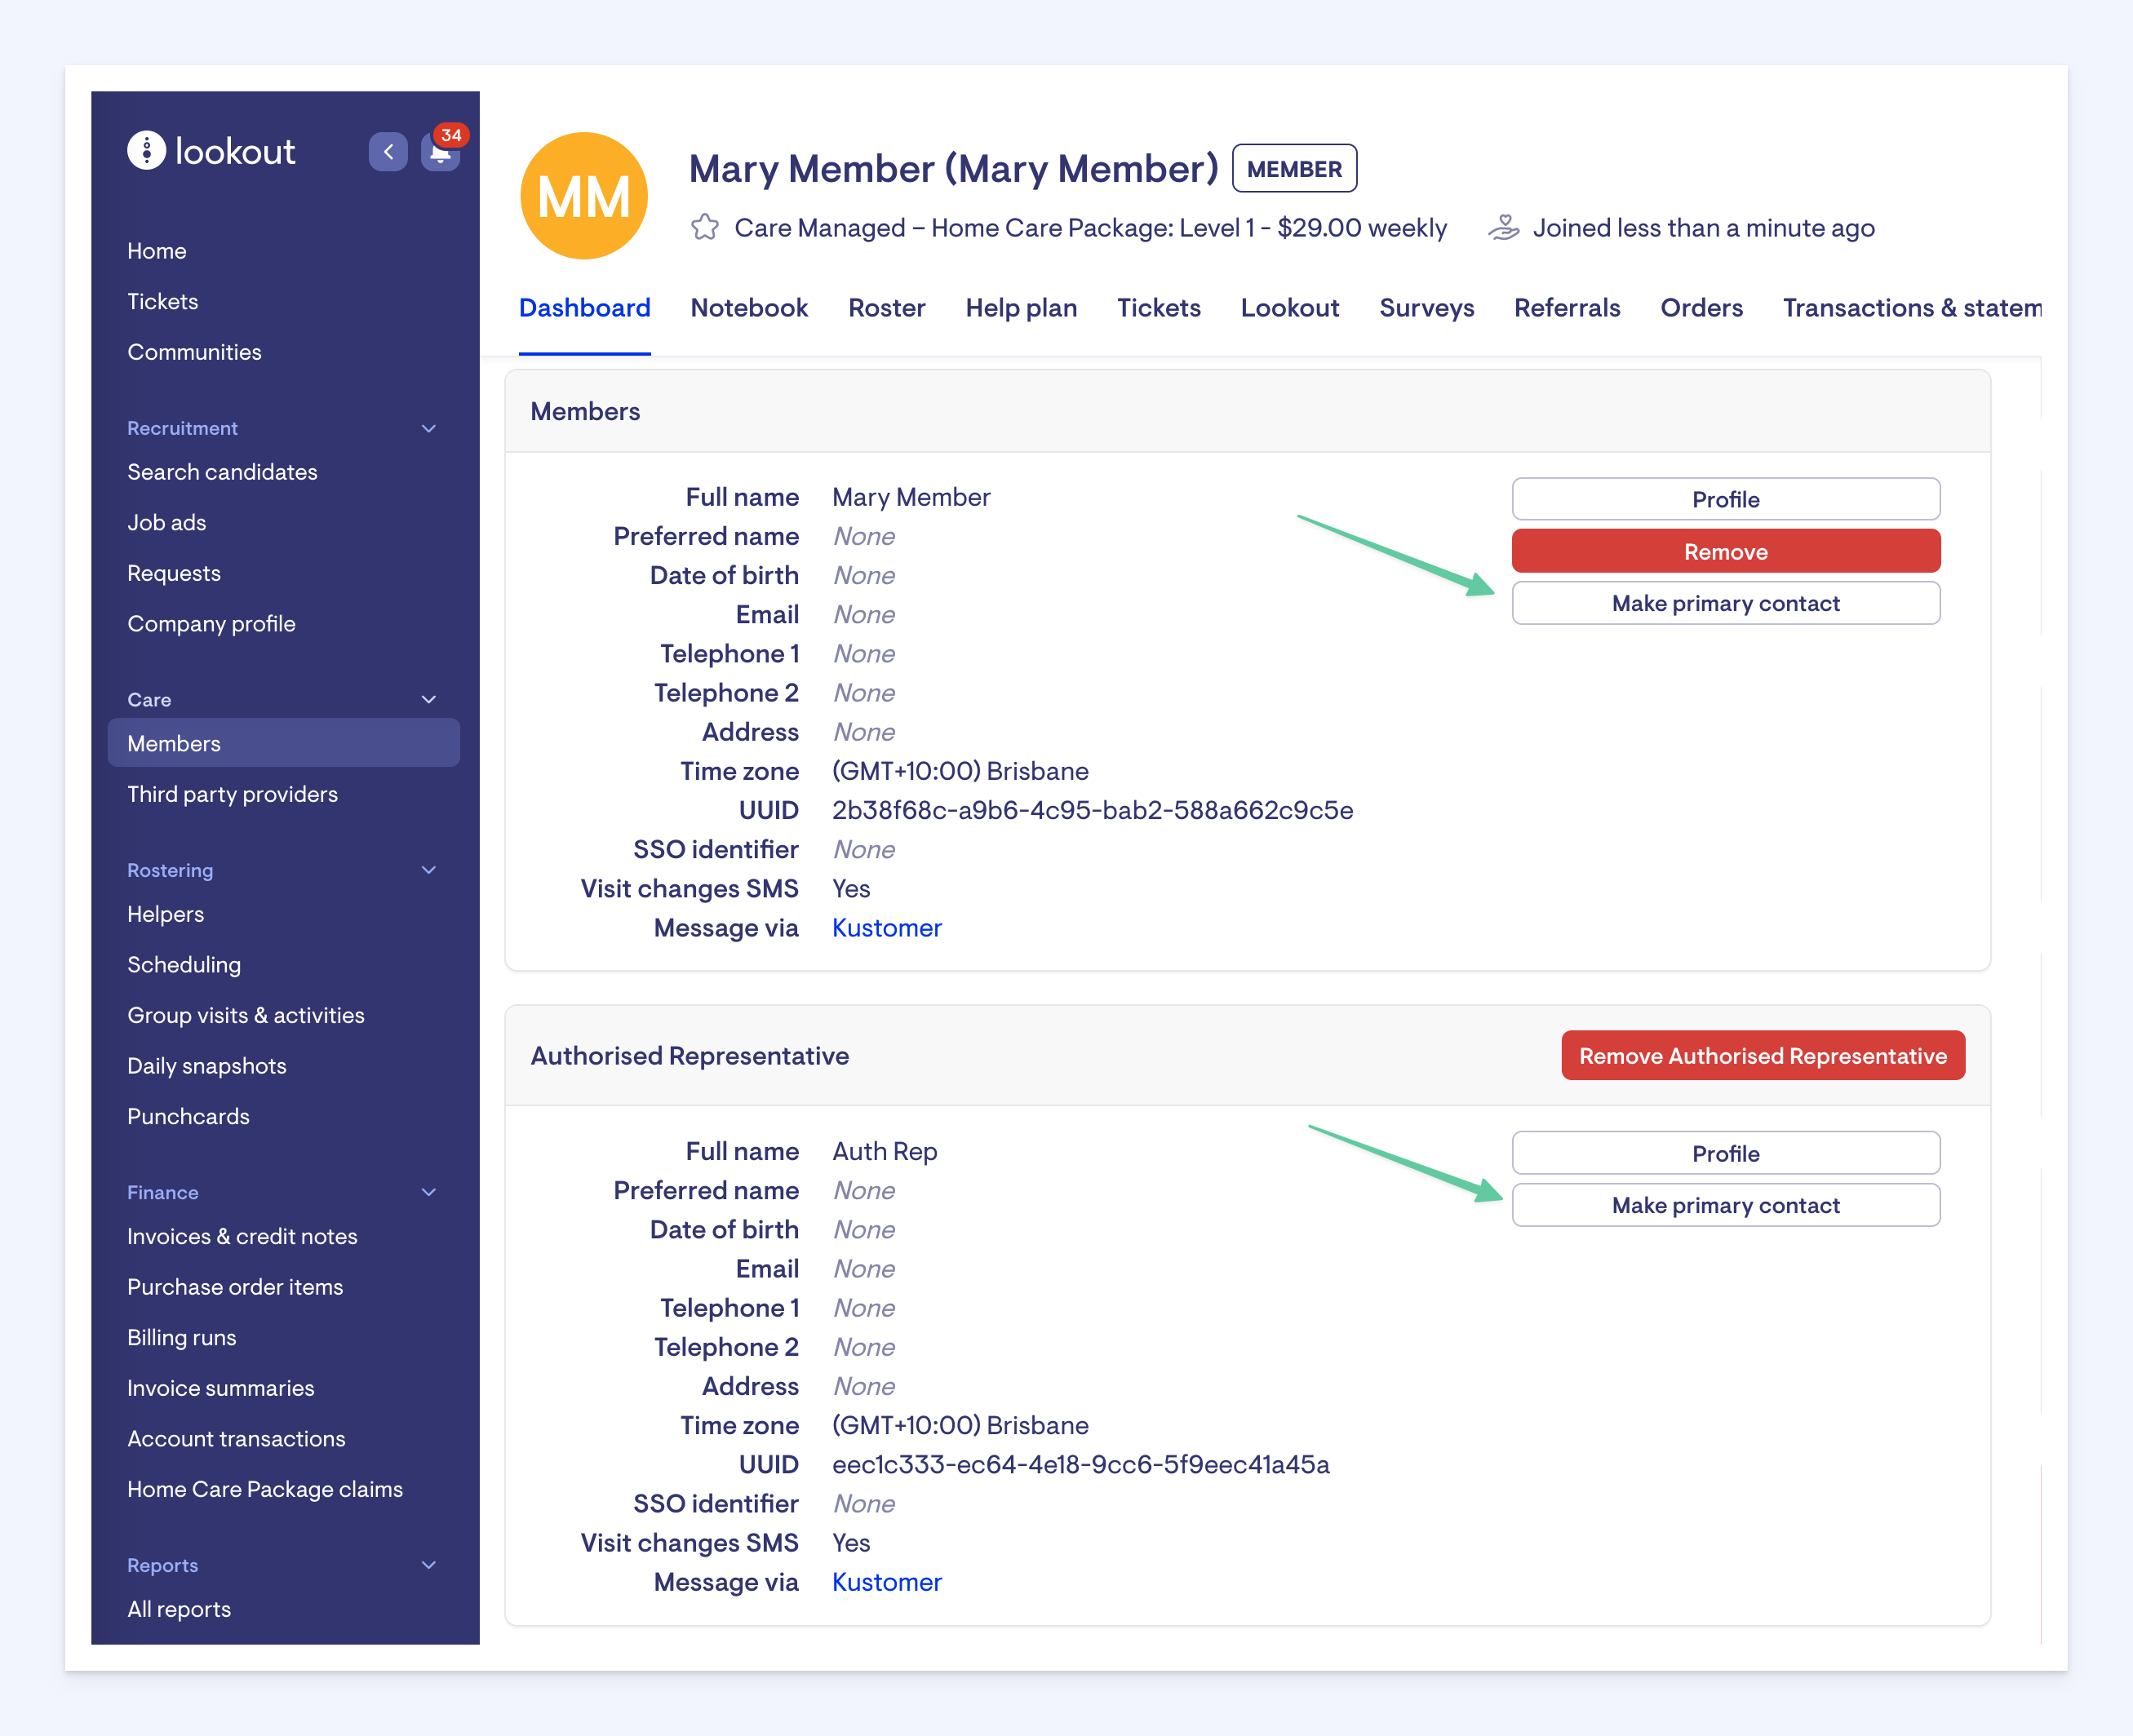
The primary contact is the main contact person for the Membership. The primary contact can be the Member themselves or the Authorised Representative. To assign someone as the primary contact, scroll down to find either the Member panel or the Authorised Representative panel and find the 'Make primary contact' button. Select the button next to the person you wish to make the primary contact and confirm.
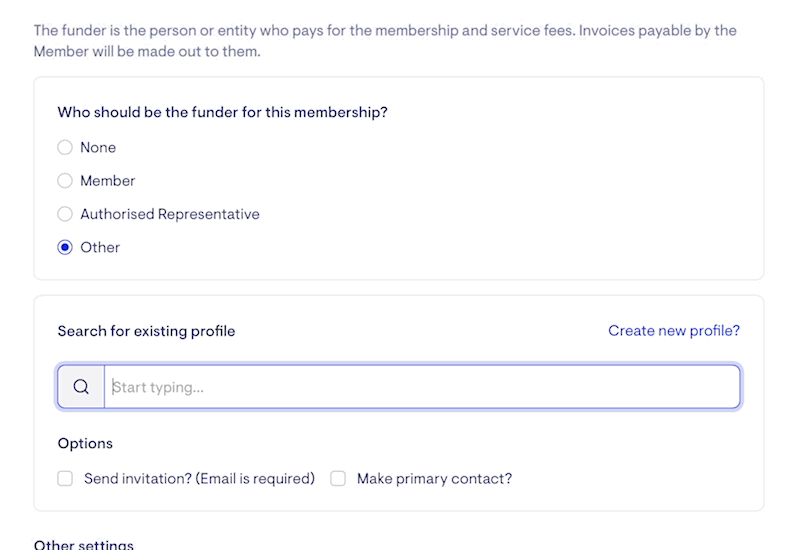
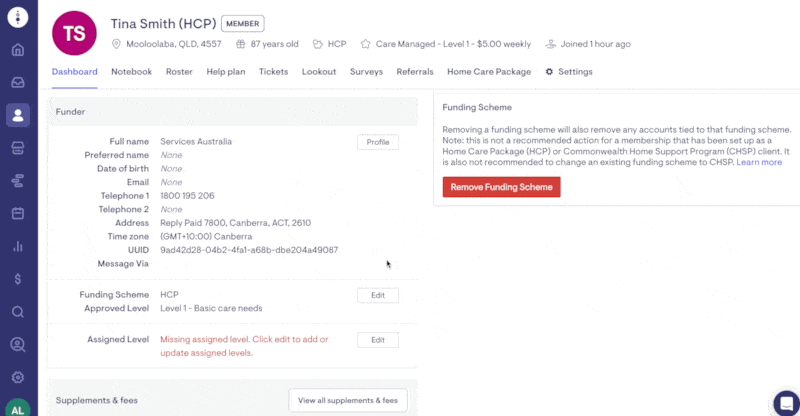
Adding the Funder and Funding Scheme
Funders are the person/entity paying for the care and services.
For example:
-
Home Care Package (HCP): Services Australia/Medicare will be the funder.
-
NDIS
-
Agency Managed: The funder will be the NDIA.
-
Plan Managed: The funder will be the agency funding the services (via the NDIA).
-
Self-Managed: The funder will be the client.
-
-
Commonwealth Home Support Programme (CHSP): Services Australia/Medicare will be the funder.
-
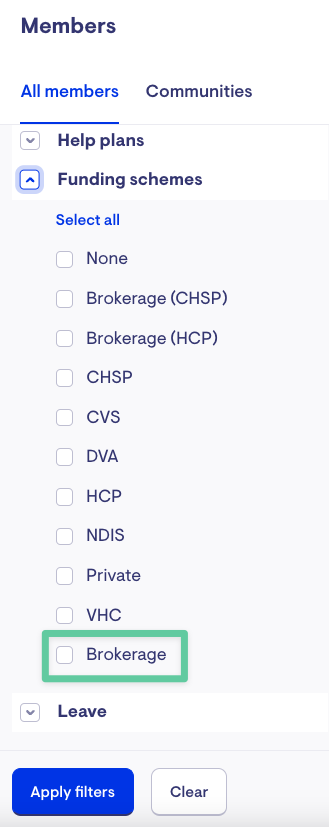
Brokerage services: The funder will be the care provider funding the services.
-
Private: The funder will be the client or person funding the services.
-
DVA Community Nursing (DVA): Department of Veterans Affairs will be the funder.
-
Veterans Home Care (VHC): Department of Veterans Affairs will be the funder.
In the search bar, start typing the Funder's name. You can link an existing profile or add a new one with the Funder's contact information.
Other settings
Configure important dates, community, membership plans, help plans, cohorts, tickets and matching requirements.
Set the Sign-Up, Commencement and Review dates
-
Signed-up date: This should be set to when the Client signs up.
-
Commencement date: This should be set to the date billing and services should commence.
-
Next review date: This can be set to any date and reminds the Care Managers via the dashboard when the Member is due for a review of care.
Add a Community *
-
Select Community and select from the dropdown list

-
Note: If you need to set-up a new community or edit an existing community, please refer to this support document - setting up communities in Lookout
Add a Plan *
-
Select Membership Plan and select a plan from the dropdown list

Note: If you need to set up a new plan or edit an existing plan, please refer to this support document for setting up membership plans in Lookout.
Select a Help Plan
The Dynamic Help Plan can be tailored to your organisation's needs with full flexibility to change the section titles and elements within the sections.
More information about how to set up a Help Plan Template can be found here
Tag Cohorts
Cohorts are ad-hoc tags that help manage group members. You can assign multiple cohorts to a member. Some common examples include:
-
Lives alone
-
Falls risk
More information about how to setup Cohorts can be found here
Assign Tickets
You can assign multiple Tickets to a member during creation. Some common examples include:
-
HCP Membership onboarding
-
Purchase orders setup
More information about how to setup Tickets can be found here
Setup Matching Requirements
The Matching Requirements section of Membership ensures that Care Workers (Helpers) have the right qualifications and clearances to work with that Member. This can be used for multiple purposes, for example:
-
Aged care Members require Care Workers who have passed a basic background check
-
NDIS Members require Care Workers to have undertaken NDIS training and have extra requirements for police checks (e.g. Yellow Card in QLD).
-
Underage Members require Care Workers who have Working with Children checks.
After Membership Creation
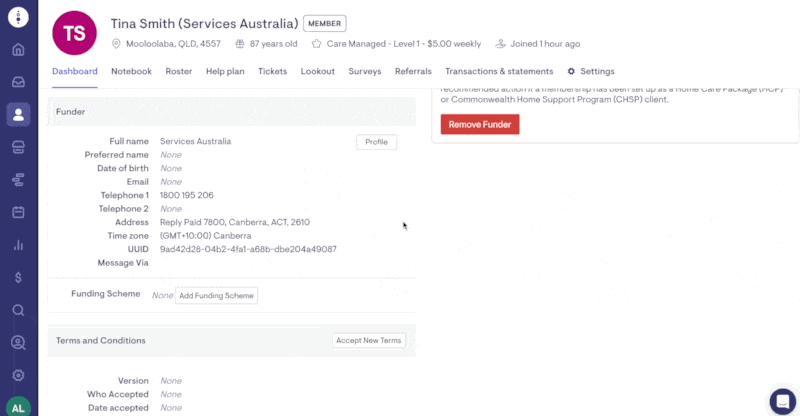
Enter specific funding information
-
Scroll down to the Funder panel and select Add Funding Scheme.
-
Select the applicable funding scheme from the dropdown list and select save.
-
Add any extra details required for the scheme (e.g. package levels) and select Save
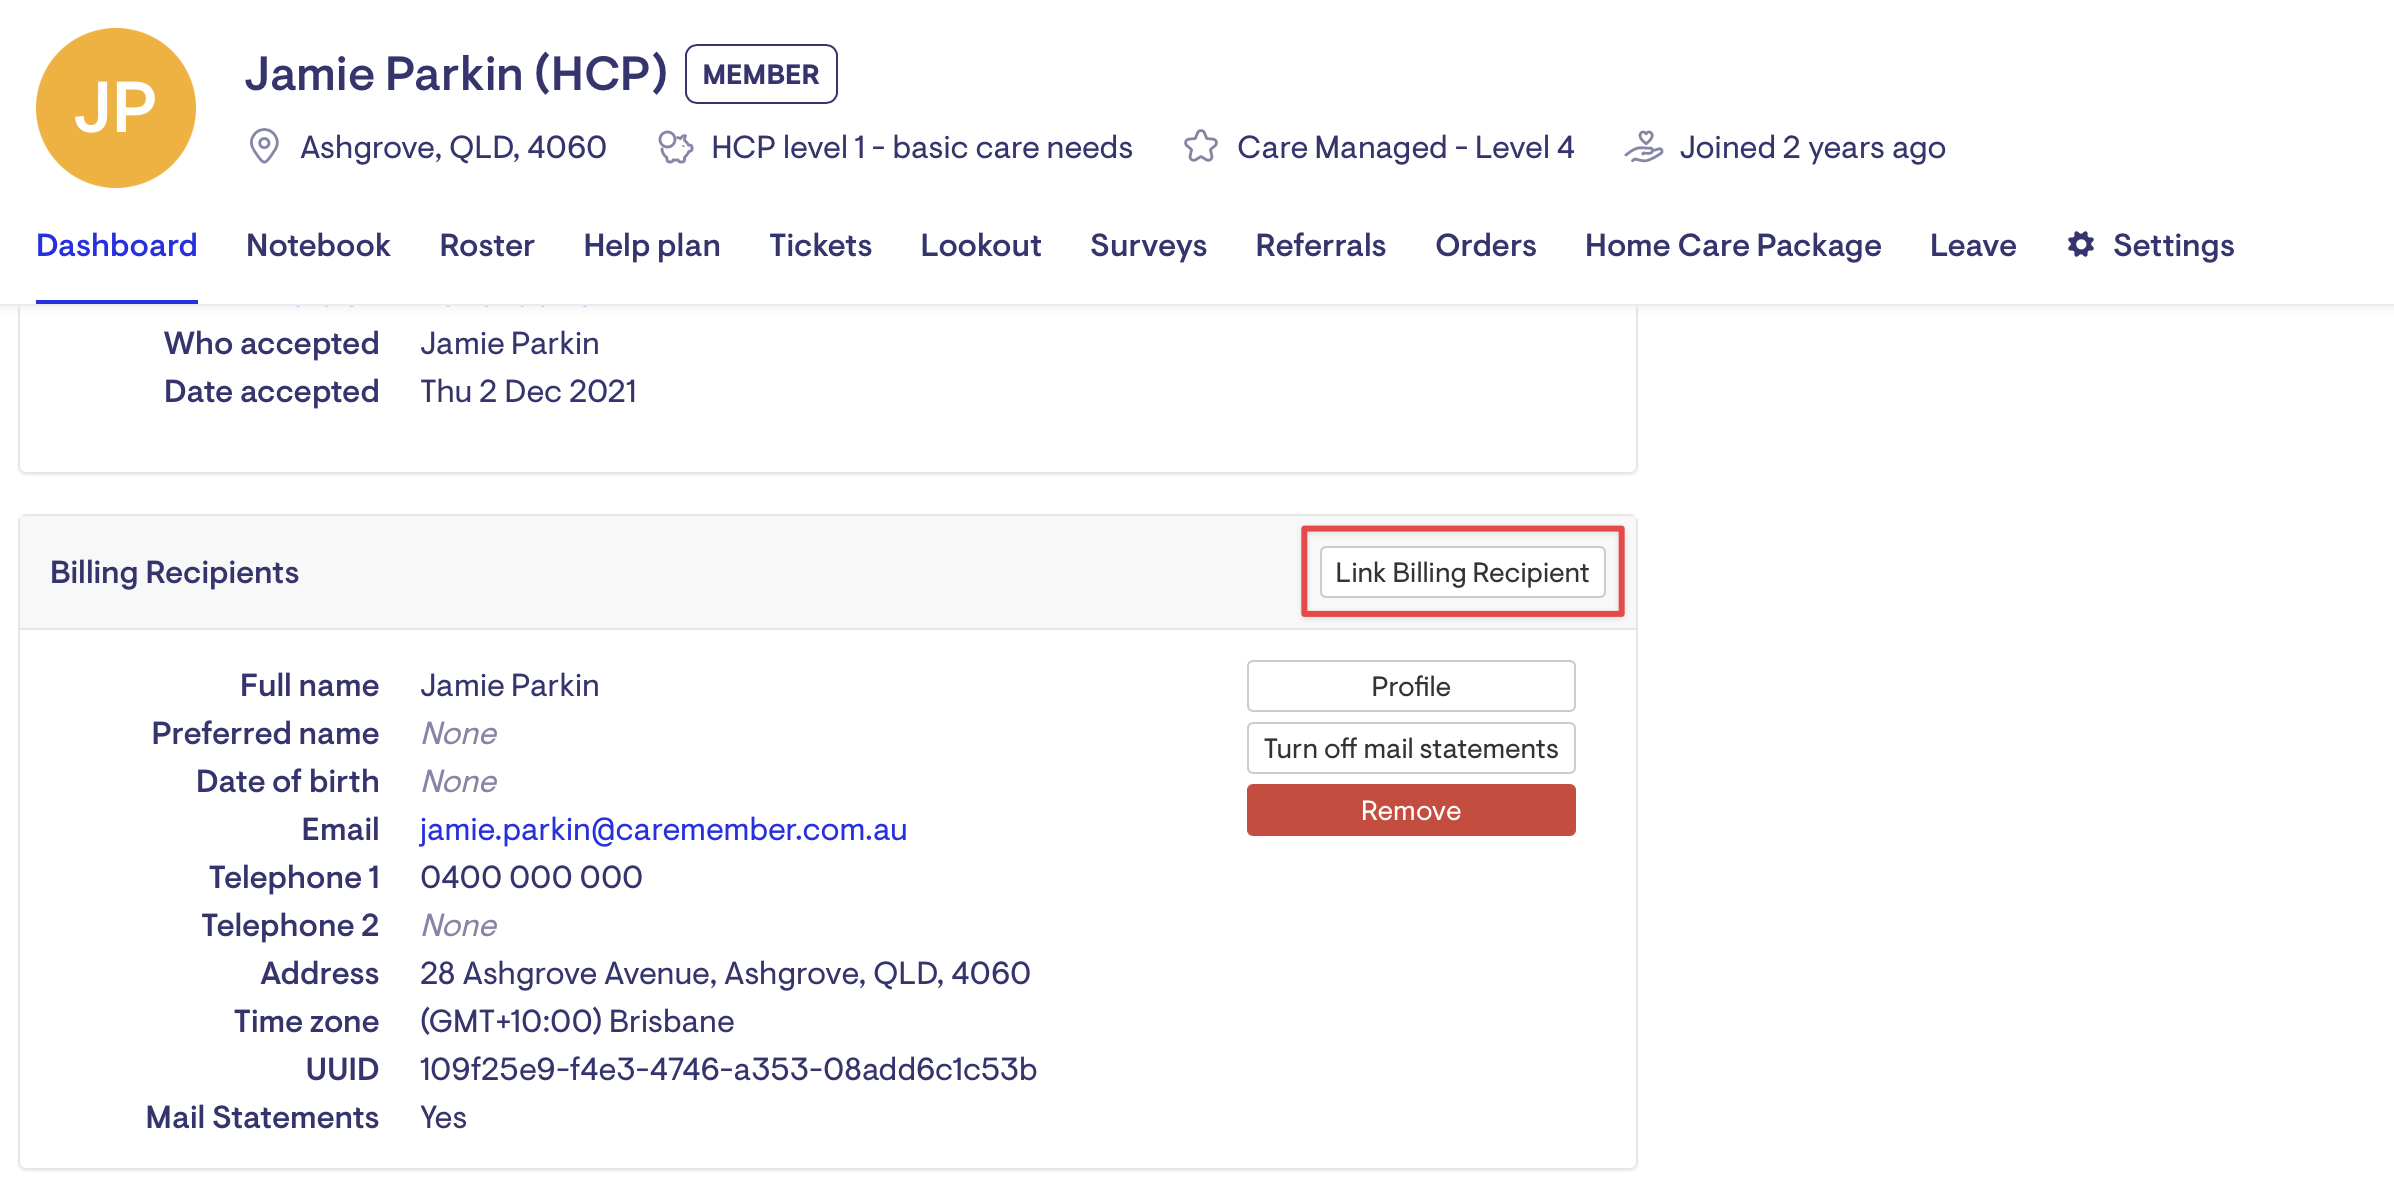
Add a Billing Recipient
Billing recipients are the people/entities who will receive the weekly summary and invoices for services the Member/Client receives. Usually, this will be the Member/Client or Authorised Representative.
You can nominate as many billing recipients as you like. Billing recipients will be able to see any summaries and invoices issued to the Client but will not be able to see the Client's Notebook unless they are also a Client, Auth Rep, or Sharer.
-
On the Members Dashboard, scroll to the Billing Recipients panel and select Link Billing Recipient.
-
Select a person already on the membership, or use the search bar to start typing the Billing Recipient's name. Then, link an existing profile or add a new profile with the Billing Recipient's contact information.
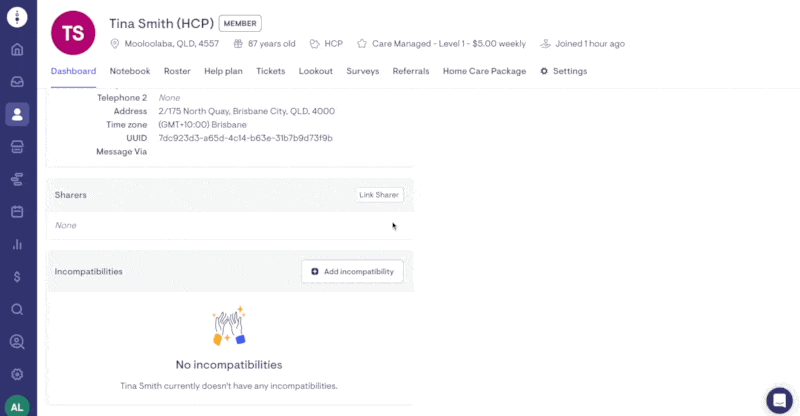
Add a Sharer
A sharer is a person who a Member or Authorised Representative want to be able to see a Members schedule. Sharers have no access to any contact or financial information. They can not make changes to a member's service on their behalf. Only the Members or Authorised Representatives can make changes to services and schedules. More than one Sharer can be linked to a Member.
-
On the Members Dashboard, scroll to the Shares panel and select Link Sharer.
-
In the search bar, start typing the Sharers' name. You can link an existing profile or add a new profile with the Sharers' contact information.
FAQs
How do I edit contact information?
You can edit the contact information by selecting the Profile button next to the Client, Authorised Representative, Billing Recipient or Sharer and then Edit Profile.
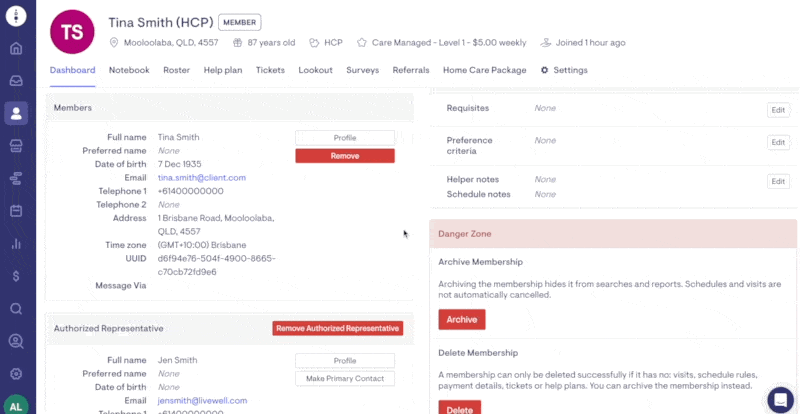
How do I change the funder?
If you've accidentally added the wrong funder, you'll first need to select Remove Funder, and then you can link the correct Funder.
It's important to note that removing a funder will also remove funding scheme details. To safeguard membership information, ensure you have a record of details such as the care recipient ID, approved level, and the assigned level. Previous records reappear once the correct funder is linked and the funding scheme details are added back.
The changes will not impact the membership roster as long as the funding scheme remains unchanged.
Important Note: It's not recommended to proceed with this method if you're changing the funder because the funding scheme has changed, and the membership is set up under the Home Care Package (HCP) or Commonwealth Home Support Program (CHSP). Instead, we recommend creating a new membership when a client switches between CHSP and HCP funding or vice versa and archiving the old one.
Can I create custom funding schemes?
Yes. You can create new funding schemes using the Custom funding schemes setting. Workflow permission is required for a staffer to be able to update these settings.
To create a new funding scheme:
-
Click the three dots next to your name on the navigation bar, and choose Settings.

-
From the Settings page, navigate to the Care submenu and open 'Custom funding schemes.' Click the add 'New custom funding scheme type' button.

-
Currently, custom funding scheme types only allow for a customised name. Enter the custom name and Save the changes.

-
To add a funding scheme, navigate to the member's page, scroll to the Funder section within the Dashboard, and click the Add funding scheme button.

-
Select Custom from the Funding scheme dropdown menu and click Save.

-
The 'Further details' section will appear, from which you can select the 'Custom funding scheme name.' Finalise the changes by clicking Save.

The custom funding scheme name will appear in the membership details, similar to other funding schemes.

It will also appear among the funding scheme filters.