Tickets are a feature in admin designed to improve your ability to collaborate with each other, share information, and track the progress of key tasks and responsibilities.
Tickets can be used for any task that needs to be tracked, communicated about, or even just to remind yourself about something you have to do. You should use tickets in a way that demonstrates the actions you took and the decisions you made to keep yourself accountable.
We've given the Tickets inbox a light refresh to make managing your work simpler, more personal, and aligned with how you work. This update introduces a task - and workflow- so you can focus on what matters most, right when it matters. It's more intuitive and focused. For more information on this, please check out our Ticket uplift article.
This Ticket uplift started rolling out in September 2025. If your organisation is approved, you can enable it through a toggle in the Release Hub. For more information on Release Hub, please see the following article: Release Hub.
Article contents:
Ticket Inbox
Navigating Around Tickets
> Per-user snooze with notifications
Creating a Ticket
Viewing a Ticket
Contributing/Commenting on a Ticket
> @mentioning others to notify them
> Checklists
Completing a Ticket
Viewing Tickets Associated with a Member or Care Worker
Archiving a Ticket
Time tracking
Adding to the Notebook
FAQs
Ticket Inbox
Click on Tickets in the main left-hand menu bar. It is near the top under Home.
When you navigate to the Tickets tab in Admin, you will see your ticket inbox. This is your one-stop shop for seeing your priorities and tasks for the day, seeing what's coming up, collaborating with others, and sharing information.
At the top of your inbox, you'll now see a filterable summary showing how many tickets are:
- Assigned to you
- Due soon
- Overdue
- High priority
- Needing updates
Click any of these to instantly filter your view and zero in on what needs your attention.

-
Priority - A star indicating whether the ticket is a priority or not. Red = priority, grey outline = not.
-
The title of the ticket with related tags underneath (if applicable).
-
Regarding - Who the ticket is regarding, either a Member or a Helper.
-
Created - date ticket created
-
Due - The due date with a countdown for how long you've got left to fulfil the ticket. Sometimes, they may be overdue. Not all tickets need to have a due date, and it's up to your discretion.
-
Progress - for tickets with a checklist, you'll be able to see how far along they're tracking.
-
Comments - you can see a count of how many comments are on the ticket so you can gauge how much discussion and activity is happening.
-
Assignees - the assignee(s) for the ticket. You'll definitely see yourself there looking at your own tickets, and sometimes multiple assignees for tasks that require a group effort.

Navigating around Tickets
The updated interface is more straightforward and more intuitive, putting the tools you use most right where you can see them. Filters like “Tags” and “Community”, which were previously located in the sidebar, are now grouped together and easily accessible in the ‘filters’ button. Instead of scrolling, you can access everything in one convenient Filters menu. This update reduces clutter in the left sidebar, making navigating and focusing on what matters simpler.
For more perspective, here is the old filter layout vs the new and improved layout:

The new pop-up filter window is also much taller than before because it contains many more filtering options.

When you navigate to Tickets, the page automatically shows you the tickets that are assigned to you. You can easily navigate to other people's tickets by selecting them from the dropdown menu in the left-hand panel.

You can filter your tickets by Status and Category in the left-hand panel.

Status options:
-
Open
-
Snoozed
-
Complete
-
Archived
Category options:
The comprehensive list of categories is determined by your internal protocols and the ticket categories set up in your settings. By default, All will be selected under Category. Clicking on a different category will filter the tickets to display only those linked to the chosen category.
If you want more control, you can also click on column headers (like Priority, Due Date, or Activity) to sort the ticket list your way. The list starts in priority order by default, so the most important tickets are always at the top.

Ticket tags
When setting up a ticket, tags can be assigned based on tags created by your workflow requirements. Filtering can be applied to tags, and ticket tags dimension available in Data Export for reporting.
To create Ticket tags
-
navigate to global settings via ellipsis
-
select 'Settings' and scroll to the Templates and configurations section of menu
-
select 'Ticket tags'
-
click 'New ticket tag' blue button in top right corner
-
give ticket tag a name and choose a tag colour
These tags will be available to select via dropdown menu on every ticket template and will be visible to staff in their ticket inbox.
Updating the ticket tags to reflect change in ticket status (as an example) can be done by clicking on 'edit' within a ticket, removing/adding tags as required.
Per-user snooze with notifications
Previously, a user could snooze a ticket, which hides it from the "Open" list until their chosen date. However, this was stored as part of the ticket state itself, so if one person snoozed a ticket, it would be snoozed for everyone, whether they wanted that or not. Additionally, if anyone later manually unsnoozed the ticket, it would then reappear in the Open list for everyone. When a ticket reached its "wake-up" date, there was no notification; it just resurfaced in everyone's "Open" list.
You can now snooze, reschedule, or un-snooze tickets just for yourself—without affecting how anyone else sees them. It’s your own personal way to manage focus. Plus, if you’d like a reminder, you can turn on wake-up notifications in your personal settings to get alerted when a snoozed ticket becomes active again.

While users can choose a specific date for a wake-up, time zones can differ, so the exact moment a new day "starts" may vary slightly from person to person. To combat this, wake-up checks will run hourly to account for varying time zones.
Creating a Ticket
-
Navigate to the Tickets menu item in the left-hand sidebar
-
Click on the top right-hand button that says New

-
Select the category of the ticket (what this ticket is for or about) from the dropdown of your internal ticket templates
-
Select the Member or Care Worker this ticket is regarding
-
Click Save

-
You will now see a page where you can fill out the details of the ticket. You can:
-
Change the title of the ticket
-
Assign it to yourself and/or others
-
Set its priority
-
Set a due date if needed
-
Add details of information to share with other team members in the description
-
Add tags for filtering if desired
-
-
Click Save, and you will have successfully created a new ticket.

Note: If a ticket category doesn't exist for the task you want to track, you can use the 'Other' category. If there's a task you regularly do and no ticket template or category exists for it, you can create a new ticket template and category in Settings.
Viewing a Ticket
-
Navigate to the Tickets menu item in the left-hand sidebar.
-
To view a particular ticket, click on the blue name descriptor in the first column after the star rating

At the very top of a ticket, you'll see
-
Title
-
Who it was created by (author)
-
When it was created
-
Priority of the ticket
-
Due date
-
Any assignees
-
Any tags associated with the ticket

Other information includes:
-
Description Section:
-
The description provides information about the ticket. Templates can be added to tickets via ticket templates, to ensure all the applicable information is provided.

-
-
Checklist Section (Optional):
-
If a to-do list has been added to the ticket template, it'll appear on the ticket as a checklist. A checklist is a way of keeping track of tasks within a ticket and communicating what's been done.

-
-
Ticket Discussion Section:
-
Shows any internal flow of conversations between Admin users. Helpers and Members won't be able to view the Ticket discussion.

-
-
Member or Care Worker Section:
-
To the right of the ticket Member or Care Worker information can be viewed, depending on the subject of the Ticket.

-
Contributing/Commenting on a Ticket
Ticket comments are for discussion with others and a place for you to record conversations, thoughts and decisions regarding the ticket. This means that this information is recorded and shared so everyone knows exactly what's happened with that Member/Helper, and it is excellent for demonstrating your own personal accountability. This is also extremely helpful for anyone needing to pick up your work when you're on leave, for example.
@mentioning others to notify them
Need to get a specific person’s attention? Use the @ symbol and start typing their name – a dropdown will appear and suggest names to choose from.
They’ll receive an email notification for the mention that will link them to the ticket to discuss.

Checklists
Some tickets your organisation has set up may contain a checklist. A checklist is a way of keeping track of tasks within a ticket and communicating what's been done. This is especially helpful for those occasions when you're going away, and someone else needs to take over your tasks for a while - by checking off the tasks you've completed, they'll know exactly where to pick up from.
-
Checklists are a way to track what needs to be done and communicate what's been done.
-
Checklist items don't need to be completed in any specific order. Do them as you deem necessary.
-
Not every item in a checklist needs to be ticked off to close the ticket - in fact, you don't need to tick off any items to close a ticket. Some items may not make sense to check off or are completely optional. View them more as a guide.
-
Record in the comments any thoughts, decisions or conversations you've had that may relate to a checklist item. This allows others to know what's happened.

Completing a Ticket
When you've completed a ticket, you need to close it. Closing signifies that all tasks have been completed, the problem has been resolved, or it's come to a logical conclusion.
Ideally, when you close a ticket, you should leave a comment with your reason for closing it. This communicates to others why you've made that decision, so if the tickets are audited later, it's easy to understand the course of action taken.
NB: If you close a ticket by accident or decide a ticket needs to be re-opened, you can always go to the closed ticket and re-open box options.
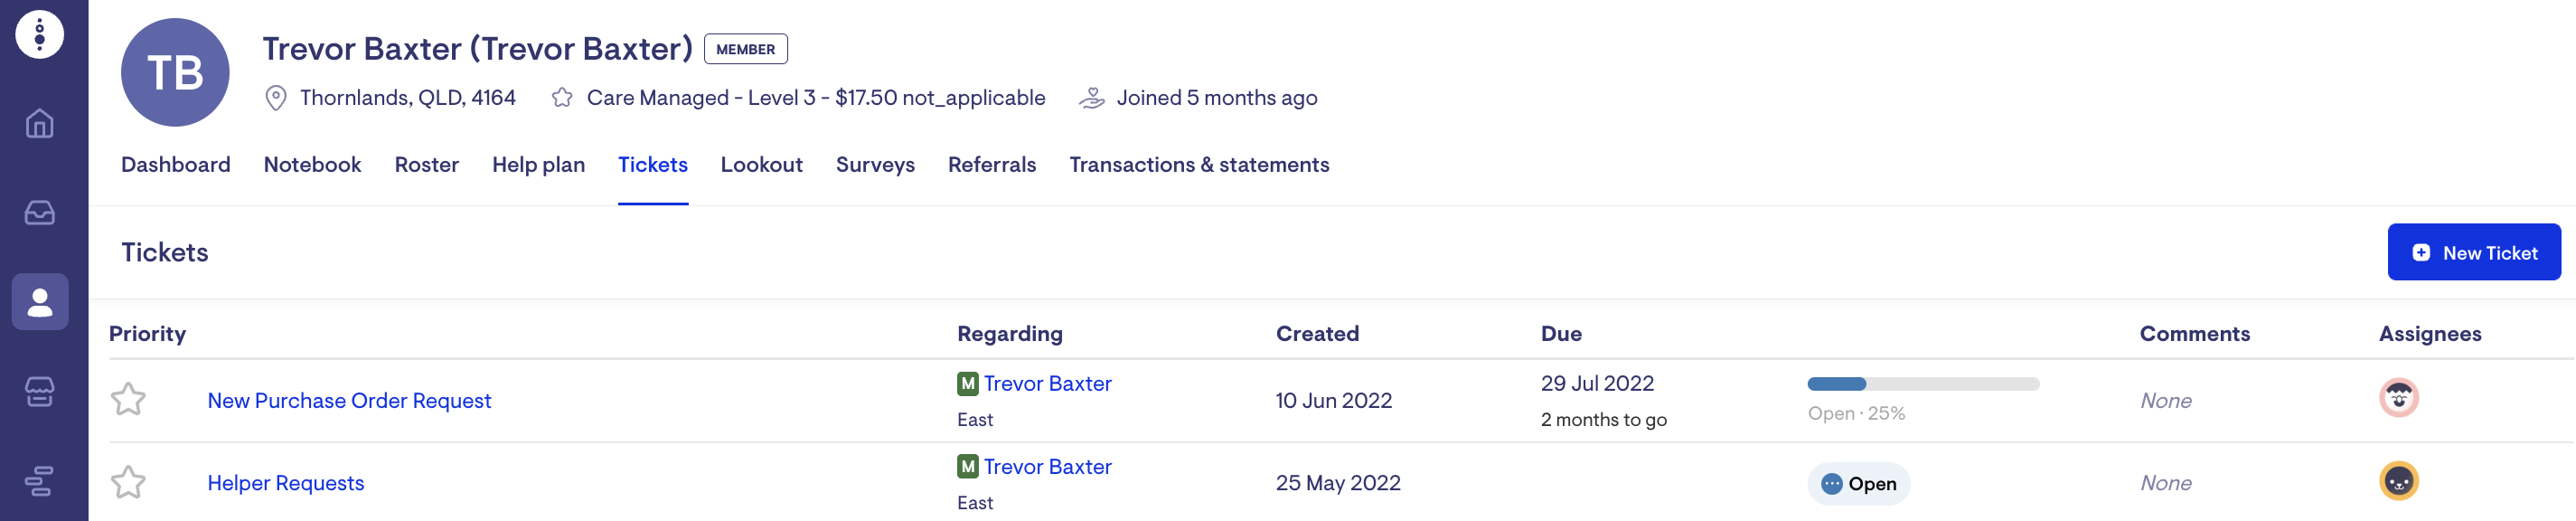
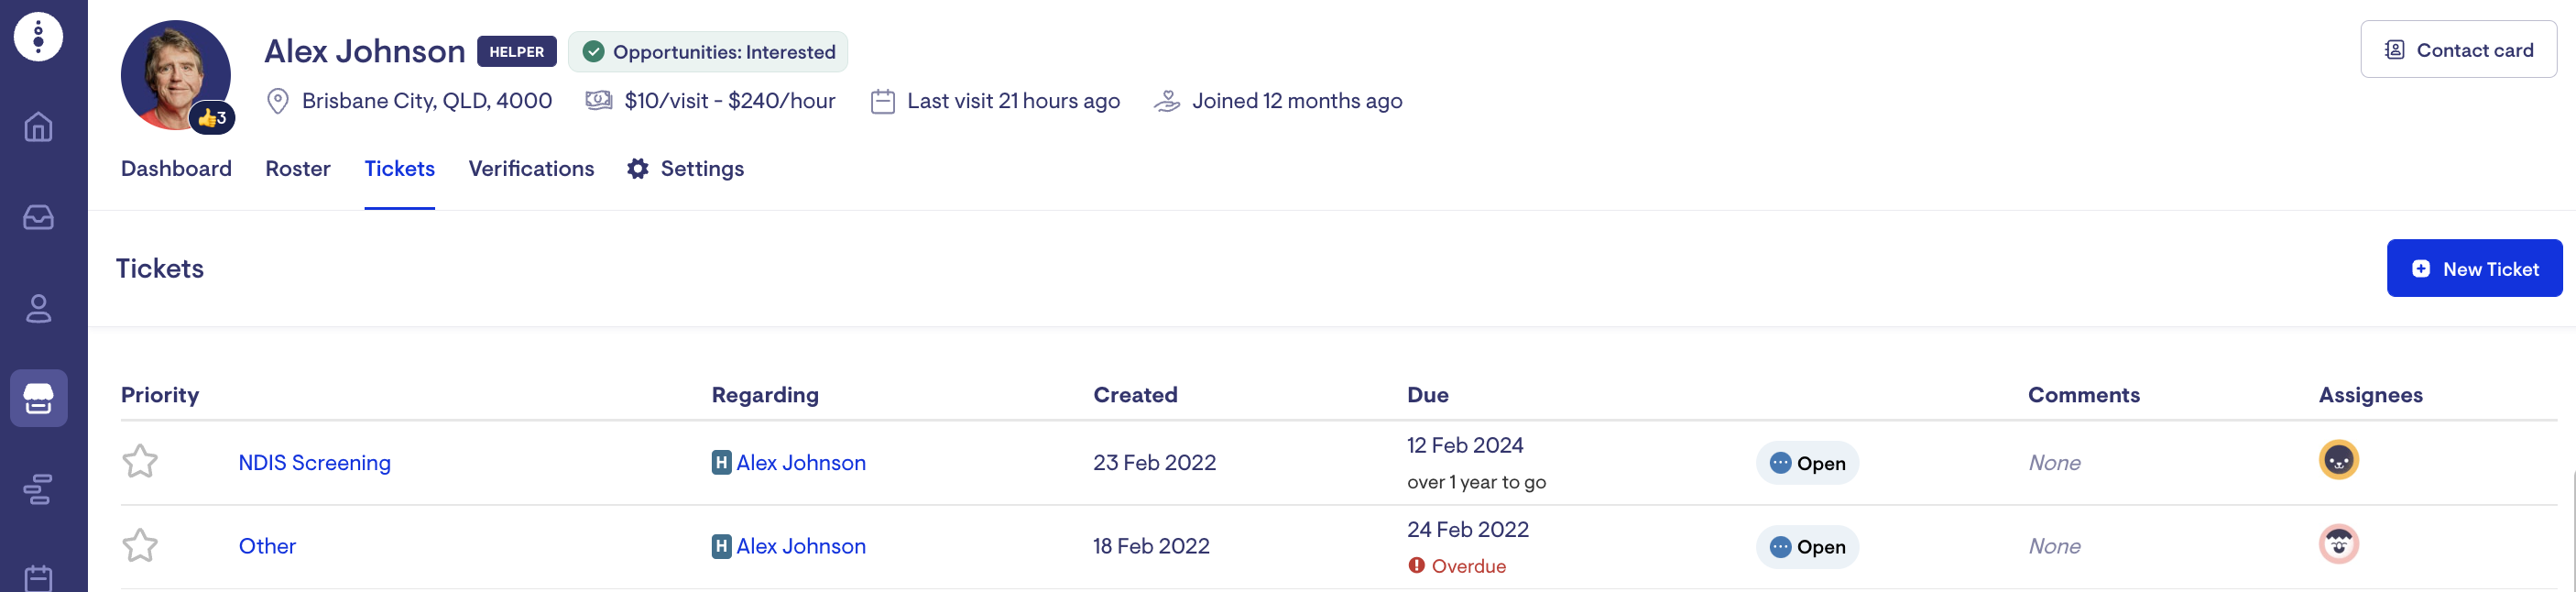
Viewing Tickets Associated with a Member or Care Worker
You can navigate to any Member or Helper and click on Tickets in the to navigation bar to view a historical list of tickets for that person:
Archiving a Ticket
When you delete a ticket in Lookout, the ticket is archived, not permanently removed. This is intentional to ensure if a Ticket is ever needed again for records, it can be restored.
To archive a ticket, locate the ticket in question and click on it. A new screen will load with all the Ticket's details, comments, and related information. A red 'delete' button will be near the top of the Ticket information. Click this button to archive.

After confirming your actions, a green banner will appear on your screen to advise that the change has been completed successfully.

Even though the action is labelled Delete and you are asked to confirm the deletion, the ticket is never truly deleted from the system. Instead, it is moved to an archived state.
Archived tickets no longer appear in the Helper or Member tickets tabs, which helps keep active ticket lists tidy. However, the ticket can still be found on the Tickets page by using the Archived status filter.

You can then click into the ticket and restore it if needed by clicking the 'undelete' button. A pop-up window will appear again for you to confirm this action.

Because deleting a ticket only archives it, this action is safe and non-destructive.
At this time, Lookout does not support permanently deleting tickets.
Time tracking
You can now log care management tasks directly from where you’re already working, whether it’s the Notebook, Observations, Help Plan, or Tickets. A Track Time button has been added to the screens, as you can see here:
To learn more about time tracking and how it can be fully utilised, follow this link.
Adding to the Notebook
You can link a ticket directly to the Notebook. This feature allows teams to link important information using the Notebook categories available to better support finding information later. When looking at a ticket, there is now a new Share to notebook button you can press to send that ticket to the notebook. Pressing this button will open a side window where you can create a note that includes a preview of the underlying visit / ticket.

Checkout notes from Visits are also now visible in the Notebook. To view, use the rostering filter when in the Notebook.

To learn more about the Notebook and how it can be fully utilised, follow this link.
FAQs
How are open tickets handled when the assigned staffer has been archived?
When a staffer is archived, such as in the case of leaving the company, the open tickets assigned to them remain unaffected. The system does not automatically remove or replace the archived staffer as an assignee, so these tickets must be updated manually.
To manage these tickets, you can use the filter option by selecting Assignee: Staff's name and Status: Open.
Please note that the tickets must be reassigned/updated before you remove the staff from your Staffer list, as the filters will not work if they are no longer a Staffer. If you have already removed the staff, you must add them as a staffer again (you do not have to enable their account if their user access is already disabled).
